Introduction
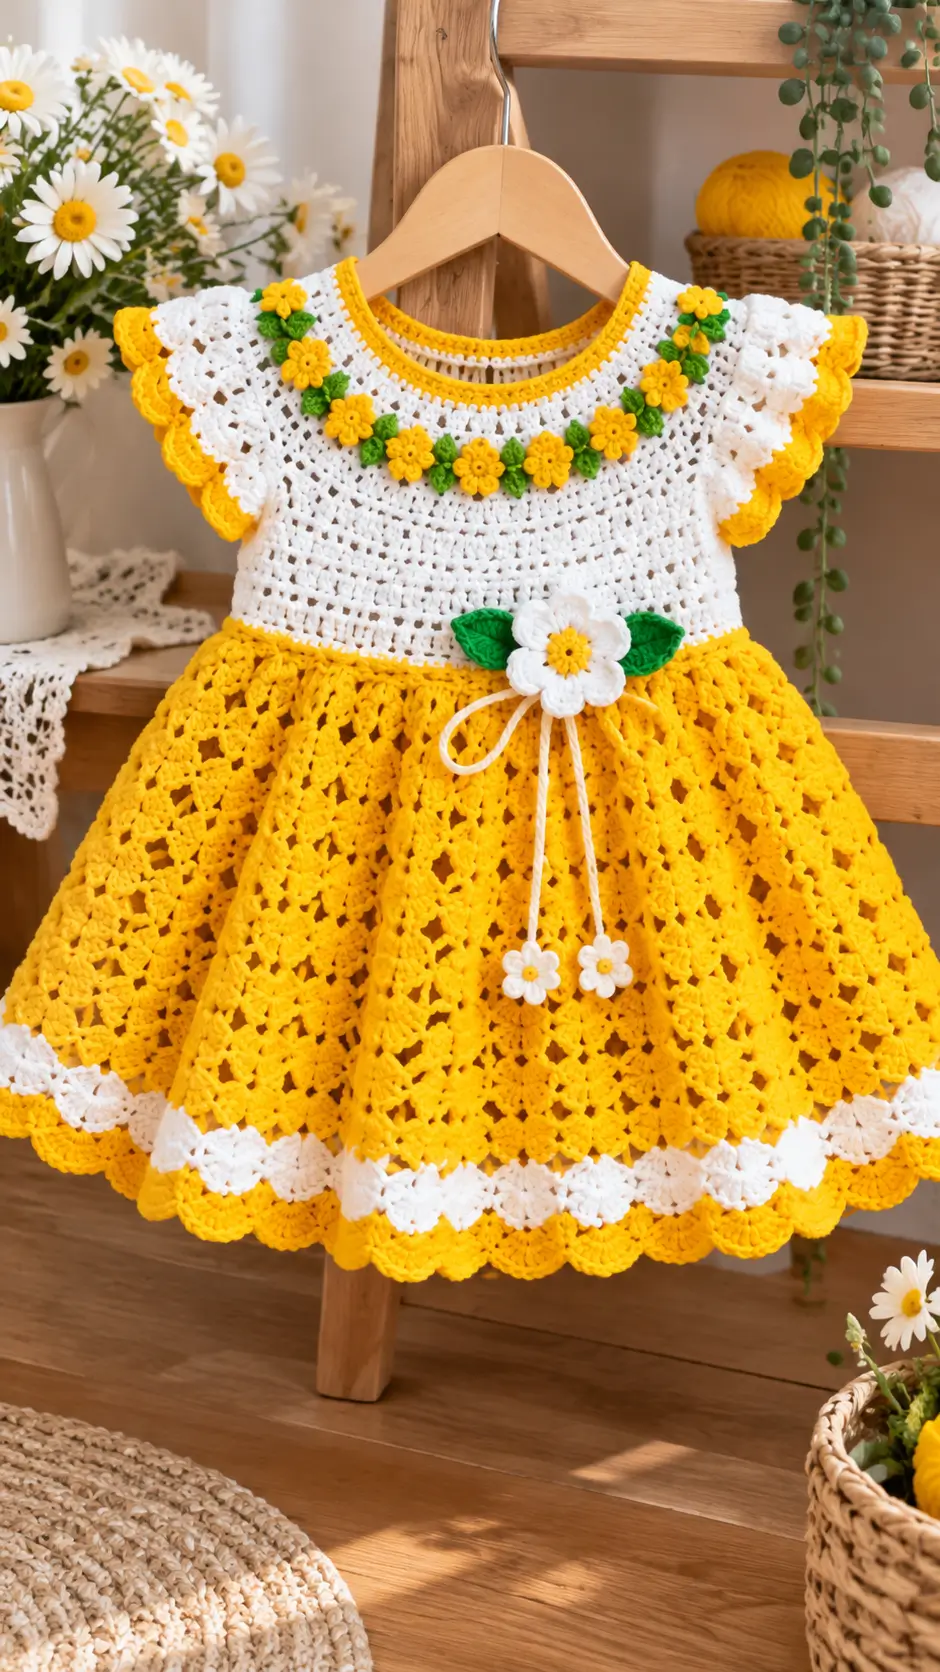
A row of miniature yellow daisies follows the neckline of this crochet dress, connecting the white lace bodice to its sunflower-yellow skirt. This free crochet daisy dress pattern uses cotton yarn, a 3.5 mm crochet hook, and decorative floral motifs to create a lightweight garment for toddlers. Designed for intermediate crocheters, the project combines a circular yoke, openwork stitches, a flared skirt, and separately crocheted flowers.
The Design: What Makes This Crochet Daisy Dress Different?
This yellow and white crochet dress combines three construction elements: a circular neckline, a fitted openwork bodice, and a wide lace skirt. The neckline is worked from the top down, allowing the crocheter to adjust the yoke before separating the sleeves from the body.
The white bodice provides a visual contrast to the bright yellow skirt. Small floral decorations are attached around the neckline, while a larger white daisy decorates the waist. Green crochet leaves add definition without requiring additional garment shaping.
The skirt uses repeated shell stitches and chain spaces to create a flared silhouette. Increasing the number of stitch groups gradually adds volume while maintaining an organized lace structure.
One common mistake when making a crochet flower dress for toddlers is creating a neckline that is too narrow. Check the opening against the child’s head measurement before completing the yoke.
Project Information at a Glance
| Feature | Details |
|---|---|
| Pattern Name | Sunshine Daisy Crochet Dress |
| Skill Level | Intermediate |
| Estimated Age | 2–3 years |
| Estimated Chest Circumference | 54–56 cm |
| Estimated Dress Length | 48–52 cm |
| Crochet Hook | 3.5 mm |
| Yarn Weight | DK cotton yarn |
| Construction | Top-down crochet with decorative lace skirt |
| Estimated Working Time | 18–25 hours |
Important: These measurements are planning estimates. The final dimensions depend on yarn thickness, stitch tension, and the number of skirt repeats. Make a gauge swatch and measure the child before starting.
Materials and Tools
Yarn
- Sunflower yellow DK cotton yarn: approximately 250–300 g for the skirt, borders, and flowers.
- White DK cotton yarn: approximately 150–200 g for the bodice, decorative edging, and waist flower.
- Green DK cotton yarn: approximately 20–30 g for leaves and floral decorations.
Choose a smooth cotton yarn with consistent thickness. Cotton provides stitch definition, which is particularly useful for shell patterns, floral motifs, and decorative lace.
Tools
- 3.5 mm crochet hook
- Stitch markers
- Tapestry needle
- Sharp scissors
- Measuring tape
- Blocking pins
- Optional: 3 mm crochet hook for smaller flowers
Crochet Abbreviations
- ch: Chain
- sc: Single crochet
- hdc: Half double crochet
- dc: Double crochet
- tr: Treble crochet
- sl st: Slip stitch
- st: Stitch
- sts: Stitches
- sp: Space
- inc: Increase
- rep: Repeat
- RS: Right side
- WS: Wrong side
This pattern uses US crochet terminology. Turning chains count as a stitch only when explicitly stated.
Gauge and Sizing
Before beginning the dress, crochet a 12 × 12 cm sample using double crochet stitches and a 3.5 mm hook.
A suggested starting gauge is approximately 20 double crochet stitches and 10 rows per 10 cm. This is a design target rather than a verified gauge for the garment shown in the photograph.
Wash and dry the sample before measuring. Cotton yarn can change dimensions after its first wash.
For a comfortable fit, allow approximately 4–6 cm of positive ease around the chest.
Free Crochet Daisy Dress Pattern – Step by Step
The following instructions provide a practical top-down construction method inspired by the pictured dress. Because the original stitch diagram is unavailable, the lace arrangement and decorative placement are adapted rather than exact.
Part 1: Crochet the White Neckline
Yarn: White cotton.
Hook: 3.5 mm.
Begin with a foundation chain of 96 stitches. Check that the chain can pass comfortably over the child’s head. If necessary, increase the foundation chain in multiples of eight.
Join with a slip stitch to form a ring, taking care not to twist the chain.
Round 1: Ch 2, work 1 hdc into each chain around. Join with sl st. (96 sts)
Round 2: Ch 3, work 1 dc into each stitch around. Join with sl st. (96 sts)
Round 3: Ch 1, work 1 sc into each stitch around. Join with sl st. (96 sts)
Fasten off the white yarn.
Part 2: Yellow Decorative Neckline Border
Yarn: Sunflower yellow.
Attach the yellow yarn to the upper edge of the neckline.
Round 1: Work 1 sc into each available stitch around the neckline.
Round 2: Ch 1, work 1 sc in the first stitch, ch 2, skip 1 stitch, and repeat around.
Round 3: Work 3 sc into each ch-2 space around.
Join with a slip stitch and fasten off.
The yellow border should lie flat. If it curls inward, reduce the number of stitches worked into each chain space.
Part 3: Crochet the Circular Yoke
Yarn: White.
Attach white yarn to the lower edge of the neckline.
Round 1: Ch 3, work 1 dc into each stitch around. Join. (96 dc)
Round 2: Ch 3, work 1 dc in each of the next 7 stitches, then 2 dc in the following stitch. Repeat around. (108 dc)
Round 3: Ch 3, work 1 dc into each stitch around. (108 dc)
Round 4: Work 1 dc in each of the next 8 stitches, then 2 dc in the following stitch. Repeat around. (120 dc)
Round 5: Work 1 dc into each stitch around. (120 dc)
Round 6: Work 1 dc in each of the next 9 stitches, then 2 dc in the following stitch. Repeat around. (132 dc)
Round 7: Work 1 dc into each stitch around. (132 dc)
Round 8: Work 1 dc in each of the next 10 stitches, then 2 dc in the following stitch. Repeat around. (144 dc)
Round 9: Work 1 dc into each stitch around. (144 dc)
Round 10: Work 1 dc in each of the next 11 stitches, then 2 dc in the following stitch. Repeat around. (156 dc)
The yoke should extend from the neckline toward the underarm without pulling across the shoulders.
If additional depth is required, work one or two rounds without increasing.
Part 4: Separate the Sleeves and Bodice
Lay the yoke flat and identify the center front and center back.
Divide the 156 stitches as follows:
- Front: 48 stitches
- Back: 48 stitches
- Left sleeve: 30 stitches
- Right sleeve: 30 stitches
Place stitch markers at the division points.
Work across the back section, chain 6 for the first underarm, skip the first sleeve section, and continue across the front.
Chain 6 for the second underarm, skip the remaining sleeve section, and join to the beginning of the round.
The resulting bodice circumference contains 108 stitches, including the underarm chains.
Check the circumference before proceeding. At the suggested gauge, this count may need adjustment to reach the intended chest measurement.
Part 5: Crochet the White Lace Bodice
Yarn: White.
The bodice uses an openwork stitch arrangement to reproduce the airy appearance of the photographed dress.
Round 1: Ch 3, work 1 dc into each stitch and underarm chain around. Join. (108 dc)
Round 2: Ch 4, skip 1 stitch, work 1 dc into the next stitch. Repeat around. (54 dc and 54 ch-1 spaces)
Round 3: Ch 3, work 1 dc into each double crochet and each chain space around. (108 dc)
Round 4: Repeat Round 2.
Round 5: Repeat Round 3.
Round 6: Repeat Round 2.
Round 7: Repeat Round 3.
Round 8: Repeat Round 2.
Round 9: Repeat Round 3.
Round 10: Repeat Round 2.
Round 11: Repeat Round 3.
Round 12: Work 1 sc into each stitch around. (108 sc)
Continue alternating the openwork rounds if additional bodice length is needed.
The bodice should finish at the intended waistline. Measure from the shoulder rather than relying only on the number of rounds.
Part 6: Crochet the Yellow Lace Skirt
Yarn: Sunflower yellow.
Attach yellow yarn to the lower edge of the bodice.
The skirt begins with a foundation round that distributes shell groups evenly around the waist.
Round 1: Ch 3, work 1 dc into each stitch around. (108 dc)
Round 2: Ch 3, work 2 additional dc in the same stitch, skip 2 stitches, work 1 sc in the next stitch, skip 2 stitches, and work 5 dc in the following stitch. Repeat the shell arrangement around.
Adjust the final repeat to meet the beginning of the round without forcing additional stitches.
Round 3: Work 5 dc into the center stitch of each shell and 1 sc between shell groups.
Round 4: Repeat Round 3.
Round 5: Work 6 dc into the center of every second shell, maintaining 5 dc in the remaining shells.
Round 6: Continue the shell pattern, working into the center of each previous shell.
Round 7: Increase selected shell groups to 6 dc, distributing the additional stitches evenly.
Rounds 8–12: Continue the established shell pattern.
Round 13: Increase selected shell groups to 7 dc to add skirt width.
Rounds 14–20: Continue the shell pattern, keeping the groups evenly spaced.
Rounds 21–28: Repeat the established lace sequence until the skirt approaches the required length.
For a longer dress, add complete pattern repeats before beginning the decorative hem.
Pattern adjustment: The shell instructions above describe the stitch arrangement rather than a fully charted repeat. The exact number of shell groups must be established from the finished waist circumference and tested in a sample before working the entire skirt.
Part 7: White Decorative Hem
Yarn: White.
Attach white yarn to the bottom edge of the yellow skirt.
Round 1: Work 1 sc into each available stitch around the hem.
Round 2: Ch 3, work groups of 5 dc into evenly spaced stitches, separating the groups with 1 sc.
Round 3: Work 1 sc into each stitch around.
The white section creates a contrasting band similar to the decorative lace visible near the bottom of the photographed dress.
Part 8: Yellow Scalloped Hem
Yarn: Sunflower yellow.
Attach yellow yarn to the final white round.
Round 1: Work 1 sc into each stitch around.
Round 2: Skip 2 stitches, work 7 dc into the next stitch, skip 2 stitches, and work 1 sc into the following stitch. Repeat around.
Adjust the spacing at the final scallop if necessary.
Fasten off and weave in the ends.
Part 9: Crochet the Ruffled Sleeves
Make: 2 sleeves.
Yarn: White and yellow.
Attach white yarn to the first armhole.
Round 1: Work 1 sc evenly around the armhole opening.
Round 2: Work 2 dc into each stitch around to create a ruffle.
Round 3: Work 1 dc into each stitch around.
Change to yellow yarn.
Round 4: Work 1 sc into each stitch around.
Round 5: Skip 2 stitches, work 5 dc into the next stitch, skip 2 stitches, and work 1 sc into the following stitch. Repeat around.
Fasten off.
Repeat for the second sleeve.
Compare both sleeves before weaving in the yarn ends. The ruffles should have similar depth and fullness.
Crochet Flower Decorations
Part 10: Small Yellow Daisy Flowers
Make: Approximately 10–12 flowers.
Yarn: Yellow.
Hook: 3 mm.
Round 1: Make a magic ring and work 6 sc into the ring. Join. (6 sc)
Round 2: Work 2 sc into each stitch around. (12 sc)
Round 3: *Ch 3, work 2 dc into the same stitch, ch 3, sl st into the next stitch.* Repeat around to form the petals.
Fasten off, leaving a 15 cm yarn tail for sewing.
Arrange the flowers around the neckline before attaching them.
The flowers should form a balanced curve across the front of the dress.
Part 11: Crochet Green Leaves
Make: Approximately 12–16 small leaves.
Yarn: Green.
Ch 7.
Starting in the second chain from the hook, work:
1 sc, 1 hdc, 2 dc, 1 hdc, and 1 sc.
Work 2 sc into the final chain.
Continue along the opposite side of the foundation chain:
1 sc, 1 hdc, 2 dc, 1 hdc, and 1 sc.
Join with a slip stitch.
Fasten off, leaving a sewing tail.
Attach the leaves between the yellow flowers to create the floral neckline arrangement.
Part 12: Large White Daisy for the Waist
Yarn: White and yellow.
Begin with yellow yarn.
Round 1: Work 6 sc into a magic ring. (6 sc)
Round 2: Work 2 sc into each stitch around. (12 sc)
Fasten off yellow yarn and attach white.
Round 3: *Ch 4, work 3 tr into the same stitch, ch 4, sl st into the next stitch.* Repeat around to form the petals.
Arrange the petals evenly and flatten the flower by hand.
Fasten off, leaving a long sewing tail.
Part 13: Large Green Leaves
Make: 2 leaves.
Yarn: Green.
Ch 12.
Starting in the second chain from the hook, work:
1 sc, 1 hdc, 2 dc, 3 tr, 2 dc, 1 hdc, and 1 sc.
Work 2 sc into the final chain.
Continue along the opposite side using the same stitch sequence in reverse.
Join and fasten off.
Position the leaves behind the large white daisy before attaching the decoration to the waist.
Part 14: Crochet Waist Ties
Yarn: White.
Make two decorative ties.
For each tie, chain approximately 65–75 stitches.
Work 1 slip stitch into each chain, beginning in the second chain from the hook.
Fasten off.
Attach the ties beneath the large waist flower.
The ends can be decorated with miniature white flowers featuring yellow centers.
For children’s garments, secure the ties permanently as short decorative cords rather than leaving long, loose drawstrings.
Part 15: Miniature White Flowers for the Ties
Make: 2 flowers.
Yarn: White and yellow.
Using yellow yarn, make a magic ring.
Round 1: Work 5 sc into the ring. Join. (5 sc)
Change to white yarn.
Round 2: *Ch 3, work 2 dc into the same stitch, ch 3, sl st into the next stitch.* Repeat five times.
Fasten off.
Sew one flower to the end of each decorative tie.
How to Assemble the Crochet Daisy Dress
- Check the neckline: Confirm that the finished opening fits comfortably over the child’s head.
- Inspect the yoke: Lay the upper section flat and check that the increases are evenly distributed.
- Check the bodice: Measure the chest circumference and confirm that the underarm openings provide adequate movement.
- Finish the sleeves: Compare the ruffles and adjust any uneven scallops.
- Block the skirt: Dampen the garment lightly and spread the lace into its intended shape.
- Attach the small flowers: Position the yellow daisies around the neckline and sew each flower securely.
- Add the green leaves: Place leaves between the flowers to create a continuous floral arrangement.
- Attach the waist flower: Sew the large white daisy to the center front of the waist, with the two green leaves behind it.
- Secure the decorative ties: Attach the white cords and miniature flowers, checking that no loose loops or long cords remain.
- Finish the garment: Weave in all yarn ends, inspect every sewn decoration, and measure the completed dress.
The completed garment consists of a white lace bodice, yellow flared skirt, contrasting hem, ruffled sleeves, and crochet floral decorations.
7 Technical Tips for a Better Crochet Daisy Dress
- 1. Check the neckline circumference. A neckline that is 2–3 cm too narrow may prevent the dress from passing over the child’s head. Measure the opening before joining the foundation chain.
- 2. Maintain consistent stitch tension. Changing tension between the bodice and skirt can create an uneven waist seam. Make a gauge sample using the same hook and yarn intended for the garment.
- 3. Mark the sleeve divisions. Incorrect stitch placement can make one armhole larger than the other. Use four stitch markers to identify the front, back, and sleeve sections before separating the yoke.
- 4. Control the skirt increases. Too many increases in one round can produce excessive rippling. Distribute increases across several rounds and check that the skirt hangs evenly.
- 5. Keep floral decorations flat. Overly tight sewing stitches can distort the neckline and pull the fabric inward. Pin each flower in place before sewing around its center.
- 6. Measure the scalloped hem. Uneven shell spacing can cause the lower edge to twist. Count the available stitches and distribute the scallops before completing the final round.
- 7. Secure every yarn tail. Short yarn ends may work loose after washing, especially around raised flowers. Weave each tail through several stitches in different directions and inspect the attachment points.
How to Adjust the Dress Size
For a Smaller Size
To make the dress for a younger child, begin with a smaller neckline circumference and reduce the yoke depth.
Shorten the bodice and skirt according to the child’s measurements. Keep the floral decorations proportional to the garment.
A smaller hook may be appropriate when using finer yarn, but always check the resulting gauge.
For a Larger Size
For an older child, increase the foundation chain in multiples that match the yoke construction.
Work additional increase rounds until the yoke reaches the required shoulder width and armhole depth.
Increase the bodice length before beginning the skirt. Additional skirt repeats can then be added to reach the desired finished length.
Do not increase the neckline and skirt by the same percentage without checking the chest and shoulder measurements separately.
Washing and Caring for the Crochet Dress
Cotton crochet garments benefit from gentle washing and careful drying.
Use cool water and a mild detergent suitable for the yarn. Avoid aggressive rubbing around the raised flowers and scalloped edges.
After washing, press out excess water using a clean towel. Do not twist the garment, as this may distort the lace pattern.
Lay the dress flat to dry and reshape the skirt while damp.
Keep the floral decorations flat and separate the scallops with your fingers to restore their definition.
Store the dress folded rather than hanging for long periods. The weight of a cotton skirt can gradually stretch the bodice and neckline.
Frequently Asked Questions
What yarn is best for a crochet daisy dress?
Smooth cotton or cotton-blend yarn is suitable for this type of garment. DK cotton provides visible stitch definition and works well for openwork bodices, decorative flowers, and lace skirts.
Can beginners make this crochet dress?
The project is better suited to crocheters who already understand double crochet, increases, joined rounds, shell stitches, and basic garment shaping. Beginners may wish to practice the floral motifs and lace repeats separately before beginning the dress.
How much yarn is needed?
For the estimated 2–3-year size, plan approximately 250–300 g of yellow yarn, 150–200 g of white yarn, and 20–30 g of green yarn.
These quantities are estimates. The final amount depends on the child’s measurements, yarn length per ball, stitch gauge, and skirt fullness.
Can the skirt be made longer?
Yes. Continue the established lace pattern until the required skirt length is reached. Complete the additional rounds before beginning the white decorative band and yellow scalloped border.
Can the dress be made without flowers?
Yes. The flowers are separate decorations and do not form part of the garment’s structural construction.
The dress can be completed with only the white bodice, yellow skirt, and contrasting hem.
How do I keep the skirt from becoming too heavy?
Use a lightweight cotton yarn and avoid excessively dense stitch patterns. A skirt with open chain spaces generally uses less yarn than one worked entirely in double crochet.
Check the garment’s weight during construction, especially when adding extra length.
Is this dress suitable for everyday wear?
The dress may be suitable for occasional or supervised wear when properly sized and securely finished. Check that the openwork does not catch on objects and that all flowers, leaves, and decorative cords are firmly attached.
A lightweight cotton lining or separate underdress may be needed because the bodice and skirt contain open lace sections.
Conclusion
This crochet daisy dress pattern combines a circular white yoke, an openwork bodice, a sunflower-yellow skirt, and separately constructed floral decorations. The finished garment can be adjusted through changes to the yoke depth, bodice length, and number of skirt repeats. Before making a second version, record the completed chest circumference, dress length, hook size, and yarn consumption. These measurements provide a useful reference for future sizing adjustments.
Save the finished project to Pinterest or share photographs on Instagram using #SunshineDaisyCrochetDress. Include the yarn weight and finished measurements when sharing your results.
Would you keep the yellow daisy neckline or replace the flowers with white petals and yellow centers?









