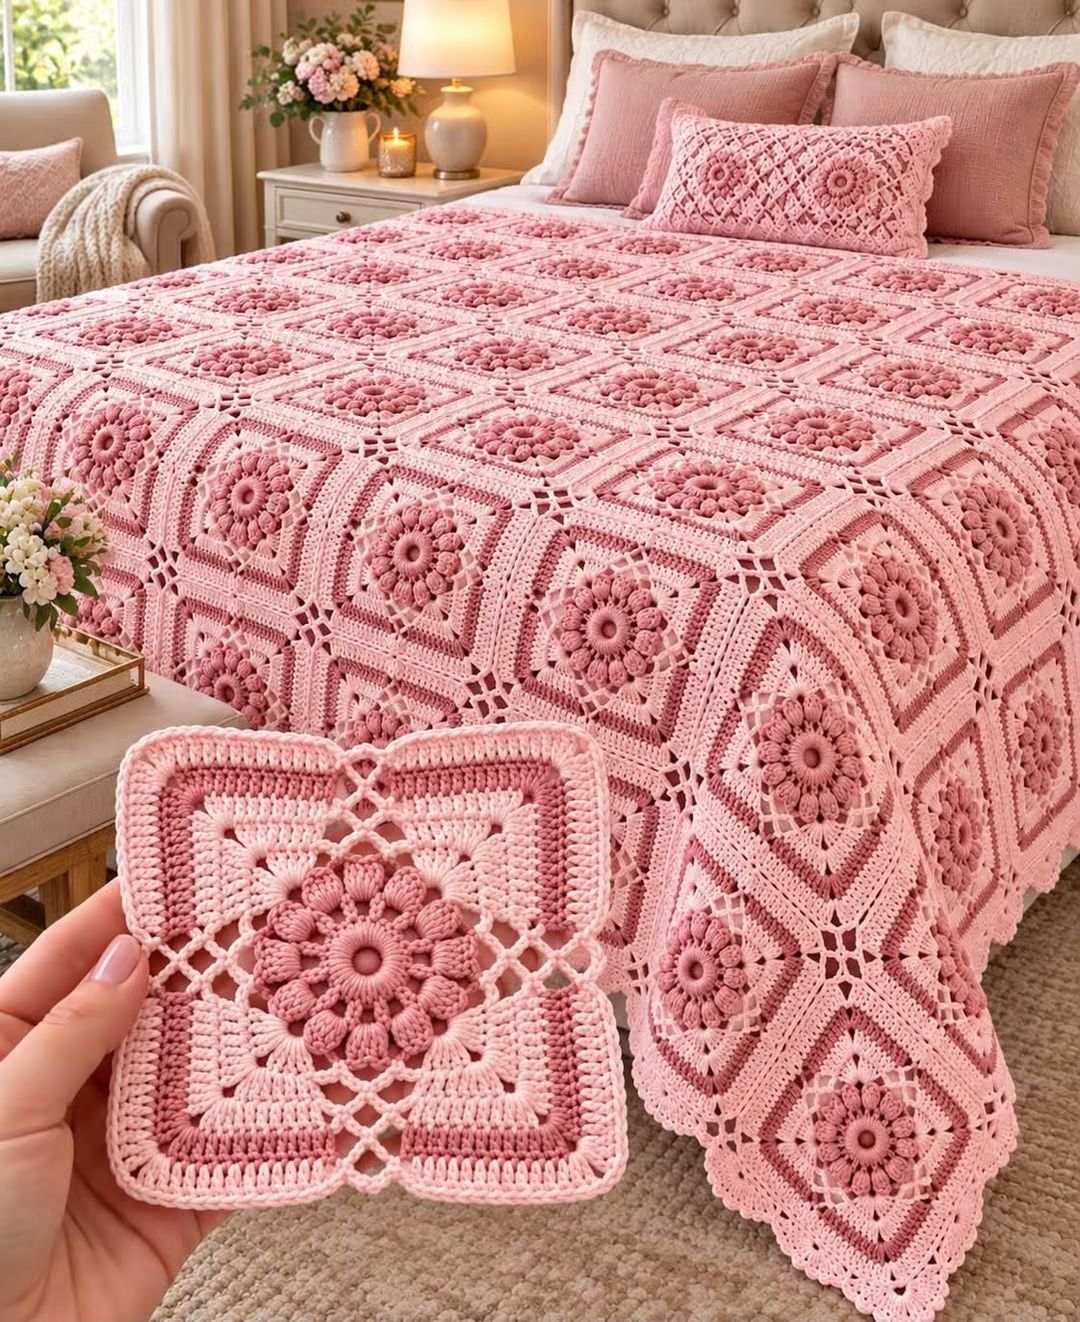
Sixteen raised petals must fit inside four equal corners without distorting the square frame. This pink flower granny square blanket pattern combines dimensional dusty-rose flowers, blush-pink borders, open crochet spaces, and repeated square motifs. Use DK yarn with a 4.5 mm hook to create a modular bedspread and coordinating cushion. The project suits intermediate crocheters who can work puff stitches, clusters, and joined rounds.
The Design: What Makes This Pink Floral Bedspread Different
The photographed bedspread uses a repeated floral square rather than a continuous stitch pattern. Each flower sits above its surrounding fabric, creating a raised center that remains visible even when dozens of motifs are joined together.
The second structural feature is the transition from a circular flower to a square frame. Open chain spaces separate the textured petals from the outer border, while four regularly spaced corners control the final geometry.
The third feature is the connecting lattice. Small openings between adjacent motifs keep the grid visible without introducing a heavy seam. This gives the pink crochet bedspread a more decorative structure than a conventional solid granny square blanket.
A frequent mistake when making a puff stitch flower granny square is pulling the petal stitches too tightly. Unequal puff heights can cause the center to cup and make the outer frame difficult to block.
Project Info at a Glance
| Skill Level | Construction | Published Square Reference | Hook | Best For |
|---|---|---|---|---|
| Intermediate | Individual flower squares joined into a panel | 12.5 × 12.5 cm | 4.5 mm | Bedspreads, throws, cushion covers |
The 12.5 cm square measurement comes from a published DK sunburst granny square blanket. It is a useful starting benchmark, not a measurement taken from the photograph.
Actual dimensions depend on the yarn, hook, stitch tension, number of framing rounds, and joining method.
Materials and Tools
Yarn
- Dusty-rose DK yarn — flower centers and textured petals.
- Light blush-pink DK yarn — square backgrounds, openwork, and framing rounds.
- Medium rose-pink DK yarn — optional contrast bands and decorative edging.
Choose yarns with comparable fiber content and thickness. Mixing a tightly spun cotton with a very elastic acrylic can produce inconsistent square measurements even when both yarns are labeled DK.
For a large bedspread, purchase yarn only after making and weighing a completed sample square. A published 30-square DK blanket uses approximately 500 g across its colors and finishing, but the more elaborate photographed design may require substantially more yarn.
Tools
- 4.5 mm crochet hook
- Yarn needle
- Scissors
- Stitch markers
- Tape measure
- Blocking mats and rustproof pins
- Cushion insert — size selected after measuring the completed cushion panel
- Optional fabric — for a lined or envelope-style cushion back
Abbreviations
- MR — magic ring
- ch — chain
- sl st — slip stitch
- sc — single crochet
- hdc — half double crochet
- dc — double crochet
- tr — treble crochet
- sp — space
- st/sts — stitch/stitches
- RS — right side
- WS — wrong side
An invisible decrease is not needed because the flower squares are expanded through clusters and corner increases rather than shaped with decreases.
Special Stitches
Puff Stitch
Yarn over, insert the hook into the indicated stitch, and pull up a long loop.
Repeat the yarn-over and loop-pull sequence twice more in the same stitch.
Yarn over and pull through all loops on the hook.
Ch 1 to secure the puff.
For consistent petals, pull every elongated loop to approximately the same height.
Three-Double-Crochet Cluster
Work three incomplete double crochet stitches into the same space.
Each incomplete double crochet leaves its final loop on the hook.
Yarn over and pull through all remaining loops.
Ch 1 to secure the cluster.
This creates a rounded textured group that sits above the surrounding stitches.
Pink Flower Granny Square Pattern — Step by Step
Work each square in joined rounds. The dusty-rose flower is made first, followed by the surrounding blush-pink frame.
Use the same color sequence for every motif if you want the regular floral grid visible in the photograph.
Round 1 — Flower Center
Yarn: dusty rose.
Make a magic ring.
Ch 2; this chain does not count as a stitch.
Work 16 dc into the ring.
Join with sl st to the first dc.
Stitch count: 16 dc.
Pull the magic ring closed and fasten off.
The center should lie flat before the textured petals are added.
Round 2 — Raised Puff Petals
Yarn: dusty rose.
Join yarn in any dc from Round 1.
Ch 1.
Work one puff stitch in the same stitch, followed by ch 1.
Repeat the following sequence around:
1 puff stitch in next dc, ch 1.
Join with sl st to the top of the first puff.
Stitch count: 16 puff stitches and 16 ch-1 spaces.
Fasten off.
Check the flower from above. All 16 puffs should have similar height and spacing.
Round 3 — Outer Flower Clusters
Yarn: medium rose or dusty rose.
Join yarn in any ch-1 space.
Ch 2.
Work 3 dc into the same space.
Ch 1.
Repeat around, working 3 dc and ch 1 in every remaining ch-1 space.
Join with sl st to the first dc.
Stitch count: 16 groups of 3 dc, totaling 48 dc, with 16 ch-1 spaces.
Fasten off.
This round expands the flower before the circular center becomes a square.
Round 4 — Turning the Flower into a Square
Yarn: light blush pink.
Join yarn in any ch-1 space.
Work the first corner:
(3 dc, ch 2, 3 dc) in the same space.
In each of the next three ch-1 spaces, work 3 hdc.
In the following ch-1 space, work another corner:
(3 dc, ch 2, 3 dc).
Repeat this structure around the flower, placing a corner in every fourth ch-1 space.
Join with sl st to the first dc.
Stitch count: 4 corner groups containing 6 dc each, 12 side groups containing 3 hdc each, and 4 ch-2 corner spaces.
There are 60 worked stitches in this round, excluding the corner chains.
Check that the four corners are evenly spaced before continuing.
Round 5 — Solid Square Frame
Yarn: light blush pink.
Join yarn in any corner space.
Work:
(2 dc, ch 2, 2 dc) in the corner.
Work one dc in each stitch along the next side.
At the following corner, work:
(2 dc, ch 2, 2 dc).
Continue around all four sides.
Join with sl st to the first dc.
Stitch count: 76 dc and four ch-2 corner spaces.
The count includes the 60 stitches worked into from Round 4 plus 16 additional stitches introduced at the corners.
Round 6 — Outer Border
Yarn: medium rose pink.
Join yarn in any corner space.
Work:
(sc, ch 2, sc) into the corner.
Work one sc in every dc along the next side.
Repeat the same corner treatment at each remaining corner.
Join with sl st.
Stitch count: 84 sc and four ch-2 corner spaces.
Fasten off, leaving a tail approximately 15 cm long if the squares will be sewn together.
Make one complete sample square and block it before beginning the remaining motifs.
Adding a More Decorative Lace Frame
The photographed bedspread contains more openwork than a basic six-round sunburst square.
To move closer to that appearance, add a decorative round before the final border.
Work groups of double crochet separated by short chain spaces along each side.
Keep all four corner treatments identical.
Place the chain openings at corresponding positions on every side so neighboring squares can be joined without twisting.
This optional variation changes the stitch count and finished size. Record the exact repeat used on the first sample and apply it consistently to every later square.
Do not mix six-round squares with expanded lace squares in the same bedspread unless their blocked dimensions match.
Making the Blanket Squares
The total number of squares depends on the required bedspread dimensions.
Measure the blocked sample square first.
For example, if each square measures 12.5 cm, a panel that is eight squares wide will measure approximately 100 cm before allowing for joins and borders.
A panel twelve squares wide will measure approximately 150 cm under the same assumptions.
These figures are planning calculations, not measurements of the photographed blanket.
For a bedspread, decide how far the crochet should extend down the sides of the mattress.
Add that drop to the mattress width when calculating the required panel width.
Then repeat the calculation for the length.
Round the required number of motifs up to the next whole square.
Blocking the Flower Granny Squares
Block the motifs before joining.
Place the first square on a blocking mat.
Measure both diagonals.
If the diagonals differ substantially, reposition the corners until the square is balanced.
Pin each corner separately.
Arrange the raised flower center without compressing the puff stitches.
Allow the motif to dry fully before removing the pins.
Use the finished sample as a size guide for the remaining squares.
Consistent blocking is especially important when the bedspread contains many rows of motifs.
Joining the Squares into a Bedspread
Arrange all completed squares on a flat surface before joining.
Keep every flower facing the same direction.
Place the squares right sides together if using a conventional sewn or slip-stitch seam.
For a flatter result, work through corresponding edge loops with a loose slip stitch.
Join the squares into horizontal strips first.
Then connect the strips into one large rectangular panel.
Do not pull the joining yarn tightly.
A seam shorter than the motif edges causes the blanket to pucker along the grid lines.
Creating the Open Lace Connections
The photograph shows small diamond-like openings where several squares meet.
A basic slip-stitch join produces a more solid grid, so an openwork connection is needed for a closer visual interpretation.
One approach is to use matching chain loops at the outer edges of each square.
Connect corresponding loops with slip stitches while leaving a small opening at each four-square intersection.
Keep the openings uniform throughout the bedspread.
Test this joining method on four completed squares before using it across the entire project.
Lay the test panel flat and measure it.
The joined panel may be wider than four individual squares placed edge to edge, depending on the length of the connecting chains.
Include that extra width in the bedspread calculation.
Adding the Bedspread Border
Once all motifs are joined, work a continuous border around the outside edge.
Begin with one round of single crochet.
Work evenly along each side, adjusting the number of stitches where necessary to keep the edge flat.
At each outside corner, work three sc into the corner position.
Join with sl st.
For the second round, use double crochet or a combination of dc and chain spaces.
A third round can introduce a narrow contrasting rose-pink stripe.
Finish with a decorative scalloped edge if desired.
Test the scallop repeat along one side before completing the entire perimeter.
Decorative Scalloped Edging
A simple shell border can reproduce the rounded finish visible around the photographed bedspread.
Work one sc into the first suitable stitch.
Skip two stitches.
Work five dc into the next stitch.
Skip two stitches.
Work one sc into the following stitch.
Repeat along the edge.
Adjust the spacing near corners rather than forcing an incomplete shell into the final stitches.
The scallops should sit flat instead of curling upward.
Matching Crochet Cushion
The image includes a rectangular decorative cushion with floral lacework.
Its exact motif differs from the bedspread squares, but the same color palette and flower construction can produce a coordinated piece.
Make enough flower squares to cover the front of the intended cushion.
Join them into a rectangle.
Measure the finished panel before selecting an insert.
A published pink lace flower cushion pattern uses approximately 10 cm squares and a 3.5 mm hook, providing a useful reference for modular cushion construction.
For a rectangular cushion, add or remove motifs until the front panel reaches the desired proportions.
Making the Cushion Back
A solid crochet back is practical when the front contains raised flowers and openwork.
Work a rectangular panel in single crochet or half double crochet.
Match its dimensions to the completed front.
Alternatively, use two overlapping crochet rectangles to form an envelope closure.
The overlapping sections should cover the insert opening securely.
Join the front and back around three sides.
Insert the cushion and close the remaining edge using the chosen fastening method.
If the front has large open spaces, a fabric lining can prevent the cushion insert from showing through unevenly.
Assembly — 10 Steps
- Complete one dusty-rose flower square and verify the 16-stitch center, 16 puff petals, and 16 outer clusters.
- Add the blush-pink square frame and check that all four corners have matching stitch structures.
- Block the sample and record its width, height, and yarn consumption.
- Calculate the number of motifs required for the bedspread, including the desired mattress drop.
- Make the remaining squares using the same yarn, hook, color sequence, and round counts.
- Block all squares to the same target dimensions before joining.
- Arrange the motifs into rows and join them using a flat seam or tested openwork connection.
- Add the continuous outer border, optional contrasting stripe, and scalloped edging.
- Make a coordinated rectangular cushion front and attach a fitted crochet or fabric back.
- Weave in all remaining tails, inspect the seams, and complete the final blocking.
The finished set consists of a joined floral bedspread and a matching decorative cushion made with the same pink color palette.
7 Technical Tips
- Count 16 double crochet stitches in the center. An extra or missing stitch changes the spacing of every puff petal in the next round.
- Pull all puff-stitch loops to the same height. Unequal loops produce petals with visibly different thicknesses and can distort the flower center.
- Check all four corner spaces after Round 4. A misplaced corner causes the square to lean diagonally and makes later joining difficult.
- Compare blocked square dimensions within approximately 5 mm. Larger differences accumulate across long rows and can create a wavy bedspread edge.
- Test the lace join on four squares before joining the full blanket. Chain connections that are too long create oversized openings at four-square intersections.
- Keep slip-stitch seams loose enough to match the motif edges. Tight joining stitches shorten the seam and pull neighboring flowers toward each other.
- Measure the completed cushion front before choosing an insert. An insert that is substantially larger than the cover can stretch the openwork and flatten the raised petals.
How Many Granny Squares Do You Need?
The square count is determined by the blocked size of one motif.
Suppose a completed square measures 12.5 cm.
A blanket made from 8 squares across and 10 squares down contains 80 motifs.
Before accounting for joining and borders, the panel would measure approximately 100 × 125 cm.
A 12 × 14 arrangement contains 168 motifs and measures approximately 150 × 175 cm before joining allowances.
A larger 14 × 16 arrangement contains 224 motifs and measures approximately 175 × 200 cm under the same assumptions.
These are mathematical planning examples.
The actual bedspread in the photograph cannot be counted reliably because some squares are obscured by folds and pillows.
Use your own blocked sample and bed measurements to determine the correct layout.
Estimating Yarn Consumption
Large floral bedspreads use substantially more yarn than a small granny square throw.
The most dependable method is to weigh a finished sample motif.
For example, if one completed square weighs 18 g and the project requires 150 squares, the motifs alone would require approximately 2,700 g.
That figure excludes joining yarn, borders, cushion panels, and additional finishing.
The 18 g measurement is an example, not a verified weight for the photographed design.
Weigh your actual sample before purchasing the full quantity.
Calculate the dusty-rose and blush-pink requirements separately if the two colors are used in different proportions.
Preventing a Wavy Granny Square Bedspread
Waving can originate in the individual motifs or in the joining process.
Inspect each square before joining.
If the center cups, review the puff-stitch tension and the number of stitches in the first three rounds.
If the outer frame ruffles, inspect the corner increases and check whether the hook is too large for the yarn.
If individual squares lie flat but the joined blanket waves, the seams may be too loose or the connecting chains may be too long.
Test a small panel before committing to the entire bedspread.
Blocking can refine small irregularities, but it cannot correct major stitch-count errors.
Choosing the Right Pink Yarn Colors
The photograph relies on tonal contrast rather than sharply different colors.
The flower centers are darker than the surrounding frames.
This difference keeps the raised petals visible across the bedspread.
Choose a dusty rose for the flowers and a lighter blush for the outer rounds.
A medium rose shade can define selected borders or joining details.
Before starting the full project, place the yarn colors beside each other in natural light.
Make one complete square using the planned combination.
Check whether the flower remains visually distinct from the background when viewed from several feet away.
Matching the Cushion to the Bedspread
A coordinated cushion does not need to reproduce every round of the blanket motif.
The photograph uses a rectangular pillow with a denser floral lace arrangement.
For a simpler construction, use the same flower squares as the bedspread and join them into a rectangular panel.
Keep the darker pink concentrated around the flowers.
Use the lighter blush yarn for the surrounding frame and cushion edging.
A solid back provides support for the raised front.
If using an envelope closure, position the opening on the back so it does not interrupt the decorative face.
Care and Washing
Follow the care instructions for the selected yarn.
Large joined blankets become heavier when wet, particularly when made from cotton.
Support the entire fabric when moving it after washing.
Avoid hanging a wet bedspread from one narrow edge because the weight can stretch the joining seams.
Dry flat whenever practical.
Reshape the corners and openwork connections while the fabric is damp.
Check the raised petals after drying and adjust any that have folded beneath neighboring stitches.
Conclusion
The raised flowers, pale square frames, and open connecting lattice define this pink flower granny square blanket pattern. Begin with one complete sample, confirm the stitch counts, and block it before calculating the bedspread dimensions. Next, weigh the sample to estimate yarn requirements for the full blanket and matching cushion. Keep the flower colors consistent and test the joining method on four squares before assembling the larger panel. Share the finished bedspread on Pinterest or Instagram using #PinkFlowerGrannyBedspread. For this particular design, would you keep every flower dusty rose or alternate two pink shades across the bedspread?









