Introduction
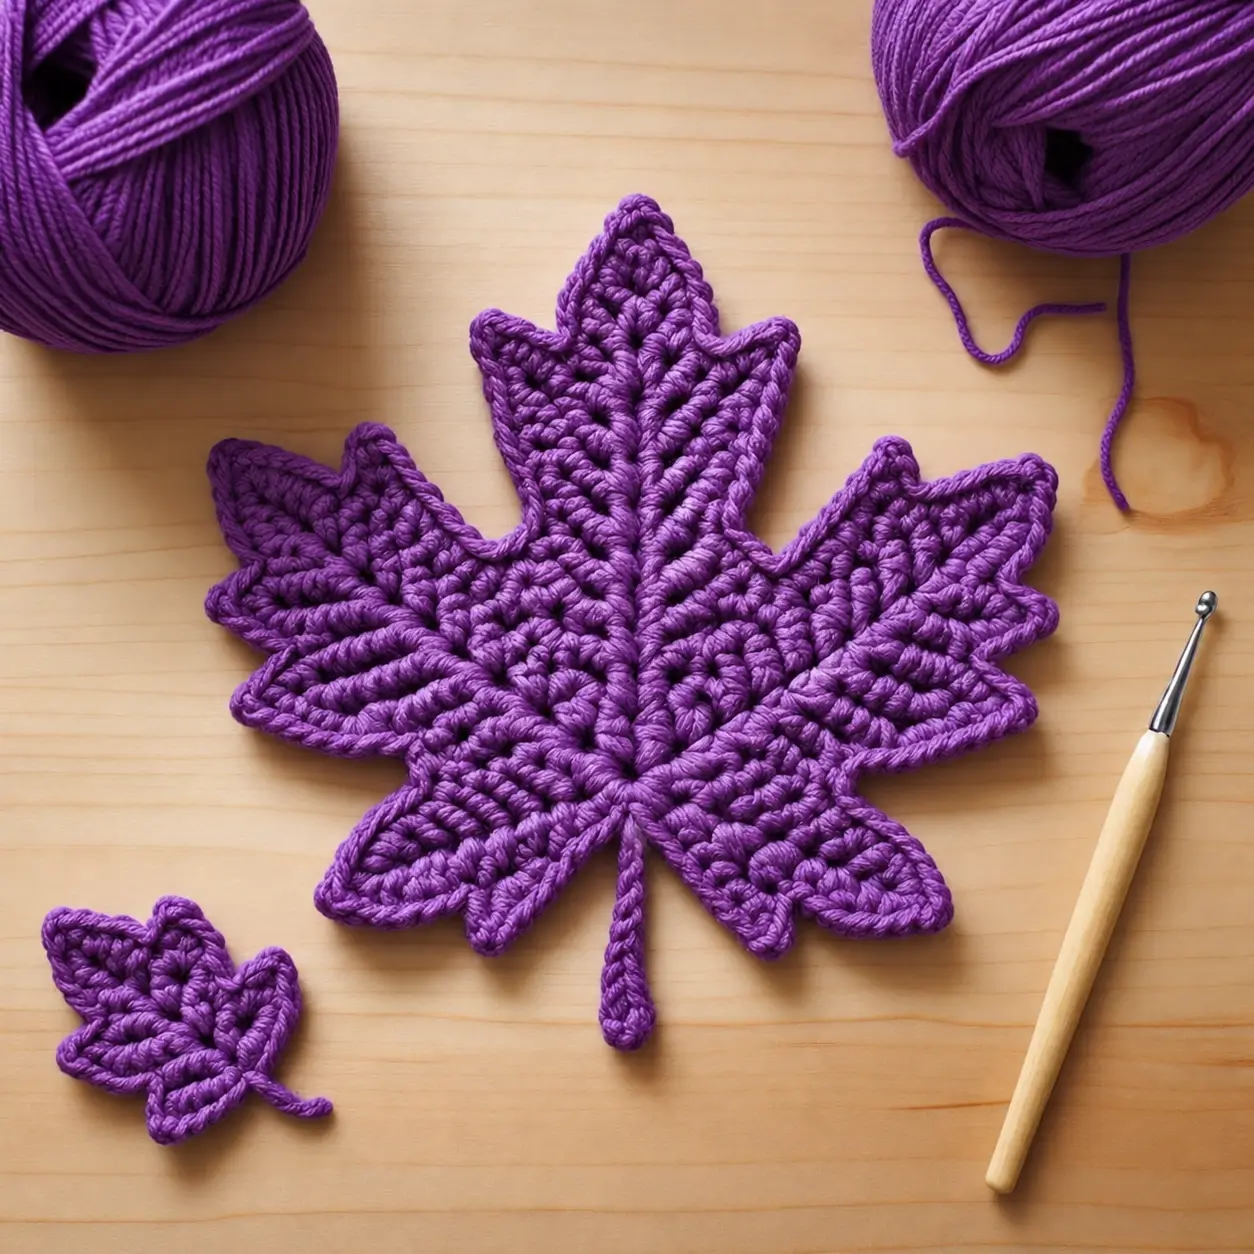
A maple leaf loses its identity when the center point is no taller than its side lobes. This purple crochet maple leaf pattern uses five structured sections, sharp valleys, a narrow stem and raised surface veins to reproduce that distinctive shape. Work it with worsted-weight yarn and a 4 mm hook for an intermediate motif around 10–13 cm wide. Use the finished leaf for fall table décor, garlands, appliqués or seasonal ornaments.
The Design: What Makes This Purple Maple Leaf Different
This design gets its definition from texture rather than color changes. The entire leaf is purple, so the raised center vein and branching side veins have to separate the individual lobes visually. The tallest central section establishes the vertical axis, while two upper side lobes create width and two smaller lower sections narrow the shape toward the stem.
The second structural feature is the corded-looking perimeter. Short stitches sit inside the valleys while taller stitch combinations build the pointed sections. That contrast keeps the crochet maple leaf appliqué from becoming circular.
A common mistake is adding extra stitches to make a point larger. The additional width usually creates rippling. Increase stitch height toward a tip instead, then reduce it symmetrically on the opposite side.
Project Info at a Glance
| Skill Level | Time | Finished Size | Hook | Best For |
|---|---|---|---|---|
| Intermediate | 45–75 minutes | Approx. 10–13 cm | 4.0 mm | Appliqués, garlands, table décor, ornaments |
Published maple-leaf patterns show substantial size variation. A DK version made with a 3.5 mm hook measures about 8.5 × 8.5 cm, while a worsted-weight version with a 4 mm hook measures approximately 10 × 10 cm. The final dimensions of this version depend on yarn thickness, personal tension and blocking.
Materials and Tools
Yarn
- Purple yarn — #4 worsted weight — approximately 8–15 g per medium leaf.
Use a smooth yarn with visible stitch definition. Cotton creates a firm decorative motif, while acrylic produces a lighter appliqué. For table pieces, cotton is the more structured option.
Tools
- 4.0 mm crochet hook
- Tapestry needle
- Scissors
- Locking stitch markers
- Blocking mat
- Rust-resistant pins
- Tape measure
Abbreviations
- ch — chain
- sl st — slip stitch
- sc — single crochet
- hdc — half double crochet
- dc — double crochet
- tr — treble crochet
- st/sts — stitch/stitches
- sp — space
- RS — right side
- FO — fasten off
Purple Crochet Maple Leaf Pattern
Pattern note: This is a photo-inspired construction written to reproduce the major visual characteristics of the reference image: one tall center lobe, paired side lobes, smaller lower points, a monochrome purple surface, raised veins and a narrow stem.
Center Foundation
Yarn: purple.
Ch 13.
Foundation Row: Starting in the second ch from the hook, work 1 sc in each chain across.
12 sc total.
This narrow strip establishes the central axis. Keep it loose enough to remain flat because the main vein will later run directly over this line.
Central Lobe
The center lobe must finish higher than every other point.
From the upper end of the foundation, ch 10.
Beginning in the second ch from the hook, work:
1 sl st, 2 sc, 2 hdc, 2 dc, 1 tr, 1 dc.
At the outer tip, ch 3.
Sl st into the first chain of the ch-3 to form a sharp picot.
Work down the opposite side using the reverse stitch-height sequence:
1 dc, 1 tr, 2 dc, 2 hdc, 2 sc, 1 sl st.
Join back to the central foundation with a sl st.
Check the point before continuing. It should remain aligned with the center of the future stem.
Upper Left Lobe
Move down the center foundation approximately three stitches.
Ch 8.
Starting in the second chain from the hook, work:
1 sl st, 1 sc, 2 hdc, 2 dc, 1 tr.
Ch 3 and sl st into the first chain to make the tip.
Work back toward the center with:
1 tr, 2 dc, 2 hdc, 1 sc, 1 sl st.
Join securely to the center.
Upper Right Lobe
Work the corresponding lobe on the opposite side.
Ch 8.
Repeat:
1 sl st, 1 sc, 2 hdc, 2 dc, 1 tr.
Create a ch-3 picot at the point.
Reverse the stitch sequence along the second side and reconnect it to the center.
Lay the motif flat. The left and right tips should finish at approximately the same horizontal level.
Lower Left Lobe
The lower lobes should be shorter than the upper pair.
Move toward the lower section of the foundation.
Ch 6.
Starting in the second chain, work:
1 sl st, 1 sc, 1 hdc, 1 dc, 1 tr.
Ch 2 and sl st into the first chain to form the point.
Reverse the stitch sequence along the opposite side.
Join to the central section.
Lower Right Lobe
Repeat the lower-left construction on the opposite side.
Check the complete silhouette before adding smaller points. The center lobe should be tallest, the upper pair should provide the greatest width and the lower pair should angle toward the stem.
Adding the Secondary Maple Points
The reference leaf has more detail than a simple five-point star. Smaller projections between the major lobes create the serrated maple outline.
Attach purple yarn at the edge where a secondary point is required.
Ch 4.
Beginning in the second chain from the hook, work:
sl st, sc, hdc.
Ch 2 and sl st into the first chain.
Work back along the second side with:
hdc, sc, sl st.
Join to the main fabric.
Add one secondary point between the center lobe and each upper lobe.
Add another smaller projection where space permits between an upper lobe and its corresponding lower lobe.
Do not make these points as tall as the five principal sections. Their function is to break up the perimeter rather than compete with the main lobes.
Filling the Leaf Sections
After establishing the structural outline, fill any open sections between the central foundation and outer lobes.
Begin beside the center vein with sc.
Increase stitch height as you move toward the widest part of a lobe:
sc → hdc → dc.
Approaching the outer point, reduce the height:
dc → hdc → sc → sl st.
Repeat the same principle for each section.
Keep the fabric dense but flat. If a section begins cupping, the stitch count is too low. If it develops waves, remove one or more stitches from the widest area.
Raised Center Vein
The raised vein is the defining feature of the photographed purple leaf.
Place the leaf right side up.
Attach purple yarn at the bottom center immediately above the stem position.
Keep the working yarn underneath the motif.
Insert the hook through the fabric from front to back, catch the working yarn and pull a loop to the surface.
Move approximately one stitch upward and repeat.
Continue working surface slip stitches along the center line until reaching the central lobe.
Follow the center lobe almost to its point.
Fasten off on the back.
Do not tighten these stitches aggressively. A surface chain that is shorter than the fabric underneath will make the leaf fold along its center.
Upper Left Raised Vein
Attach yarn at the central junction.
Surface slip stitch diagonally toward the upper-left lobe.
Follow the center of the lobe rather than its outer edge.
Stop approximately 5–8 mm before the point.
Fasten off on the reverse side.
Upper Right Raised Vein
Repeat the same surface-crochet technique from the central junction toward the upper-right point.
Compare both veins before continuing. They should leave the center at approximately matching angles.
Lower Left Raised Vein
Start again at the center.
Surface slip stitch toward the lower-left lobe.
Keep this branch shorter than the upper vein.
Fasten off before reaching the outer edge.
Lower Right Raised Vein
Repeat on the opposite side.
The finished motif should now contain five dominant raised lines: one central vein and four branches.
Adding Smaller Branching Veins
The reference image contains additional texture branching away from the main ridges.
Use short lengths of surface slip stitch to add two or three branches along each major lobe.
Begin each small vein beside a primary raised line and work diagonally toward the outer edge.
Stop before reaching the perimeter.
Keep secondary veins short. Filling every row with surface crochet creates excessive thickness and can make the motif difficult to block.
Outer Crochet Border
The border should follow the existing shape rather than create a new silhouette.
Attach purple yarn at the lower edge.
Work sc evenly around the perimeter.
Along a normal edge, work approximately one sc in each available stitch or row end.
At a major point, work:
sc, ch 2, sc
into the tip.
At a smaller secondary point, work:
sc, ch 1, sc.
At every deep valley, work a sl st.
The short slip stitch pulls the valley inward and separates the neighboring lobes.
Continue around the entire leaf and join with a sl st.
Optional Raised Edge
For a thicker perimeter similar to the reference, work one additional surface-style edging round.
Work one loose sl st in each stitch around.
At the major tips, preserve the ch-2 point.
At deep valleys, work directly into the existing valley slip stitch.
Stop and place the leaf flat after each lobe. If the perimeter begins to ripple, the slip stitches are being added too loosely or too frequently.
Crochet Maple Leaf Stem
The stem should continue directly from the raised center vein.
Attach purple yarn at the bottom center.
Ch 10.
Starting in the second chain from the hook, work 1 sc in each chain back toward the leaf.
At the base, join with a sl st.
For a thicker stem, turn and work another row of sc toward the end.
Place 3 sc into the final stitch to round the tip, then sl st back toward the leaf along the opposite edge.
Fasten off.
Assembly and Finishing
- Establish the center axis. Keep the foundation straight before building the lobes.
- Make the tallest point. The central lobe determines the final orientation of the leaf.
- Add the upper lobes. Compare their height and distance from the center.
- Make the lower lobes. Keep them shorter and angled toward the base.
- Add the secondary points. Use them to sharpen the perimeter without increasing the overall width excessively.
- Fill the leaf sections. Adjust stitch height to maintain a flat fabric.
- Add the raised center vein. Work from the base toward the highest point.
- Add the four main branches. Keep corresponding left and right veins approximately symmetrical.
- Finish the border and stem. Use short stitches in valleys and pointed chain spaces at the tips.
- Block the finished leaf. Pin every major point and valley separately before allowing the motif to dry.
The completed motif should show a tall central lobe, balanced side sections, deep valleys, raised purple veins and a stem positioned on the same axis as the center ridge.
7 Technical Tips for Better Maple Leaf Shaping
- Check the center point first. It should extend at least 1–2 cm above the upper side points on a medium leaf. If all three finish at the same height, the silhouette becomes too crown-like.
- Keep the valleys narrow. Multiple sc stitches inside a valley will fill the indentation. Use one sl st at the deepest point when stronger separation is needed.
- Watch the surface-vein tension. A tight center vein can shorten the motif and make both sides curl upward. Surface slip stitches should rest on the fabric without pulling it together.
- Compare matching lobes before edging. The left and right upper points should remain within approximately 5 mm of each other on a medium motif. Correct a noticeable difference before adding the perimeter.
- Do not add border stitches to fix size. Excess sc stitches produce a ruffled outline. Increase the motif itself or use thicker yarn when a larger finished leaf is required.
- Pin every valley during blocking. Pinning only the outer points stretches the motif without defining the maple silhouette. Pull each valley gently inward and secure it separately.
- Hide tails under raised areas. Weave each tail through matching stitches for at least 4–5 cm before reversing direction. The raised vein sections provide useful coverage without exposing yarn ends along the outer edge.
Blocking the Purple Maple Leaf
Blocking is responsible for much of the final definition.
Place the leaf on a blocking mat with the right side facing upward.
Align the stem vertically.
Pin the top center point first.
Next, pin the upper-left and upper-right points at matching distances from the center.
Secure both lower lobes.
Add pins to the secondary points.
Finally, move back around the motif and pin every valley inward.
Do not stretch the raised surface veins. They should remain relaxed while the underlying leaf is shaped.
Allow the motif to dry completely before removing the pins.
How to Make a Small Purple Maple Leaf
The photograph also includes a miniature version, so the same visual idea works well as a two-size set.
For a small appliqué, switch to DK yarn and a 3.5 mm hook. Published examples using that combination finish around 8.5 cm across, making the scale suitable for garlands, gift tags and sewn-on embellishments.
Another published worsted-weight maple-leaf appliqué uses only about 4 g of yarn and measures approximately 3 × 3 inches.
Do not simply remove random lobes to reduce the size. Preserve the five-part hierarchy and scale down the yarn, hook and foundation lengths instead.
How to Make a Larger Leaf
For a coaster or small table mat, use a heavier worsted cotton or move up one hook size after making a gauge sample.
Bulky yarn can enlarge the motif further, but the raised veins also become substantially thicker. Keep the surface slip stitches loose enough that they do not overpower the surrounding fabric.
Measure the first blocked leaf before producing a set. Record its width, total height including stem, yarn weight and hook size.
Choosing Yarn for Raised Veins
A smooth, tightly spun yarn shows the surface ridges more clearly than a heavily fuzzy fiber.
Cotton works particularly well for a decorative table leaf because the stitches remain defined after blocking. Worsted acrylic is suitable when the finished motif will be attached to a garland, wreath or fabric project.
The reference uses the same purple throughout. That monochrome approach makes stitch direction responsible for the contrast.
For a subtler variation, work the leaf body in medium purple and the raised veins in a slightly darker plum. Keep both yarns at the same weight so the surface lines do not become disproportionately bulky.
Color Variations
Purple creates an unconventional autumn version without changing the botanical structure. The same crochet maple leaf pattern can be worked in burgundy, rust, mustard, olive, forest green or burnt orange.
For a mixed fall garland, make several leaves with identical yarn weight and hook size. Alternating colors while keeping dimensions consistent produces a more regular finished strand.
A second option is a gradient set: begin with deep plum, move through purple and mauve, then finish with dusty pink. Block every motif against the same measurement template before joining them.
Ways to Use the Finished Maple Leaf
Use a single leaf as an appliqué on a tote bag, cushion cover or seasonal table runner. Sew around the perimeter while leaving the raised veins untouched.
For a garland, make multiple motifs and connect them through the stem ends with a long crochet chain.
A group of medium leaves can also be scattered across an autumn table. Cotton versions can function as decorative coasters when their size and yarn are appropriate for that purpose.
The miniature version works well for gift wrapping, place cards or wreath embellishments.
Conclusion
The five main points establish the maple silhouette, but the monochrome raised veins give this version its strongest visual detail. Build the tall center lobe first, compare matching side sections before edging and keep surface slip stitches loose enough for the fabric to remain flat. Start with worsted yarn and a 4 mm hook for a medium motif, then make one blocked sample before changing scale. Save the finished purple crochet maple leaf pattern to Pinterest and share your version on Instagram with #PurpleCrochetMapleLeaf. For this particular leaf, would you keep the veins purple or make them a darker plum?









