Introduction
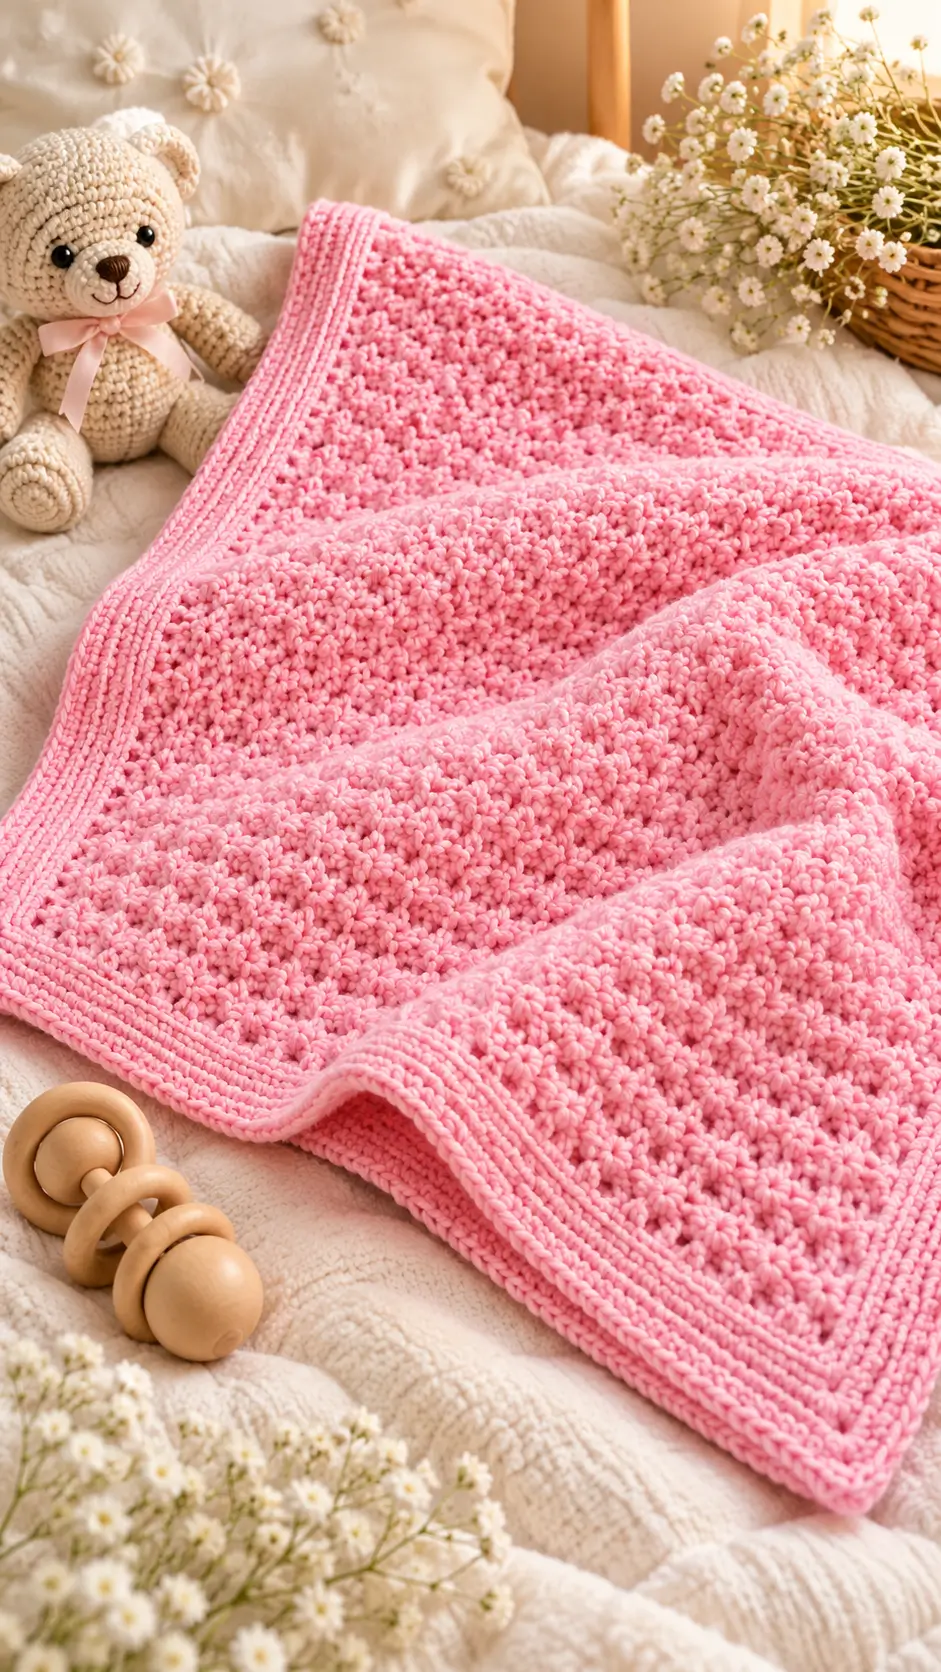
Raised pink clusters cover this blanket from edge to edge, while a compact border controls the fabric’s shape. This pink crochet baby blanket pattern recreates that visual structure using medium-weight yarn, a 5 mm crochet hook, and alternating textured rows. The proposed finished size is approximately 76 × 84 cm, subject to gauge. Designed for intermediate crocheters, the blanket works as a nursery textile or a handmade baby-shower gift.
The Design: What Makes This Pink Blanket Different
The photographed blanket combines three construction elements: a continuous textured center, closely spaced raised stitches, and a substantial outer border. Each element affects the finished fabric.
First, the textured surface creates a repeated floral-like appearance without requiring individually crocheted flowers. The pattern below uses puff stitches to approximate that effect. These are not confirmed to be the exact stitches in the reference image.
Second, the rectangular body uses a consistent stitch count. You can adjust the length without modifying the width, and the maker can inspect the edges after every row.
Third, the border uses ordinary single crochet followed by back-loop-only rounds. This produces a defined frame around the raised stitch baby blanket.
A common mistake in a crochet flower stitch blanket is pulling the puff stitches too tightly. The result is compressed texture, uneven row height, and a narrower finished fabric.
Project Info at a Glance
| Project Detail | Specification |
|---|---|
| Skill Level | Intermediate |
| Estimated Time | 15–25 hours |
| Target Finished Size | 76 × 84 cm |
| Crochet Hook | 5 mm |
| Yarn Weight | Aran / Worsted |
| Construction | Flat rows with a four-round border |
| Main Stitch | Puff stitch and single crochet |
Measurements, time, and yarn requirements are estimates for this original photo-inspired pattern. They have not been verified through a completed sample.
Materials and Tools
Yarn
- Main yarn: Bubblegum pink, aran/worsted weight, approximately 650–850 g.
- Border yarn: Same pink yarn, included in the estimated total.
- Suggested yarn: Caron Simply Soft or a comparable machine-washable medium-weight yarn.
The actual amount of yarn depends on stitch tension, puff height, yarn yardage, and finished dimensions. Purchase enough yarn from the same dye lot to maintain consistent color throughout the blanket.
Tools
- 5 mm crochet hook
- Blunt tapestry needle
- Stitch markers
- Sharp scissors
- Measuring tape
- Blocking mat and rust-resistant pins (optional)
Choose a washable yarn suitable for frequent laundering. Avoid attaching beads, buttons, loose bows, or other detachable decorations to a blanket intended for infant use.
Crochet Abbreviations
| Abbreviation | Meaning |
|---|---|
| ch | Chain |
| sc | Single crochet |
| hdc | Half double crochet |
| dc | Double crochet |
| sl st | Slip stitch |
| st(s) | Stitch(es) |
| BLO | Back loop only |
| RS | Right side |
| WS | Wrong side |
| puff | Puff stitch |
| rep | Repeat |
All instructions use US crochet terminology.
Special Stitch: Puff Stitch
- Yarn over, insert the hook into the indicated stitch, and pull up a long loop.
- Repeat the yarn-over, insert, and pull-up movement three more times in the same stitch.
- Yarn over and pull through all loops on the hook.
- Chain one to secure the puff stitch.
The closing chain belongs to the puff stitch and does not count as an additional stitch in the row total.
Maintain approximately the same loop height for every puff. Taller loops create more pronounced texture but increase yarn consumption.
Pink Crochet Baby Blanket Pattern – Step by Step
This is an original photo-inspired approximation, not a transcription of the photographed blanket’s original pattern. Work the blanket in flat turning rows, then add the border in joined rounds.
Part 1: Foundation Chain
Yarn: Bubblegum pink
Hook: 5 mm
Foundation: Ch 102.
Row 1: Sc in the second chain from the hook and in each remaining chain. (101 sts)
Turn your work.
Count the completed row before proceeding. There must be exactly 101 single crochet stitches, excluding the turning chain.
The odd stitch count allows a single crochet at each end of the textured rows, providing a stable edge.
Part 2: Raised Textured Blanket Body
The center uses a two-row repeat. One row forms the raised surface, while the next stabilizes the fabric.
Row 2 (RS): Ch 1, sc in first st, [puff in next st, sc in next st] × 50. (101 sts)
Row 3 (WS): Ch 1, sc in every st across. (101 sts)
Row 4: Repeat Row 2. (101 sts)
Row 5: Repeat Row 3. (101 sts)
Continue alternating these two rows.
For a starting sample, work through Row 111, ending on a plain single crochet row. This gives 55 puff rows separated by 55 plain rows, plus the foundation row.
Every row must contain 101 stitches. Each puff counts as one stitch.
Important: The puff stitches should sit above the previous textured rows, forming an organized raised surface. Check alignment after every few repeats.
Part 3: Checking the Blanket Length
The row count is a starting point rather than a guarantee of finished length.
After completing 15–20 rows, lay the fabric flat without stretching it. Measure the height of ten complete rows, then estimate how many additional rows are needed.
For example, if ten rows measure 7 cm and the desired body length is 78 cm, approximately 112 rows would be required. Adjust to a complete two-row repeat, ending on a plain single crochet row.
Measure the width at the center as well as near the foundation edge. If the center has narrowed noticeably, the puff stitches may be tighter than the single crochet rows.
The intended border adds additional width and length, so stop the body before reaching the final target measurements.
Part 4: Preparing the Border
The photographed blanket has a substantial edge with closely spaced horizontal ridges.
The proposed border uses four rounds to create a similar framed appearance.
Before beginning, inspect all four sides. Correct any accidentally skipped stitches or irregular edge loops.
Keep the working yarn attached after the last body row.
Part 5: Border Round 1 – Foundation Edging
Round 1: Ch 1, work sc evenly along the top edge.
At the first corner, work 3 sc into the corner stitch.
Continue down the first side, distributing stitches evenly along the row ends.
Work 3 sc into the next corner.
Sc across the foundation edge, then work 3 sc into the third corner.
Continue up the final side and place 3 sc into the fourth corner.
Join with a sl st to the first sc.
The side-edge count depends on the finished row height. A fixed count cannot be specified accurately without a measured sample.
Mark the center stitch of each three-stitch corner group.
Part 6: Border Round 2 – Structured Edge
Round 2: Ch 1, sc in BLO of each stitch around.
At every marked corner, work 3 sc in BLO of the marked center corner stitch.
Move each corner marker into the new center stitch.
Join with a sl st.
This round creates the first visible ridge in the edging.
Part 7: Border Round 3 – Second Ridge
Round 3: Ch 1, sc in BLO around, working 3 sc in the marked center stitch of each corner.
Join with a sl st.
Inspect the corners before continuing.
If the edge curls inward, the tension may be too tight. If it ripples excessively, there may be too many stitches along the sides.
Part 8: Border Round 4 – Final Edge
Round 4: Repeat Round 3.
Join with a sl st and fasten off, leaving approximately 15 cm of yarn for weaving.
The completed border should lie flat, with four clearly defined corner turns.
The resulting appearance is similar in structure to the ribbed border visible in the reference image, although the exact ridge profile may differ.
Assembly and Finishing
A flat blanket does not require sewn-together body parts. The following sequence covers finishing and inspection.
- Place the completed blanket on a clean, flat surface with the raised stitches facing upward.
- Check the center for any missed puff stitches or unexpected gaps.
- Count the stitches along the top and bottom edges to confirm that no accidental increases occurred.
- Inspect the four corners for symmetrical shaping.
- Thread the beginning yarn tail through a blunt tapestry needle.
- Weave the tail through several neighboring stitches on the wrong side, changing direction at least once.
- Repeat with the final border tail and any joined-yarn ends.
- Wash or damp-block according to the yarn manufacturer’s care instructions.
- Lay flat, shape the corners, and measure the width and length after drying.
- Examine the blanket for loose yarn ends, open seams, or detachable embellishments before use.
The finished project is a rectangular textured crochet blanket with a four-round single crochet border.
7 Technical Tips for a Better Textured Blanket
- Use stitch markers to prevent edge drift. Place markers in the first and last stitch of each row; losing one stitch per row can produce a visibly tapered blanket.
- Keep puff height consistent. Pull each puff loop to approximately 10–12 mm as a starting reference, then adjust for the yarn; uneven loops produce irregular raised clusters.
- Check tension every ten rows. A width variation greater than approximately 2 cm across the fabric suggests inconsistent stitch tension or missed stitches.
- Control the closing chain. A loose closing chain can leave visible holes around the puff stitches, while a very tight one compresses the cluster.
- Measure before adding the border. A four-round edge changes both dimensions, so working the center to the full intended finished size may produce an oversized blanket.
- Pin the corners during blocking. Align all four corners with a rectangular measuring guide; pulling one corner farther than the others can distort the border.
- Weave yarn tails through multiple directions. A tail passed through only one short line of stitches may loosen during washing, so change direction and inspect it after the first laundering.
Frequently Asked Questions
Can beginners make this blanket?
A crocheter familiar with single crochet, turning chains, and consistent stitch counts can learn the puff stitch used here. The main challenge is maintaining uniform tension across a large number of textured rows.
How much yarn does the blanket require?
The estimated amount for this untested design is 650–850 g of medium-weight yarn. Actual consumption depends on the yarn’s meters per gram, puff height, tension, finished dimensions, and border.
Purchase sufficient yarn from the same dye lot when possible. A measured swatch provides a more reliable estimate than the photograph.
Can the blanket be made larger?
Yes. Add foundation chains in multiples of two, keeping an odd number of working stitches after Row 1.
For example, increasing the foundation chain from 102 to 122 produces 121 working stitches. The textured row would then contain 60 puff stitches separated by single crochet stitches.
Increase the number of rows to obtain the desired length.
Is the raised texture suitable for a baby blanket?
Choose a washable yarn, maintain a secure fabric, and avoid loose decorative attachments. The texture should not contain long unsecured loops that can catch on fingers.
For infant safety, follow current safe-sleep guidance: blankets and other loose bedding should not be placed in a baby’s sleep space. The finished item is more appropriate for supervised use or decorative display.
How can I make the texture more floral?
The puff stitch creates raised dots or clustered shapes rather than distinct multi-petal flowers.
For a more defined flower effect, use a tested flower-puff stitch pattern with separate petal construction. Flower motifs can also be crocheted individually and joined into a larger rectangular fabric.
Why is the blanket curling at the edges?
Curling can result from a tight foundation chain, uneven side-edge stitch placement, or overly tight border rounds.
Compare the foundation edge against the center width. If the foundation is noticeably shorter, remake it with a larger hook or use a more flexible foundation technique.
Conclusion
This pink crochet baby blanket pattern uses alternating puff and single crochet rows to build a consistent raised surface. The four-round border provides a defined rectangular frame, while the odd stitch count keeps the textured repeat balanced. Before making a full-size blanket, crochet a gauge swatch, measure its width and height, and calculate the yarn needed for the intended dimensions. Record the finished measurements and actual yarn consumption for future projects. Share a photograph of the completed blanket on Pinterest or Instagram using #PinkFloralBabyBlanket. When comparing your version with the reference photo, which feature would you adjust first: the density of the raised clusters or the width of the ribbed border?









