Introduction
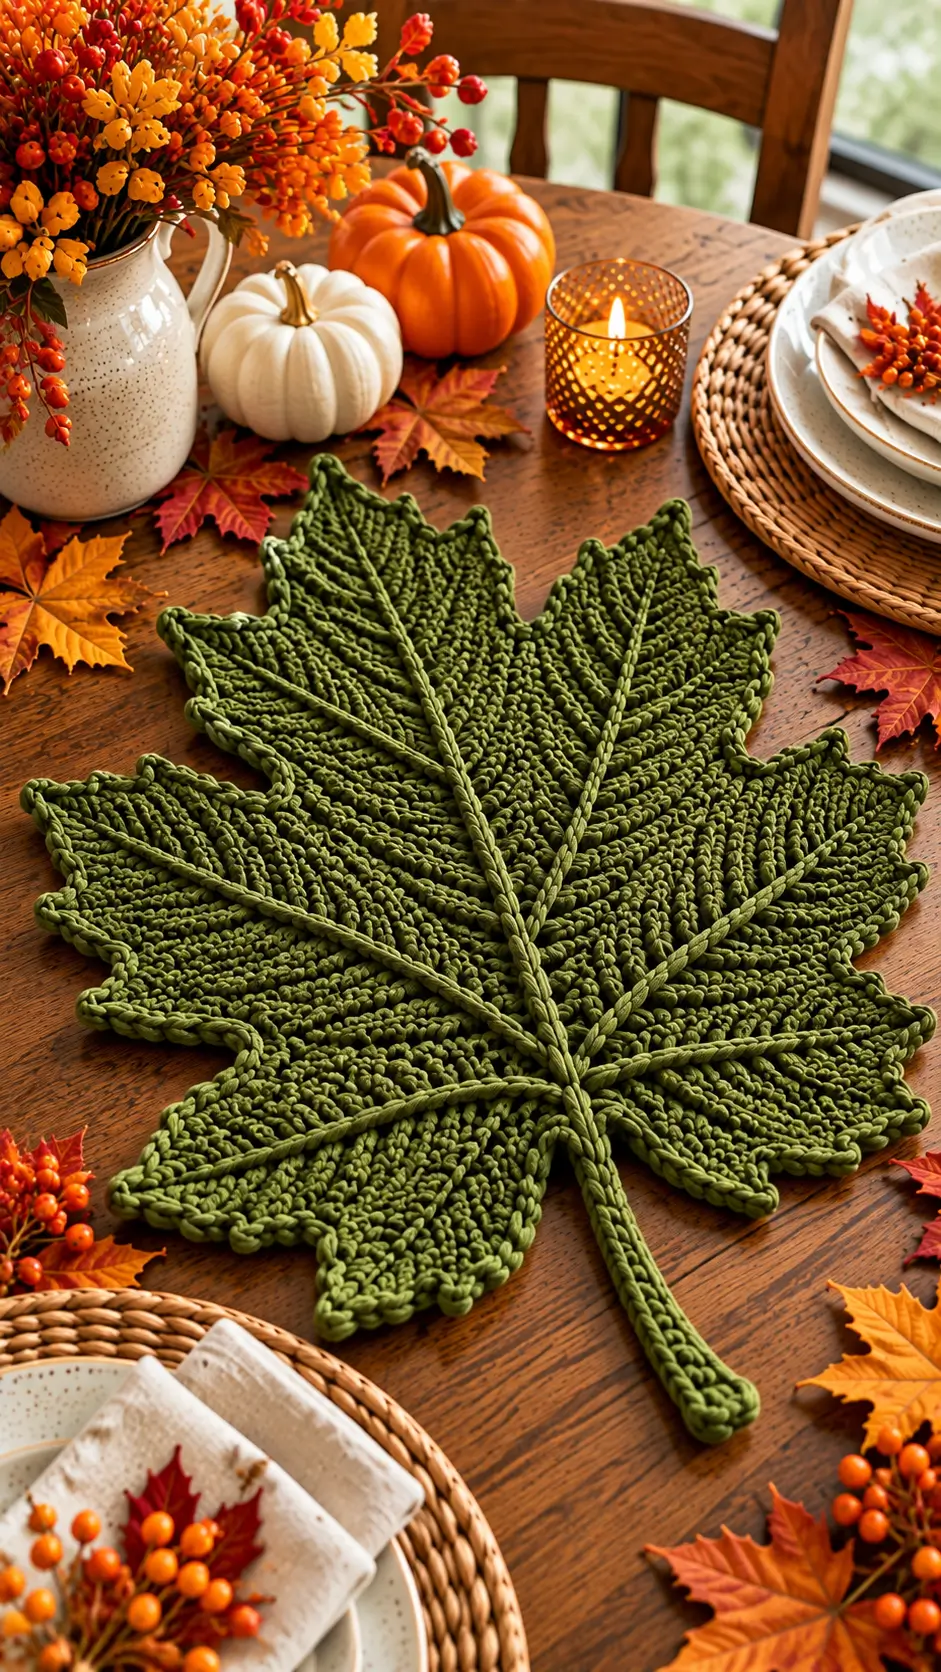
A maple leaf this large needs a dominant center lobe or the finished outline starts looking like a five-point star. This crochet maple leaf placemat pattern builds a broad green leaf with five primary lobes, smaller serrated points, raised veins and a long structured stem. Work it in medium-weight cotton with a 5 mm hook for an intermediate table-decoration project measuring approximately 37 × 38 cm.
The Design: What Makes This Maple Leaf Different
The photographed leaf is built around a pronounced vein system. One thick central ridge begins in the stem and continues almost to the highest point, while four major branches travel diagonally into the side lobes. Those raised lines divide a large field of green crochet and reinforce the botanical structure.
Lobe proportion is equally important. The center lobe is longest, the upper side lobes establish width, and the two lower lobes angle outward before narrowing toward the stem. Smaller points break up each outer edge.
A frequent problem with a large crochet maple leaf is excessive edge expansion. Too many stitches around the points produce waves that blocking cannot fully correct. Build the main shape first, check it on a flat surface, then add the final edging.
Project Info at a Glance
| Skill Level | Time | Finished Size | Hook | Best For |
|---|---|---|---|---|
| Intermediate | 4–6 hours | Approx. 37 × 38 cm | 5.0 mm | Placemat, centerpiece, fall table decor |
The 37 × 38 cm measurement is based on a published maple-leaf placemat measuring 14.5 × 15 inches with a 5 mm hook. Final dimensions depend on yarn, gauge and blocking.
Materials and Tools
Yarn
- Olive green — #4 medium/worsted cotton or cotton-blend yarn — approximately 140–170 yards.
- Optional darker green — small quantity if you want the raised veins to have additional contrast.
A published placemat-scale maple leaf uses Aran-weight cotton with approximately 152 yards and a 5 mm hook. Cotton is particularly suitable when the project will be used as table decor because it produces defined stitches and can be blocked firmly.
Tools
- 5.0 mm crochet hook
- Stitch markers
- Tapestry needle
- Scissors
- Tape measure
- Blocking mat
- Rust-resistant pins
Abbreviations
- ch — chain
- sl st — slip stitch
- sc — single crochet
- hdc — half double crochet
- dc — double crochet
- tr — treble crochet
- st/sts — stitch/stitches
- sp — space
- RS — right side
- FO — fasten off
Large Crochet Maple Leaf Pattern
Pattern note: This is a photo-inspired construction rather than a transcription of an existing published pattern. The objective is to reproduce the visible characteristics of the reference: an oversized green maple silhouette, pronounced center vein, branching raised veins, serrated perimeter and long stem.
Central Foundation
Use olive-green yarn.
Ch 25 loosely.
Row 1: Beginning in the second ch from the hook, work 1 sc in each of the first 4 chains, 1 hdc in each of the next 4 chains, 1 dc in each of the next 8 chains, 1 hdc in each of the next 4 chains and 1 sc in each remaining chain.
Do not fasten off.
This strip establishes the central axis. It should remain straight because the largest lobe and stem will align with it.
Large Center Lobe
The center lobe is the tallest section of the leaf.
Ch 16 from the upper section of the central foundation.
Starting in the second chain from the hook, work:
2 sl st, 2 sc, 3 hdc, 5 dc, 2 tr, 1 dc.
At the tip, ch 3 and sl st into the first chain to make a pointed picot.
Work down the opposite side using the stitch heights in reverse order.
The center point should project clearly above every other lobe.
Upper Left Lobe
Move down from the center point to the first major branching position.
Ch 13.
Starting in the second chain, work:
1 sl st, 2 sc, 2 hdc, 4 dc, 2 tr, 1 dc.
Ch 3 and sl st into the first chain to form the outer point.
Reverse the stitch sequence down the second side.
Join securely to the central section.
Upper Right Lobe
Repeat the upper-left-lobe construction on the opposite side.
Before continuing, place the leaf on a flat surface. Measure from the center vein to each outer point. The difference between the two sides should remain within approximately 5–10 mm.
Lower Left Lobe
The lower lobes should be broader but shorter than the upper pair.
Ch 11.
Starting in the second chain from the hook, work:
1 sl st, 2 sc, 2 hdc, 3 dc, 1 tr, 1 dc.
At the tip work a ch-3 picot.
Reverse the sequence along the second side and reconnect it to the central structure.
Lower Right Lobe
Repeat the same construction on the opposite side.
Do not try to make all five lobes identical. Maple-leaf recognition depends on a clear hierarchy: one tall center lobe, two substantial upper side lobes and two shorter lower lobes.
Adding the Smaller Serrated Points
The photographed leaf contains secondary points between the five major lobes. These prevent the perimeter from looking like a simple star.
At the outside edge of a major lobe, attach yarn at the location where a secondary point is required.
Ch 5.
Starting in the second chain from the hook, work:
sl st, sc, hdc, dc.
At the tip work ch 2, sl st into the first chain.
Work back down the second side using:
dc, hdc, sc, sl st.
Join the small point back to the main fabric.
Add one or two secondary points to each major lobe according to available space. Keep the secondary points substantially shorter than the five structural lobes.
Building the Textured Leaf Surface
The reference image contains dense directional texture. The stitches appear to travel outward from the center rather than forming ordinary horizontal bands.
Work rows or short-row sections from each main vein toward the outer perimeter. Use sc and hdc near the vein, graduating to dc where extra width is required.
When approaching a point, reduce the stitch height:
dc → hdc → sc → sl st.
When moving away from a valley toward another point, reverse the sequence:
sl st → sc → hdc → dc.
This variation controls the outer contour without requiring a heavy final border.
Raised Central Vein
The raised center vein is one of the most prominent details in the photograph.
Place the leaf right side up.
Attach green yarn at the bottom center where the stem will begin.
Surface slip stitch vertically along the center of the leaf toward the top lobe.
Keep the working yarn underneath the fabric and the hook above it. Insert the hook through the fabric, catch the yarn from below and pull a loop to the surface.
Continue the surface slip stitches toward the highest point.
Do not pull them tightly. Excessive tension shortens the center axis and causes the entire leaf to cup.
Raised Side Veins
Four major side veins should branch away from the center.
Attach yarn at the central junction.
Surface slip stitch diagonally toward the tip of the upper-left lobe.
Fasten off near the point.
Repeat from the center toward the upper-right lobe.
Add two more branches leading into the lower-left and lower-right lobes.
The branching lines should meet the central vein at approximately the same area rather than beginning at unrelated positions.
Secondary Veins
For additional texture, add shorter branches from each primary side vein.
Keep these lines narrower and shorter than the five main structural veins.
Two or three secondary branches on a large lobe are generally sufficient. Crowding the surface with raised stitches can make the placemat too thick.
Crochet Maple Leaf Stem
The stem in the reference is long, narrow and aligned directly with the center vein.
Join yarn at the bottom center.
Ch 22.
Starting in the second chain from the hook, work 1 sc in each chain back toward the leaf.
Turn.
Work another row of sc along the stem if a thicker structure is required.
At the rounded end, place 3 sc into the final stitch before working back along the opposite edge.
Join the stem securely to the base of the leaf.
The stem and center vein should appear to form one continuous line.
Outer Leaf Edging
Work the edging only after the complete leaf lies reasonably flat.
Attach olive-green yarn at the base near the stem.
Work sc evenly around the perimeter.
On ordinary edges, work approximately one sc per available edge stitch.
At each major point work:
sc, ch 2, sc
into the tip.
At each smaller point use:
sc, ch 1, sc.
At every deep valley between lobes, use a sl st rather than adding extra sc stitches. The shorter stitch pulls the indentation inward.
Continue around the complete perimeter and join with a sl st.
Fasten off.
Optional Raised Rope Edge
The photographed piece has a substantial raised-looking perimeter. A second round can reproduce that effect.
Join yarn near the stem.
Work surface slip stitches or reverse single crochet around the ordinary perimeter.
Maintain the established points and valleys. At a major tip, ch 2 before continuing. At a deep valley, use one tight sl st.
Check the fabric after every lobe.
If the border begins to ripple, remove stitches rather than trying to flatten the excess during blocking.
Assembly and Finishing
- Complete the center foundation. Check that it lies straight before adding the lobes.
- Make the tall center lobe. This establishes the maximum length and the vertical axis.
- Add the upper side lobes. Compare their distance from the central vein before proceeding.
- Work the lower lobes. Keep these shorter so the silhouette narrows toward the stem.
- Add secondary points. Space them between the major lobes without making them equal in size to the primary points.
- Complete the main fabric. Lay the piece flat and correct any strongly distorted section before surface crochet is added.
- Add the raised veins. Work the center vein first and the four primary branches second.
- Crochet the stem. Align it precisely with the center vein.
- Finish the perimeter. Sharpen points with chain spaces and compress valleys with slip stitches.
- Block the placemat. Pin every major point, secondary point and valley separately, then allow the piece to dry completely.
The finished leaf should have one dominant center lobe, four subordinate primary lobes, a serrated outer edge, five raised structural veins and a stem aligned with the central ridge.
7 Technical Tips for a Flat Maple Leaf Placemat
- Correct a curling center immediately. Tight surface slip stitches can shorten the central vein by more than 1 cm across a large motif. Remove and rework them more loosely if the center begins lifting from the table.
- Measure paired lobes. Compare each left-hand point with its corresponding right-hand point before adding the border. A difference greater than approximately 1 cm will remain visible after blocking.
- Control deep valleys with short stitches. Using dc or multiple sc stitches inside an indentation fills the valley and rounds the silhouette. Use a sl st at the deepest point instead.
- Do not over-expand the perimeter. A ruffled edge indicates too many border stitches rather than insufficient blocking. Remove excess stitches from the curved sections while preserving the point stitches.
- Pin every structural point. A large maple leaf can require 12 or more blocking pins around the perimeter. Pinning only the five major tips leaves the smaller serrations rounded.
- Keep the stem centered. The middle of the stem should remain within approximately 5 mm of the central vein axis. An off-center stem makes an otherwise symmetrical leaf appear twisted.
- Weave tails along matching ridges. Hide each yarn tail for at least 5 cm before reversing direction. Avoid carrying tails across open or loosely worked areas where they can remain visible from the front.
Blocking the Finished Maple Leaf
Blocking controls the final shape of this green crochet maple leaf placemat. Place the finished piece right side up on a blocking mat and align the stem vertically.
Pin the highest center point first. Next pin the upper-left and upper-right lobes at equal distances from the center.
Pin both lower lobes. Then work around the perimeter, pinning every secondary point outward and every valley inward.
Measure the widest section from the left outer point to the corresponding right point. For this version, approximately 37–38 cm is a practical placemat-scale target.
Do not stretch one lobe merely to reach the target measurement. Symmetry and flatness are more important than an exact final number.
How to Make a Larger Version
For an oversized centerpiece similar to the visual scale in the photograph, thicker yarn is the easiest adjustment.
Super-bulky T-shirt yarn can produce a substantially larger leaf. A published maple-leaf placemat using this approach measures approximately 16 × 19 inches and uses a 10 mm hook.
Do not simply add random stitches to the outer border. That enlarges the circumference without increasing the internal structure and usually causes severe rippling.
Instead, enlarge the entire construction proportionally: extend the center foundation, lengthen all five major lobes and increase the side sections before adding the final edge.
How to Make a Smaller Maple Leaf
For a smaller table mat, switch to worsted cotton with a 3.5 mm hook. A published 2025 maple-leaf design made with worsted yarn and a 3.5 mm hook measures approximately 25.5 cm tall by 23 cm wide.
A smaller hook also makes the fabric denser. Make one sample before committing to a full table set because personal tension can change the dimensions considerably.
Best Yarn for a Maple Leaf Placemat
Medium-weight cotton is a practical starting material. It provides enough stitch definition for the raised veins while retaining the structure required by the pointed perimeter.
For a softer decorative centerpiece that will not be exposed to hot cookware, a cotton blend can also be used.
If the finished leaf will contact hot dishes, choose a fiber specifically appropriate for that intended use and follow the yarn manufacturer’s care and heat guidance. Decorative acrylic pieces should not automatically be treated as trivets.
Color Options
The dark olive green shown in the photograph gives the maple structure a botanical rather than autumn-red appearance. Because the entire piece is nearly monochromatic, the raised veins provide the contrast through texture instead of color.
For a fall table set, make individual leaves in olive green, burnt orange, mustard, rust and burgundy. Keep the yarn weight and hook size identical so all finished placemats reach comparable dimensions.
A second option is to crochet the main fabric in olive and work the raised veins in a slightly darker forest green. The difference should remain subtle enough that the leaf still reads as a single-color piece.
Using the Finished Leaf on a Fall Table
The finished crochet maple leaf placemat can sit beneath an individual place setting or function as a decorative centerpiece. For a coordinated dining-table set, make every leaf from the same yarn lot and block them against the same measurement template.
The long stem can face the diner for a conventional placemat arrangement. For a centerpiece, rotate several leaves in different directions and overlap only the outer points so the raised vein work remains visible.
Record the hook size, yarn, finished width and finished height after making the first leaf. Those four measurements are the working standard for every remaining piece in the set.
Conclusion
The center vein controls this design from the tip of the tallest lobe through the base of the stem, so establish that axis before concentrating on decorative texture. Compare paired lobes on a flat surface, correct the valleys before edging and block every point independently. A 5 mm hook with medium-weight yarn provides a documented starting point for a placemat around 37 × 38 cm, while thicker yarn can produce a substantially larger centerpiece. Save the finished crochet maple leaf placemat pattern to Pinterest and share the completed table setting on Instagram with #GreenMapleLeafPlacemat. For this specific design, would you keep all five veins olive green or work them in a darker forest-green contrast?









