Introduction
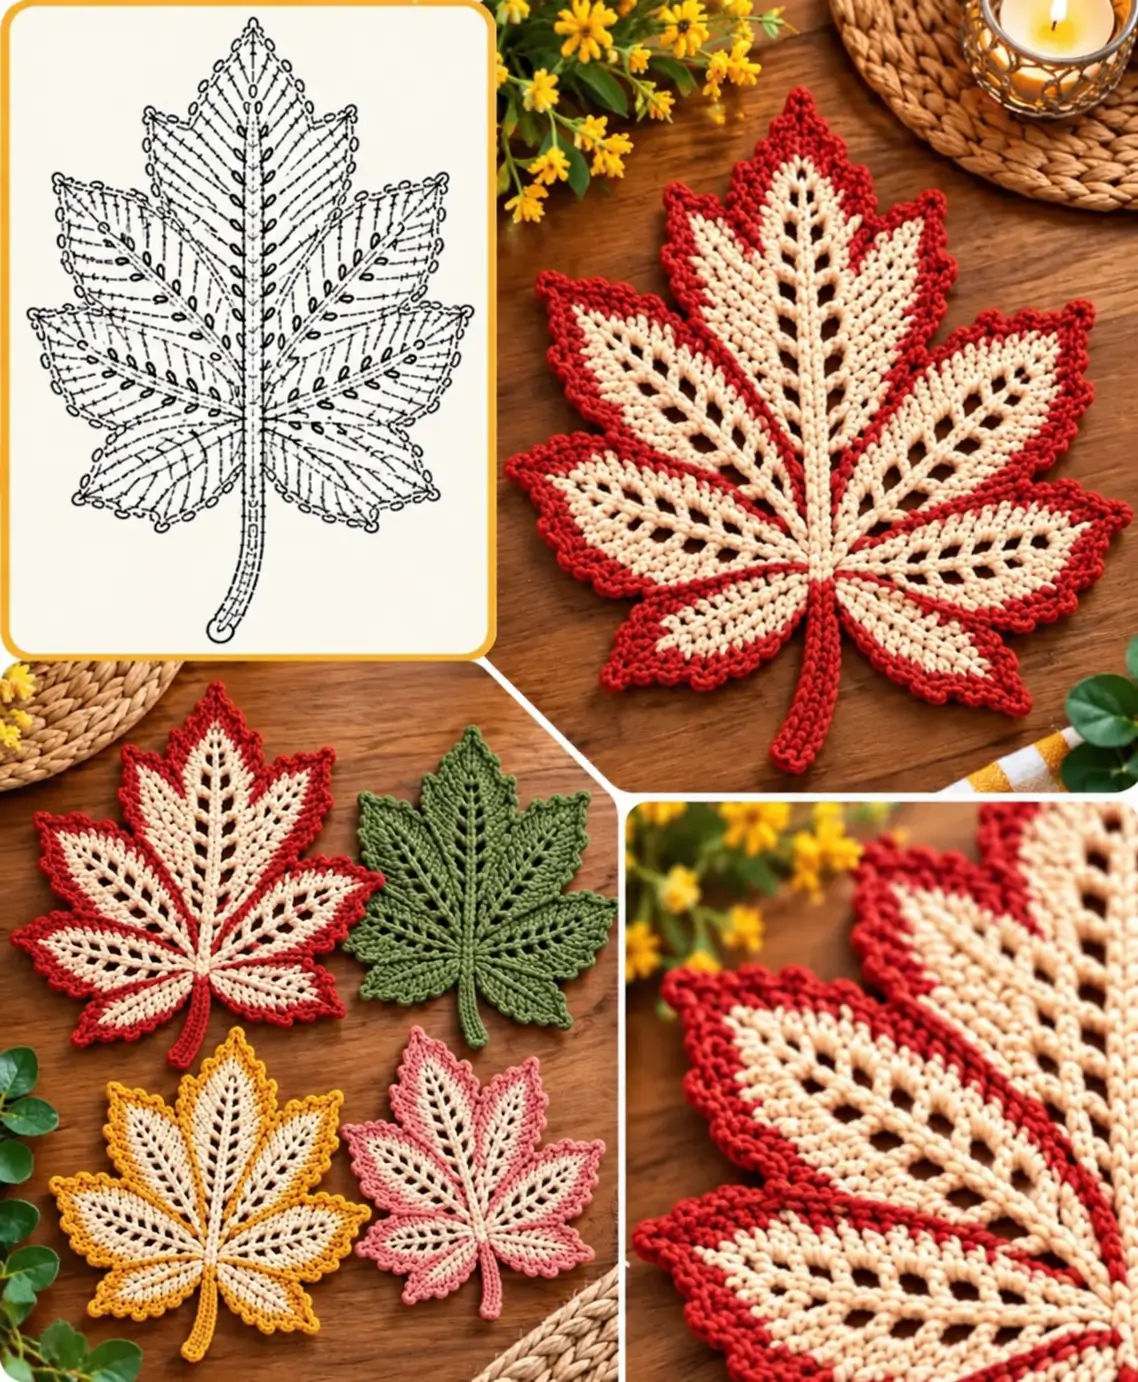
A maple leaf needs deep valleys between its pointed lobes or the silhouette quickly turns into an ordinary round leaf. This crochet maple leaf pattern uses a structured center, five major pointed sections, open vein spaces, a contrasting border and a narrow stem. Worked in cotton yarn, the finished leaf can be used as a coaster, table decoration, garland motif or autumn appliqué.
The Design: What Makes This Crochet Maple Leaf Different
The structure of this maple leaf depends on three details. First, the center vein must remain straight because the side lobes are visually balanced against it. Second, changes in stitch height create the pointed outline: shorter stitches pull the valleys inward while taller stitches extend the tips. Finally, the contrasting border traces every lobe and makes the maple silhouette easier to read.
The photographed version adds another useful detail: open spaces run beside the central veins. These gaps reduce bulk and give each section a defined direction.
A common failure is adding too many stitches around the outer points. The edge then ripples instead of lying flat. Check the leaf on a flat surface after every major section rather than waiting until the border is complete.
Project Info at a Glance
| Skill Level | Time | Finished Size | Hook | Best For |
|---|---|---|---|---|
| Intermediate | 45–90 minutes | Approx. 12–15 cm | 3.0–4.0 mm | Coasters, fall decor, appliqués, garlands |
The exact finished measurement depends on yarn weight, hook size and blocking. For a functional coaster, cotton yarn is preferable because it produces a firm, relatively flat fabric.
Materials and Tools
Yarn
- Cream cotton yarn — DK or light worsted — approximately 10–15 g for the inner leaf.
- Red cotton yarn — DK or light worsted — approximately 5–10 g for the veins, outline and stem.
The same construction can be worked in green, mustard, burnt orange, burgundy or pink. Keep the inner and outer colors different when you want the vein structure to remain prominent.
Tools
- 3.5 mm crochet hook
- Yarn needle
- Scissors
- Stitch markers
- Blocking pins
- Tape measure
Abbreviations
- ch — chain
- sl st — slip stitch
- sc — single crochet
- hdc — half double crochet
- dc — double crochet
- tr — treble crochet
- sp — space
- st/sts — stitch/stitches
- FO — fasten off
Crochet Maple Leaf Pattern
Pattern note: This is a photo-inspired construction designed to reproduce the main visual characteristics of the leaf shown: pointed lobes, open vein lines, a light interior, contrasting outline and narrow stem.
Foundation and Central Vein
Use cream yarn.
Step 1: Ch 18.
This foundation chain forms the central structural line of the maple leaf.
Row 1: Beginning in the second ch from the hook, work 1 sl st, 2 sc, 3 hdc, 6 dc, 3 hdc, 2 sc.
Do not fasten off.
The changes in stitch height create the first tapered section. Keep the foundation chain loose enough that the central vein remains straight.
Top Central Lobe
The longest point should sit directly above the stem. This is the visual axis of the entire leaf.
Row 2: Ch 3. Work dc stitches along the upper portion of the foundation, increasing gradually toward the center.
At the tip, ch 3 and sl st into the first chain to form a small picot.
Work back down the opposite side using the reverse stitch sequence.
The two sides of the central lobe must contain the same number of stitches.
First Side Lobe
Move down the central structure approximately one-third of the distance from the top point.
Ch 9.
Beginning in the second ch from the hook, work:
1 sl st, 1 sc, 2 hdc, 3 dc, 1 tr.
At the outer tip, ch 3 and sl st into the first chain.
Work down the opposite side with:
1 tr, 3 dc, 2 hdc, 1 sc, 1 sl st.
Join the lobe back to the center structure.
Second Side Lobe
Work the matching lobe on the opposite side of the central vein.
Ch 9.
Repeat the same stitch progression:
1 sl st, 1 sc, 2 hdc, 3 dc, 1 tr.
Create the pointed tip with a ch-3 picot, then reverse the stitch heights down the second side.
Compare both lobes before continuing. Their outer points should finish at approximately the same height.
Lower Left Lobe
Move farther down the center.
Ch 7.
Beginning in the second chain, work:
1 sl st, 1 sc, 1 hdc, 2 dc, 1 tr.
Ch 3 and sl st into the first chain to form the point.
Reverse the sequence down the second edge.
Join to the central section.
Lower Right Lobe
Repeat the lower-lobe construction on the opposite side.
Keep this section slightly shorter than the upper side lobes. The stepped reduction in length is what gives the finished motif a recognizable maple-leaf outline.
Bottom Side Points
Work one small point on each side near the base.
For each point, ch 5.
Starting in the second chain, work:
sl st, sc, hdc, dc.
Ch 2 at the tip and sl st into the first chain.
Work back toward the base with:
dc, hdc, sc, sl st.
Repeat on the opposite side.
Creating the Open Leaf Veins
The photographed leaf has visible open spaces running beside the structural veins. These gaps can be created by replacing selected solid stitches with chain spaces.
Along each major lobe, work toward the tip while leaving a ch-1 space between selected stitch groups.
A useful repeat is:
2 dc, ch 1, skip 1, 2 dc.
Continue the spacing toward the point, reducing the number of solid stitches as the lobe narrows.
Do not place every opening directly beside another opening. A narrow column of solid crochet must remain along the center of each lobe to represent the vein.
The longest central lobe can contain three to five openings on each side. Medium lobes normally need two to four. The smallest bottom lobes may need only one or two.
Contrasting Red Veins
Change to red yarn.
Attach red yarn at the bottom center of the leaf.
Slip stitch along the central cream structure toward the top point.
Keep these stitches on the surface rather than pulling them tightly into the fabric.
At the junction of a side lobe, branch away from the center and slip stitch toward that lobe’s tip.
Fasten off at the outer point.
Rejoin red at the center and repeat for the remaining lobes.
The result should resemble veins radiating outward from one central junction.
Red Outer Border
Continue with red yarn.
Attach the yarn near the bottom of the leaf.
Work 1 sc evenly along the outer edge.
At an ordinary curved section, continue with one sc per available edge stitch or row end.
At each deep valley between two lobes, work a sl st. This pulls the valley inward.
At each major outer point, work:
sc, ch 2, sc
into the tip.
The chain creates a sharper point without adding excessive width.
Continue around the entire maple leaf.
Place extra stitches only when required to prevent the edge from pulling inward. Adding unnecessary stitches produces rippling.
Optional Textured Border
For the slightly raised outline visible in the reference image, add a second border round.
Border R2: Work sl st in the next stitch, sc in the following stitch, then repeat around the ordinary edges.
At each point work:
sc, ch 2, sc.
At each valley use a sl st.
This combination makes the points project outward while pulling the spaces between them inward.
Crochet Maple Leaf Stem
Use red yarn.
Join at the bottom center.
Ch 13.
Beginning in the second chain from the hook, work 1 sc in each chain back toward the leaf.
For a slightly curved stem, work one sl st instead of sc in the final two chains.
Join the stem securely to the base with a sl st.
Fasten off.
For a thicker stem, work a second row of sc along the opposite side of the foundation chain.
Blocking the Maple Leaf
Blocking is particularly important for this motif because the outline contains multiple points and deep valleys.
Place the finished leaf on a blocking mat.
Pin the top central point first.
Next pin the two upper side points at equal distances from the center.
Pin the two lower points, followed by the smaller base points.
Finally, pin each valley inward.
Measure the leaf from side to side before allowing it to dry. A coaster-size version should generally finish around 12–15 cm, although the exact measurement changes with yarn and hook choice.
How to Make the Two-Color Version
The strongest visual match to the reference uses cream for the body and red for the outline.
Complete all structural lobes in cream first. Add red surface slip stitches along the main veins only after the cream section lies flat.
Finish with the red perimeter and stem.
This order prevents the contrasting yarn from interfering with the open chain spaces.
For other autumn versions, keep the cream interior and substitute mustard, burnt orange, dusty pink or olive green for the border.
How to Make a Solid Green Maple Leaf
A single-color version removes the contrast between the interior and outline but retains the same construction.
Work the complete leaf in olive or forest-green cotton.
Instead of adding contrasting surface crochet, define the veins with slip stitches in the same yarn.
The result is more restrained and places greater emphasis on the open spaces.
Assembly and Finishing
- Complete the cream foundation and central vein.
- Work the longest top lobe first so it establishes the vertical axis.
- Add the two upper side lobes and compare their lengths.
- Work the lower lobes and smaller base points.
- Check the entire leaf on a flat surface before adding another color.
- Add the open vein spaces or confirm that all existing chain spaces remain unobstructed.
- Surface crochet the contrasting red veins from the center toward the tips.
- Work the red border around all points and valleys.
- Add the narrow stem at the bottom center.
- Weave in the tails, block every point individually and allow the motif to dry flat.
The finished maple leaf should have one dominant central point, balanced side lobes, clearly defined valleys, visible vein openings and a stem aligned with the center axis.
7 Technical Tips for a Better Crochet Maple Leaf
- Watch for a rounded silhouette. If a lobe loses its point, replace the ordinary turning stitches at its tip with a ch-2 or ch-3 picot. Every major lobe needs a visibly defined apex.
- Control the valleys. Too many stitches between adjacent lobes make the leaf look circular. Use a slip stitch at the deepest section to pull each valley inward.
- Keep the central vein straight. A twisted foundation chain shifts the top point away from the stem. Lay the first section flat before adding side lobes.
- Measure matching lobes. Corresponding left and right points should finish within approximately 5 mm of each other. Larger differences become obvious after blocking.
- Do not overcrowd the border. Rippling usually indicates excess stitches around the perimeter. Remove stitches from curved sections rather than reducing the sharp points.
- Preserve the open spaces. Surface slip stitches can accidentally close the ch-1 vein openings. Keep the contrasting yarn on the solid central columns instead.
- Pin every major point. Use at least seven perimeter pins plus additional pins in the valleys during blocking. This fixes the maple silhouette more accurately than pinning only the outside corners.
Using the Finished Crochet Maple Leaves
A finished crochet maple leaf coaster can be used individually under a mug or glass. Cotton is a practical yarn choice for this application because the finished fabric remains relatively firm and washable.
Several leaves can also be joined into a fall garland. Make the same motif in red, mustard, orange, olive and cream, then connect the stems to a long crochet chain.
For table decor, work four to six matching leaves and block every motif to the same dimensions. A consistent set looks more deliberate than leaves made with different hooks or substantially different yarn weights.
The motif can also be sewn onto a plain tote bag, cushion cover or blanket. In that case, omit the second border round if a flatter appliqué is required.
Yarn and Hook Adjustments
Changing yarn weight changes the finished dimensions considerably. Fine yarn with a small hook produces a decorative appliqué, while worsted cotton creates a broader coaster or table motif.
For a smaller leaf, try DK cotton with a 3.0 mm hook. For a medium coaster, use DK or light worsted cotton with approximately a 3.5 mm hook. A 4.0–4.5 mm hook with thicker cotton will create a larger leaf.
Always make one sample before producing a complete set. Record its finished width, height and yarn weight after blocking.
Color Ideas
The red-and-cream combination creates the strongest two-color definition because the border, veins and stem are clearly separated from the inner leaf.
For a coordinated autumn set, make one leaf with each of these combinations:
- Cream + burgundy
- Cream + burnt orange
- Cream + mustard
- Cream + dusty pink
- Olive green + dark green
A solid olive version can be added to break up the repeated two-color arrangement.
Conclusion
A recognizable maple motif depends on geometry more than decoration. Establish the long central point first, balance the matching side lobes, pull the valleys inward and add the border only after the inner structure lies flat. Make one test leaf with a 3.5 mm hook, block it and record its final dimensions before producing a coaster set. For the photographed style, use cream inside the lobes and repeat red along the veins, outline and stem. Save the finished crochet maple leaf pattern to Pinterest or share your color combination on Instagram with #CrochetMapleLeaf. Which version would you make first: red, mustard, green or pink?









