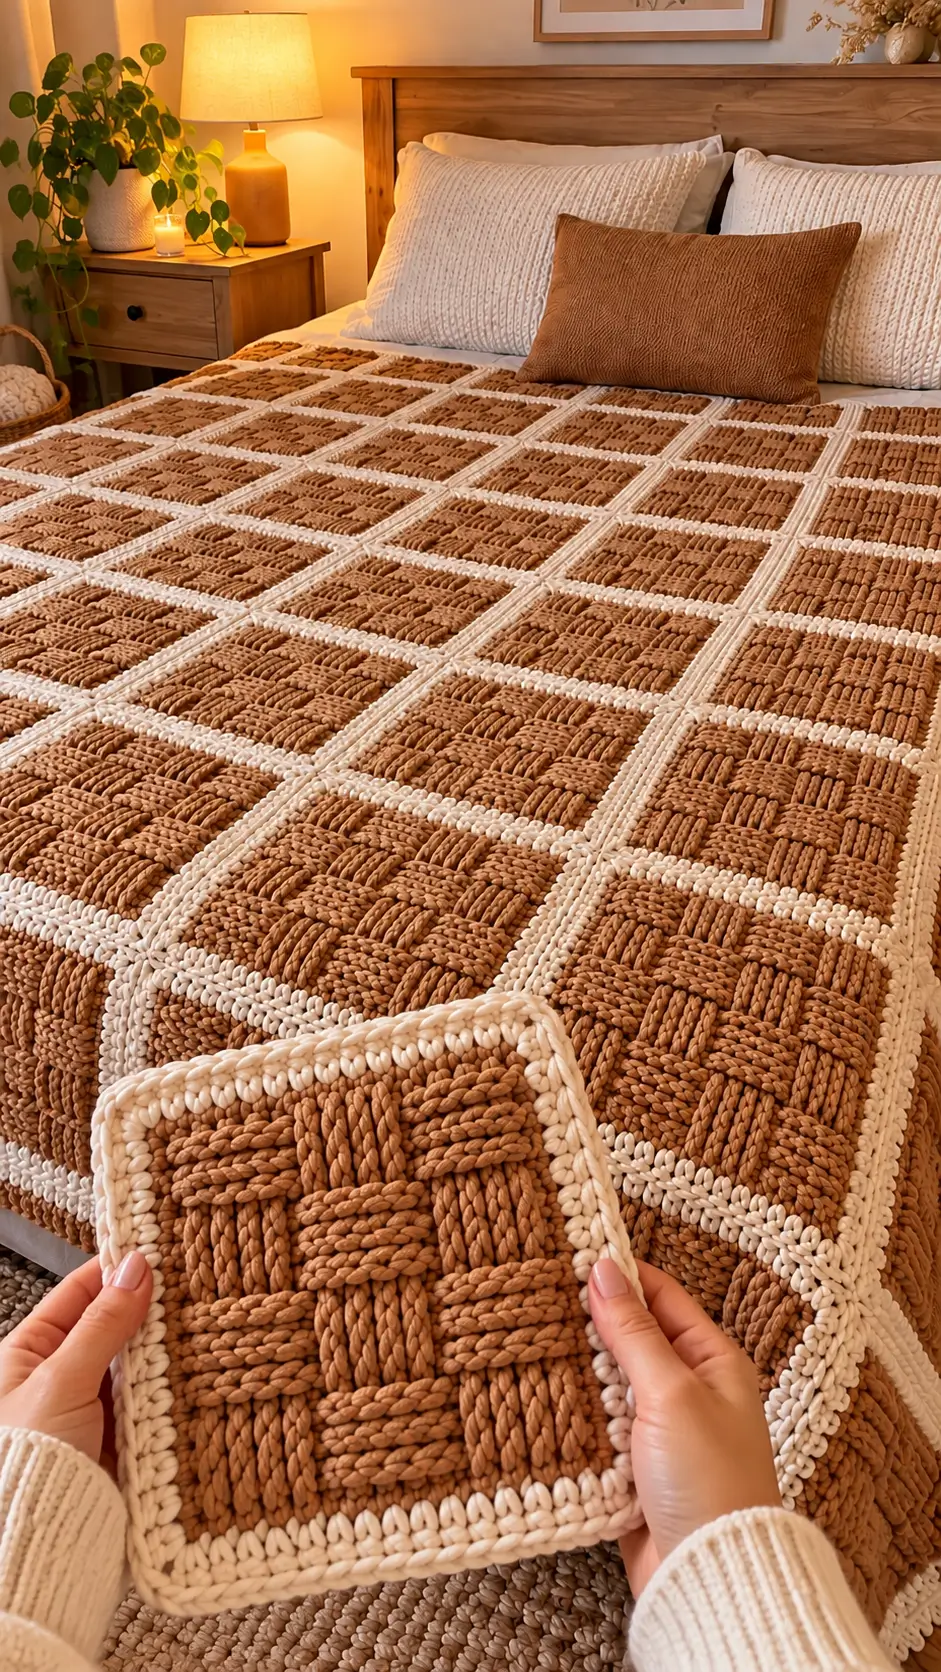
Brown basket blocks separated by thick cream lines give this blanket its unusually architectural structure. This chunky basket weave crochet blanket pattern recreates that construction with super-bulky yarn, a 9 mm hook, post stitches, and a contrast surface grid. The target size is approximately 127 × 144.5 cm. It suits intermediate crochet skills and produces a substantial throw that can also be used as a bed layer.
The Design: What Makes This Basket Weave Blanket Different
The design does not rely on basketweave texture alone. Brown raised blocks establish the main fabric, while cream lines divide the surface into a strong geometric grid. That contrast matters: without it, the individual brown blocks merge visually into a conventional basketweave crochet blanket.
A second decision is scale. Super-bulky yarn makes the post stitches deep enough for the over-and-under structure to remain visible across a large bed surface. A 9 mm hook provides a useful starting point for this yarn weight.
Finally, the cream perimeter is wider than a minimal finishing round. It visually connects with the internal grid and gives the blanket a defined frame.
The common mistake with a brown crochet blanket pattern like this is shifting a post group by one stitch. The stitch total can remain correct while the basket geometry breaks.
Project Info at a Glance
| Skill Level | Time | Finished Size | Hook | Best For |
|---|---|---|---|---|
| Intermediate | Multi-session project | Approx. 127 × 144.5 cm | 9 mm | Large throw / bed layer |
Materials and Tools
Yarn
- Caramel brown: Super Bulky #6 — approximately 1,800–2,000 g.
- Warm cream/ivory: Super Bulky #6 — approximately 400–600 g.
Choose brown and cream yarns from the same yarn family when possible. Matching fiber content and thickness helps the cream grid sit evenly over the brown basketweave fabric.
Tools
- 9 mm crochet hook
- 10 mm crochet hook, optional for the foundation chain
- Large tapestry needle
- Locking stitch markers
- Scissors
- Flexible measuring tape
Abbreviations
- ch — chain
- sc — single crochet
- dc — double crochet
- hdc — half double crochet
- FPdc — front post double crochet
- BPdc — back post double crochet
- sl st — slip stitch
- st/sts — stitch/stitches
- RS — right side
- WS — wrong side
- rep — repeat
FPdc and BPdc are double crochet stitches worked around the post of the stitch below instead of through its top loops. Alternating these stitches creates the raised and recessed sections needed for the basketweave effect.
Pattern — Step by Step
Work the main blanket flat in rows. The cream grid is added after the brown basketweave panel has been completed.
Gauge Swatch
Yarn: caramel brown.
Work a swatch measuring at least 15 × 15 cm. A useful target is approximately 8 basketweave stitches × 5 rows per 10 cm.
If the fabric feels excessively rigid or the post stitches are difficult to work, move to a larger hook. If large gaps appear between the stitches, test a smaller hook.
Measure only after allowing the swatch to rest flat.
Main Foundation
Yarn: caramel brown.
The basket structure uses groups of four post stitches. Four FPdc followed by four BPdc creates an eight-stitch complete repeat.
For the sample construction:
Foundation: Ch 108.
Row 1: Dc in fourth ch from hook and in each chain across. Turn.
The first double crochet row creates the posts required for the basketweave stitches.
Basket Block Section A
Yarn: caramel brown.
Row 2: Ch 2, turn. Dc in first st. *FPdc around next 4 posts, BPdc around next 4 posts.* Repeat the sequence across the center section. Dc in final st.
Row 3: Ch 2, turn. Maintain the established basket blocks by working around each post according to its orientation. Dc at both edges.
Row 4: Repeat Row 3.
Row 5: Repeat Row 3.
Place a stitch marker on the right side of the blanket after Row 5. This prevents accidental reversal of the basket sequence later.
Basket Block Section B
Yarn: caramel brown.
Row 6: Ch 2, turn. Reverse the basket groups across the center. Work BPdc over the group that previously projected toward the right side and FPdc over the neighboring group.
Row 7: Maintain the new orientation across the row.
Row 8: Repeat Row 7.
Row 9: Repeat Row 7.
Rows 2–9 create one complete basketweave cycle.
Repeat Rows 2–9 until the blanket reaches the required length. For the large throw shown here, work toward approximately 144.5 cm before the final border adjustment.
End after a complete basket block whenever possible. Finishing halfway through a block makes the top edge visually different from the bottom edge.
Cream Horizontal Grid Lines
Yarn: warm cream/ivory.
The contrasting cream lines are added after the main brown panel has been completed.
Lay the blanket right side facing upward on a flat surface.
Use locking stitch markers to identify the horizontal routes between selected basket blocks. Check the distance between every line before attaching the cream yarn.
Grid Line 1: Join cream at one side edge. Work loose surface slip stitches across the marked horizontal route.
Fasten off, leaving approximately 20 cm for weaving.
Repeat this process across the remaining horizontal divisions.
Keep the surface stitches loose. Tight slip stitches can shorten the width of the blanket and cause the brown panel to gather.
Cream Vertical Grid Lines
Yarn: warm cream/ivory.
Lay the blanket completely flat again after finishing the horizontal lines.
Mark the vertical paths with locking stitch markers. Measure at the top and bottom before crocheting so each line remains vertical.
Vertical Line 1: Join cream at the lower edge and work surface slip stitches upward along the marked route.
Fasten off at the top.
Repeat across the width of the blanket.
At each intersection, cross the existing cream line cleanly. Avoid adding several stitches at the same point because excessive yarn creates a hard knot at the intersection.
Cream Border — Round 1
Yarn: warm cream/ivory.
Join cream yarn in any corner.
Round 1: Ch 1. Sc evenly around all four sides, working 3 sc into each corner. Join with sl st.
Pay particular attention to the row ends along the sides. Too many stitches create a rippled border; too few stitches pull the blanket inward.
Cream Border — Round 2
Round 2: Ch 1. Sc in each st around. Work 3 sc into the center corner stitch at each corner. Join with sl st.
Lay the blanket flat before continuing.
Cream Border — Round 3
Round 3: Ch 2. Hdc in every st around. Work 3 hdc into each center corner stitch. Join with sl st.
This round increases the visual width of the cream frame while keeping the border less textured than the basketweave center.
Cream Border — Round 4
Round 4: Ch 1. Sc in every st around. Work 3 sc into each center corner stitch. Join with sl st.
Check all four edges.
If the border develops waves, remove the round and reduce the number of stitches along the affected edge. If the edge contracts or the corners lift, additional corner space or looser tension is required.
Cream Border — Round 5
Round 5: Ch 2. Hdc in each st around. At every corner, work 2 hdc, ch 1, 2 hdc into the corner space.
Join with sl st.
Cream Border — Round 6
Round 6: Ch 1. Sc around. Work 3 sc into each corner ch-1 space.
Join with sl st.
Fasten off, leaving approximately 25 cm of yarn for weaving.
How to Adjust the Blanket Size
The approximately 127 × 144.5 cm dimensions provide a practical target for a large throw, but the blanket can be resized.
Change the width by adding or removing complete eight-stitch basket repeats. Avoid adding arbitrary individual stitches to the textured center because incomplete groups interrupt the alternating FPdc and BPdc pattern.
Change the length by adding or removing complete basket-block sections.
For a bed-sized blanket, measure the mattress rather than relying on standard blanket labels. Decide how far the finished blanket should hang over each side, then add that amount to the mattress width.
Remember that the cream border adds several centimeters to the final dimensions.
Assembly and Finishing
- Complete the entire brown basketweave panel before adding contrasting yarn.
- Lay the panel flat and measure its width at the top, center, and bottom.
- Mark every horizontal cream route before crocheting the first grid line.
- Work the horizontal surface-crochet lines with loose, consistent tension.
- Mark the vertical routes after checking the spacing of the horizontal grid.
- Work all vertical cream lines from the same edge for consistent stitch direction.
- Inspect every cream intersection and correct any line that pulls the brown fabric inward.
- Add the cream perimeter border after completing the internal grid.
- Weave the yarn tails through several neighboring stitches without forming thick lumps.
- Lay the finished blanket flat and correct minor shape differences with blocking appropriate for the yarn fiber.
The finished blanket should have a rectangular brown basketweave field, evenly spaced cream divisions, and a continuous cream outer frame.
7 Technical Tips for Cleaner Basket Weave Crochet
- Prevent block drift: Place a locking marker after every complete eight-stitch repeat on the first post row. A one-stitch displacement can leave the total stitch count unchanged while shifting every basket block.
- Watch foundation contraction: If the lower edge curves inward, make the foundation chain with a hook approximately 1 mm larger. Return to the main hook when working the first row.
- Check post placement: Insert the hook around the complete stitch post rather than through its top loops. Working into the loops by mistake produces a flat stitch inside an otherwise raised block.
- Prevent grid distortion: A cream surface line that shortens an edge by 1–2 cm is too tight. Remove the line and crochet it again while maintaining a larger working loop.
- Control intersections: Avoid stacking multiple surface stitches where the horizontal and vertical cream lines cross. Excess yarn at a crossing creates a hard raised lump.
- Check border rippling: Lay the blanket flat after every border round. A wavy long edge indicates excess stitches, while a contracted edge indicates too few stitches or excessive tension.
- Secure yarn tails: Leave approximately 20–25 cm tails when working with super-bulky yarn. Thick yarn produces fewer stitches per centimeter, giving a short tail less fabric through which it can be woven.
How the Basket Weave Texture Works
A standard double crochet is worked into the top loops of the stitch below. Front post and back post double crochet change that placement.
For FPdc, the hook passes around the post from the front. This pulls the post toward the visible surface.
For BPdc, the hook approaches the post from behind. That placement pushes the corresponding section visually backward.
Working several FPdc stitches beside several BPdc stitches produces alternating raised and recessed groups. Reversing those groups after a fixed number of rows creates the illusion that one section passes over another.
No crochet strips are physically woven together. The woven appearance comes from controlled changes in stitch depth.
In this chunky basket weave crochet blanket pattern, the cream overlay makes the structure more pronounced. Brown post stitches create the physical depth, while cream surface crochet creates the large geometric framework.
Choosing Yarn for This Blanket
Do not choose replacement yarn based on ball weight alone. Two 300 g yarn balls can contain very different lengths of yarn.
Compare the yarn category, meters or yards per ball, fiber content, and resulting gauge. For this project, a smooth Super Bulky #6 yarn gives the basket blocks enough physical depth to remain visible across a large blanket.
Chenille-style blanket yarn can also produce a similar oversized appearance, but its stitch definition may be softer. A more tightly spun super-bulky yarn makes the boundaries between individual post stitches easier to see.
The brown and cream yarn should be similar in thickness. A cream yarn that is substantially thicker than the brown yarn can make the surface grid dominate the blanket.
Make the gauge swatch before purchasing the full quantity whenever possible.
Keeping the Cream Grid Straight
The contrasting grid is one of the most visible parts of this design. Small placement errors become increasingly obvious across a large blanket.
Do not add each line by eye.
Measure the proposed positions and mark them before surface crocheting. For vertical lines, measure their positions at both the upper and lower edges. Add one or two temporary markers through the middle of a long route if necessary.
Work every vertical line in the same direction. Changing direction can alter the appearance of the surface chain.
After completing each line, spread the blanket flat and compare the distance to its neighboring line. Correct an inaccurate line immediately rather than attempting to compensate with the next one.
Conclusion
The brown field supplies the depth; the cream grid supplies the geometry. That distinction is the key to reproducing this design instead of making a conventional single-color basketweave throw. Swatch the post-stitch repeat first, record the measured width of one eight-stitch repeat, and calculate the foundation from that measurement before purchasing the full yarn quantity. Reserve enough cream yarn for both the surface lines and substantial perimeter border. Save this chunky basket weave crochet blanket pattern to Pinterest and share the completed version on Instagram with #BrownCreamBasketWeave. For your version, would you keep the wide cream grid shown here or make the lines narrower so the brown basket blocks dominate?









