Introduction
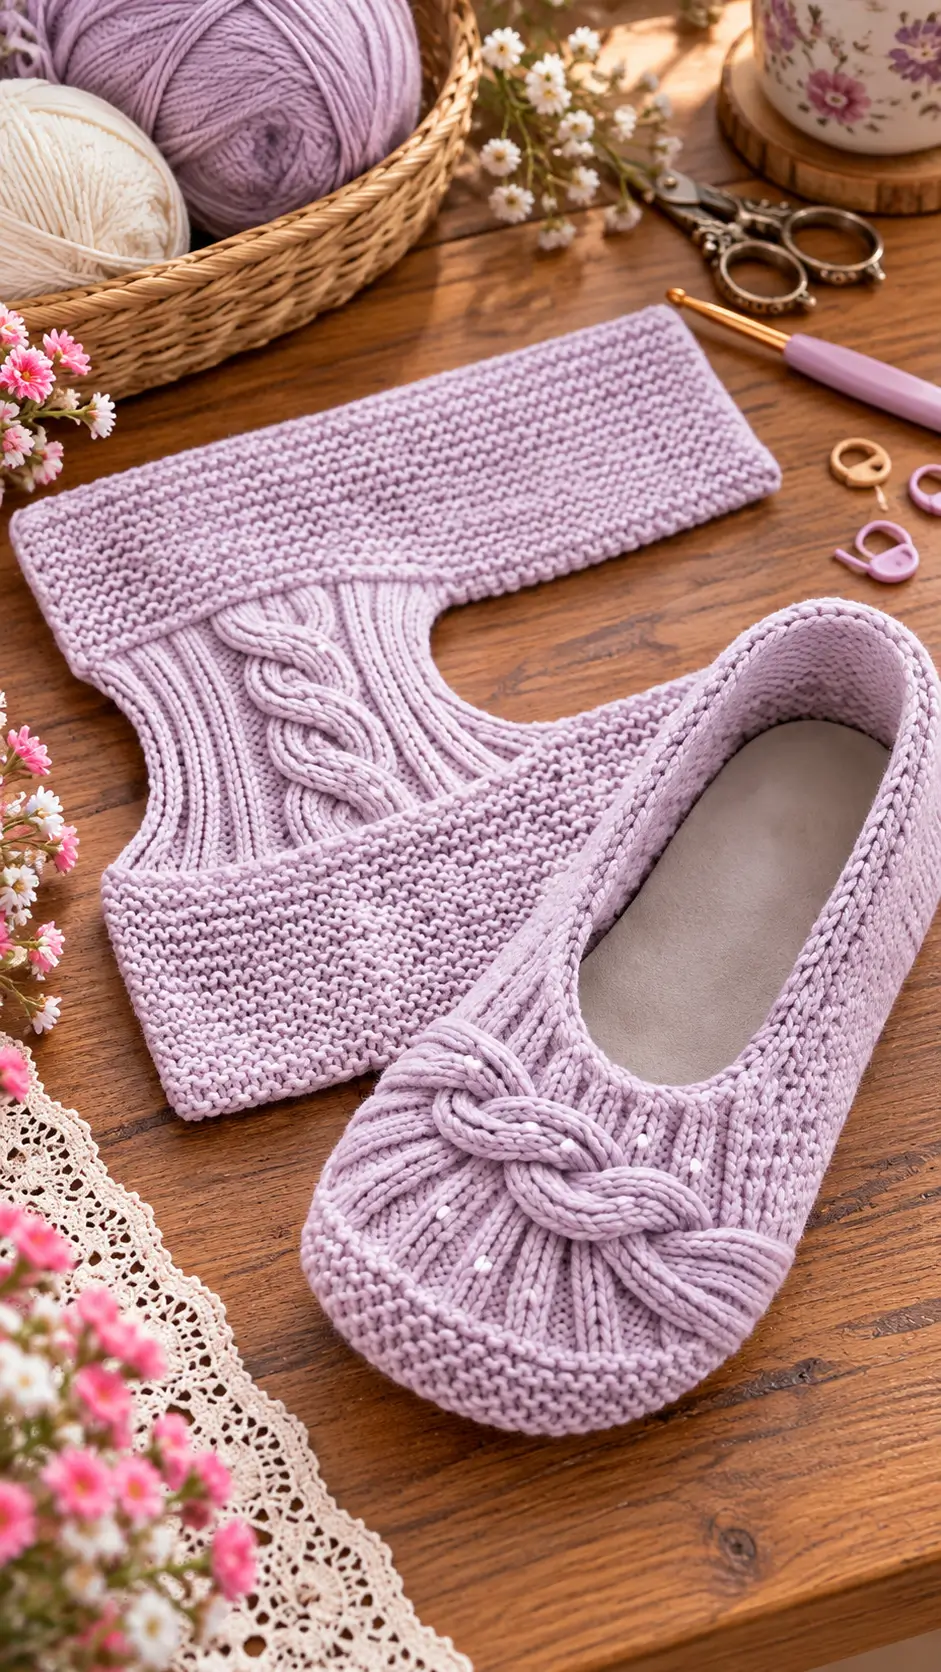
A ballet-flat slipper needs enough fabric to hold the heel without hiding the cable across the foot. This cable knit slippers pattern uses worsted yarn, 4 mm needles, a ribbed forefoot, and a raised center braid to reproduce that balance. The reference size is approximately 25 cm long and suits an intermediate knitter. Its low opening also reduces bulk when the slippers are worn as indoor shoes.
The Design: What Makes These Lavender Slippers Different
The photographed design depends on three structural decisions. First, the opening sits low across the instep, so the knitted fabric must grip at the heel rather than relying on a tall cuff. Second, vertical ribbing runs beneath the cable. That elastic background allows the forefoot to expand while keeping the braid visually defined.
The third decision is the textured perimeter. A garter-based side and heel section gives these knitted ballet slippers more body than an all-stockinette shell and reduces edge curl. The center motif then becomes the focal point instead of competing with texture across the entire upper.
A frequent mistake in a ballet flat knitting pattern is making the opening too long. Once worn, the fabric stretches lengthwise and the heel begins slipping. The knitter therefore needs to judge opening length after accounting for negative ease, not by matching the foot measurement exactly.
Project Info at a Glance
| Skill Level | Time | Finished Size | Needles | Best For |
|---|---|---|---|---|
| Intermediate | 5–8 hours per pair | Approx. 25.4 cm | 4.0 mm | Adult indoor slippers |
The 25.4 cm reference is based on published cabled-slipper sizing, while 4 mm needles are used in a comparable worsted-weight cable slipper design. Finished measurements should still be adjusted to the wearer’s foot and the actual gauge achieved.
Materials and Tools
Yarn
- Lavender worsted-weight yarn — approximately 80–100 g for an average adult pair.
- Optional sole yarn — worsted weight — approximately 20–30 g when adding a second sole layer.
Choose a smooth wool, wool-blend, or acrylic yarn with clear stitch definition. The raised braid depends on individual cable crossings remaining visible.
Tools
- 4.0 mm knitting needles
- Cable needle
- Tapestry needle
- Locking stitch markers
- Scissors
- Flexible measuring tape
- Blocking pins
- Optional nonslip sole treatment
Abbreviations
- CO — cast on
- BO — bind off
- k — knit
- p — purl
- st/sts — stitch/stitches
- k2tog — knit 2 together
- ssk — slip, slip, knit
- M1L — make one left
- M1R — make one right
- C4F — slip 2 stitches to cable needle and hold in front, knit 2, knit 2 from cable needle
- C4B — slip 2 stitches to cable needle and hold in back, knit 2, knit 2 from cable needle
- RS — right side
- WS — wrong side
Keep toe decreases paired: an ssk on one side and k2tog on the other creates a cleaner mirrored decrease line than identical decreases on both edges.
Cable Knit Slippers Pattern — Step by Step
Construction: This photo-inspired version uses a flat sole and separately worked upper sections that are joined during assembly. The calculations target approximately a women’s medium, around 24–25.5 cm depending on yarn elasticity and gauge.
Gauge target: Approximately 17 stitches per 10 cm in the main fabric.
Sole — Make 2
Yarn: lavender worsted weight.
CO 8 sts.
Row 1: Knit across. (8)
Row 2: K1, M1L, knit to last st, M1R, k1. (10)
Row 3: Knit. (10)
Row 4: K1, M1L, knit to last st, M1R, k1. (12)
Row 5: Knit. (12)
Row 6: K1, M1L, knit to last st, M1R, k1. (14)
Rows 7–12: Knit. (14)
Row 13: K1, M1L, knit to last st, M1R, k1. (16)
Rows 14–48: Knit. (16)
Measure the piece before shaping the heel. Add or remove pairs of rows here to adjust the finished foot length.
Row 49: K1, ssk, knit to last 3 sts, k2tog, k1. (14)
Row 50: Knit. (14)
Row 51: K1, ssk, knit to last 3 sts, k2tog, k1. (12)
Row 52: Knit. (12)
Row 53: K1, ssk, knit to last 3 sts, k2tog, k1. (10)
Row 54: Knit. (10)
BO loosely.
The sole should finish slightly shorter than the wearer’s bare foot because knitted slippers require negative ease. Adjust length through the straight section rather than changing the shaping sequence.
Side and Heel Band — Make 2
Yarn: lavender worsted weight.
CO 10 sts.
Row 1: Knit. (10)
Row 2: Knit. (10)
Repeat Rows 1–2 until the strip reaches from one side of the toe opening, around the heel, and back to the opposite side. For an average women’s medium, begin checking the fit at approximately 40–44 cm of unstretched strip length.
BO loosely.
Pin the band around the sole before sewing. The heel section should sit under slight tension. Excess band length can cause the finished heel to slip during wear.
Ribbed Toe Panel — Make 2
Yarn: lavender worsted weight.
CO 26 sts.
Row 1 (RS): K2, *p2, k2; repeat from * across. (26)
Row 2 (WS): P2, *k2, p2; repeat from * across. (26)
Repeat Rows 1–2 until the panel measures approximately 8–9 cm.
Next RS row: K1, ssk, work in established rib to last 3 sts, k2tog, k1. (24)
Next WS row: Work in pattern. (24)
Next RS row: K1, ssk, work in pattern to last 3 sts, k2tog, k1. (22)
Next WS row: Work in pattern. (22)
BO in pattern.
The rib columns should travel toward the toes rather than across the foot. This orientation creates the strong vertical lines underneath the central cable.
Central Braided Cable — Make 2
Yarn: lavender worsted weight.
CO 12 sts.
Row 1 (RS): K12. (12)
Row 2 (WS): P12. (12)
Row 3: C4F, k4, C4B. (12)
Row 4: P12. (12)
Row 5: K12. (12)
Row 6: P12. (12)
Row 7: K4, C4F, k4. (12)
Row 8: P12. (12)
Row 9: C4B, k4, C4F. (12)
Row 10: P12. (12)
Row 11: K12. (12)
Row 12: P12. (12)
Repeat Rows 3–12 until the braid runs from the front edge of the foot opening to approximately 1–1.5 cm from the toe.
BO.
Pin the cable over the center of the ribbed panel before sewing. Do not stretch it lengthwise. Excess tension reduces cable relief and can pull the finished toe upward.
Toe Edge
With the toe panel positioned on the sole, pick up stitches evenly around the exposed toe perimeter at approximately three stitches for every four row ends.
Row 1: Knit all stitches.
Row 2: Knit all stitches.
Row 3: Knit all stitches.
Row 4: Knit all stitches.
BO loosely.
This narrow garter section forms the raised perimeter around the toe. A flared edge indicates too many picked-up stitches. A toe that cups upward indicates too few.
Foot Opening Edge
Pick up stitches evenly around the complete foot opening.
Row/Round 1: Knit all stitches.
Row/Round 2: Knit all stitches.
Row/Round 3: Knit all stitches.
BO using a flexible bind-off.
The opening should lie flat when the slipper is unworn while retaining enough elasticity to pass over the heel.
Optional Double Sole — Make 2
For additional thickness, make another sole using the same sole instructions.
Position the second sole directly beneath the completed slipper. Align the toe, heel, and side edges, then sew around the perimeter using mattress stitch or whip stitch.
A double sole increases thickness and reduces some flexibility. Complete one slipper first and check the result before adding the second sole to its mate.
Assembly
- Block both soles to matching measurements and allow them to dry flat before attaching the uppers.
- Pin each side-and-heel band around its sole, beginning at the center back and working toward the toe.
- Sew the band to the sole with small, evenly spaced mattress or whip stitches.
- Center the ribbed toe panel over the forefoot and pin its left and right edges symmetrically.
- Sew the toe panel to the side structure without stretching the ribbing.
- Position the braided cable on the center line of the ribbed panel, leaving approximately 1–1.5 cm between the braid and front toe edge.
- Stitch the braid down along both long edges, catching the underside edge stitches so the cable retains its raised structure.
- Work or attach the garter edging around the toe and compare the opening width of both slippers.
- Finish the foot-opening edge and weave each yarn tail into the inside of a seam rather than across exposed ribbing.
- Place both slippers together and compare length, heel height, cable placement, toe depth, and opening circumference before final blocking.
The completed pair should have matching toe depth, centered braided cables, and enough negative ease for the heel to remain against the foot.
7 Technical Tips for Better Cable Knit Slippers
- Mark the heel center before assembly. A heel band shifted by even 1 cm can make the cable appear off-center when the slipper is worn.
- Check sole length before starting the upper. If the relaxed knitted sole already equals the wearer’s complete foot length, normal stretching can make the finished slipper loose.
- Do not pull the cable strip during pinning. Lengthwise tension flattens the braid and can shorten the toe vertically after the pins are removed.
- Keep cable crossing tension consistent. One unusually tight C4F or C4B crossing creates a visible pinch that blocking may not fully correct.
- Measure both foot openings before binding off. A difference of 1 cm in circumference can make one slipper grip the heel more tightly than the other.
- Use the same pickup ratio around both toes. Too many stitches produce a ruffled perimeter, while too few draw the toe upward.
- Bury yarn tails along seams for at least 4–5 cm. Short tails worked through elastic ribbing can migrate outward as the slipper repeatedly stretches over the foot.
How to Size the Slippers
Finished length needs to be treated as a fit variable rather than a universal measurement. Comparable cabled slipper patterns include finished lengths around 22.9, 25.4, and 27.9 cm. Foot dimensions, gauge, fiber content, and construction all affect the correct finished measurement.
For this photo-inspired version, start by making the sole approximately 5–8% shorter than the wearer’s actual foot. Treat that figure as a fitting target rather than an absolute sizing rule.
Yarn behavior matters. Wool can recover strongly after being stretched, while some acrylic yarns remain more relaxed after repeated wear.
Perform a fitting check before permanently sewing the toe panel. The heel should remain against the foot during normal walking without requiring a high back.
Choosing Yarn for a Defined Cable
The appearance of these braided cable slippers depends heavily on stitch definition. A smooth, tightly plied worsted yarn makes the individual rib columns and cable crossings easier to distinguish.
A current comparable cable-slipper design uses worsted yarn with a gauge of approximately 17 stitches per 10 cm in garter stitch. Other knitted ballet-slipper patterns use heavier yarn, demonstrating why gauge should be checked rather than selecting needles from yarn weight alone.
For the pictured appearance, select yarn with moderate elasticity and a clean surface. Highly textured yarn can obscure the braid, while a loosely spun single-ply yarn may show abrasion quickly along the sole.
A washable wool blend provides a practical option for knitted house shoes that will receive repeated indoor wear.
How to Keep the Ballet-Flat Shape
Low-cut women’s knitted slippers have less fabric available to stabilize the foot than slipper socks or boot-style designs. The heel band, opening circumference, toe depth, and sole length therefore need to work as one fitting system.
Do not deepen the toe only to make the slipper tighter. Excess material over the toes changes the low ballet-flat profile. Shortening the opening or reducing the heel-band length is generally the better adjustment.
Avoid making the heel excessively high. The intended design uses a low rounded back that continues the visual line created by the side walls.
Check the cable after putting the unfinished slipper on the foot. The braid should remain centered over the instep. If it moves significantly toward either side, inspect the toe-panel placement and side seams before changing the cable itself.
Conclusion
The key measurement in this cable knit slippers pattern is the relationship between sole length, opening circumference, and heel tension. Knit the sole first, compare it with the intended foot, then pin the upper before completing the permanent seams. For the lavender ballet-flat appearance, keep the yarn smooth, the toe ribbing vertical, and the central braid raised rather than stretched flat.
Save the finished slippers to Pinterest or share the completed pair on Instagram with #LavenderCableBalletSlippers. Before knitting another size, record the finished sole length and opening circumference so the adjustments can be repeated accurately. Which feature would you change on the next pair: the width of the central braid or the depth of the ballet-flat opening?









