Black and White Crochet Baby Dress Set: Construction Guide
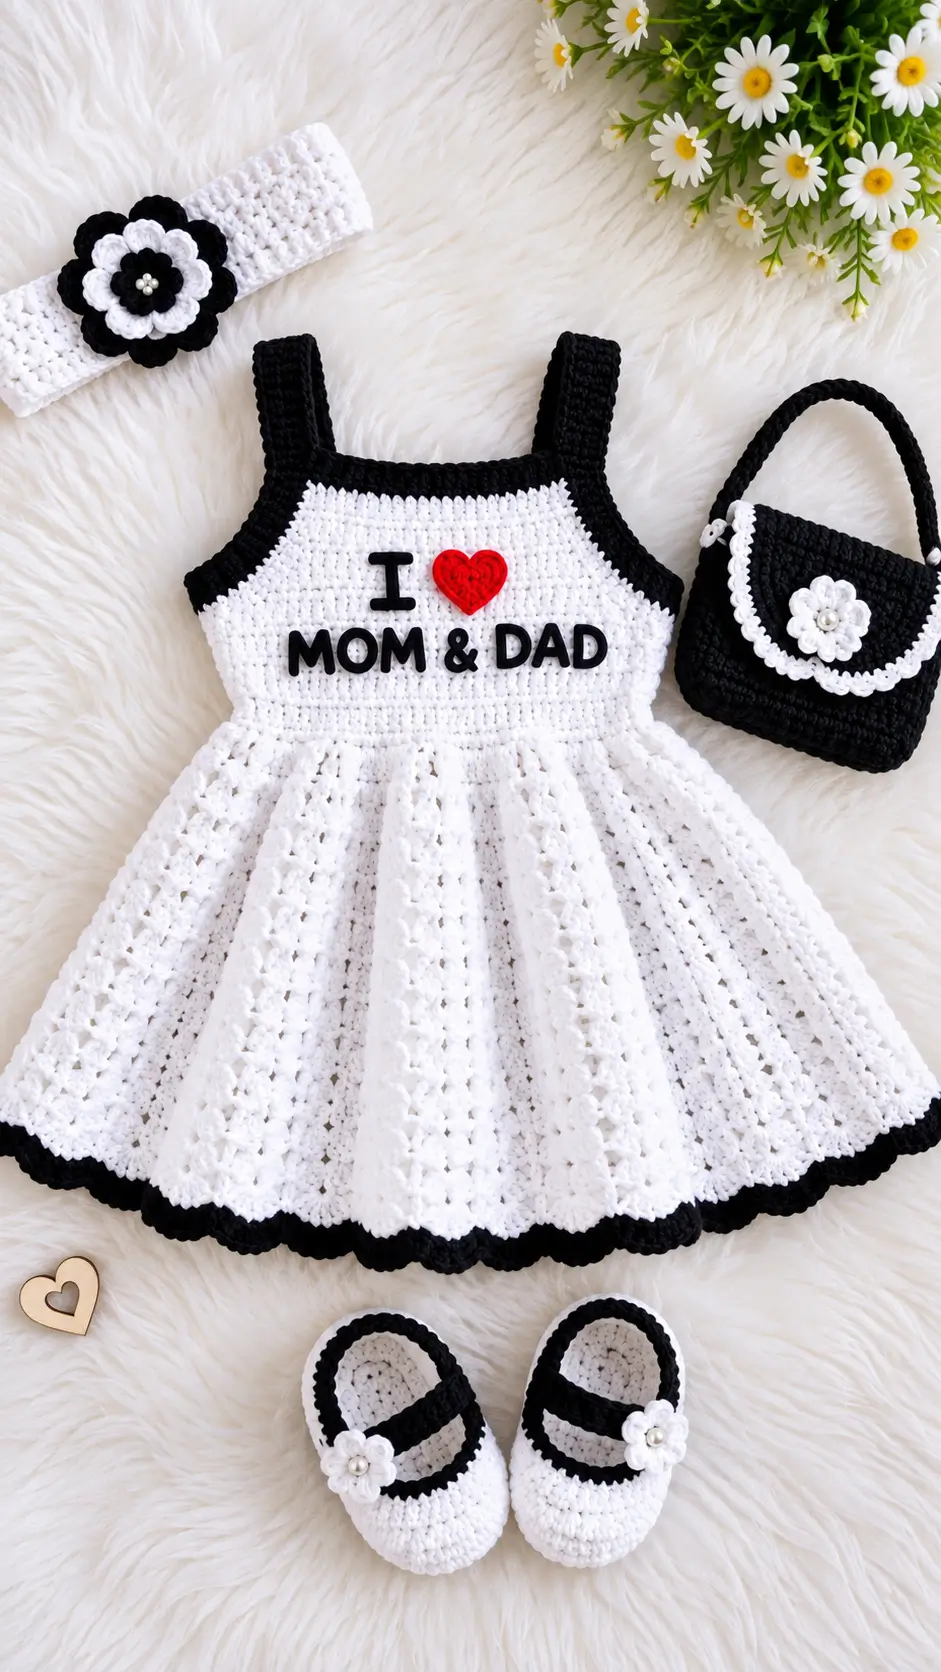
The black scalloped hem is what controls the visual balance of this white dress; remove it and the matching straps, shoes and handbag lose their connection. This black and white crochet baby dress guide analyzes the photographed set using sport or DK yarn, size-appropriate hooks and a 40.5 cm reference chest. The project suits an intermediate crocheter and provides a practical framework for building a coordinated baby outfit.
The Design: What Makes This Crochet Dress Different
Three structural decisions define this crochet baby dress set. First, the bodice is substantially denser than the skirt, giving the straps and chest section enough stability to support the garment while the lower section expands into an open, flared fabric.
Second, black is restricted mainly to outlines: straps, upper edges, lettering, accessories and hem. That placement keeps the white skirt dominant while creating a clear connection between every piece in the set.
The third decision is repetition. Flower motifs appear on the headband, handbag and shoes, so the separate accessories read as one crochet baby dress set rather than unrelated pieces. The Mary Jane straps also repeat the strong black lines of the dress straps.
A frequent mistake in a crochet baby girl dress of this shape is adding skirt increases too quickly. Excess circumference close to the waist creates bunching instead of a controlled flare. The expansion needs to be distributed gradually through the skirt.
Project Info at a Glance
| Skill Level | Time | Finished Size | Hook | Best For |
|---|---|---|---|---|
| Intermediate | Varies by gauge and accessories | Reference chest: 40.5 cm | Reference: 4 mm | Coordinated baby dress set |
The 40.5 cm chest and 4 mm hook are reference specifications from a 1–3 month crochet baby dress pattern. They are not measurements extracted directly from the photograph.
Materials and Tools
Yarn
For a photo-inspired version, select the yarn and hook together and make a gauge swatch before beginning the bodice.
- White yarn — sport/category 2 or soft DK — main dress, shoes, headband details and flowers.
- Black yarn — matching yarn weight — straps, borders, lettering, shoe trim, handbag and flower details.
- Red yarn — small quantity — heart appliqué.
- White or pearl accent — small quantity — flower centers.
A comparable baby dress pattern uses category-2 baby yarn with a 4 mm hook. Yarn consumption changes according to size, skirt length, stitch density and the number of accessories made.
Tools
- 4 mm crochet hook for the main reference construction
- 3.5 mm crochet hook for smaller accessories when required
- Yarn needle
- Scissors
- Stitch markers
- Flexible measuring tape
- Rust-resistant pins
Safety eyes are not required. This project is a wearable crochet set rather than an amigurumi toy.
Abbreviations
- ch — chain
- sl st — slip stitch
- sc — single crochet
- hdc — half double crochet
- dc — double crochet
- inc — increase
- dec — decrease
- BLO — back loop only
- st/sts — stitch/stitches
- RS — right side
- WS — wrong side
Invisible decrease is primarily an amigurumi technique and is not required for the main dress construction; garment decreases should follow the structure and gauge of the selected stitch.
Black and White Crochet Baby Dress Construction
Before Crocheting the Dress
The photograph does not provide gauge, wearer measurements, yarn label information or the original designer’s written pattern. Exact stitch counts for the pictured garment therefore cannot be calculated reliably from the photograph alone.
Start by making a gauge swatch with the selected yarn and hook. Measure the intended wearer or use a trusted standard baby-size chart. A 40.5 cm finished chest can be used as a reference for approximately 1–3 months when working from the cited reference sizing.
Do not use the six-stitch magic-ring construction associated with amigurumi. A fitted garment requires calculations based on gauge and finished circumference.
Bodice
Yarn: white with black upper and side edging.
Make a gauge swatch measuring at least 10 × 10 cm. Measure the stitches across the central section of the swatch rather than including unstable outer edges.
Calculate the required bodice circumference from the intended finished chest measurement. Determine how many stitches are required from your measured stitches per centimeter.
Foundation: Chain to the calculated chest width, adding the turning chains required by the selected stitch.
Row 1: Work hdc or dc evenly across.
Rows 2 onward: Maintain the established stitch count until the bodice reaches the required waist-to-underarm depth.
The bodice should remain comparatively solid. Large lace openings are less suitable here because the front needs enough structure to support the heart and lettering.
Shape the upper sides toward the strap positions when the required bodice height is reached. Finish the upper and side sections with black edging.
Shoulder Straps — Make 2
Yarn: black.
The shoulder straps are broad and visually substantial, which balances the black hem at the bottom of the dress.
Row 1: Chain to the required strap width and work sc across.
Row 2: Ch 1, turn and sc across.
Repeat Row 2 until the strap reaches the required length.
Make the second strap with exactly the same number of rows. Place both pieces side by side without stretching them before attachment.
Pin the straps to the bodice before sewing. Measure from each side edge so the two attachment points remain symmetrical.
Flared Lace Skirt
Yarn: white.
Join the white yarn evenly around the lower edge of the bodice.
Round 1: Work evenly around the waist without adding enough stitches to make the fabric ripple.
Round 2: Establish the chosen lace repeat.
Round 3: Add increases at evenly distributed points.
Round 4: Work even without increasing.
Round 5: Repeat the established lace sequence.
Round 6: Add another controlled increase round.
Continue alternating stable lace rounds with distributed expansion until the skirt reaches the required circumference and length.
The photographed skirt has strong vertical openwork lines. A combination of double crochet stitches and chain spaces works better for this visual structure than a dense single-crochet fabric.
Increase gradually. Adding too many stitches immediately below the bodice produces gathers at the waist instead of the long flared shape visible in the design.
Black Scalloped Hem
Yarn: black.
Join black yarn to the final white skirt round.
Round 1: Work sc evenly around the entire lower edge. Adjust the spacing only when necessary to make the stitch count compatible with the chosen shell repeat.
Round 2: Skip the required number of stitches, work several dc into the next stitch to form a shell, skip the same number of stitches and anchor the shell with sc.
Repeat the shell sequence around the complete hem.
The border should remain relatively narrow. Its purpose is to define the white skirt and connect it visually with the black bodice edging.
If the border starts waving before blocking, check the setup round. Too many stitches in the foundation edge can make the scallops flare outward.
Red Heart Appliqué
Yarn: red.
Make a small flat crochet heart sized according to the available front-bodice area.
Begin with a small central ring. Use taller stitches to create the two upper lobes and shorter stitches toward the lower section to create the pointed bottom.
Fasten off with a sufficiently long sewing tail.
Block the heart flat before attaching it to the dress. Position it above the lower lettering and check the complete layout before sewing.
I Love Mom & Dad Lettering
Yarn: black.
The photographed dress uses raised black lettering rather than letters incorporated into the main crochet fabric.
One method is to crochet narrow chains for the principal letter strokes. Another option is surface crochet worked directly over the finished bodice.
Lay out the entire phrase before attaching individual letters. Keep the letter height consistent and leave enough space around the red heart.
Sew each crochet letter at multiple points so the edges cannot lift easily from the bodice.
Layered Crochet Flowers
Yarn: black and white.
The same flower idea is repeated across the headband, handbag and shoes, helping the separate accessories function as one coordinated set.
Round 1: Create a small center ring.
Round 2: Establish evenly spaced loops or petal bases around the center.
Round 3: Work the first petal layer.
Round 4: Create another set of loops behind the first petals.
Round 5: Work larger contrasting petals into those rear loops.
For the headband, use black for the larger outer petals and white for the contrasting middle layer. Smaller flowers can be used for the shoes and handbag.
Crochet Flower Headband
Yarn: white with black and white flower.
Make a rectangular crochet band according to the intended head circumference and the actual stretch of the selected yarn.
Row 1: Chain to the required band width and work sc across.
Row 2: Ch 1, turn and work sc across.
Continue until the band reaches the calculated length.
Join the short ends using the selected seam or closure method. Attach the layered flower securely to the front or slightly off-center, following the placement visible in the photographed set.
Mary Jane Crochet Baby Shoes — Make 2
Yarn: white with black edging and straps.
Begin each shoe at the sole rather than with a magic ring. Baby shoe soles are commonly constructed by crocheting around both sides of a foundation chain.
Foundation: Chain according to the required foot length.
Sole Round 1: Work along one side of the foundation chain, place additional stitches at the toe, continue along the opposite side and add stitches at the heel.
Sole Round 2: Increase around the curved toe and heel sections while keeping the sides comparatively straight.
Sole Round 3: Repeat the shaping until the required sole width is reached.
Work one or more rounds without increases to turn the fabric upward and begin the shoe upper.
Shape the toe by decreasing over the front portion rather than decreasing evenly around the entire shoe.
Change to black yarn and add a narrow edging around the shoe opening.
Mary Jane Straps
Yarn: black.
Attach black yarn to one side of each shoe. Chain across the instep to the required length, then work back along the chain to strengthen the strap.
Attach the opposite end securely according to the intended closure.
Make both straps the same length before final attachment. Add one small white crochet flower to the outer side of each shoe.
Matching Crochet Handbag
Yarn: black with white trim.
Make two matching black rectangular panels or crochet one long rectangle that can be folded to create the front and back.
Join the sides and lower edge while leaving the top open.
Create the flap from the upper back edge. Shape its lower corners gradually so the flap has the rounded appearance visible in the photograph.
Add a white scalloped border around the flap.
For the handle, crochet a firm black strap. Attach each end across several stitches rather than securing the handle through a single stitch.
Make a layered white flower and position it centrally on the flap. Sew around several points of the flower so it remains flat against the bag.
Assembly
- Block the bodice and skirt lightly to the target measurements before attaching the accessories.
- Pin both shoulder straps at equal distances from the side edges and sew them securely.
- Attach the black edging without stretching the armhole or upper bodice sections.
- Position the red heart and all black lettering before permanently sewing any single appliqué.
- Sew every appliqué through multiple contact points and weave the yarn tails into the fabric.
- Complete the black scalloped skirt border and check that the hem lies flat.
- Compare both shoes by sole length and overall height before adding the straps.
- Attach the shoe flowers securely without leaving long or loose yarn loops.
- Sew the large layered flower to the headband and the smaller flower to the handbag flap.
- Inspect seams, appliqués, strap joins and woven yarn tails before the set is used.
The completed project consists of one crochet dress, one flower headband, one handbag and one matching pair of Mary Jane shoes.
7 Technical Tips for a Cleaner Finish
- Control stitch-marker drift. Mark the first skirt stitch and the principal increase sections. A moving round start can cause the vertical lace columns to rotate noticeably before reaching the hem.
- Do not add stuffing. This is a wearable project rather than amigurumi. Stuffing placed behind the heart or flowers creates unnecessary raised areas on the garment.
- Avoid amigurumi-style invisible decreases in the skirt. Garment shaping needs to follow the selected lace repeat. Using toy-construction decreases can interrupt the openwork pattern.
- Skip safety-eye hardware. No eyes appear anywhere in this design. Adding plastic components would change the photographed concept and is unnecessary.
- Check tension after every color change. White and black yarn can behave differently even when their labels show the same weight. Measure the fabric after changing yarn rather than assuming the gauge remains identical.
- Measure strap placement before sewing. Check the distance from each side of the bodice to its nearest strap. A difference of 1 cm can make the upper dress appear visibly asymmetrical.
- Secure every yarn tail. Weave appliqué and accessory tails through several stitch directions before trimming. Cutting immediately beside a knot can allow flowers, lettering or straps to loosen after washing.
Final Construction Notes
Before making this black and white crochet baby dress, measure the intended wearer and crochet a gauge swatch with the actual yarn. The photograph alone cannot establish either variable accurately.
Build the fitted bodice first and confirm its circumference before beginning the flared skirt. Add the black border and shoulder straps after the principal white structure has been checked for fit. The headband, Mary Jane shoes and handbag can then be sized in proportion to the finished dress.
For the closest visual match, keep the black scalloped hem relatively narrow, repeat the same flower construction across the accessories, and maintain strong black outlines against the predominantly white fabric.
Save your finished version to Pinterest or share it on Instagram with #BlackWhiteBabyDress. Which detail would you change on this specific design: the width of the black scalloped hem or the size of the flower motifs?









