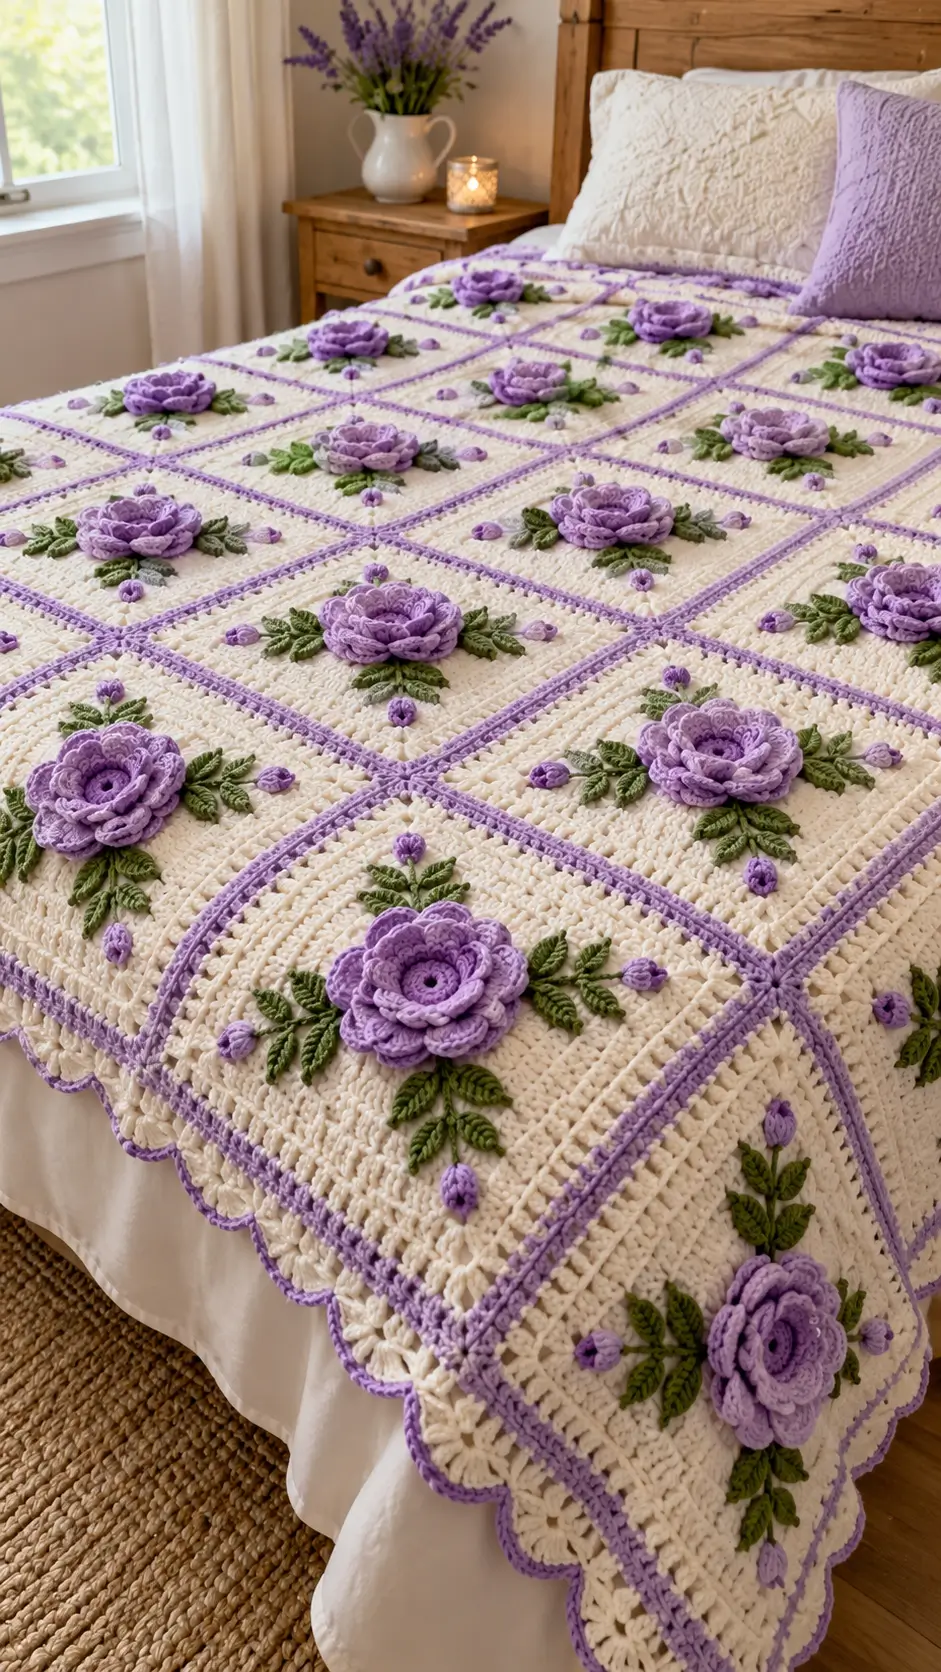
A rose that projects several centimeters above a blanket cannot be treated like a flat granny-square flower. This 3D rose granny square blanket uses layered lavender petals, green leaves, cream square backgrounds, small rosebuds, contrasting seams, and a scalloped perimeter. DK yarn with a 3.5 mm hook provides a practical starting point. The modular construction suits intermediate crochet and allows the blanket dimensions to be changed square by square.
The Design: What Makes This Rose Blanket Different
The defining feature is the dimensional flower. Instead of placing a flat floral disk in the center, several petal layers overlap from a tight inner ring toward broader outer petals. That construction gives the lavender roses the height visible across the photographed bedspread.
Green leaves perform a structural as well as decorative job. They spread the visual weight of each flower across the cream background and prevent the rose from appearing isolated in the middle of a large square. Small lavender buds then fill selected open areas without competing with the main bloom.
The final decision is the contrasting seam. Lavender joining lines separate the cream blocks into a visible grid. A common failure with a crochet rose granny square blanket is joining unblocked squares; even a small size difference becomes obvious once several contrasting seams intersect.
Project Info at a Glance
| Skill Level | Construction | Reference Square | Hook | Best For |
|---|---|---|---|---|
| Intermediate | Modular squares | 10 × 10 cm reference size | 3.5 mm | Throws and bedspreads |
The 10 × 10 cm measurement is a published benchmark for a DK 3D rose granny square rather than a measured dimension taken from the photograph. Your squares can be enlarged by adding background rounds before joining.
Materials and Tools
Yarn
- Cream DK yarn — square backgrounds and outer border.
- Lavender DK yarn — layered roses, rosebuds, joining seams, and border accents.
- Olive green DK yarn — leaves and bud stems.
Use yarns with similar fiber content and meterage. Mixing a springy acrylic background with a dense cotton flower can produce different shrinkage and stretch after blocking.
Tools
- 3.5 mm crochet hook
- Yarn needle
- Stitch markers
- Scissors
- Blocking mats
- Rustproof pins
- Tape measure
Abbreviations
- MR — magic ring
- ch — chain
- sc — single crochet
- hdc — half double crochet
- dc — double crochet
- tr — treble crochet
- sl st — slip stitch
- FLO — front loop only
- BLO — back loop only
- sp — space
- st/sts — stitch/stitches
Invisible decreases are not required for the main blanket construction because the flowers are shaped through layered stitches rather than stuffed amigurumi decreases.
3D Rose Granny Square Blanket Pattern
Make one complete sample block before starting production. Block it, measure it, and record its yarn consumption. The photographed blanket contains many repeated floral blocks, so a small difference in gauge becomes significant across an entire bedspread.
3D Lavender Rose
Yarn: lavender DK.
Round 1: MR, ch 1, work 6 sc into MR. Join with sl st. (6)
Round 2: Working in FLO, form three compact inner petals by working groups of sc, hdc and dc across pairs of stitches. Keep the petals close to the center.
Do not cut the yarn. The unused back loops provide attachment points for the next petal layer.
Round 3: Working behind the first petals, create 6 chain spaces around the flower.
Round 4: In each chain space work (sc, hdc, 3 dc, hdc, sc). Repeat around to form 6 petals.
Round 5: Work behind Round 4 and create 8 evenly spaced chain loops.
Round 6: In each loop work (sc, hdc, 4 dc, hdc, sc). Repeat around. (8 petals)
Round 7: Create 8 larger chain loops behind the previous petal layer.
Round 8: In each loop work (sc, hdc, dc, 3 tr, dc, hdc, sc). Repeat around. (8 outer petals)
Fasten off, leaving a 20 cm tail for attaching the rose to the square.
The inner petals should remain upright while the outer layer opens farther across the cream block. Do not press the flower flat during blocking.
Green Leaf
Yarn: olive green DK. Make 4–6 per large rose depending on the planned arrangement.
Row 1: Ch 9.
Row 2: Starting in the second ch from the hook, work sl st, sc, hdc, dc, dc, hdc, sc, then 3 sc in the final chain.
Continue down the opposite side of the foundation chain with sc, hdc, dc, dc, hdc, sc, sl st.
Fasten off with a 15 cm sewing tail.
For a more defined central vein, surface-crochet slip stitches from the base toward the tip after the leaf has been completed.
Small Lavender Rosebud
Yarn: lavender DK.
Row 1: Ch 8.
Row 2: Work 2 hdc in each chain across.
The strip will begin curling naturally. Roll it tightly from one end to form a compact bud.
Fasten off with a 15 cm tail and stitch through the base several times to hold the roll.
Small buds should remain substantially smaller than the main roses. Their purpose is to occupy selected cream spaces and extend the floral arrangement outward.
Bud Stem
Yarn: olive green DK.
Join green yarn beneath the rosebud.
Row 1: Ch 5–8 according to the required stem length.
Fasten off and leave a sewing tail.
Longer stems should be attached to the cream background at more than one point so they do not lift when the blanket is handled.
Cream Granny Square Background
Yarn: cream DK.
Round 1: MR, ch 3, work 2 dc, ch 2, then work (3 dc, ch 2) three times. Join with sl st.
Round 2: Sl st to the corner space. Ch 3, 2 dc, ch 2, 3 dc in the same corner. Ch 1. In each remaining corner work (3 dc, ch 2, 3 dc), placing ch 1 between corners. Join.
Round 3: Work (3 dc, ch 2, 3 dc) into each corner. Work 3 dc into each side ch-1 space, separating groups with ch 1.
Round 4: Continue the established granny-square structure, adding one additional 3-dc group to each side.
Round 5: Repeat the established increase structure.
Continue adding rounds until the square reaches the planned measurement. A documented 3D rose granny square measures 10 × 10 cm, but the blocks visible in the photograph appear proportionally larger relative to the flowers.
Fasten off and block every square to the same dimensions before attaching flowers.
Attaching the Rose
Place one lavender rose in the center of the blocked cream square. Pin it before sewing.
Thread the long lavender tail onto a yarn needle. Stitch through the underside of the flower and the cream background while avoiding the visible upper petals.
Attach the central flower base firmly, then add two or three discreet anchoring stitches beneath the outer petals. The petals themselves should remain free enough to retain their dimensional structure.
Attaching the Leaves
Arrange four primary leaves around the lower and side edges of the rose. Add extra leaves where the photograph requires a longer botanical spray.
Sew each leaf along its central vein. Leave the outer edges relatively free rather than stitching around the entire perimeter.
Place smaller leaves beside selected buds. Keep their orientation varied so every floral unit does not look mechanically identical.
Adding the Rosebuds
Position the small lavender buds around the main flower after the leaves are pinned.
Sew each bud through its base. Attach the green stem to the background with small matching stitches.
The photograph uses buds as secondary details. Avoid placing them so close to the main rose that the dimensional petals overlap them completely.
Joining the Granny Squares
The lavender joining lines are an important part of the design. They create the visible grid that separates the cream floral blocks.
Arrange all finished squares on a flat surface before joining. Rotate individual floral arrangements where necessary so the leaves and buds do not all point in the same direction.
With lavender yarn, place two squares with their edges aligned.
Work a row of sc through corresponding edge stitches of both squares. Maintain the same stitch-to-stitch alignment from corner to corner.
Continue joining squares into horizontal strips. Join the completed strips using the same method.
At four-square intersections, check that all corners meet at one point. Misalignment of even one or two stitches creates a visible jog in the contrasting lavender grid.
Scalloped Blanket Border
The photographed blanket finishes with a broad cream edge and lavender-accented scallops.
Border Foundation
Round 1: Join cream yarn in any corner. Work sc evenly around the entire blanket, placing 3 sc at each corner.
Round 2: Ch 3 and work dc in each stitch around. At each corner work (2 dc, ch 2, 2 dc).
Round 3: Work another cream round, maintaining four flat corners.
Lavender Accent Round
Join lavender yarn.
Round 4: Work sc evenly around the perimeter. Place 3 sc in each corner.
Fasten off.
Cream Scallops
Join cream yarn.
Round 5: *Skip 2 sts, work 7 dc in the next st, skip 2 sts, sl st in the next st.* Repeat around.
Adjust the spacing slightly before each corner so one full shell turns each corner cleanly.
Lavender Scallop Edge
Join lavender at the beginning of any cream shell.
Round 6: Work sl st or sc evenly over the outer edge of each cream scallop.
Fasten off and weave the tail into the border.
Assembly
- Crochet and block one cream test square to establish the finished dimensions.
- Make the required number of matching cream squares.
- Crochet one layered lavender rose for each primary floral block.
- Make the olive leaves and small lavender buds required for each arrangement.
- Pin and sew the main roses to the centers of the blocked squares.
- Arrange and attach the leaves beneath the outer petals.
- Add the lavender buds and green stems to the remaining cream areas.
- Arrange all completed blocks in the final blanket layout and join them with lavender yarn.
- Work the cream foundation border followed by the lavender accent and scalloped edging.
- Block the finished blanket to rectangular dimensions without flattening the raised roses.
The finished blanket should have equal square dimensions, aligned lavender seams, raised rose petals, secure leaves, and a border that lies flat around all four sides.
7 Technical Tips
- Block every square to the same measurement before joining. A 5 mm difference per block can accumulate into several centimeters across a bed-sized blanket.
- Mark the first stitch of every rose layer. Losing the round transition can shift the outer petals and leave one side of the flower noticeably heavier.
- Keep the rose center tighter than the outer petals. Loose center stitches create a visible hole and reduce the upright structure of the innermost petal layer.
- Anchor the flower beneath the petals rather than through their upper edges. Sewing through the petal tips pulls the rose flat and removes the dimensional effect.
- Pin each leaf before sewing. A leaf positioned only 1–2 cm too far under the flower can disappear beneath the outer petals once the blanket lies on a bed.
- Count corresponding edge stitches during joining. Joining two unequal edges forces the lavender seam to ripple or causes the cream squares to buckle.
- Weave joining tails through at least 4–5 cm of dense stitches. Short tails placed inside an open granny space can work loose as the heavy blanket moves.
Calculating the Blanket Size
Do not calculate a bedspread from the unblocked square measurement. Complete one entire block, including its cream background, then block it to the dimensions you intend to reproduce.
A documented DK rose granny square measures 10 × 10 cm with a 3.5 mm hook. That provides a useful reference, but the larger blocks visible in this design can be created simply by adding cream background rounds.
For example, a blocked 20 cm square arranged seven blocks across creates approximately 140 cm of width before the outer border. Eight squares create approximately 160 cm. Joining method and blocking can alter those figures slightly.
Measure the bed when making a fitted decorative cover. Decide how much fabric should hang over each side, then divide the target width and length by the blocked square measurement.
Estimating Yarn Requirements
Published data for a 10 cm DK 3D rose square provides a useful starting benchmark: approximately 10 meters for the rose, 3 meters of green, and 5 meters of cream are specified for one particular construction.
The photographed design uses considerably more cream because its background blocks are larger, and additional lavender yarn is required for the visible joining grid, buds, and border.
The most accurate method is weight-based. Make one complete block and weigh each color before and after crocheting it. Multiply the consumption by the total number of squares, then add the separately calculated joining and border yarn.
Add extra yarn from the same dye lot. Large blankets amplify small color differences, particularly across the broad cream background.
Keeping the 3D Roses Raised
The rose should not be blocked in the same way as the square underneath it. Pin the cream background to its target dimensions while leaving the flower uncompressed.
Petal layers need separate attachment points behind one another. If every layer is stitched through the same visible edge, the rose loses depth and begins to resemble a thick flat disk.
After washing, reshape the petals while the yarn is damp. Lift the inner petals and spread the outer layer sufficiently to expose portions of the green leaves.
Storage also matters. Fold the blanket along the joining seams where possible rather than placing a hard fold directly through a row of raised roses.
Choosing Colors for the Floral Grid
The photographed combination depends on three distinct value groups: a light cream field, medium lavender flowers and seams, and darker olive foliage. Maintaining that separation keeps the individual components readable.
If the flower and background are too similar in value, the raised petals still create shadows but the rose loses definition from a distance. Leaves that are too pale can disappear against cream.
The joining color has another function. Lavender seams repeat the flower color between every block, connecting isolated roses into one continuous design.
Test the three yarn colors together before making dozens of squares. Photographing the swatch in grayscale is a practical way to check whether the flower, foliage, and background remain visually separate.
Conclusion
The defining measurement in a 3D rose granny square blanket is the blocked square, because every seam and final blanket dimension depends on that repeat. Make one complete cream block, attach its lavender rose and green leaves, then record the finished size and yarn consumption before producing the remaining motifs. Keep the flower petals free during blocking and verify every lavender joining intersection as the rows are assembled. Share the finished bedspread on Pinterest or Instagram with #LavenderRoseGrannyBlanket. For this particular floral layout, would you place a raised lavender rose on every square or alternate the large roses with simpler bud-only blocks?









