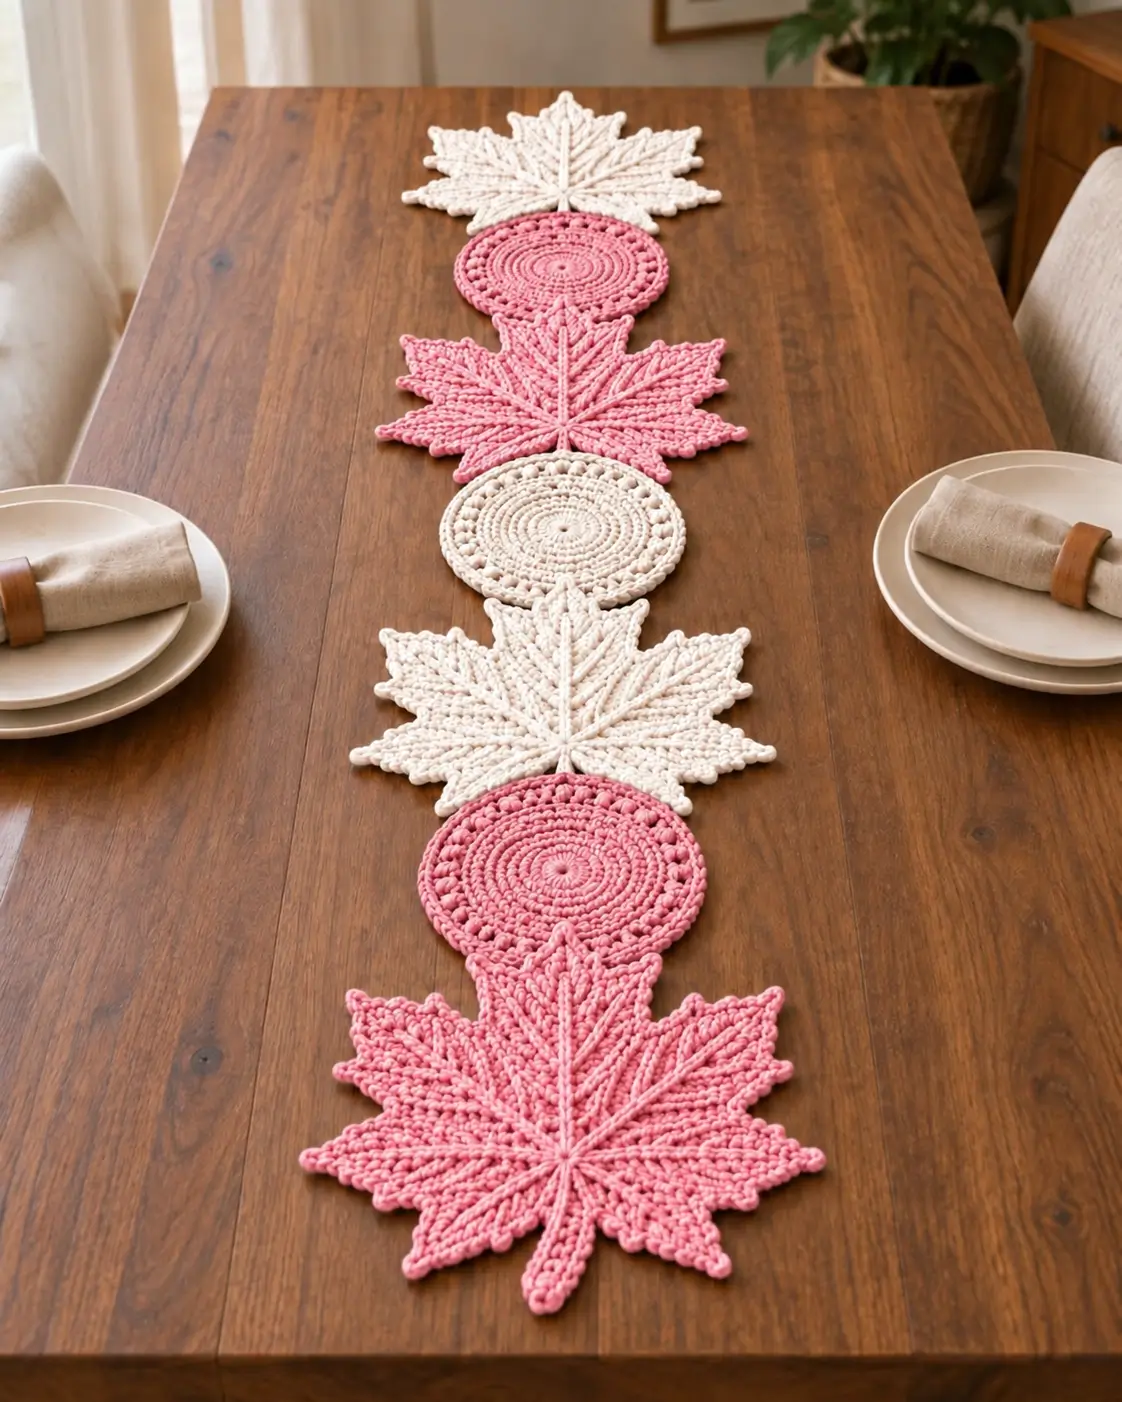
A runner built from maple leaves and circles only works when every leaf keeps a strong center axis and every medallion stays perfectly flat. This maple leaf crochet table runner pattern alternates oversized five-lobe leaves with round crochet medallions in blush pink and warm cream. Raised veins, pointed leaf edges and textured circular rounds create the photo-inspired centerpiece without using a conventional rectangular backing.
The Design: What Makes This Table Runner Different
The photographed runner is assembled from independent motifs. Large maple leaves alternate with round medallions along one central line, allowing the wooden table to remain visible around every component. That open construction makes the runner visually lighter than a solid rectangle.
The leaves depend on proportion. The center lobe is longest, two upper side lobes angle diagonally, and the lower pair spread outward. Raised surface-crochet veins reinforce those directions and add the pronounced botanical texture visible in the reference.
The circles provide a structural pause between the detailed leaves. Dense center rounds keep each medallion flat, while a slightly textured outer round connects visually with the leaf edges.
A common mistake with a crochet maple leaf table runner is joining motifs before blocking. Even a small twist in one leaf or a cupped circle becomes obvious once all pieces share the same center line.
Project Info at a Glance
| Skill Level | Time | Finished Size | Hook | Construction |
|---|---|---|---|---|
| Intermediate | 10–14 hours | Approx. 35 × 135 cm | 4 mm | Separate maple leaves and circular medallions |
The dimensions above are a photo-inspired target rather than measurements taken directly from the photographed runner. Published maple-leaf table-runner patterns provide useful benchmarks: one current worsted-weight design uses a 4 mm hook, while another published runner measures approximately 14 × 52 inches with worsted cotton and a 5 mm hook. 0
Materials and Tools
Yarn
- Blush pink — worsted/category 4 cotton or cotton blend — approximately 220–280 g
- Warm cream — worsted/category 4 cotton or cotton blend — approximately 180–240 g
Allow approximately 400–520 g total for the complete photo-inspired runner. Cotton is particularly suitable because the finished leaves respond well to blocking and the circular motifs need enough body to remain flat.
Tools
- 4 mm crochet hook
- 3.5 mm crochet hook if the surface veins need firmer definition
- Locking stitch markers
- Yarn needle
- Sharp scissors
- Blocking mat
- Rust-resistant pins
- Flexible tape measure
Abbreviations
- MR — magic ring
- ch — chain
- sl st — slip stitch
- sc — single crochet
- hdc — half double crochet
- dc — double crochet
- tr — treble crochet
- inc — increase
- dec — decrease
- st/sts — stitch/stitches
- sp — space
- RS — right side
- WS — wrong side
Keep decreases compact at the valleys between leaf lobes. Loose decreases soften the indentations and reduce the recognizable maple silhouette.
Runner Layout
The photo-inspired version uses four large maple leaves and three circular medallions.
Arrange the motifs in this sequence:
Cream leaf → pink circle → pink leaf → cream circle → cream leaf → pink circle → pink leaf.
Each component touches or slightly overlaps the next motif along the center axis.
Target approximately 28–32 cm across the widest portion of each leaf. The medallions should measure approximately 18–20 cm across.
The complete blocked runner should finish around 125–140 cm long, depending on how much the motifs overlap during assembly.
Pattern — Step by Step
Large Maple Leaf — Make 4
Make 2 in blush pink and 2 in warm cream.
The maple leaf is constructed from five shaped lobes joined around one lower center. This method makes it easier to control the width and the deep valleys visible in the photograph.
Central Lobe
Ch 17.
Row 1: Sc in second ch from hook and across. (16)
Row 2: Ch 1, turn. Sc across. (16)
Row 3: Ch 1, turn. 2 sc in first st, sc across to final st, 2 sc in final st. (18)
Row 4: Ch 1, turn. Sc across. (18)
Row 5: Ch 1, turn. 2 sc in first st, sc across to final st, 2 sc in final st. (20)
Row 6: Ch 1, turn. Sc across. (20)
Row 7: Ch 1, turn. 2 sc in first st, sc across to final st, 2 sc in final st. (22)
Rows 8–12: Ch 1, turn. Sc across. (22)
Row 13: Ch 1, turn. Dec, sc across to final 2 sts, dec. (20)
Row 14: Ch 1, turn. Sc across. (20)
Row 15: Ch 1, turn. Dec, sc across to final 2 sts, dec. (18)
Row 16: Ch 1, turn. Dec, sc across to final 2 sts, dec. (16)
Row 17: Ch 1, turn. Dec, sc across to final 2 sts, dec. (14)
Row 18: Ch 1, turn. Dec, sc across to final 2 sts, dec. (12)
Row 19: Ch 1, turn. Dec, sc across to final 2 sts, dec. (10)
Row 20: Ch 1, turn. Dec, sc across to final 2 sts, dec. (8)
Row 21: Ch 1, turn. Dec, sc 4, dec. (6)
Row 22: Ch 1, turn. Dec, sc 2, dec. (4)
Row 23: Ch 1, turn. Dec twice. (2)
Row 24: Dec. (1)
Fasten off with a 30 cm tail.
Upper Left Lobe
Ch 14.
Row 1: Sc in second ch from hook and across. (13)
Row 2: Ch 1, turn. Sc across. (13)
Row 3: Ch 1, turn. 2 sc in first st, sc across to final st, 2 sc in final st. (15)
Row 4: Ch 1, turn. Sc across. (15)
Row 5: Ch 1, turn. 2 sc in first st, sc across to final st, 2 sc in final st. (17)
Rows 6–9: Ch 1, turn. Sc across. (17)
Row 10: Ch 1, turn. Dec, sc across to final 2 sts, dec. (15)
Row 11: Ch 1, turn. Sc across. (15)
Row 12: Ch 1, turn. Dec, sc across to final 2 sts, dec. (13)
Row 13: Ch 1, turn. Dec, sc across to final 2 sts, dec. (11)
Row 14: Ch 1, turn. Dec, sc across to final 2 sts, dec. (9)
Row 15: Ch 1, turn. Dec, sc across to final 2 sts, dec. (7)
Row 16: Ch 1, turn. Dec, sc 3, dec. (5)
Row 17: Ch 1, turn. Dec, sc 1, dec. (3)
Row 18: Sc3tog. (1)
Fasten off with a 30 cm tail.
Upper Right Lobe
Repeat the upper-left lobe exactly.
Place both finished pieces together. Their widest points should differ by no more than approximately 5 mm.
Lower Left Lobe
Ch 12.
Row 1: Sc in second ch from hook and across. (11)
Row 2: Ch 1, turn. 2 sc in first st, sc across to final st, 2 sc in final st. (13)
Row 3: Ch 1, turn. Sc across. (13)
Row 4: Ch 1, turn. 2 sc in first st, sc across to final st, 2 sc in final st. (15)
Rows 5–8: Ch 1, turn. Sc across. (15)
Row 9: Ch 1, turn. Dec, sc across to final 2 sts, dec. (13)
Row 10: Ch 1, turn. Sc across. (13)
Row 11: Ch 1, turn. Dec, sc across to final 2 sts, dec. (11)
Row 12: Ch 1, turn. Dec, sc across to final 2 sts, dec. (9)
Row 13: Ch 1, turn. Dec, sc across to final 2 sts, dec. (7)
Row 14: Ch 1, turn. Dec, sc 3, dec. (5)
Row 15: Ch 1, turn. Dec, sc 1, dec. (3)
Row 16: Sc3tog. (1)
Fasten off with a 30 cm tail.
Lower Right Lobe
Repeat the lower-left lobe.
These two sections should be shorter and broader in placement than the upper pair.
Joining the Maple Leaf Lobes
Place the central lobe vertically.
Position the two upper lobes at approximately 35–45 degrees from the center.
Place the two lower lobes at approximately 65–75 degrees.
Overlap the inner lower corners by approximately 1–1.5 cm.
Pin all five pieces before sewing.
Turn the assembly over and whipstitch the overlapping sections using matching yarn.
Return the leaf to the right side and check the silhouette before continuing.
Pointed Maple Edge
Join matching yarn near the lower center.
Work sc evenly around the perimeter.
At each main lobe point work:
(sc, ch 2, sc).
To form smaller serrations between the major points, periodically work:
sc, hdc, dc, ch 2, sl st in second ch from hook, dc, hdc, sc.
At each deep valley between lobes, work one compact sl st.
Continue around the complete leaf.
Join with sl st and fasten off.
Raised Central Vein
Keep the leaf right side up.
Join matching yarn at the lower center.
Surface sl st vertically through the middle of the leaf toward the central point.
Stop approximately 1 cm before the point.
Fasten off on the wrong side.
Upper Side Veins — Make 2
Join matching yarn beside the central vein.
Surface sl st diagonally toward one upper lobe.
Stop approximately 1–1.5 cm before its point.
Fasten off.
Repeat on the opposite side.
Lower Side Veins — Make 2
Join yarn lower on the central vein.
Surface sl st toward one lower lobe.
Keep this line more horizontal than the upper vein.
Stop approximately 1–1.5 cm before the edge.
Repeat for the opposite lower lobe.
Secondary Veins
Add two short branches along each main vein.
Begin each branch against an existing raised line.
Surface sl st diagonally outward for approximately 3–5 cm.
Stop before reaching the leaf edge.
The branches should shorten progressively as they approach a lobe point.
Leaf Stem
Join matching yarn at the lower center.
Ch 9.
Beginning in second ch from hook, sl st through all 8 chains.
Sl st back into the leaf base.
Fasten off with a 25 cm tail.
Round Crochet Medallion — Make 3
Make 2 in blush pink and 1 in warm cream.
The photographed circles are dense through most of their diameter with a more decorative outer section. A flat circle requires regular increases; if the work begins cupping, the increase rate is too low for the current tension.
Medallion Center
Make MR.
R1: 6 sc in MR. Join with sl st. (6)
R2: Ch 1, inc ×6. Join. (12)
R3: Ch 1, (sc, inc) ×6. Join. (18)
R4: Ch 1, (2 sc, inc) ×6. Join. (24)
R5: Ch 1, (3 sc, inc) ×6. Join. (30)
R6: Ch 1, (4 sc, inc) ×6. Join. (36)
R7: Ch 1, (5 sc, inc) ×6. Join. (42)
R8: Ch 1, (6 sc, inc) ×6. Join. (48)
R9: Ch 1, (7 sc, inc) ×6. Join. (54)
R10: Ch 1, (8 sc, inc) ×6. Join. (60)
The medallion should remain flat after every round.
Textured Medallion Round
R11: Ch 1, (9 sc, inc) ×6. Join. (66)
R12: Ch 1, sc around. Join. (66)
R13: Ch 1, *sc in next 4 sts, ch 1, skip 1 st, sc in next 6 sts.* Repeat around as evenly as possible, adjusting the final repeat at the join.
This round creates small openings similar to the decorative ring visible in the photograph.
Medallion Outer Edge
R14: Ch 1. Sc in each sc and work 2 sc into each ch-1 space.
Join with sl st.
R15: *Sl st in next st, 3 hdc in next st, sl st in next st.* Repeat around for a subtle textured edge.
Join with sl st.
Fasten off with a 35 cm tail.
Block to approximately 18–20 cm across.
Why the Circles Must Stay Flat
Circular crochet expands as each round increases. A practical flat-circle structure begins with six single crochet stitches and adds six stitches per increase round, which is the progression used through the dense section of this medallion.
If the circle forms a bowl, check the stitch count first. Missing an increase can reduce the circumference enough to create cupping.
If the edge begins waving, the circle may have too much circumference for the current gauge. Work the next round without increases or use a slightly smaller hook.
Published circular-motif runners confirm that individually crocheted circles can be assembled successfully into elongated table-runner layouts rather than being incorporated into a rectangular background. 1
Blocking the Maple Leaves
Blocking controls the geometry of this runner.
Dampen each completed leaf according to the yarn manufacturer’s instructions.
Place it right side up on a blocking mat.
Pin the center point first.
Align the lower stem directly beneath that point.
Pin both upper side lobes at equal angles.
Spread the two lower lobes farther outward.
Place additional pins in the four major valleys and along selected smaller serrations.
Check that the central raised vein remains straight.
Allow the leaf to dry completely before removing the pins.
Blocking the Circular Medallions
Place each damp circle on the blocking mat.
Measure its diameter in two directions.
Pin opposite points first, then add another pair at 90 degrees.
Continue adding pins around the circumference while maintaining an approximately circular outline.
Do not stretch one circle larger simply to compensate for a leaf that was made too long. Each type of motif should be blocked according to its own target measurement.
Planning the Runner Layout
Lay all seven motifs on the table before joining.
Place the first cream leaf with its central point facing outward toward one end of the table.
Position a pink medallion below it.
Add the first pink leaf with its point directed toward the medallion.
Place the cream medallion in the middle.
Continue with the second cream leaf, second pink circle and final pink leaf.
The two end leaves can point away from the center while the internal leaves alternate direction.
Overlap adjoining components by approximately 1.5–3 cm.
Joining a Leaf to a Medallion
Use the matching color of the motif that will sit uppermost.
Thread a 30–35 cm yarn tail onto the needle.
Overlap the leaf stem or lower central section with the medallion by approximately 2 cm.
From the wrong side, make several small whipstitches through both layers.
Keep the stitches inside the overlap so they remain hidden from the front.
Make at least 5–7 secure passes across the connection.
Weave the tail into the back of the same motif.
Joining Leaf to Leaf
If two leaf sections touch directly in a resized version, overlap only their lower center areas.
Do not sew the outer lobe points together.
Join through approximately 2–3 cm of the lower edge.
The outer points should remain free so each leaf keeps its individual silhouette.
Assembly
- Crochet two cream maple leaves and two blush-pink maple leaves, including the pointed edging, stems and raised vein networks.
- Make two blush-pink circular medallions and one cream medallion, checking all stitch counts so the circles remain flat.
- Wet-block every leaf with its center point and stem aligned on the same axis.
- Block all three medallions to approximately 18–20 cm and confirm that their diameters match within 5 mm.
- Arrange all seven motifs in the alternating leaf-and-circle sequence on a flat table.
- Adjust the overlaps until the complete runner measures approximately 125–140 cm long.
- Pin each connection while checking that the center line remains approximately straight.
- Whipstitch adjoining motifs through the hidden overlap areas with 5–7 secure passes at each connection.
- Turn the runner right side up and correct any motif that rotates away from the central axis.
- Weave all remaining tails into matching-colored stitches and lightly reshape the complete runner without flattening the raised veins.
The finished runner should alternate broad five-lobe maple leaves with dense circular medallions while leaving the tabletop visible around the entire composition.
7 Technical Tips
- Keep corresponding leaf lobes within 5 mm of each other. A larger difference makes the central vein appear off-center even when the leaf has been assembled correctly.
- Count every medallion increase round. One missing increase can cause a visible bowl, while unnecessary increases create a ruffled outer circumference.
- Pin all four major leaf valleys during blocking. Pinning only the outer points produces a star-like silhouette instead of the deep maple indentations shown in the reference.
- Keep surface slip stitches relaxed. A tight central vein can shorten a large leaf by 1–2 cm and make the central lobe curl upward.
- Overlap neighboring motifs by approximately 1.5–3 cm. A smaller connection can rotate under handling, while a much larger overlap hides too much of the circular medallion.
- Use at least 5–7 sewing passes at every connection. A single attachment stitch creates a pivot point and allows the large leaves to turn sideways.
- Measure the complete runner before the final two joins. Correct the overlap depth if the project is more than approximately 5 cm outside the intended finished length.
How the Maple Leaf Proportions Work
A recognizable maple leaf is not a collection of five identical points. The center lobe establishes the vertical direction and should remain the longest section.
The upper pair creates the broad upper silhouette. Position these lobes diagonally rather than nearly parallel to the center.
The lower pair has a different job. They widen the base and create the deep valleys that separate the leaf from a simple five-point star.
Smaller serrations can be added around the perimeter, but they should remain subordinate to those five primary lobes.
Published maple-leaf runner designs use worsted or Aran yarn and hooks around 4–5 mm, supporting the yarn-and-hook range used for this photo-inspired version. 2
Why Surface Crochet Works for the Veins
The raised vein network is applied after the main leaf structure is complete. That keeps the body of each lobe uninterrupted and allows the vein placement to follow the final blocked geometry.
Begin with the center line because every secondary branch depends on it.
Work the upper branches next, followed by the more horizontal lower veins.
Do not extend a branch directly into the perimeter. Leaving approximately 1–1.5 cm of plain crochet between the vein and outer edge makes the pointed silhouette easier to read.
Surface crochet also adds a small amount of structural reinforcement along each lobe without requiring a contrasting color.
Adjusting the Runner Length
The modular construction makes the finished length easy to change.
For a short centerpiece, use three leaves and two circles. Depending on motif size and overlap, this produces a runner approximately 80–95 cm long.
For the photographed proportion, use four leaves and three circles.
For a long dining table, use five leaves and four circles, alternating pink and cream throughout.
Add complete motifs rather than stretching the gaps between them. The visual continuity depends on each leaf or medallion touching the next component.
Changing the Motif Size
To make a smaller runner, use DK cotton with a 3–3.5 mm hook. Keep the same lobe proportions and reduce the medallion after fewer increase rounds.
For the photo-inspired scale, worsted cotton with a 4 mm hook gives enough structure for large leaves and dense circles. A published 2022 maple-leaf table-runner pattern also specifies Aran yarn with a 4 mm hook. 3
For a substantially larger centerpiece, increase the yarn weight rather than adding arbitrary rows to only one leaf section.
All five lobes must grow proportionally or the silhouette changes.
Choosing Yarn for Table Décor
Cotton provides crisp stitch definition and responds predictably to wet blocking. Both characteristics are useful here because the design depends on sharp leaf points and flat circular motifs.
A cotton-acrylic blend can reduce weight while retaining much of that definition.
If acrylic is used, treat the runner as decorative table décor rather than protection from hot cookware. Use a suitable heat-resistant trivet beneath hot serving dishes.
Keep both colors in the same yarn line when possible. A thicker pink yarn and thinner cream yarn would produce visibly different motif dimensions even if the stitch counts were identical.
Pink and Cream Color Placement
The reference uses only two colors, so placement becomes important. Alternating colors prevents a long uninterrupted pink or cream section from dominating the runner.
The cream motifs provide visual breaks between the stronger blush-pink components.
For a more autumnal variation, replace pink with burnt orange while retaining cream.
A muted botanical version can combine sage green and ivory. Burgundy and oatmeal create stronger contrast, while dusty blue and cream shift the same construction toward year-round table décor.
Whatever pair is chosen, keep the motif sequence consistent enough that the runner reads as one planned composition rather than unrelated crochet pieces.
Care and Storage
Follow the yarn manufacturer’s washing instructions.
After washing, reshape every leaf while damp. Pin the central point, four side lobes and major valleys if the motifs have lost definition.
Reshape the medallions separately by smoothing their circumferences into circles.
Store the runner flat or loosely rolled. Folding directly through a raised central vein can leave a temporary crease and bend the pointed lobes.
If the runner is rolled, place a sheet of clean cotton fabric over the raised surface first so the leaf points do not catch on neighboring motifs.
Technical References
A current free maple-leaf table-runner pattern from CrochetClover specifies worsted cotton, a 5 mm hook and an approximately 14 × 52 inch finished size, providing a useful benchmark for yarn weight and table-runner scale. 4
Heather Noble’s published Maple Leaves Table Runner on Ravelry specifies Aran yarn, a 4 mm hook and approximately 470 yards, supporting a similar hook range for structured maple-leaf table décor. 5
EyeLoveKnots documents a table runner constructed from separate circular motifs, while the Ravelry-listed Study in Circles Table Runner likewise uses individually crocheted motifs assembled into a runner. These provide construction references for the modular circle sections used here. 6
Conclusion
Block every component before deciding the final overlap because the runner’s length depends on the finished dimensions of both motif types. Keep the maple center lobes aligned with their stems, pin the deep valleys individually and correct any cupping in the circular medallions before assembly. Join each pair through a 1.5–3 cm hidden overlap so the seven motifs remain stable while their outer edges stay free. This maple leaf crochet table runner pattern can then be shortened or extended by changing the number of complete motifs. Save the finished layout to Pinterest or share it on Instagram with #PinkMapleLeafRunner. Would you keep the alternating pink-and-cream sequence or make both end leaves cream?









