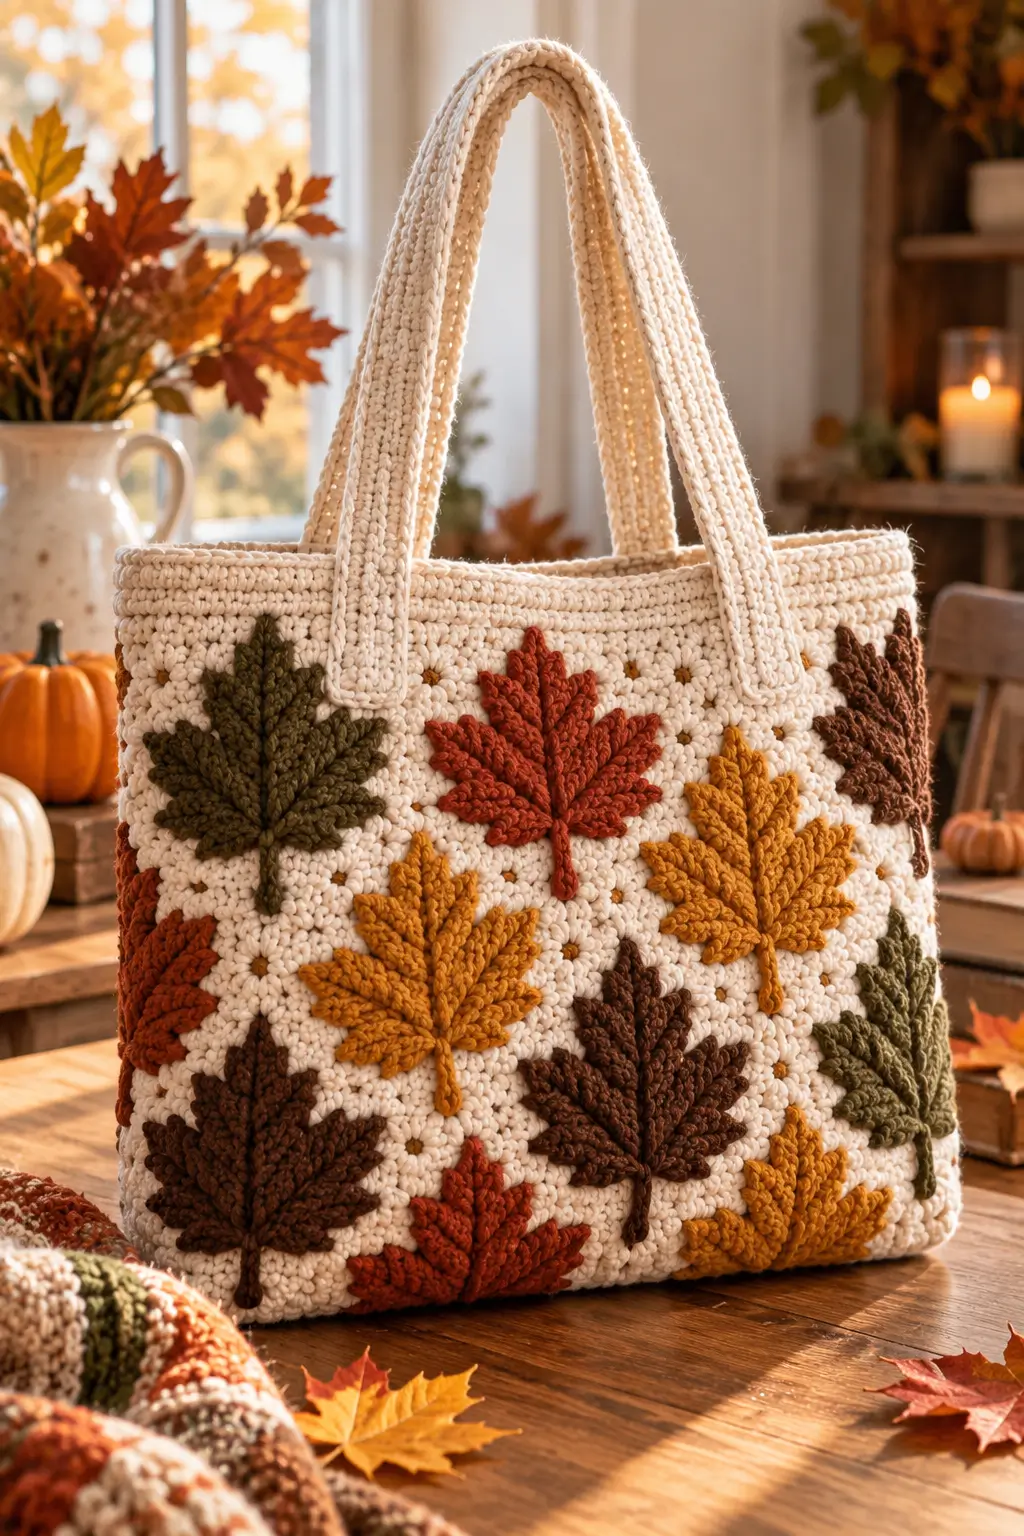
A maple leaf appliqué needs five readable lobes before it can carry the front of a bag this prominently. This crochet maple leaf tote bag pattern combines a dense cream tote with raised autumn leaves in rust, mustard, olive and brown. Reinforced shoulder straps, a firm rectangular body and separately crocheted leaf appliqués produce the structured fall bag shown in the photo.
The Design: What Makes This Autumn Tote Different
The bag body is intentionally simple because the surface decoration carries most of the detail. Dense single crochet gives the cream background enough structure to support multiple raised leaves without sagging around their attachment points.
The leaves are separate appliqués rather than colorwork inside the tote fabric. Each motif uses a dominant center lobe, two middle lobes and two smaller lower lobes, followed by a narrow stem. Published maple-leaf appliqués commonly use worsted yarn with hooks around 3.5–4 mm; documented examples finish from about 7.5 to 10 cm across.
Wide straps distribute weight better than narrow cords. Their attachment points extend several centimeters down the bag face, reducing stress at the upper edge.
A common mistake with an autumn crochet tote bag is attaching the appliqués before the bag has been blocked. Distortion in the body then becomes much harder to correct.
Project Info at a Glance
| Skill Level | Time | Finished Size | Hook | Construction |
|---|---|---|---|---|
| Intermediate | 12–16 hours | Approx. 36 × 38 cm | 4.5 mm body / 4 mm leaves | Dense tote with sewn maple-leaf appliqués |
The 36 × 38 cm measurement is a photo-inspired target rather than a direct measurement of the pictured bag. For comparison, published worsted-cotton tote patterns commonly use hooks around 4.5–5 mm, and one documented dense cotton tote measures approximately 30 × 29 cm with a 7.5 cm base.
Materials and Tools
Yarn
- Warm cream — worsted/category 4 cotton — approximately 550–650 g
- Burnt orange — worsted/category 4 — approximately 50–60 g
- Mustard gold — worsted/category 4 — approximately 50–60 g
- Dark brown — worsted/category 4 — approximately 50–60 g
- Olive green — worsted/category 4 — approximately 50–60 g
Cotton is the preferred fiber for the bag body because a dense cotton fabric has substantially less stretch than a loosely worked decorative fabric. Published sturdy tote patterns also commonly specify worsted cotton and a hook slightly smaller than the yarn label might otherwise suggest.
Tools
- 4.5 mm crochet hook for the tote
- 4 mm crochet hook for the maple leaves
- Yarn needle
- Stitch markers
- Sharp scissors
- Blocking pins
- Blocking mat
- Flexible tape measure
- Cotton lining fabric — optional
Abbreviations
- MR — magic ring
- ch — chain
- sl st — slip stitch
- sc — single crochet
- hdc — half double crochet
- dc — double crochet
- tr — treble crochet
- inc — increase
- st/sts — stitch/stitches
- BLO — back loop only
- RS — right side
- WS — wrong side
Keep leaf decreases and valley stitches compact because loose transitions make the maple points appear rounded.
Gauge
For the cream bag body, target approximately 14–15 sc × 16–17 rows = 10 cm using the 4.5 mm hook.
The fabric should be dense enough that small objects cannot easily push between stitches.
Make a 15 cm square swatch before beginning. Wash and dry it according to the yarn label, then measure again.
If the swatch is substantially wider than the target, change to a 4 mm hook. If the fabric becomes rigid and difficult to work, move to a 5 mm hook while maintaining firm tension.
Pattern — Step by Step
Front Panel
Yarn: warm cream.
Ch 55.
Row 1: Sc in second ch from hook and in every ch across. (54)
Row 2: Ch 1, turn. Sc in every st across. (54)
Rows 3–60: Repeat Row 2. (54)
Measure the panel before fastening off.
Target approximately 36 cm wide × 38 cm high.
If row gauge differs, add or remove rows until the height reaches approximately 38 cm.
Fasten off with a 60 cm tail.
Back Panel
Yarn: warm cream.
Repeat the front-panel instructions exactly.
Lay the two panels together after completion.
The side and lower edges should match within approximately 5 mm.
Correct a substantial difference before assembly rather than trying to stretch the smaller panel during seaming.
Optional Bottom Gusset
The photographed bag has enough depth to stand as a substantial tote. Add a separate bottom gusset for a similar profile.
Ch 55.
Row 1: Sc in second ch from hook and across. (54)
Rows 2–12: Ch 1, turn. Sc across. (54)
Target approximately 7–8 cm of depth.
Fasten off with a 60 cm tail.
Side Gusset — Make 2
Ch 13.
Row 1: Sc in second ch from hook and across. (12)
Rows 2–60: Ch 1, turn. Sc across. (12)
Target the same length as the vertical edge of the front and back panels.
Fasten off with a 60 cm tail.
Joining the Tote Body
Place the front panel and one side gusset with wrong sides together.
Join cream yarn at the lower corner.
Work sc evenly through both layers along the entire edge.
Attach the second side gusset in the same manner.
Join the back panel to both gussets.
Finally, attach the bottom panel around all four lower edges.
Keep the corner stitches firm. Loose corner seams allow the rectangular base to collapse outward when the tote is filled.
Top Reinforcement
Join cream yarn at one side seam.
Round 1: Ch 1. Sc evenly around the complete opening. Join with sl st.
Round 2: Ch 1. Sc in every st around. Join.
Round 3: Ch 1. Sc BLO in every st around. Join.
Round 4: Ch 1. Sc in every st around. Join.
Fasten off.
The reinforced upper band should measure approximately 2.5–3 cm deep.
Long Shoulder Handle — Make 2
Yarn: warm cream.
Ch 9.
Row 1: Sc in second ch from hook and across. (8)
Row 2: Ch 1, turn. Sc across. (8)
Rows 3–105: Repeat Row 2. (8)
Target approximately 65–70 cm before attachment.
Do not make the straps longer until they have been gently stretched by hand. Cotton handles lengthen slightly under load.
Fasten off with a 50 cm tail.
Handle Edging
Join cream yarn at one lower corner of the strap.
Sc evenly along the long edge.
Work 3 sc around the short end.
Sc down the opposite long edge.
Work 3 sc around the remaining end.
Join with sl st.
Fasten off.
Repeat for the second strap.
Attaching the Handles
Lay the tote flat.
Position the first handle ends approximately 8–9 cm from each side edge.
Overlap each strap end onto the bag by approximately 7 cm.
Pin both attachment points before sewing.
Using cream yarn, sew a rectangle around the perimeter of each overlapping section.
Then sew an X through the center of that rectangle.
Repeat for the second handle on the back panel.
Check that both handles have the same drop before securing the final attachment.
Maple Leaf Appliqué
Published maple-leaf appliqué patterns provide useful scale references. One current worsted-weight pattern uses a 4 mm hook and produces a leaf approximately 10 × 10 cm, while another uses worsted yarn with a 3.5 mm hook for a leaf approximately 7.5 × 7.5 cm. Use the 4 mm hook here and target approximately 9–11 cm per motif.
Maple Leaf Center
Make leaves in burnt orange, mustard, olive and dark brown.
Make MR.
R1: Ch 1, 6 sc in MR. Join with sl st. (6)
R2: Ch 1, 2 sc in every st around. Join. (12)
R3: Ch 1, (sc, inc) ×6. Join. (18)
R4: Ch 1, (2 sc, inc) ×6. Join. (24)
The center now provides the foundation for five unequal points.
Center Maple Lobe
From the current position:
Ch 9.
Beginning in second ch from hook, work:
Sl st, sc, hdc, dc, tr, dc, hdc, sc.
Sl st into the next available stitch of the center.
This is the tallest point.
Upper Side Lobe
Sl st into the next center stitch.
Ch 7.
Beginning in second ch from hook:
Sl st, sc, hdc, dc, hdc, sc.
Sl st into the next center stitch.
Lower Side Lobe
Sl st into the next stitch.
Ch 5.
Beginning in second ch from hook:
Sl st, sc, hdc, sc.
Sl st into the center.
Opposite Lower Lobe
Repeat the lower side-lobe instructions.
Opposite Upper Lobe
Repeat the upper side-lobe instructions.
You should now have five visible lobes: one tall central point, two medium upper points and two smaller lower points.
Maple Leaf Stem
Sl st toward the bottom center of the motif.
Ch 8.
Beginning in second ch from hook, sl st through all 7 chains.
Sl st back into the leaf center.
Fasten off with a 35 cm tail.
Leaf Surface Texture
The leaves in the reference are strongly raised and veined.
Join matching yarn at the end of the stem.
Surface sl st from the stem into the center of the leaf and toward the central point.
Fasten off before reaching the tip.
Add two diagonal surface-slip-stitch branches toward the medium lobes.
Add two shorter branches toward the lower lobes.
Keep these stitches relaxed so the motif remains flat.
Leaf Quantity and Color Plan
For the photo-inspired front panel, make approximately 10–12 maple leaves.
- Burnt orange — 3 leaves
- Mustard gold — 3 leaves
- Dark brown — 3 leaves
- Olive green — 3 leaves
Use fewer leaves if you want more cream background to remain visible.
Make several motifs before attaching any of them. Small variations in lobe shape make the arrangement look more botanical than twelve mechanically identical leaves.
Blocking the Maple Leaves
Dampen each motif according to the yarn-care instructions.
Pin the center lobe first.
Pin the two medium side lobes at matching angles.
Spread the lower lobes outward and pin them last.
Keep the stem aligned below the center point.
Allow the motifs to dry completely before removing the pins.
A documented worsted maple-leaf appliqué can measure about 10 cm square with a 4 mm hook, making that a practical benchmark for the motifs on this tote.
Planning the Leaf Arrangement
Stuff the tote lightly with folded towels before positioning the appliqués. This gives the front panel approximately the same shape it will have during use.
Place the largest visual leaf near the upper center.
Add mustard, brown and olive motifs around it.
Rotate individual leaves between approximately 10 and 35 degrees.
Keep at least 2 cm between most neighboring motifs.
Allow selected leaves to approach the side seams, as shown in the reference, but avoid placing a thick leaf directly over the seam itself.
Photograph the arrangement before sewing.
Sewing the Maple Leaves to the Bag
Thread the long matching yarn tail onto a tapestry needle.
Sew through the leaf center first.
Continue around the lower half of each lobe.
Leave approximately the outer 5–8 mm of the lobe points free if you want a slightly raised appearance.
Secure the stem along its complete length because loose stems can catch during regular use.
Pass the sewing yarn through the dense cream fabric without pulling hard enough to create puckers.
Knot on the inside and weave the tail through several cream stitches.
Optional Fabric Lining
A lining is useful when the tote will carry keys, pens or other objects that can catch on crochet stitches.
Measure the completed bag after assembly.
Cut two fabric rectangles approximately 2 cm wider than the interior width and 2 cm taller than the interior height, allowing for seam allowances.
Sew the fabric sides and bottom.
Fold the upper raw edge toward the wrong side and press it.
Insert the lining into the tote.
Hand-sew it just below the cream top reinforcement band.
Do not stitch through the exterior handle attachment lines unless additional reinforcement is intentional.
Assembly
- Crochet the cream front and back panels and check that their dimensions match within approximately 5 mm.
- Make the bottom and side gussets, then join them to the two large panels with firm cream seams.
- Work four reinforcement rounds around the upper opening before attaching any handles.
- Crochet two 65–70 cm shoulder straps and add a stabilizing single-crochet edging around each one.
- Attach every handle end with approximately 7 cm of overlap using a sewn rectangle and internal X.
- Crochet 10–12 maple-leaf appliqués in rust, mustard, olive and brown, then add the raised surface veins.
- Block every leaf into a clear five-lobe shape before arranging the motifs on the tote.
- Position the leaves across the front panel, photograph the layout and sew each motif with matching yarn.
- Add an optional cotton lining after all exterior appliqué sewing has been completed.
- Weave all remaining tails, check the four handle attachments and reshape the tote body before use.
The completed tote should have a dense rectangular cream body, two reinforced shoulder handles and a scattered arrangement of raised five-lobe autumn leaves.
7 Technical Tips
- Keep the cream body near 14–15 sc per 10 cm. A substantially looser gauge produces larger openings and increases stretching when the tote carries weight.
- Overlap each handle end by approximately 7 cm. Attaching only the final row of a strap concentrates the load at the upper edge and can distort the bag opening.
- Keep the two handle drops within 5 mm of one another. Unequal handles make the loaded tote hang at an angle even when the body panels match.
- Block every maple leaf before sewing. Attaching an unblocked 10 cm motif and stretching it afterward can pucker the cream panel around its sewing line.
- Leave only 5–8 mm of the leaf points unattached. Larger unsupported sections can curl, catch on clothing or fold backward during use.
- Keep at least 2 cm between most appliqués. Heavy overlap creates a thick surface and places unnecessary weight on one section of the cream panel.
- Test the tote with 2–3 kg before final trimming. Check the handle attachment boxes, bottom corners and side seams for movement before cutting any remaining reinforcement tails.
Why Cotton Works for the Tote Body
A decorative bag needs to retain its shape after objects are placed inside it. Current published tote patterns frequently specify worsted cotton and relatively firm tension for this reason. One dense cotton tote pattern uses category 4 cotton with a 5 mm hook and a gauge of 14 single crochet stitches per 10 cm.
The photograph also shows a substantial fabric rather than an open market-bag mesh. Single crochet suits that structure because the stitches create a close background for sewing the appliqués.
If a cotton-acrylic blend is substituted, make the gauge swatch larger and test it with weight. A yarn that stretches significantly can change both the bag height and handle drop.
Making Strong Crochet Handles
The handles carry more concentrated stress than any other part of the tote. Width, density and attachment depth therefore matter more than decorative stitch complexity.
The photo shows broad cream straps rather than chain handles. An eight-stitch single-crochet strap creates a similar visual proportion.
After crocheting each handle, stretch it gently by hand and measure again. Correct any difference between the pair before attachment.
The 7 cm overlap transfers load farther down the front and back panels. A box-and-X sewing pattern spreads the attachment over a larger area.
For a tote intended to carry heavier objects regularly, cotton twill tape can be hand-sewn to the wrong side of each crochet handle before the lining is installed.
Making the Maple Leaves More Dimensional
The reference leaves have pronounced ridges. Surface crochet can reproduce much of that texture without making a second complete leaf layer.
Start each raised vein at the stem. Continue through the leaf center and toward the dominant point.
Branch toward the four side lobes afterward.
Using the same color keeps the texture subtle. For greater contrast, work the veins in a shade one step lighter or darker than the leaf body.
Do not pull the surface stitches tightly. A short surface line contracts the appliqué and makes the lobe edges curl toward the front.
Changing the Tote Size
For a smaller handbag, reduce the front and back panels to approximately 30 × 32 cm. Use 6–8 maple leaves and shorten the handles according to the desired drop.
For a large project bag, increase the body to approximately 42 × 42 cm and widen the bottom gusset to about 10 cm.
Do not enlarge the appliqués automatically when enlarging the bag. More standard-sized leaves often produce a better scattered pattern than a few oversized motifs.
Measure the bag after assembly before cutting a fabric lining. Crochet dimensions can change slightly when the seams and top reinforcement are added.
Autumn Color Placement
The photographed palette uses four muted leaf colors against a warm cream ground. Rust supplies the strongest saturated accent. Mustard adds a lighter warm value, brown anchors the composition and olive introduces contrast without leaving the autumn palette.
A balanced arrangement does not require equal spacing. Separate identical colors where possible and avoid forming obvious horizontal rows.
Place one strong rust or mustard leaf near the upper center, then distribute the remaining colors around it.
Another version could use burgundy, camel, forest green and copper. Keep the bag body neutral if the appliqués use four or more colors.
Care and Maintenance
Follow the yarn manufacturer’s washing directions. Empty the tote completely before washing and remove any detachable base insert.
Reshape the body while damp. Straighten the side seams and arrange the maple points before drying.
A lined tote should be washed according to the requirements of both the crochet yarn and lining fabric.
Do not hang the bag by one handle while it is saturated with water. Support the full body instead so the wet weight does not stretch one strap attachment.
Inspect the appliqué stems and handle bases periodically. These narrow sections receive more abrasion than the broad leaf centers.
Conclusion
Build the cream tote first and check its structure before adding the autumn decoration. Reinforce the opening, attach both broad handles with 7 cm overlaps, then block and arrange the maple leaves only after the body holds its final shape. Keep the appliqués around 9–11 cm so several colors can be distributed without covering the cream background. A fabric lining can be added last for additional interior structure. This crochet maple leaf tote bag pattern can be adapted by changing the leaf palette while retaining the same bag construction. Save the finished version to Pinterest or share it on Instagram with #AutumnMapleLeafTote. Which leaf color would you place at the center: rust, mustard, brown or olive?









