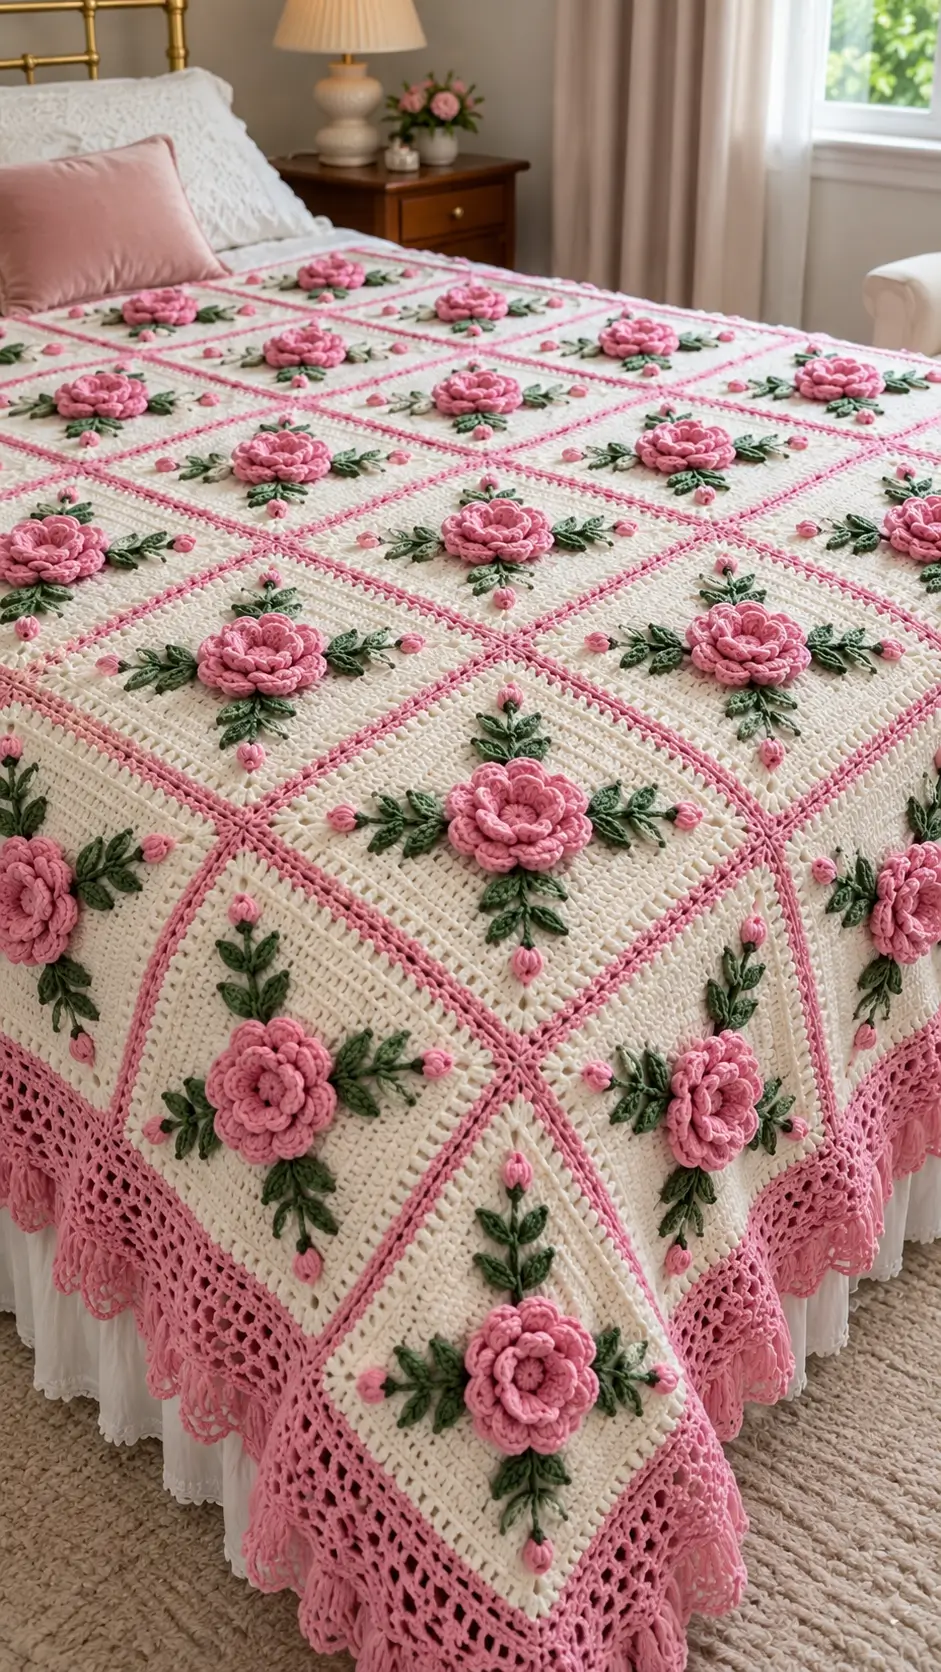
A raised rose this deep needs a firm square beneath it or the flower will pull the bedspread into a permanent dip. This crochet rose bedspread pattern combines cream square panels, dimensional pink roses, green leaves, miniature rosebuds and pink joining lines. A wide lace border finishes the photo-inspired design as a full-size floral bed covering.
The Design: What Makes This Rose Bedspread Different
The bedspread is built as a grid rather than crocheted in one continuous piece. Each cream square provides a stable background for a three-dimensional rose and symmetrical leaf arrangement. Pink joining seams then become part of the design instead of disappearing between motifs.
The flowers need several graduated petal layers. Small inner petals establish the rose center, while wider outer petals create the open bloom visible across the bed. Green leaves are attached around each flower after the square has been blocked, which reduces distortion.
Small rosebuds extend toward the corners and break up the large cream areas without competing with the central flower.
A common mistake with a 3D rose crochet blanket is attaching heavy flowers before blocking the squares. The extra weight can distort the background and produce uneven joining lines.
Project Info at a Glance
| Skill Level | Time | Finished Size | Hook | Construction |
|---|---|---|---|---|
| Intermediate/Advanced | 45–70 hours | Approx. 180 × 220 cm | 4 mm | Joined squares with appliqué flowers |
The finished measurement is a photo-inspired target rather than a direct measurement of the pictured bedspread. Adjust the number of squares after making and blocking one complete sample motif.
Materials and Tools
Yarn
- Warm cream — worsted/category 4 — approximately 2,000–2,400 g for squares and background
- Rose pink — worsted/category 4 — approximately 900–1,200 g for roses, joins and border
- Leaf green — worsted/category 4 — approximately 450–600 g for leaves and stems
A smooth cotton, cotton-acrylic blend or soft acrylic with clear stitch definition works well for this construction. Buy the main colors from consistent dye lots when possible because the bedspread requires a large quantity of yarn.
Tools
- 4 mm crochet hook
- 3.5 mm crochet hook for compact flowers if required
- Yarn needle
- Stitch markers
- Sharp scissors
- Blocking mats
- Rust-resistant blocking pins
- Flexible tape measure
Abbreviations
- MR — magic ring
- ch — chain
- sl st — slip stitch
- sc — single crochet
- hdc — half double crochet
- dc — double crochet
- tr — treble crochet
- inc — increase
- st/sts — stitch/stitches
- sp — space
- RS — right side
- WS — wrong side
Keep decreases compact when shaping leaves and buds so their pointed ends remain defined against the cream background.
Planning the Bedspread
The photograph shows a repeating square-grid construction. For a photo-inspired full bedspread, make approximately 30 squares and arrange them in a 5 × 6 grid.
Target each blocked square at approximately 30–32 cm. Five squares across produce a central panel approximately 150–160 cm wide before the outer border. Six squares produce approximately 180–192 cm of length.
A pink lace border approximately 12–15 cm deep can bring the final dimensions close to 180 × 220 cm, depending on square gauge and joining method.
Make one complete square, rose and leaf arrangement before producing the remaining motifs. Measure that sample after blocking.
Pattern — Step by Step
Cream Background Square — Make 30
Yarn: warm cream.
Ch 55.
Row 1: Dc in fourth ch from hook and in every ch across. (52 dc)
Row 2: Ch 3, turn. Dc in every st across. (52)
Row 3: Ch 3, turn. Dc in every st across. (52)
Rows 4–24: Repeat Row 3. (52)
Measure the panel. Continue the established row if additional height is required to produce a square.
Do not fasten off when the panel reaches approximately 28–30 cm before edging.
Square Foundation Edging
Ch 1.
Work sc evenly around all four sides of the square.
At each corner work:
(sc, ch 2, sc).
Join with sl st.
Edging Round 2: Ch 1, sc in every st around. Work (sc, ch 2, sc) in each corner space.
Join with sl st.
Fasten off with a 20 cm tail.
Block each square to approximately 30–32 cm. All squares must match before joining.
Large Pink Rose — Make 30
Yarn: rose pink.
The rose is crocheted as a long petal strip and rolled into a dimensional flower. This construction produces multiple overlapping petal layers without requiring each petal to be sewn separately.
Ch 61.
Row 1: Dc in fifth ch from hook. Ch 1, skip 1 ch, dc in next ch. Repeat across to create a series of open spaces.
Turn.
Row 2: Work the following into each ch-1 space:
(sc, hdc, 3 dc, hdc, sc).
Repeat across.
Fasten off with a 70 cm tail.
The strip will naturally curl because several stitches are worked into each space.
Shaping the Rose Center
Begin at one end of the petal strip.
Roll the first 3–4 petals tightly around themselves to form the center.
Pass the yarn tail through the base of the roll several times.
Continue wrapping the remaining petals around the center, allowing each new layer to sit slightly farther outward.
Rotate the petal strip as it is wrapped so the upper edges do not stack directly above one another.
Sew through the lower edge after every two or three petals.
The completed rose should measure approximately 10–12 cm across.
Outer Rose Petal Layer
For the broad outer petals visible in the photograph, join pink yarn to the underside of the assembled flower.
Work evenly around the base:
Round 1: Ch 1, sc around the flower base. Join with sl st.
Round 2: *Ch 4, skip 2 sts, sl st in next st.* Repeat around.
Round 3: Into each ch-4 space work (sc, hdc, 5 dc, hdc, sc).
Join with sl st.
Fasten off with a 40 cm sewing tail.
These outer petals should sit lower than the tightly rolled center.
Large Green Leaf — Make 60
Yarn: leaf green.
Ch 12.
Beginning in second ch from hook:
Sl st, sc, hdc, dc, tr, tr, dc, hdc, sc, sl st.
Work 3 sc into the final chain.
Rotate the work and continue along the opposite side of the foundation chain:
Sl st, sc, hdc, dc, tr, tr, dc, hdc, sc, sl st.
Join at the base.
Fasten off with a 25 cm tail.
Small Green Leaf — Make 120
Ch 8.
Beginning in second ch from hook:
Sl st, sc, hdc, dc, hdc, sc.
Work 3 sc into the final chain.
Continue along the opposite side:
Sc, hdc, dc, hdc, sc, sl st.
Fasten off with a 20 cm tail.
The small leaves are used in pairs around the central flower and along the rosebud stems.
Raised Leaf Vein
With the right side of the leaf facing upward, join green yarn at the base.
Surface sl st along the center foundation chain toward the point.
Fasten off before reaching the final tip.
Keep the surface stitches relaxed enough that the leaf remains flat.
Pink Rosebud — Make 120
Yarn: rose pink.
Ch 7.
Row 1: Beginning in second ch from hook, work 2 hdc in each ch across.
Fasten off with a 25 cm tail.
The strip will curl automatically.
Roll it into a compact bud and secure the lower edge with several stitches.
Target approximately 2–2.5 cm for each finished bud.
Rosebud Green Base
Yarn: leaf green.
Join green yarn to the bottom of the pink bud.
Ch 3.
Sl st back to the bud base.
Repeat twice more to create three small sepals.
Fasten off with a 20 cm tail.
Green Stems
The stems can be worked directly onto the blocked cream square with surface crochet.
Mark the center of the square.
Mark four points approximately 8–10 cm from the center at the top, bottom, left and right.
Join green yarn near the center.
Surface sl st toward the first marker.
Fasten off on the wrong side.
Repeat for the remaining directions.
For a more organic arrangement, angle the side stems slightly rather than keeping all four perfectly horizontal or vertical.
Attaching the Central Rose
Place one large pink rose in the center of a blocked cream square.
Pin it at four points.
Using the long pink tail, sew around the underside of the flower.
Attach only the base and lowest outer petals. Leave the upper petal edges free so the flower retains its three-dimensional structure.
Make a second sewing pass through the flower base if the bedspread will be used regularly rather than displayed decoratively.
Attaching the Large Leaves
Position two large leaves on opposite sides of the central rose.
The leaf bases should disappear slightly beneath the flower.
Sew along the central vein and around the lower third of each leaf.
Leave the pointed outer sections free.
This creates the raised botanical appearance visible in the photograph.
Attaching the Small Leaves
Arrange two small leaves beside each major stem.
Angle them away from the central line by approximately 30–45 degrees.
Sew the lower half of each leaf to the cream square.
Do not stitch around the entire perimeter.
Attaching the Rosebuds
Position one rosebud at the end of each selected green stem.
Most squares can use four buds arranged around the central rose.
Sew through the green bud base and cream square several times.
Leave the upper pink section slightly raised.
Pink Joining Border for Each Square
Yarn: rose pink.
After all cream squares are blocked but before the large flowers are attached, work the pink joining border.
Join pink yarn in any corner.
Round 1: Ch 1. Sc in every st around. Work (sc, ch 2, sc) in each corner.
Join with sl st.
Round 2: Ch 1. Sc around again, maintaining the corner spaces.
Join with sl st.
Fasten off.
The two narrow pink rounds reproduce the grid lines visible between the cream panels.
Joining the Squares
Arrange the completed background squares in a 5 × 6 grid.
Check the orientation before joining. All floral stems should follow the planned layout.
With pink yarn, place two neighboring squares wrong sides together.
Sl st through corresponding border stitches.
Continue across the entire edge.
Join squares into horizontal rows first.
After all six rows are assembled, join the horizontal seams.
At four-square intersections, keep the joining stitches compact. Excess yarn at these junctions creates raised knots in the finished bedspread.
Outer Cream Foundation Border
Join cream yarn at one corner of the assembled bedspread.
Round 1: Ch 1. Sc evenly around the complete perimeter. Work (sc, ch 2, sc) in every corner.
Round 2: Ch 3. Dc in every st around. Work (2 dc, ch 2, 2 dc) in each corner space.
Round 3: Ch 1. Sc around, maintaining the corner increases.
Fasten off.
Wide Pink Lace Border
Yarn: rose pink.
Join pink yarn in a corner.
Round 1: Ch 4, skip 2 sts, sc in next st. Repeat around. Adjust the final repeat slightly where required so each side ends evenly.
At each corner work:
(sc, ch 4, sc, ch 4, sc).
Round 2: Sl st into first ch-4 space. Ch 3, work 3 dc in same space. Work 4 dc in every ch-4 space around.
At corners work (4 dc, ch 3, 4 dc).
Round 3: Ch 4, skip 2 dc, sc between the next dc groups. Repeat around.
Round 4: Work 5 dc into each ch-4 space.
Round 5: Ch 5, sc between each 5-dc group. Repeat around.
Round 6: Into each ch-5 space work (sc, hdc, 5 dc, hdc, sc).
At the corners, add one extra shell if necessary to keep the border flat.
Fasten off with a 30 cm tail.
Optional Scalloped Final Edge
For the deeper scalloped appearance visible around the photographed bedspread, add one final decorative round.
Join pink yarn between two shells.
Into the center dc of the next shell work:
7 dc.
Sl st between shells.
Repeat around.
At each corner, work 9 dc into the corner shell rather than seven.
Fasten off and weave the tail through the back of the lace border.
Assembly
- Crochet 30 cream background squares and block every piece to the same 30–32 cm measurement.
- Add two narrow pink border rounds to each square before attaching dimensional decorations.
- Arrange the squares in a 5 × 6 grid and join them with pink slip-stitch seams.
- Surface crochet the green stems onto each cream panel after the joined grid lies flat.
- Sew one large pink rose to the center of every square, attaching only the flower base and lower petals.
- Position the large and small green leaves around each rose and stitch mainly through their lower sections.
- Attach the small pink rosebuds at selected stem ends and check that neighboring motifs have similar spacing.
- Work the cream foundation rounds around the complete assembled bedspread.
- Add the wide pink lace border and optional final scalloped round.
- Weave all remaining tails into matching-colored stitches and block the perimeter without flattening the dimensional flowers.
The completed bedspread should form a regular pink-outlined grid while the roses, leaves and buds remain raised above the cream background.
7 Technical Tips
- Block every square to within 5 mm of the target measurement. A 1 cm variation repeated across five columns can shift the bedspread width by approximately 5 cm.
- Join the squares before sewing on the roses. Large three-dimensional flowers make it difficult to keep adjoining panels flat while working the pink seams.
- Attach only the lower rose petals. Sewing through every petal layer compresses a 10–12 cm flower into a flat circular appliqué.
- Keep surface-crocheted stems relaxed. A tight stem can shorten one section of the cream square and create a visible diagonal pucker.
- Leave the outer third of each leaf free. Fully sewing the perimeter removes the raised leaf profile visible around the roses.
- Check the lace border every two rounds. Rippling indicates too many stitches or chain spaces, while corners curling upward indicate insufficient increases.
- Support the bedspread when moving it. Lifting a large finished piece by one rose or one lace section can place the weight of several kilograms on a small attachment area.
Making the Raised Crochet Roses
The flower depth comes from overlapping rather than simply increasing stitch height. A long petal strip creates many small petals that can be rolled tightly at the center and progressively loosened toward the outside.
Do not roll the complete strip at identical tension. The first few petals should be compact. Middle petals sit farther away from the center, while the final petals should open outward.
Secure the flower repeatedly while rolling it. Waiting until the entire strip has been wrapped makes the rose difficult to control and allows the inner layers to rotate.
After sewing, place the rose on a flat surface. The base should remain relatively flat even though the petals project upward.
Arranging the Leaves and Rosebuds
Use the central rose as the anchor point. Large leaves should sit closest to the flower, with smaller leaves extending along the stems.
A balanced square can use two large leaves, four smaller leaves and approximately four rosebuds. Slight variations between panels prevent the repeated motifs from appearing mechanically identical.
Keep the appliqué several centimeters away from the pink joining border. Flowers or leaves sewn directly over a seam make future repairs more difficult and obscure the square-grid structure.
Before sewing, place all components on one sample square and photograph the arrangement. Use that reference to maintain similar spacing across the remaining panels.
Adjusting the Bedspread Size
The modular grid allows the dimensions to be changed without altering the flower pattern.
For a smaller throw, make 4 × 5 squares. At approximately 30 cm per square, the central panel measures around 120 × 150 cm before the border.
For a larger bed covering, use 6 × 7 squares. This produces a central panel around 180 × 210 cm before adding the outer lace.
Measure the mattress and decide how much drop is required at the sides and foot before choosing the grid.
The wide lace edging contributes significant additional width. Include its planned depth in the final calculation rather than sizing the square grid to the complete target measurement.
Color Variations
The photographed version uses warm cream as the dominant background, dusty rose pink for flowers and borders, and medium-to-dark green for foliage. This three-color structure keeps the large bedspread visually organized despite the number of dimensional details.
For a softer variation, use ivory, blush and sage. Burgundy roses with forest-green foliage produce stronger contrast, while white flowers on a cream background create a more restrained tonal version.
Keep the joining color related to the roses if you want the square grid to remain visible. Matching the joins to the cream background will make the individual panels less prominent.
Washing and Care
Dimensional flowers require more careful handling than a flat crochet blanket. Follow the yarn manufacturer’s washing instructions and test a sample rose before laundering the complete bedspread.
A large wet bedspread becomes substantially heavier. Support the fabric from underneath when moving it so the flower attachments and lace edging do not carry the weight.
Lay flat when practical, or dry according to the yarn label. Reshape the roses and leaves while damp.
After drying, lift individual outer petals with your fingers and straighten any leaf points that folded during washing.
Finishing the Bedspread
Spread the finished piece across a large flat surface. Inspect the pink joining grid first; the seams should remain approximately straight from one end to the other.
Check every flower by gently lifting the outer petals. Reinforce any rose whose base shifts against the cream square.
Inspect the green leaves and rosebuds next. No loose yarn tail should remain near a raised appliqué because it becomes difficult to hide after regular use.
Finish by arranging the pink lace edge and checking all four corners. Each corner should lie flat without curling upward or producing a large ruffle.
Conclusion
Make and block one complete square before committing yarn to the full grid, because that measurement determines the final bedspread dimensions. Join the cream panels before attaching the dimensional flowers, then add roses, foliage and buds only after the pink seams lie flat. The wide lace edging should be worked last so its depth can be adjusted to the mattress. For this crochet rose bedspread pattern, consistent square sizing matters more than making every flower identical. Save the finished layout to Pinterest or share it on Instagram with #RoseGardenCrochetBedspread. Would you keep the photographed pink roses and green foliage, or change the flowers to burgundy while retaining the cream background?









