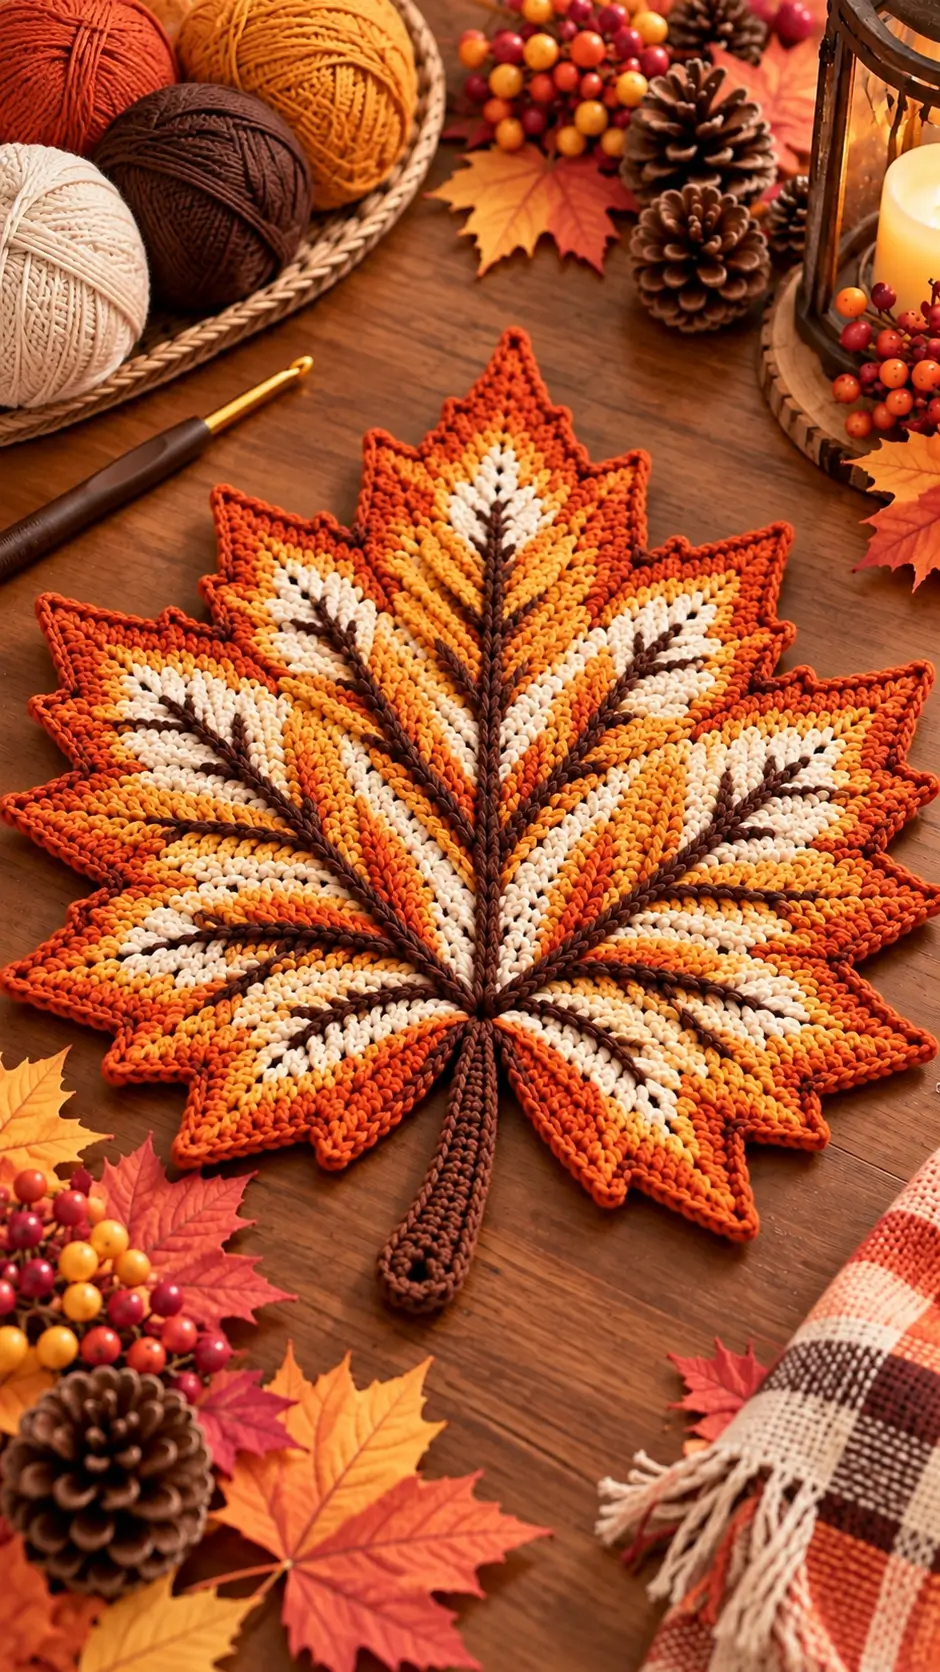
A maple leaf with this many color bands needs every stripe to point toward the same stem junction; horizontal bands would destroy the leaf anatomy. This autumn maple leaf crochet placemat combines burnt orange, pumpkin gold, warm cream and chocolate brown in five major lobes with smaller serrated points. Raised brown veins organize the color sections, while a reinforced stem completes the shape. Target approximately 42 cm wide by 52 cm long.
The Design: What Makes This Maple Leaf Different
The color arrangement follows the veins rather than the outer edge. Cream forms bright inner wedges, pumpkin gold surrounds those wedges, and burnt orange defines the pointed perimeter. Dark brown then runs from the stem junction through each major lobe, separating neighboring color sections and making the maple structure readable.
The second decision is proportion. The center lobe is longest, the upper side lobes are slightly shorter, and the lower sections spread outward to create width near the stem. Smaller teeth sit between these primary points.
Finally, the dark stem continues directly into the central vein. That uninterrupted line visually supports the entire leaf. A common failure is making every lobe the same length; the result becomes star-shaped instead of resembling a maple leaf.
Project Info at a Glance
| Skill Level | Time | Finished Size | Hook | Construction |
|---|---|---|---|---|
| Intermediate | 7–10 hours | Approx. 42 × 52 cm | 4.0 mm | Shaped flat motif with color bands and surface veins |
These dimensions are working targets for a photo-inspired construction rather than measurements taken directly from the photograph. Yarn thickness, tension and blocking will change the finished size.
Materials and Tools
Yarn
- Burnt orange worsted-weight cotton — approximately 85–100 g
- Pumpkin gold or mustard worsted-weight cotton — approximately 65–80 g
- Warm cream worsted-weight cotton — approximately 75–90 g
- Dark chocolate brown worsted-weight cotton — approximately 45–55 g
Plan for approximately 280–325 g total yarn. Smooth cotton or a firm cotton-rich blend is suitable because the pointed perimeter needs enough body to remain defined after blocking.
Tools
- 4.0 mm crochet hook
- 3.5 mm crochet hook for surface crochet if needed
- Large-eye yarn needle
- Scissors
- Locking stitch markers
- Flexible measuring tape
- Blocking mats
- Rustproof pins
Abbreviations
- MR — magic ring
- ch — chain
- sc — single crochet
- hdc — half double crochet
- dc — double crochet
- tr — treble crochet
- sl st — slip stitch
- inc — increase
- dec — decrease
- BLO — back loop only
- sp — space
- st / sts — stitch / stitches
Surface slip stitches create the dark branching veins. Keep each loop loose enough that the colored fabric underneath remains completely flat.
Gauge and Target Measurements
Target approximately 17–19 sc per 10 cm with worsted cotton and a 4.0 mm hook.
The leaf body should finish approximately 40–42 cm across. From the central junction to the highest point, target approximately 25–27 cm.
The brown stem should add approximately 10–12 cm below the leaf body.
Autumn Maple Leaf Crochet Placemat Pattern
Central Junction
Use dark chocolate brown yarn.
R1: 10 sc in MR. Join with sl st. (10)
R2: Ch 1, inc in each stitch around. Join. (20)
R3: Ch 1, [sc, inc] ×10. Join. (30)
Fasten off.
Mark five directions around R3: center top, upper left, upper right, lower left and lower right. These positions establish the five primary veins and should remain visible until all major lobes are complete.
Central Cream Lobe
Use warm cream yarn.
Join at the upper-center marker.
Ch 29.
Starting in the second chain from the hook:
Sl st in next ch.
Sc in next 2 ch.
Hdc in next 3 ch.
Dc in next 5 ch.
Tr in next 9 ch.
Dc in next 4 ch.
Hdc in next 2 ch.
Sc in next 2 ch.
Work 5 sc around the final foundation position.
Continue down the opposite side of the chain, reversing the stitch sequence.
Sl st into the central junction.
Fasten off.
Upper Left Cream Lobe
Join cream yarn at the upper-left marker.
Ch 24.
Starting in second ch:
Sl st, sc in next 2 ch, hdc in next 3 ch, dc in next 5 ch, tr in next 6 ch, dc in next 3 ch, hdc in next 2 ch, sc.
Work 5 sc around the turning point.
Mirror the sequence along the opposite side.
Attach to the central junction and fasten off.
Upper Right Cream Lobe
Repeat the upper-left lobe at the matching right-side marker.
Measure both lobes from the center before continuing. Keep their finished lengths within approximately 5 mm of each other.
Lower Left Cream Lobe
Join cream yarn at the lower-left marker.
Ch 19.
Starting in second ch:
Sl st, sc, hdc in next 2 ch, dc in next 4 ch, tr in next 5 ch, dc in next 3 ch, hdc, sc.
Work 3 sc at the tip.
Mirror the stitch progression along the opposite side.
Attach to the center and fasten off.
Lower Right Cream Lobe
Repeat the lower-left lobe at the corresponding right-side marker.
Five cream sections should now radiate from the same dark center.
Connecting the Cream Lobes
Join cream yarn near the base of the central lobe.
Work sc toward the valley between adjacent sections.
Use hdc and dc where additional fabric is needed to bridge the widest part of the opening.
Work one sl st at the deepest point.
Increase through hdc and dc toward the next lobe.
Repeat for all major gaps.
Preserve approximately 3–5 cm of indentation between primary lobes. Those valleys are essential to the maple outline.
First Cream Shaping Round
Join cream yarn near the lower center.
Sc around the connected leaf sections.
At each primary point work:
(sc, ch 2, sc).
At a deep valley work one sl st.
Do not add extra stitches inside the valleys.
Fasten off.
Pumpkin Gold Color Band
Switch to pumpkin gold or mustard.
Join yarn at the edge of one lower cream section.
Work sc around the leaf.
At broad sections where more depth is required, use hdc.
At the five main points work:
(sc, ch 2, sc).
At each valley use sl st.
Join at the lower center.
Second Gold Round
Ch 1.
Work sc around.
Maintain each major point with (sc, ch 2, sc).
Add one increase only where a broad lobe pulls inward.
Fasten off.
The golden section should create a visible band around the cream rather than covering most of the lobe.
Burnt Orange Outer Section
Join burnt-orange yarn to the golden edge.
Sc around the complete leaf.
Use hdc through broad curves where the lobe requires extra width.
At every major point work:
(sc, ch 2, sc).
Work sl st at the deepest valleys.
Join and continue.
Second Orange Round
Ch 1.
Sc around.
Maintain all five major points.
At positions where the photographed leaf shows additional serrations, mark the edge for secondary points.
Join and fasten off.
Secondary Maple Points
Join burnt-orange yarn at the first marked position.
Ch 6.
Starting in second ch from hook:
Sl st, sc, hdc, dc, tr.
Sl st into the next available perimeter stitch.
Fasten off or continue with sc toward the next marked point.
Add approximately two secondary points along each large upper lobe and one or two along each lower section.
The central lobe may carry two smaller teeth below its main tip.
Final Burnt Orange Shaping Round
Join orange yarn near the stem position.
Sc around the complete silhouette, including all secondary points.
At a major point work:
(sc, ch 2, sc).
At a secondary point work one sc into its tip.
At a valley use one sl st.
Fasten off.
Dark Brown Perimeter
Join chocolate brown yarn beside the future stem.
Work one compact round of sc around the entire leaf.
Follow every orange tooth rather than smoothing over the serrations.
At primary tips work:
(sc, ch 1, sc).
At valleys use sl st.
Join at the lower center and fasten off.
Keep this final border narrow so the burnt-orange band remains visible.
Dark Brown Central Vein
Join brown yarn at the central junction.
Surface sl st directly toward the top point.
Follow the center of the cream and gold sections.
Stop approximately 1 cm before the outer border.
Fasten off on the reverse.
This should be the longest and visually strongest vein in the leaf.
Upper Left Primary Vein
Join brown at the central junction.
Surface sl st diagonally toward the upper-left point.
Keep the line centered through that lobe.
Stop approximately 1 cm before the brown perimeter.
Fasten off.
Upper Right Primary Vein
Repeat toward the upper-right point.
Compare the angle of the two upper veins. They should appear balanced around the center line rather than perfectly horizontal.
Lower Left Primary Vein
Join brown at the shared center.
Surface sl st toward the lower-left lobe.
Stop before reaching the orange perimeter.
Fasten off.
Lower Right Primary Vein
Repeat toward the lower-right point.
The five primary veins should now meet at a single dark junction.
Dark Brown Secondary Veins
Join brown yarn approximately one-third of the way along a primary vein.
Surface sl st diagonally toward a nearby secondary point.
Stop 1–2 cm before the outer edge.
Fasten off.
Add two or three branches to each large lobe and one or two to each lower section.
Keep the branches shorter as they approach the tip of each lobe.
Optional Cream Vein Highlights
For additional contrast similar to the reference, add short cream lines beside selected brown veins.
Join cream yarn 4–6 cm above the central junction.
Surface sl st parallel to the brown line for approximately 5–8 cm.
Fasten off.
Repeat only on the largest lobes. The brown veins should remain the dominant structure.
Optional Gold Vein Highlights
Golden surface crochet can be added between selected brown branches.
Begin directly beside a primary vein.
Work toward a secondary point for approximately 4–6 cm.
Fasten off.
Use these lines sparingly so cream, gold and brown remain visually distinct.
Decorative Eyelets
Small openings can be incorporated near the main vein lines.
During a shaping row, replace one stitch with:
Ch 1, skip 1 st.
On the next round, work one stitch into the chain space.
Keep eyelets approximately 2–3 cm apart and at least 1.5 cm from the perimeter.
Do not place eyelets directly beneath the raised brown vein.
Chocolate Brown Stem
Join brown yarn at the lower central junction.
Ch 27.
Starting in second chain from hook, sc across. (26)
Ch 1 and turn.
Sc back toward the tip.
At the end, ch 7.
Join with sl st to form a small opening.
Work 10 sc around the opening.
Continue sc down the opposite side of the stem.
Attach securely to the leaf base.
Fasten off with a 30 cm tail.
Reinforcing the Stem
Thread the remaining brown tail through a yarn needle.
Pass it internally from the leaf junction toward the stem tip.
Return through a neighboring row of stitches.
Keep the yarn relaxed so the stem remains approximately 10–12 cm long.
Weave the remaining tail into the brown center.
Making the Center Junction Neat
Four colors and multiple surface veins can create excessive thickness at the lower center.
Do not weave every yarn tail through the same stitches.
Direct cream tails into cream sections, gold tails into gold stitches and orange tails outward through the orange band.
Brown vein tails can be distributed among different primary veins.
The completed center should remain flat enough for the placemat to rest evenly on a table.
Blocking the Maple Leaf
Dampen the completed piece according to the yarn care instructions.
Place it face up on a blocking mat.
Pin the central junction first.
Align the brown central vein vertically.
Pin the top point approximately 25–27 cm above the junction.
Pin the two upper side points at matching distances from the center.
Repeat with the lower primary points.
Shape each smaller serration individually.
Finally, straighten the brown stem.
Target approximately 40–42 cm across the broadest part and approximately 52 cm from the upper point to the stem end.
Leave pinned until completely dry.
Assembly
- Crochet the dark brown center and mark the five primary lobe directions before adding any colored sections.
- Work the central cream lobe first, followed by the matching upper-left and upper-right lobes.
- Add both lower cream lobes and connect the gaps while preserving approximately 3–5 cm valleys.
- Work the pumpkin-gold transition rounds, then expand the silhouette with burnt-orange rounds and secondary points.
- Add the narrow chocolate-brown perimeter while preserving every major and secondary point.
- Crochet the brown stem from the lower junction and reinforce its full 10–12 cm length internally.
- Surface crochet the central brown vein first, followed by the four side veins radiating from the same junction.
- Add shorter brown branches and any optional cream or gold highlights without tightening the underlying fabric.
- Distribute all yarn tails into matching-color sections and check that the central junction remains flat.
- Block the five primary points first, then position the secondary teeth and stem before allowing the leaf to dry completely.
The finished placemat should have five dominant lobes, smaller pointed serrations, cream interior wedges, pumpkin-gold transitions, burnt-orange outer sections, dark branching veins and a chocolate-brown stem.
7 Technical Tips for a Better Autumn Maple Leaf
- Keep paired lobes within 5–7 mm of each other. A small discrepancy becomes much larger after three color bands are added. Measure from the central brown junction before beginning the next color.
- Preserve valleys at approximately 3–5 cm deep. Too many connecting stitches create a rounded edge. Use compact stitches at the deepest point between lobes.
- Keep surface veins loose. A brown vein shortened by even 1 cm can lift a complete lobe from the table. Check the fabric after every primary line.
- Limit the brown border to one compact round. A border wider than approximately 1 cm can hide the orange perimeter. The darkest color should define the outline rather than replace it.
- Keep eyelets at least 1.5 cm from an outer point. Holes positioned too close to a narrow tooth weaken it during blocking. Move the eyelet inward toward the primary vein.
- Distribute center yarn tails in different directions. Stacking eight or more tails through one junction creates a hard raised area. Weave each tail into the closest matching-color section.
- Pin the five primary points before secondary serrations. Establishing the main 40–42 cm silhouette first prevents smaller teeth from pulling the leaf out of proportion.
How to Make a Smaller Maple Leaf Placemat
Switch to DK cotton and a 3.0–3.5 mm hook.
Reduce each foundation chain by approximately 20–25 percent. Keep all five primary lobes and preserve their relative proportions.
Shorten the stem to approximately 18–20 chains.
A smaller version should finish near 28–32 cm across and can be used as a centerpiece mat or decorative trivet when made from heat-appropriate cotton.
How to Make a Larger Maple Leaf Centerpiece
Add 6–8 chains to the central lobe, 4–5 chains to each upper side lobe and 2–3 chains to the lower sections.
Extend the tall-stitch areas through the middle of each lobe instead of placing frequent increases along the edges.
Add one additional orange shaping round before the brown perimeter.
A large centerpiece can reach approximately 50–55 cm across while retaining the same color hierarchy.
Choosing the Four Autumn Colors
The palette works because each yarn has a separate structural role.
Cream provides the lightest interior area. Pumpkin gold forms the transition. Burnt orange carries most of the outer silhouette. Chocolate brown supplies the strongest lines through the stem, veins and narrow perimeter.
Maintain enough value difference between neighboring yarns. If the gold and orange are nearly identical, the intermediate band will disappear from normal viewing distance.
Alternative Fall Color Palette
For a deeper autumn version, combine oatmeal, mustard, burgundy and espresso brown.
A lighter farmhouse palette can use ivory, muted gold, terracotta and medium brown.
For a woodland version, combine cream, ochre, rust and dark olive.
Keep the darkest shade on the primary veins if the branching leaf anatomy is intended to remain prominent.
Keeping the Color Sections Balanced
The cream area should remain the largest single interior color field. Gold works best as an intermediate band, while orange should be broad enough to form clearly visible outer points.
Do not force every color band to the same width.
Near narrow secondary teeth, the orange section may occupy most of the available space. Around broad central lobes, the cream and gold areas can remain much wider.
Following the shape of each lobe produces a more convincing leaf than maintaining mathematically identical stripes.
Keeping the Placemat Flat
Lay the project on a table after every major color section.
Rippling after the gold or orange rounds indicates too many perimeter increases. Remove selected increases from broad areas.
Cupping after the brown surface veins indicates that those stitches are too tight.
Correct tension problems before blocking. Blocking should sharpen the points and refine the final dimensions rather than repair major structural distortion.
Using the Maple Leaf as a Placemat
Place a dinner plate over the lower central area so the five colored lobes remain visible around it.
Keep the raised vein stitches relatively low where tableware will sit.
The brown stem can point toward the diner for an individual setting or toward the table center when several maple leaves are arranged together.
For decorative use without plates, the complete vein structure can remain exposed as a table centerpiece.
Making a Coordinated Fall Set
Complete and block the first leaf before starting additional pieces.
Record the final width, top-lobe length, stem length and hook size.
For variation, keep cream and brown consistent while changing the intermediate colors. One placemat can use burnt orange and gold, another burgundy and rust, and another mustard and olive.
Keeping the dark vein color consistent ties the set together even when the outer colors change.
Care Instructions
Follow the care directions for the selected yarn.
Support the full leaf when moving it while wet rather than lifting it by the narrow stem.
Press excess water between clean towels without twisting.
Lay the placemat flat and align the central brown vein first. Shape the paired lobes around that axis.
Pin the primary points if needed and allow the piece to dry completely.
Store flat or loosely rolled. Avoid folding directly across the raised brown vein junction.
Conclusion
The branching color placement gives this autumn maple leaf crochet placemat its distinctive structure: cream fills the inner lobes, pumpkin gold creates transition, burnt orange forms the pointed silhouette, and chocolate brown connects the stem to every primary vein. Work the five cream sections first and compare the paired lobes before expanding the colored perimeter. Add the surface veins only after the leaf lies flat. Your next step is to crochet the brown center and first 29-chain central lobe, then measure it before continuing. Save the finished project to Pinterest or share it on Instagram with #AutumnMapleLeafCrochet. Would you make the next leaf with the same cream center or replace it with golden mustard?









