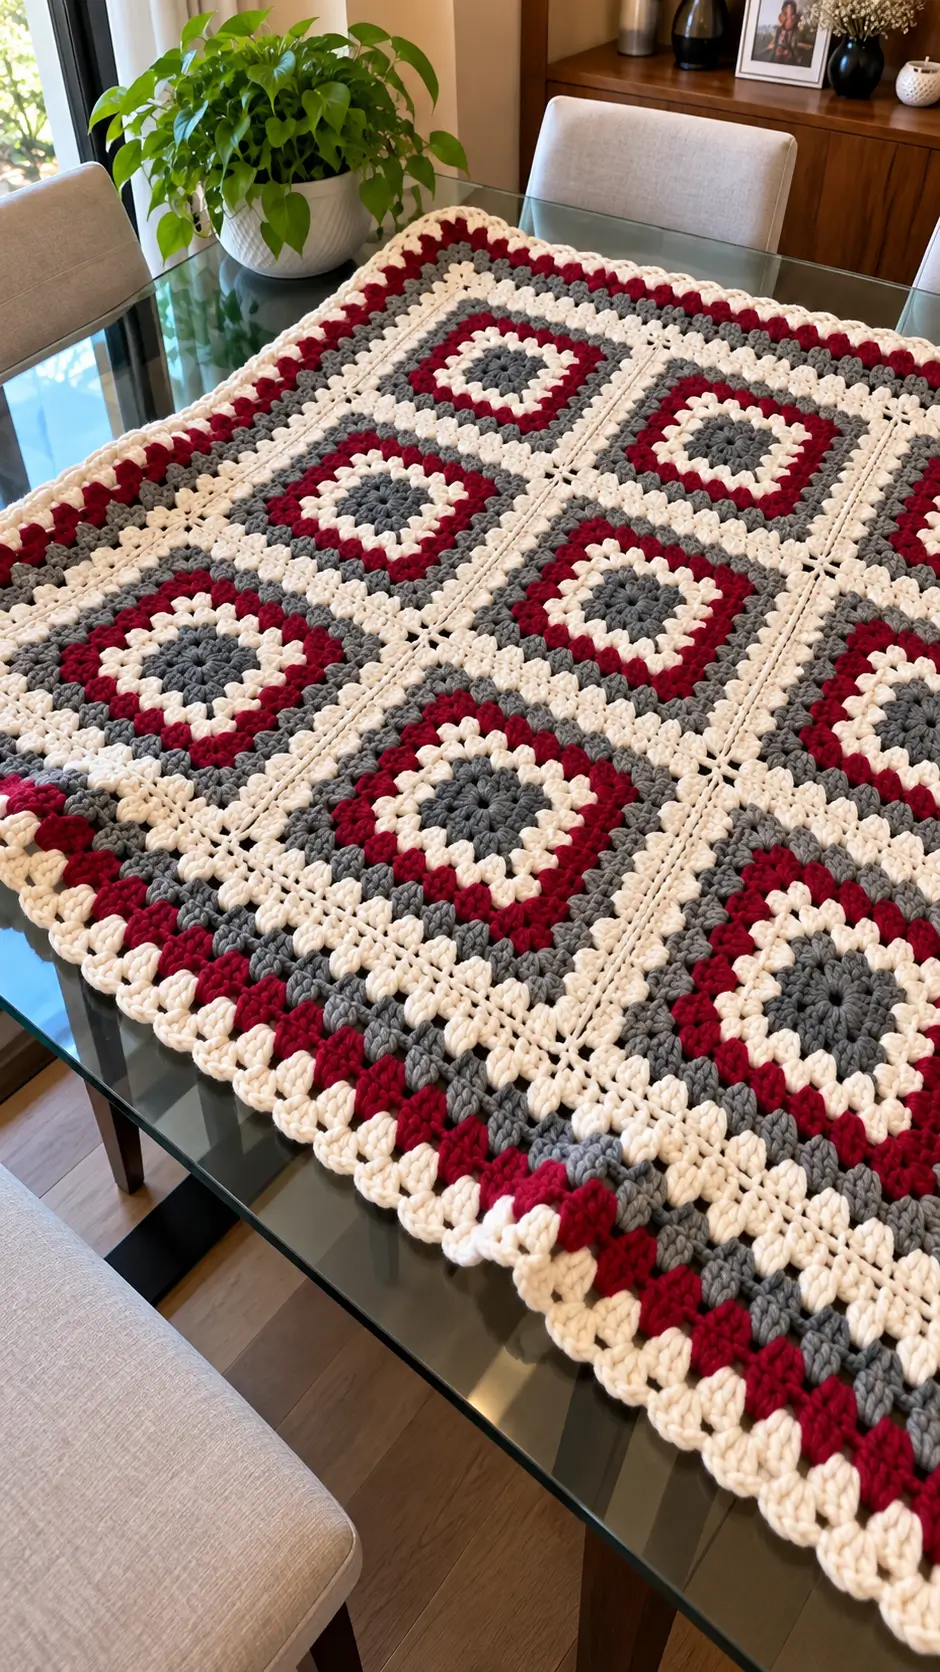
Gray centers surrounded by burgundy and cream rings give this blanket its distinctive target-like geometry. This granny square blanket pattern recreates that structure with super-bulky yarn, an 8 mm hook and oversized motifs for a large throw. The construction suits an advanced beginner familiar with double crochet. Separate squares make the project practical because damaged motifs can be repaired without rebuilding the entire blanket.
The Design: What Makes This Granny Square Blanket Different
The photograph depends on three structural decisions. First, dark gray centers anchor each motif before cream and burgundy produce progressively larger frames. Second, broad cream joins separate neighboring squares, preventing the repeated red-and-gray rings from merging visually. Finally, the outer edge repeats the motif colors rather than finishing in one solid shade.
Those choices also affect construction. An oversized chunky granny square blanket can become heavy at the seams, so the joining yarn should have comparable thickness and stretch to the motif yarn. The cream lattice needs consistent chain lengths or the grid will pucker. A common error with a crochet granny square throw is changing tension after switching colors; that produces squares that look identical in round count but differ after blocking.
Project Info at a Glance
| Skill Level | Time | Finished Size | Hook | Best For |
|---|---|---|---|---|
| Advanced beginner | Approx. 15–25 hours, gauge dependent | Adjustable; 142 × 182 cm is a chunky reference size | 8 mm | Large throw / afghan |
The finished measurements are adjustable. Yarn composition, motif count, individual square size, joining width and personal crochet tension can all change the final dimensions.
Materials and Tools
Yarn
- Cream / warm ivory — Super Bulky #6 — approximately 450–550 g.
- Charcoal gray — Super Bulky #6 — approximately 200–300 g.
- Deep burgundy — Super Bulky #6 — approximately 200–300 g.
Use the same yarn line for all three colors when possible. Matching fiber content and thickness helps the motifs remain consistent after blocking.
The quantities above are planning estimates. Make and weigh a complete sample square before purchasing yarn for a precisely sized blanket.
Tools
- 8 mm crochet hook
- Tapestry needle
- Locking stitch markers
- Scissors
- Flexible tape measure
- Blocking mats or clean blocking surface
- Rust-resistant blocking pins
Abbreviations
- MR — magic ring
- ch — chain
- sc — single crochet
- dc — double crochet
- sl st — slip stitch
- sp — space
- sts — stitches
- RS — right side
- WS — wrong side
- rep — repeat
An invisible decrease is an amigurumi technique worked through selected front loops; it is not required for the flat granny-square construction used here.
Granny Square Blanket Pattern — Step by Step
This blanket is worked as individual square motifs. Unlike amigurumi, granny squares are not continuous spirals. Close each round with a slip stitch unless the instructions state otherwise.
Main Granny Square Motif
Colors: charcoal gray, cream and burgundy.
Make enough motifs for your intended blanket dimensions. A 3 × 4 grid creates 12 oversized squares. Increase the number of squares when using smaller motifs.
Round 1 — Charcoal
Make an MR.
Ch 3; this counts as the first dc. Work 2 dc into the ring, ch 2.
Work (3 dc, ch 2) three more times.
Join with sl st to the top of beginning ch 3.
Count: 4 groups of 3 dc and 4 corner ch-2 spaces.
Fasten off charcoal.
Round 2 — Charcoal
Join charcoal in any corner ch-2 sp.
Ch 3, 2 dc, ch 2, 3 dc in the same corner.
In each remaining corner work:
(3 dc, ch 2, 3 dc)
Join with sl st.
Count: 8 groups of 3 dc and 4 corner spaces.
Fasten off.
Round 3 — Cream
Join cream in any corner.
Work (ch 3, 2 dc, ch 2, 3 dc) in the first corner.
Ch 1. Work 3 dc in the next side space, ch 1.
In the next corner work (3 dc, ch 2, 3 dc).
Repeat around.
Join with sl st.
Count: 12 groups of 3 dc.
Fasten off.
Round 4 — Burgundy
Join burgundy at a corner.
Work (ch 3, 2 dc, ch 2, 3 dc) in the corner.
Ch 1. Work 3 dc in each ch-1 side space, placing ch 1 between groups.
At every corner work:
(3 dc, ch 2, 3 dc)
Continue around and join.
Count: 16 groups of 3 dc.
Fasten off.
Round 5 — Burgundy
Repeat the established granny-square sequence in burgundy.
Each side now contains three non-corner cluster positions between its corner groups.
Keep ch-1 spaces between neighboring groups and ch-2 spaces at all four corners.
Count: 20 groups of 3 dc.
Fasten off.
Round 6 — Charcoal
Join charcoal at a corner.
Continue the established pattern, adding one additional 3-dc group to each side compared with Round 5.
Count: 24 groups of 3 dc.
Fasten off.
Round 7 — Charcoal
Continue once more in charcoal.
Count: 28 groups of 3 dc.
Fasten off.
Round 8 — Cream
Join cream and repeat the established square expansion.
Count: 32 groups of 3 dc.
Fasten off, leaving approximately a 15 cm tail.
Optional Larger Granny Square
For fewer and larger squares, add another cream round.
Round 9 — Cream
Join cream in a corner.
Work (ch 3, 2 dc, ch 2, 3 dc) in that corner.
Work 3 dc into each ch-1 side space with ch 1 between groups.
At each corner work:
(3 dc, ch 2, 3 dc)
Continue around and join with sl st.
Count: 36 groups of 3 dc.
Fasten off.
Block and measure the finished motif before deciding on the final number of squares.
Cream Joining Strip
Yarn: cream.
The visible cream space between motifs is an important feature of this blanket. A decorative crochet join creates more separation than a basic sewn seam.
Place two blocked squares side by side with the right sides facing upward.
Join cream to the corner of the first square.
Ch 1 and sc into the corner space.
Ch 2.
Sc into the corresponding corner space of the neighboring square.
Continue back and forth:
ch 2, sc in next space of opposite square
Repeat across the complete edge.
At the final corners, ch 2 and sc into the last corner space.
Fasten off.
This method creates an open zigzag or lattice-style join. Keep every ch-2 bridge consistent. Shorter chains can pull the squares inward and cause puckering.
Join individual motifs into rows first. Join the completed rows using the same technique.
Crochet Blanket Border
Border Round 1 — Cream
With RS facing, join cream at any blanket corner.
Ch 3, 2 dc, ch 2, 3 dc in the corner.
Work granny clusters across the edge, placing 3 dc into suitable spaces and ch 1 between groups.
Where two motifs meet, avoid forcing extra clusters into a tight joining space. Maintain an even edge.
At each blanket corner work:
(3 dc, ch 2, 3 dc)
Join with sl st.
Fasten off.
Border Round 2 — Charcoal
Join charcoal in any corner.
Work the established granny-cluster pattern around the complete blanket.
At each corner work:
(3 dc, ch 2, 3 dc)
Join and fasten off.
Border Round 3 — Burgundy
Repeat Border Round 2 using burgundy yarn.
Lay the blanket on a flat surface before continuing. A wavy edge usually indicates excessive stitches or chain spaces that are too loose.
Fasten off.
Border Round 4 — Cream
Join cream at any corner.
Ch 1, sc in the same space.
Work sc evenly around the perimeter.
Place 3 sc in each corner ch-2 space.
Join with sl st to the first sc.
Fasten off.
Weave the yarn tail through approximately 8–10 cm of neighboring stitches.
For a more pronounced granny-cluster edge, replace the final single-crochet round with another traditional granny round.
Assembly
- Block every finished motif to the same dimensions before joining. Measure across the center rather than along a distorted edge.
- Arrange the motifs into the selected rectangular grid with every right side facing upward.
- Photograph the complete layout before moving the squares so their intended positions can be restored.
- Join adjacent motifs into horizontal rows using cream yarn and the lattice joining method.
- Check each finished row against the others. A noticeably shorter row indicates inconsistent chain lengths or motif gauge.
- Join the completed horizontal rows with the same cream lattice construction.
- Lay the assembled blanket flat and correct any twisted motif before beginning the perimeter.
- Crochet the cream foundation border around the complete rectangle while maintaining four distinct corners.
- Add the charcoal, burgundy and final cream border rounds, checking the blanket after every round.
- Weave in every remaining tail, trim the ends and lightly block the completed blanket to square the corners.
The blanket is complete when the motif grid lies flat, all four outer corners remain square and no yarn tails are exposed.
7 Technical Tips for a Chunky Granny Square Blanket
- Mark every corner space. Missing one ch-2 corner causes incorrect expansion on the following round and distorts an oversized motif. Keep locking markers in all four corners until the square geometry is obvious.
- Measure after blocking. A difference of only 1 cm per motif can become several centimeters across a complete row. Set one target measurement and block every square to that figure.
- Control the joining-chain length. A ch-2 lattice that is tighter than the motif edges pulls neighboring squares together. Change to ch 3 if the thick yarn cannot span the joining gap without tension.
- Keep color changes in corresponding corners. Randomly positioned joins can create visible bumps across the face of the blanket. Starting new colors at the same relative corner produces a more consistent finish.
- Check super-bulky corner tension. Tight (3 dc, ch 2, 3 dc) groups can make a corner cup because six thick stitches occupy one space. Test a larger hook if the corners rise despite correct stitch placement.
- Pin the complete grid before joining. A rotated motif can interrupt the alignment of starting seams and color transitions. Check every square before joining the rows permanently.
- Weave tails for at least 8–10 cm. Short ends can work free from open granny clusters during use. Reverse direction through dense portions of matching-color stitches instead of carrying the tail across an open chain space.
How to Size the Granny Square Blanket
A blanket cannot be measured accurately from a photograph alone. Perspective changes apparent dimensions, furniture sizes vary and there is no calibrated measuring object in the image.
The more reliable method is to calculate the blanket from a blocked motif.
For example, suppose one finished square measures 30 cm and each cream join contributes approximately 2 cm between neighboring motifs.
A three-square row measures approximately:
30 + 2 + 30 + 2 + 30 = 94 cm
Four motifs in the other direction measure approximately:
30 + 2 + 30 + 2 + 30 + 2 + 30 = 126 cm
The outer border increases both dimensions further.
For a larger throw, increase either the dimensions of each granny square or the number of motifs in the grid. Measuring the first blocked square prevents unnecessary guesswork.
How Much Yarn Does a Granny Square Blanket Need?
Do not calculate yarn requirements solely from the photograph. Fiber density, hook size, stitch height, square dimensions, border depth and joining technique all affect consumption.
Instead, crochet one complete motif and block it to the intended dimensions.
Weigh the finished square using a digital kitchen scale. Multiply that weight by the total number of motifs required for the blanket.
For example, if one finished motif weighs 60 g and the blanket requires 12 motifs:
60 g × 12 = 720 g
That calculation covers only the motifs. Additional yarn is required for the cream joining strips, border and gauge variation.
Buying a reasonable reserve from the same dye lot reduces the risk of visible shade differences when additional yarn is needed later.
Why the Cream Join Matters
The cream joining method is one of the strongest structural features of this design. A charcoal seam would visually connect neighboring dark rounds, while burgundy would make the red bands appear more continuous.
Cream creates separation around each square. Individual motifs remain clearly visible even after the blanket is assembled.
A decorative join also affects the finished measurements. Wide joins increase the blanket dimensions more than a whip stitch or narrow slip-stitch seam.
Measure a joined pair before calculating the complete blanket width.
For example, if two 30 cm motifs measure 63 cm after joining, the decorative seam contributes approximately 3 cm:
63 − 30 − 30 = 3 cm
Include that measurement for every internal join when calculating the final dimensions of the blanket.
Finishing the Blanket
Place the finished blanket on a flat surface and inspect every joining line before trimming the final yarn tails. Correct any loose joining chains while they remain accessible.
Check the four corners next. Each corner should lie flat without curling upward or spreading into a wave. Border distortion usually indicates either excess stitches or inconsistent tension rather than a problem with the central motifs.
Measure the finished width and length after the final blocking and record both figures with the yarn name, hook size and number of motifs. These measurements provide a reliable formula if the same granny square blanket pattern is made again in another color palette or size.
Conclusion
Finish this granny square blanket pattern by measuring the blocked motifs before committing to the complete grid, then calculate the cream joining width separately from the squares. That measurement matters when the lattice seams form a visible part of the design rather than disappearing between motifs. Record the final dimensions, yarn quantity and hook size in your project notes for future reference. Pin the finished burgundy, charcoal and cream blanket to Pinterest or share the completed grid on Instagram with #BurgundyGridBlanket. For this specific color arrangement, compare a cream final border with a burgundy one before fastening off: which gives the charcoal-centered squares clearer separation?









