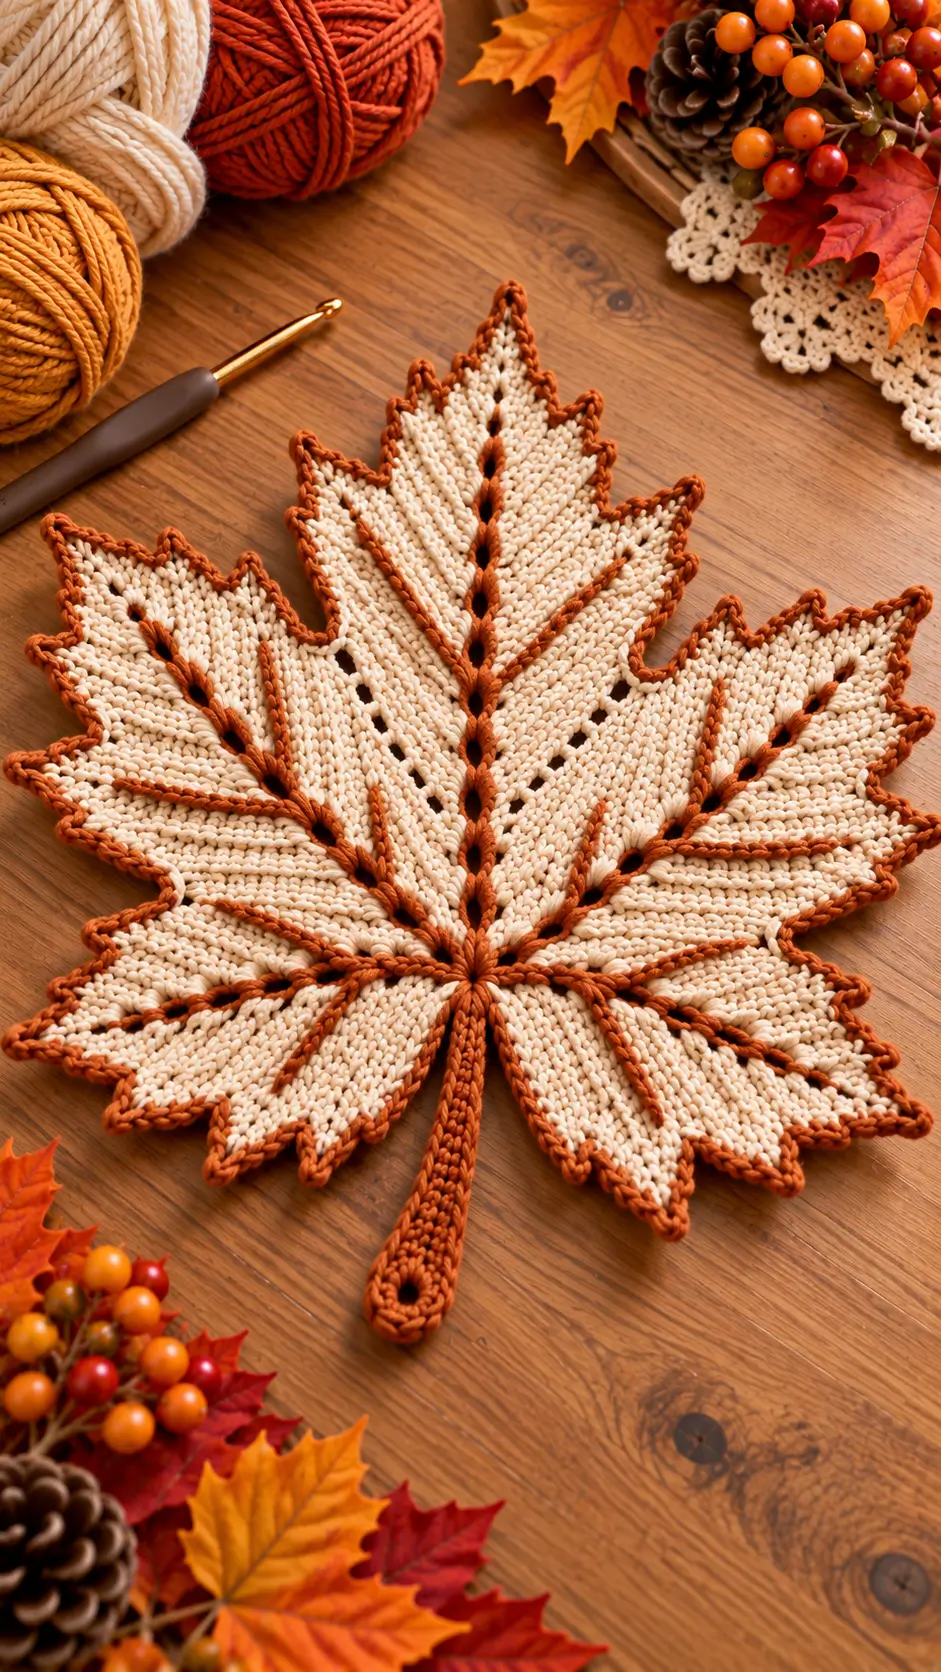
A maple leaf needs five unmistakable points and veins that radiate from one stem junction; lose that geometry and the motif becomes a generic autumn leaf. This crochet maple leaf placemat uses a warm cream body, rust-orange raised veins, a pointed contrast border and a reinforced stem. The finished piece is designed for worsted cotton and measures approximately 38–42 cm wide by 48–52 cm long including the stem.
The Design: What Makes This Maple Leaf Placemat Different
The photographed design is dominated by five primary lobes: one long central point, two large upper side lobes and two broader lower lobes. Smaller teeth along those lobes create the recognizable maple outline without making the edge excessively delicate.
Color is structural rather than decorative. Cream fills the main leaf while rust-orange follows the central vein, branches into the five major lobes and outlines the complete perimeter. Those raised lines divide a large pale surface into distinct sections.
The third decision is the stem. It is wide enough to support the leaf visually and ends in a small opening rather than a blunt rectangle. The common failure mode is an uneven center junction. If the five vein lines do not meet at approximately the same point, the finished maple leaf looks twisted even when the outer edge is symmetrical.
Project Info at a Glance
| Skill Level | Time | Finished Size | Hook | Construction |
|---|---|---|---|---|
| Intermediate | 5–8 hours | Approx. 38–42 × 48–52 cm | 4.0 mm | Flat shaped leaf with surface veins |
The dimensions are targets for this photo-inspired pattern rather than measurements taken directly from the image. Yarn thickness, hook choice and blocking will affect the final size.
Materials and Tools
Yarn
- Warm cream worsted-weight cotton — approximately 160–190 g
- Rust or burnt-orange worsted-weight cotton — approximately 60–80 g
A smooth cotton or cotton-rich blend gives the points and raised veins more definition than a fuzzy yarn. Use two colors of similar thickness so the rust border does not pull against the cream body.
Tools
- 4.0 mm crochet hook
- 3.5 mm crochet hook for the surface veins if your tension is loose
- Large-eye yarn needle
- Scissors
- Locking stitch markers
- Flexible measuring tape
- Blocking mats
- Rustproof pins
Abbreviations
- MR — magic ring
- ch — chain
- sc — single crochet
- hdc — half double crochet
- dc — double crochet
- tr — treble crochet
- dtr — double treble crochet
- inc — increase
- dec — decrease
- sl st — slip stitch
- BLO — back loop only
- sp — space
- st / sts — stitch / stitches
- picot — ch 3, sl st into first ch
Surface slip stitches form the rust veins. Work them with relaxed tension so they sit on top of the cream fabric without shortening the leaf sections.
Gauge and Measurements
Work a small swatch before beginning. A useful target is approximately 17–19 single crochet stitches per 10 cm with worsted cotton and a 4.0 mm hook.
The cream leaf body should measure approximately 37–40 cm across before the final rust edging. The center lobe should extend approximately 23–26 cm from the vein junction.
The finished stem adds approximately 10–12 cm to the total length.
Crochet Maple Leaf Placemat Pattern
Central Foundation
Use warm cream yarn and a 4.0 mm hook.
R1: 10 sc in MR. Join with sl st. (10)
R2: Ch 1. Inc in each stitch around. Join. (20)
R3: Ch 1. [Sc, inc] ×10. Join. (30)
Fasten off.
This small circular junction sits where the major maple veins meet. Mark five evenly distributed attachment positions around the outer round.
Central Top Lobe
Join cream yarn at the first marked position.
Ch 27.
Starting in second ch from hook:
Sl st in next ch.
Sc in next 2 ch.
Hdc in next 3 ch.
Dc in next 5 ch.
Tr in next 7 ch.
Dc in next 4 ch.
Hdc in next 2 ch.
Sc in next 2 ch.
Work 5 sc into the final foundation position to turn around the point.
Continue along the opposite side of the foundation chain, mirroring the stitch progression back toward the center.
Sl st into the next stitch of the central foundation.
Do not fasten off.
Shaping the Central Lobe
Ch 1 and work sc around the lobe.
Approximately 6 cm below the main point, create a small side tooth:
Ch 5, sl st in second ch, sc, hdc, dc, then sl st back into the lobe edge.
Continue sc toward the tip.
At the central point work:
(sc, ch 3, sl st into first ch, sc).
Work down the opposite edge, adding a matching small tooth approximately 6 cm below the point.
Fasten off at the base.
Upper Left Maple Lobe
Join cream yarn at the next marked position on the central foundation.
Ch 23.
Starting in second ch:
Sl st, sc in next 2 ch, hdc in next 3 ch, dc in next 5 ch, tr in next 5 ch, dc in next 3 ch, hdc in next 2 ch, sc.
Work 5 sc in the final chain.
Mirror the stitch sequence along the opposite side.
Attach to the central foundation.
Work one shaping round around the lobe, adding two small pointed teeth along the outer side and one along the inner side.
Fasten off.
Upper Right Maple Lobe
Repeat the upper-left lobe construction at the corresponding marked position on the opposite side.
Check both lobes before fastening off. Their outer points should finish within approximately 5 mm of the same distance from the center.
Lower Left Maple Lobe
Join cream yarn at the fourth marked position.
Ch 18.
Starting in second ch:
Sl st, sc, hdc in next 2 ch, dc in next 4 ch, tr in next 4 ch, dc in next 3 ch, hdc, sc.
Work 3 sc into the final chain.
Mirror the sequence along the opposite side.
Return to the central foundation.
Work one edging round and create two pointed teeth along the outer edge.
Fasten off.
Lower Right Maple Lobe
Repeat the lower-left lobe on the opposite side.
Lay the leaf flat after completing this section. Five dominant points should now be visible around the central junction.
Filling the Spaces Between Lobes
The separate lobes need connecting sections to produce one continuous maple-leaf surface.
Join cream yarn at the lower edge of the central top lobe.
Sc toward the valley between the center and upper-left lobe.
At the deepest point, work one sl st.
Continue with hdc, dc and tr as needed to bridge the open area.
Decrease back through dc, hdc and sc as the stitches approach the neighboring lobe.
Fasten off.
Repeat for all four major valleys.
The valleys should remain approximately 3–5 cm deep. Filling them completely produces a rounded leaf rather than the pointed maple silhouette.
Lower Cream Leaf Sections
The reference leaf has broad lower wings beside the stem.
Join cream yarn at the lower-left side of the central foundation.
Ch 13.
Work back along the chain:
Sl st, sc, hdc in next 2 ch, dc in next 4 ch, hdc in next 2 ch, sc.
Work 3 sc at the outer point.
Mirror the stitches back toward the center.
Attach securely.
Repeat on the lower-right side.
These two sections should angle slightly downward and outward.
First Cream Unifying Round
Join cream yarn beside the future stem position.
Sc around the complete leaf perimeter.
At each of the five primary points, work:
(sc, ch 2, sc).
At smaller teeth, work:
(sc, ch 1, sc).
At deep valleys, use sl st or one compact sc.
Do not place several increases in a valley. Extra stitches there will soften the maple outline.
Join at the base.
Second Cream Shaping Round
Ch 1.
Sc around the perimeter again.
Maintain every major point by working (sc, ch 2, sc) into its previous ch-2 point.
Work one stitch in each stitch along straight areas.
If a lobe begins ruffling, skip one increase on that section.
If a lobe pulls inward, add one extra sc near its broadest curve.
Fasten off.
Rust Central Vein
Switch to rust or burnt-orange yarn.
Join at the center of the leaf where the stem will begin.
Surface sl st in a straight line toward the point of the central lobe.
Follow the visual center of the cream stitches.
Stop approximately 1 cm before the outer point.
Fasten off.
The line should sit above the cream fabric without pulling it into a fold.
Upper Side Veins – Make 2
Join rust yarn at the central vein junction.
Surface sl st diagonally toward the upper-left lobe.
Follow the center of the lobe and stop approximately 1 cm before its point.
Fasten off.
Repeat toward the upper-right lobe.
Lower Side Veins – Make 2
Join rust yarn at the same central junction.
Surface sl st toward the lower-left lobe.
Fasten off near its outer point.
Repeat for the lower-right lobe.
All five major vein lines should radiate from approximately the same center.
Secondary Rust Veins
Add shorter branches to reproduce the detailed vein structure visible in the reference.
Join rust yarn approximately halfway along a primary vein.
Surface sl st diagonally toward one nearby tooth.
Stop 1–2 cm before the edge.
Fasten off.
Add approximately two secondary veins to each large lobe and one to each lower lobe.
Avoid filling every available space. Visible cream fabric between the rust lines keeps the vein pattern readable.
Rust Maple Leaf Border
Join rust yarn at the lower-left edge.
Work sc evenly around the complete leaf.
At each major point work:
(sc, ch 3, sl st into first ch, sc).
At each smaller tooth work:
(sc, ch 2, sc).
In each deep valley work one sl st.
Continue around all lobes.
Join near the stem position.
Do not fasten off if working the stem immediately.
Crochet Maple Leaf Stem
From the center base, ch 24 with rust yarn.
Starting in second ch from hook, sc in each chain back toward the leaf. (23)
Turn.
Ch 1 and sc back toward the stem tip.
At the tip, ch 6 and join with sl st to the first chain to form the small opening.
Work 8–10 sc around the opening.
Continue sc down the opposite side of the stem.
Sl st into the leaf base.
Fasten off with a 25 cm tail.
Reinforcing the Stem
A wide placemat can place significant tension on a narrow stem when the piece is lifted.
Thread the rust tail onto a yarn needle.
Run it through the center of the stem toward the tip and back again.
Do not pull tightly.
This hidden reinforcement helps the stem maintain its shape without adding a second visible border.
Optional Raised Vein Technique
For thicker rust veins, work a second line of surface slip stitches directly beside the first.
Keep the two lines close together at the center junction and allow them to separate slightly as they approach the leaf points.
This technique works best on the central vein and the two upper side veins.
Do not double every secondary vein. Too much raised crochet can make the placemat uneven beneath tableware.
Blocking the Maple Leaf
Blocking controls the final shape more than it does on a simple rectangular project.
Dampen the completed placemat according to the yarn care instructions.
Place it on a large blocking mat.
Pin the center junction first.
Pull the central top point into position and pin it approximately 23–26 cm above the junction.
Pin the upper-left and upper-right points next, checking that their distances from the center match.
Pin the lower lobes.
Shape each smaller tooth individually.
Finally, straighten the stem and pin its opening.
Target approximately 38–42 cm across the widest area.
Allow the placemat to dry completely before removing the pins.
Assembly
- Crochet the cream central foundation and mark five evenly spaced positions for the primary maple lobes.
- Work the long central lobe first, then add the matching upper-left and upper-right sections.
- Add the two lower lobes and compare their measurements before filling the spaces between sections.
- Crochet the lower wings beside the stem area, then work the cream unifying rounds around the complete perimeter.
- Block the cream body lightly if the five main points do not lie flat before adding contrast details.
- Surface crochet the rust central vein from the stem junction toward the top point.
- Add four primary side veins and the shorter secondary veins, keeping all lines relaxed.
- Work the rust edging around the entire maple outline and maintain each major point with a small picot.
- Crochet the rust stem from the lower junction and reinforce it internally with the remaining yarn tail.
- Complete the final blocking, align the five major points and weave all tails through matching-color stitches on the reverse.
The finished placemat should have five dominant maple points, a warm cream surface, rust-colored branching veins and a narrow contrast outline that follows every tooth.
7 Technical Tips for a Better Crochet Maple Leaf
- Mark the five vein directions before making the lobes. Moving one attachment position by several stitches can make one side noticeably narrower. Place all five markers on the center foundation before joining yarn for the first lobe.
- Compare matching lobes within 5 mm. The two upper side lobes control most of the finished width. Lay them flat against each other before working the perimeter rounds.
- Keep the valleys deep. Filling a valley with more than a few tall stitches can erase the maple silhouette. Maintain approximately 3–5 cm of visible indentation between major lobes.
- Do not tighten the rust veins. A surface line shortened by 1 cm can make a cream lobe cup upward. Flatten the leaf after every major vein and release any stitches causing distortion.
- Use compact stitches at the points. Too many increases produce rounded tips instead of sharp maple points. One ch-2 or ch-3 point is sufficient at each primary lobe.
- Reinforce the 10–12 cm stem. The stem receives extra tension whenever the placemat is moved. Pass a yarn tail through its center in both directions before weaving it away.
- Pin every primary point during blocking. A 2 cm difference between the left and right upper lobes is immediately visible. Measure from the central vein junction rather than from the outer border.
How to Make a Smaller Maple Leaf
For a decorative coaster or small centerpiece, reduce each lobe foundation chain by approximately one-third.
Use a 3.0–3.5 mm hook with DK cotton.
A finished width around 24–28 cm works well for a small table accent. Reduce the stem proportionally to approximately 7–8 cm.
Keep all five major lobes. Removing a pair changes the botanical structure more than simply shortening the existing sections.
How to Make a Larger Maple Leaf Centerpiece
Increase the central lobe foundation by 5–7 chains and add 3–4 chains to each upper side lobe.
Extend the lower lobes by 2–3 chains.
Add extra tall stitches through the middle of each enlarged section rather than placing increases along the full edge.
A large version can reach approximately 50–55 cm across. At that scale, add an additional cream perimeter round before working the rust border.
Choosing Cream Yarn
Natural cream, oatmeal or warm ivory gives the closest appearance to the reference. Brilliant white creates a much stronger contrast with rust and changes the autumn palette.
A tightly twisted cotton makes the cream surface look cleaner because the individual stitches remain visible beside the raised veins.
Check the yarn against the rust color before starting. Cream with a yellow undertone generally pairs well with burnt orange, cinnamon and terracotta shades.
Choosing the Rust Accent
The accent yarn performs three jobs: veins, perimeter and stem. Select a color dark enough to remain clearly visible against cream.
Burnt orange, copper, cinnamon and dark terracotta all work. A very pale orange can disappear when photographed under warm indoor lighting.
Use the same rust yarn throughout the project. Changing the vein color at the border can visually separate the stem from the rest of the leaf.
Keeping the Placemat Flat
Maple shapes combine narrow valleys, wide lobes and sharp points, so the stitch distribution changes constantly around the perimeter.
If an edge ruffles, remove one or two increases from that area. If it pulls inward, add one stitch through the broad curve rather than at the point.
Check the piece on a table after every complete perimeter round.
The leaf should lie reasonably flat before blocking. Blocking can refine the points and straighten the stem, but it should not be used to correct severe rippling.
Making a Matching Fall Table Set
Complete and block one maple leaf before beginning the remaining set.
Record the final width of all five lobes, stem length and hook size. Use those measurements as the template for later pieces.
For variation, reverse the colors on selected placemats: rust body with cream veins and edging. Another option is to use mustard, olive and dark brown while keeping the same maple construction.
Maintain one consistent finished size if the leaves will be used as individual place settings.
Care Instructions
Follow the yarn manufacturer’s washing instructions. Cotton placemats can often be washed, but raised surface crochet benefits from gentler handling.
Press excess water between clean towels rather than twisting the leaf.
Reshape the five major lobes while damp. Straighten the central vein first, then arrange the side lobes and stem around it.
Dry flat. If the points soften after washing, pin the main tips until completely dry.
Store the placemat flat or loosely rolled. A hard fold across the central junction can distort several raised veins at once.
Conclusion
Five clearly separated lobes and one shared vein junction define this crochet maple leaf placemat. Build the cream body first, compare the matching side sections, and preserve the deep valleys before adding any rust details. The contrast veins should sit on the surface without shortening the fabric, while the final rust border sharpens every major point and smaller tooth. Start with the cream center and central lobe, then measure that first section before duplicating the side geometry. Save the completed fall table piece to Pinterest or share it on Instagram with #CrochetMapleLeafPlacemat. For a second leaf, would you keep the cream body or reverse the colors and make the entire maple leaf rust?









