Blue Floral Crochet Baby Dress Pattern With Headband and Shoes
Introduction
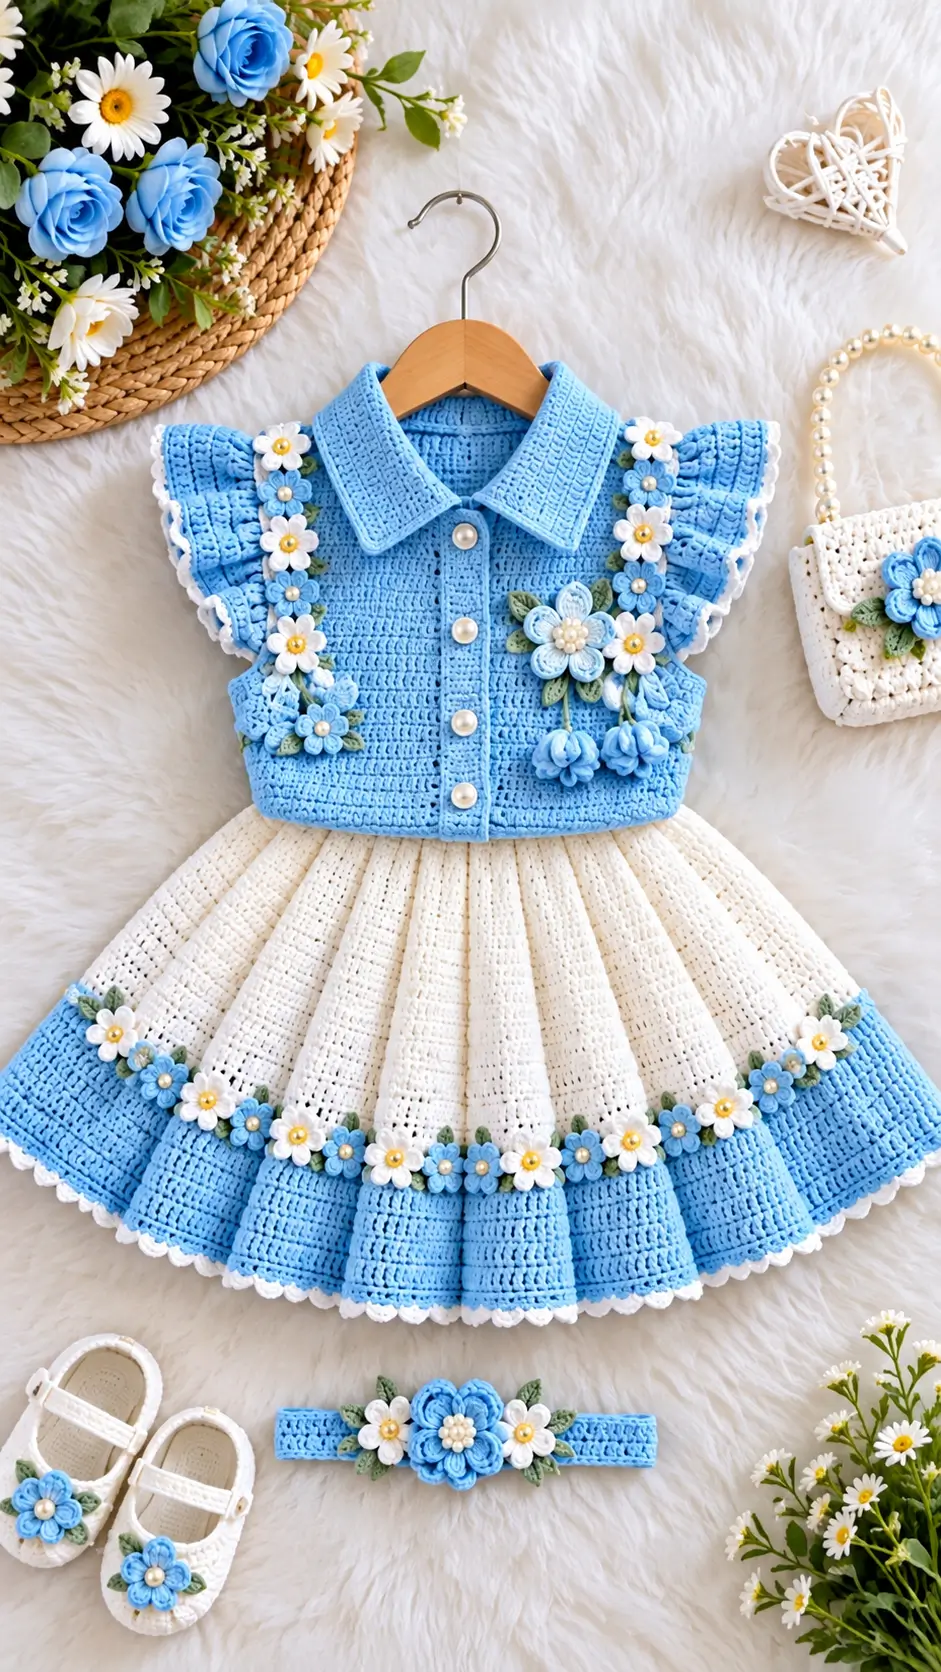
The double flower garlands running from this dress’s shoulders to its waist determine almost every other design decision. This crochet baby dress pattern recreates that blue-and-white structure with DK yarn, a 4 mm hook, a collared bodice, gathered skirt, appliqué flowers and matching accessories. The reference size is approximately 6–9 months and suits intermediate crochet skills. Its separate decorative components also make damaged flowers or trim replaceable.
The Design: What Makes This Floral Dress Different
The photographed dress depends on three structural divisions. A relatively dense blue bodice supports the collar, buttons and dimensional appliqués without collapsing under their combined weight. The white skirt begins at the waist with added fullness, producing vertical folds rather than a narrow A-line profile. Finally, a broad blue lower border gives the lightweight white section enough visual and physical weight to hang cleanly.
The floral crochet baby dress also repeats small flowers vertically instead of concentrating every motif at the hem. That changes assembly: appliqués should be pinned only after the bodice dimensions have stabilized.
A common mistake in a blue crochet baby dress of this type is attaching flowers before blocking. Even a 1 cm change in bodice width can make two supposedly symmetrical garlands visibly uneven.
Project Info at a Glance
| Skill Level | Time | Finished Size | Hook | Best For |
|---|---|---|---|---|
| Intermediate | 12–18 hours | Approx. 6–9 months; fit by measurements | 4 mm | Dress set, photography outfit, special-event garment |
Always prioritize the intended wearer’s actual chest measurement and a gauge swatch over an age label.
Materials and Tools
Yarn
- Baby blue — DK/light worsted — approximately 150–180 g — washable cotton/acrylic DK suggested.
- White/ivory — DK/light worsted — approximately 120–150 g — use the same fiber family as the blue yarn.
- Pale green — DK — approximately 10–15 g for leaves.
- Flower-center color — DK — approximately 5 g.
Yarn quantities are estimates for the complete photo-inspired set. Actual consumption changes with gauge, dress size, skirt fullness and the number of flowers added.
Tools
- 4 mm crochet hook
- Yarn needle
- Locking stitch markers
- Scissors
- Measuring tape
- Four small buttons
Pearl-effect embellishments can reproduce the appearance of the reference image. For an item intended for an infant, securely worked yarn centers avoid detachable decorative pieces.
Abbreviations
- ch — chain
- sc — single crochet
- hdc — half double crochet
- dc — double crochet
- sl st — slip stitch
- st/sts — stitch/stitches
- inc — increase
- dc2tog — double crochet two together
- RS — right side
- WS — wrong side
For shaped sections, work decreases through the indicated stitches without pulling the closing loop tighter than the surrounding fabric.
Gauge and Sizing Before You Crochet
Garment stitch mathematics cannot use the standard amigurumi rule of six increases per round. The bodice has to fit a torso, so its stitch count must be calculated from gauge and the intended finished chest measurement.
Make a swatch first. A practical starting target for this DK construction is approximately 20 stitches per 10 cm.
Measure the intended wearer’s chest. Add approximately 3–5 cm of wearing ease, then calculate the approximate stitch requirement:
Required circumference × stitches per cm = approximate bodice stitch requirement.
For a 46 cm finished chest at five stitches per centimetre, the target is roughly 230 stitches around the full circumference. Construction, armholes and the front opening determine how those stitches are distributed.
This calculation is more reliable than assigning one universal stitch count to every 6–9-month garment.
Pattern — Step by Step
Bodice
Yarn: baby blue.
Chain enough stitches to produce the required back-neck width according to your gauge swatch.
Row 1: Work dc evenly across the foundation chain. Turn.
Row 2: Ch 2, dc across, placing increases at four marked raglan points.
Rows 3–8: Repeat the established raglan increase structure until the yoke reaches the required shoulder width.
Next row: Work to the first sleeve section, skip those sleeve stitches, chain across the underarm, work across the back, skip the second sleeve section, chain across the second underarm and finish the front.
Continue the torso in dc rows until the bodice reaches the waist.
Check the chest circumference before proceeding. The front edges should meet without stretching.
Fasten off.
Front Button Bands
Yarn: baby blue.
Join yarn at the lower front edge.
Row 1: Sc evenly from the waist to the neckline.
Rows 2–4: Ch 1, sc across.
Repeat on the opposite front while spacing four buttonholes vertically. Form a small buttonhole with ch 1, skip 1 where that opening fits the selected button.
Sew the buttons only after blocking and checking the alignment of both bands.
Collar — Make 2
Yarn: baby blue.
Work each collar half from the neckline outward.
Row 1: Join at the center back and sc evenly toward the front neckline.
Row 2: Ch 2, dc across, increasing near the outer corners.
Rows 3–5: Continue in dc, adding enough corner increases for the collar to lie flat.
Final row: Sc around the outer edge.
Fasten off and weave the tail into the underside.
The reference dress uses a broad pointed collar. Test the point position before attaching the upper flowers because an oversized collar can cover the first appliqué.
Ruffled Sleeves — Make 2
Yarn: baby blue and white.
Join the blue yarn around one armhole.
Round 1: Sc evenly around; join.
Round 2: Ch 3, work 2 dc in each stitch around for pronounced fullness; join.
Round 3: Dc in each stitch around.
Round 4: Dc in each stitch around.
Change to white.
Round 5: Work sc, ch 3, sc in alternating edge positions to create the small white decorative edging.
Fasten off.
Repeat for the second sleeve. Match the base stitch count on both armholes so the ruffles have equal fullness.
Gathered Skirt
Yarn: white.
Join white yarn around the lower edge of the blue bodice.
Round 1: Ch 3, work approximately 1.5–2 dc into each available waist stitch, distributing the increases evenly. Join.
Round 2: Ch 3, dc around; join.
Rounds 3 onward: Repeat Round 2 until the white section reaches the planned lower-border position.
The skirt should form controlled vertical folds rather than a stiff horizontal flare. If the first increased round develops dense waves when laid flat, reduce the number of increases before continuing.
Blue Hem Border
Yarn: baby blue and white.
Join blue yarn to the lower edge of the white skirt.
Rounds 1–7: Ch 3, dc in every stitch around; join.
Adjust the number of rounds according to the total dress length. In the reference image, the blue section forms a substantial lower border rather than a narrow stripe.
Change to white.
Final round: Repeat sc, skip 1 st, 5 dc in next st, skip 1 st around. Adjust the final repeat where necessary so the scallops meet cleanly.
Fasten off.
Small Daisy Flowers
Yarn: white with cream center.
Round 1: Form a small ring and work 6 sc into it. Join. (6)
Round 2: Change to white. Repeat sl st, ch 3, 2 dc, ch 3, sl st around to create six compact petals.
Fasten off with a long sewing tail.
Make enough daisies to create the two vertical bodice garlands and the floral line above the blue skirt border.
Blue Five-Petal Flowers
Yarn: baby blue.
Round 1: Work 5 sc into a small ring. Join. (5)
Round 2: In each stitch work sl st, ch 2, 3 dc, ch 2, sl st. (5 petals)
Fasten off and leave a sewing tail.
Add a securely stitched yarn center before attaching the flower to the dress.
Large Layered Feature Flower
Yarn: baby blue, white or cream, and pale green.
Round 1: Work 6 sc into a ring. (6)
Round 2: Form six small blue petals.
Round 3: Working behind the first petals, create six chain loops.
Round 4: Work one larger petal into each rear loop.
Round 5: Add another layer only when the flower remains flat enough to attach securely.
Work or embroider the center firmly. Position the larger feature flower near the chest, following the general arrangement shown in the reference image.
Leaves
Yarn: pale green.
Ch 6.
Working along one side of the chain, make sl st, sc, hdc, dc, hdc. Work around the end of the chain and mirror the stitch sequence along the opposite side.
Fasten off with a long sewing tail.
Make the leaves in pairs and position them partly underneath the larger flowers.
Headband
Yarn: baby blue.
Chain to the required head circumference minus approximately 1–2 cm, depending on the stretch of the finished fabric.
Row 1: Hdc in the second chain and across.
Rows 2–3: Ch 1, hdc across.
Join the short ends securely to form the band.
Sew one large layered blue flower at the center. Position smaller white flowers and pale-green leaves symmetrically on either side.
Measure the intended wearer rather than relying exclusively on an age-based headband measurement.
Mary Jane Shoes — Make 2
Yarn: white with baby-blue flower.
Size each shoe from the baby’s measured foot length rather than an age label.
Begin with an oval sole. Chain to the required length and work increases around both ends of the foundation chain.
Work one or two rounds without increases to turn the edge of the sole upward.
Begin decreasing across the toe while leaving the heel area unchanged. Continue until the upper reaches the low Mary Jane shape visible in the reference image.
For the strap, join yarn at one side of the shoe, chain across the instep and return with sc. Attach the strap securely to the opposite side or form a correctly sized button loop.
Make one small blue flower and attach it to the toe of each shoe.
These crocheted shoes are decorative soft footwear rather than protective walking shoes.
Optional Mini Handbag
Yarn: white with baby-blue and pale-green details.
Make two small rectangular panels in sc.
Join three sides with sc while leaving the upper edge open.
Create a narrow handle from a foundation chain reinforced with one return row of sc.
Attach a blue layered flower and pale-green leaves to the front panel.
The handbag is an optional accessory and does not affect the construction of the dress.
Assembly
- Block the blue bodice to the calculated finished chest measurement before attaching dimensional decorations.
- Attach the white skirt evenly around the waist and check that its gathers are distributed symmetrically.
- Position the collar halves from the center back toward each front edge, then stitch them in place without stretching the neckline.
- Sew the four front buttons opposite their buttonholes and check that the front placket remains flat.
- Pin both vertical floral garlands from the shoulders toward the waist before permanently sewing any individual flower.
- Sew the large flowers first, then distribute the daisies and smaller blue flowers between them.
- Position pale-green leaves underneath selected flowers and stitch them through the center section.
- Arrange the skirt flowers only after blocking the skirt, maintaining an even line above the blue border.
- Add the flowers to the headband and shoes separately, keeping all yarn tails enclosed on the wrong side.
- Weave every remaining tail through several stitches, inspect all attachments and remeasure the finished chest and total dress length.
The completed set consists of a collared blue bodice, full white-and-blue skirt, dimensional floral decoration, matching headband and optional shoes and handbag.
7 Technical Tips for Better Construction
- Control marker drift: place locking markers at both side seams before beginning the skirt. A repeated one-stitch shift can rotate the decorative hem away from the center front.
- Check skirt rippling: lay the first increased skirt round on a flat surface before continuing. Dense waves indicate that too many increases were added at the waist.
- Measure button bands: compare both front bands before sewing the buttons. A difference greater than approximately 5 mm can pull the collar away from the center line.
- Pin flowers first: position every bodice flower before sewing any of them permanently. Keep matching flowers on the two garlands within approximately 5 mm of the same vertical position.
- Count sleeve bases: record the number of stitches around each armhole before adding the ruffles. Unequal base counts produce noticeably different sleeve fullness.
- Correct collar curling: block both collar halves to matching dimensions before attachment. Persistent upward curling usually indicates insufficient shaping along the outer edge.
- Leave adequate sewing tails: keep approximately 10–12 cm of yarn when finishing appliqués. This provides enough length to secure the flowers and weave the yarn through several directions on the wrong side.
Conclusion
This crochet baby dress pattern depends more on gauge control and accurate decorative placement than complicated individual stitches. Make the bodice swatch first, calculate the required chest circumference, and complete the undecorated garment before attaching the floral garlands. That sequence prevents the collar, button bands and appliqués from shifting after blocking. The next step is to crochet a 10 cm DK swatch with the 4 mm hook and record its stitch count before calculating the bodice. Save the finished blue-and-white dress to Pinterest or share the completed set on Instagram with #BlueFloralBabyDress. Which detail would you repeat on the accessories: the small white daisies or the large layered blue flower?
Introduction
The double flower garlands running from this dress’s shoulders to its waist determine almost every other design decision. This crochet baby dress pattern recreates that blue-and-white structure with DK yarn, a 4 mm hook, a collared bodice, gathered skirt, appliqué flowers and matching accessories. The reference size is approximately 6–9 months and suits intermediate crochet skills. Its separate decorative components also make damaged flowers or trim replaceable.
The Design: What Makes This Floral Dress Different
The photographed dress depends on three structural divisions. A relatively dense blue bodice supports the collar, buttons and dimensional appliqués without collapsing under their combined weight. The white skirt begins at the waist with added fullness, producing vertical folds rather than a narrow A-line profile. Finally, a broad blue lower border gives the lightweight white section enough visual and physical weight to hang cleanly.
The floral crochet baby dress also repeats small flowers vertically instead of concentrating every motif at the hem. That changes assembly: appliqués should be pinned only after the bodice dimensions have stabilized.
A common mistake in a blue crochet baby dress of this type is attaching flowers before blocking. Even a 1 cm change in bodice width can make two supposedly symmetrical garlands visibly uneven.
Project Info at a Glance
| Skill Level | Time | Finished Size | Hook | Best For |
|---|---|---|---|---|
| Intermediate | 12–18 hours | Approx. 6–9 months; fit by measurements | 4 mm | Dress set, photography outfit, special-event garment |
Always prioritize the intended wearer’s actual chest measurement and a gauge swatch over an age label.
Materials and Tools
Yarn
- Baby blue — DK/light worsted — approximately 150–180 g — washable cotton/acrylic DK suggested.
- White/ivory — DK/light worsted — approximately 120–150 g — use the same fiber family as the blue yarn.
- Pale green — DK — approximately 10–15 g for leaves.
- Flower-center color — DK — approximately 5 g.
Yarn quantities are estimates for the complete photo-inspired set. Actual consumption changes with gauge, dress size, skirt fullness and the number of flowers added.
Tools
- 4 mm crochet hook
- Yarn needle
- Locking stitch markers
- Scissors
- Measuring tape
- Four small buttons
Pearl-effect embellishments can reproduce the appearance of the reference image. For an item intended for an infant, securely worked yarn centers avoid detachable decorative pieces.
Abbreviations
- ch — chain
- sc — single crochet
- hdc — half double crochet
- dc — double crochet
- sl st — slip stitch
- st/sts — stitch/stitches
- inc — increase
- dc2tog — double crochet two together
- RS — right side
- WS — wrong side
For shaped sections, work decreases through the indicated stitches without pulling the closing loop tighter than the surrounding fabric.
Gauge and Sizing Before You Crochet
Garment stitch mathematics cannot use the standard amigurumi rule of six increases per round. The bodice has to fit a torso, so its stitch count must be calculated from gauge and the intended finished chest measurement.
Make a swatch first. A practical starting target for this DK construction is approximately 20 stitches per 10 cm.
Measure the intended wearer’s chest. Add approximately 3–5 cm of wearing ease, then calculate the approximate stitch requirement:
Required circumference × stitches per cm = approximate bodice stitch requirement.
For a 46 cm finished chest at five stitches per centimetre, the target is roughly 230 stitches around the full circumference. Construction, armholes and the front opening determine how those stitches are distributed.
This calculation is more reliable than assigning one universal stitch count to every 6–9-month garment.
Pattern — Step by Step
Bodice
Yarn: baby blue.
Chain enough stitches to produce the required back-neck width according to your gauge swatch.
Row 1: Work dc evenly across the foundation chain. Turn.
Row 2: Ch 2, dc across, placing increases at four marked raglan points.
Rows 3–8: Repeat the established raglan increase structure until the yoke reaches the required shoulder width.
Next row: Work to the first sleeve section, skip those sleeve stitches, chain across the underarm, work across the back, skip the second sleeve section, chain across the second underarm and finish the front.
Continue the torso in dc rows until the bodice reaches the waist.
Check the chest circumference before proceeding. The front edges should meet without stretching.
Fasten off.
Front Button Bands
Yarn: baby blue.
Join yarn at the lower front edge.
Row 1: Sc evenly from the waist to the neckline.
Rows 2–4: Ch 1, sc across.
Repeat on the opposite front while spacing four buttonholes vertically. Form a small buttonhole with ch 1, skip 1 where that opening fits the selected button.
Sew the buttons only after blocking and checking the alignment of both bands.
Collar — Make 2
Yarn: baby blue.
Work each collar half from the neckline outward.
Row 1: Join at the center back and sc evenly toward the front neckline.
Row 2: Ch 2, dc across, increasing near the outer corners.
Rows 3–5: Continue in dc, adding enough corner increases for the collar to lie flat.
Final row: Sc around the outer edge.
Fasten off and weave the tail into the underside.
The reference dress uses a broad pointed collar. Test the point position before attaching the upper flowers because an oversized collar can cover the first appliqué.
Ruffled Sleeves — Make 2
Yarn: baby blue and white.
Join the blue yarn around one armhole.
Round 1: Sc evenly around; join.
Round 2: Ch 3, work 2 dc in each stitch around for pronounced fullness; join.
Round 3: Dc in each stitch around.
Round 4: Dc in each stitch around.
Change to white.
Round 5: Work sc, ch 3, sc in alternating edge positions to create the small white decorative edging.
Fasten off.
Repeat for the second sleeve. Match the base stitch count on both armholes so the ruffles have equal fullness.
Gathered Skirt
Yarn: white.
Join white yarn around the lower edge of the blue bodice.
Round 1: Ch 3, work approximately 1.5–2 dc into each available waist stitch, distributing the increases evenly. Join.
Round 2: Ch 3, dc around; join.
Rounds 3 onward: Repeat Round 2 until the white section reaches the planned lower-border position.
The skirt should form controlled vertical folds rather than a stiff horizontal flare. If the first increased round develops dense waves when laid flat, reduce the number of increases before continuing.
Blue Hem Border
Yarn: baby blue and white.
Join blue yarn to the lower edge of the white skirt.
Rounds 1–7: Ch 3, dc in every stitch around; join.
Adjust the number of rounds according to the total dress length. In the reference image, the blue section forms a substantial lower border rather than a narrow stripe.
Change to white.
Final round: Repeat sc, skip 1 st, 5 dc in next st, skip 1 st around. Adjust the final repeat where necessary so the scallops meet cleanly.
Fasten off.
Small Daisy Flowers
Yarn: white with cream center.
Round 1: Form a small ring and work 6 sc into it. Join. (6)
Round 2: Change to white. Repeat sl st, ch 3, 2 dc, ch 3, sl st around to create six compact petals.
Fasten off with a long sewing tail.
Make enough daisies to create the two vertical bodice garlands and the floral line above the blue skirt border.
Blue Five-Petal Flowers
Yarn: baby blue.
Round 1: Work 5 sc into a small ring. Join. (5)
Round 2: In each stitch work sl st, ch 2, 3 dc, ch 2, sl st. (5 petals)
Fasten off and leave a sewing tail.
Add a securely stitched yarn center before attaching the flower to the dress.
Large Layered Feature Flower
Yarn: baby blue, white or cream, and pale green.
Round 1: Work 6 sc into a ring. (6)
Round 2: Form six small blue petals.
Round 3: Working behind the first petals, create six chain loops.
Round 4: Work one larger petal into each rear loop.
Round 5: Add another layer only when the flower remains flat enough to attach securely.
Work or embroider the center firmly. Position the larger feature flower near the chest, following the general arrangement shown in the reference image.
Leaves
Yarn: pale green.
Ch 6.
Working along one side of the chain, make sl st, sc, hdc, dc, hdc. Work around the end of the chain and mirror the stitch sequence along the opposite side.
Fasten off with a long sewing tail.
Make the leaves in pairs and position them partly underneath the larger flowers.
Headband
Yarn: baby blue.
Chain to the required head circumference minus approximately 1–2 cm, depending on the stretch of the finished fabric.
Row 1: Hdc in the second chain and across.
Rows 2–3: Ch 1, hdc across.
Join the short ends securely to form the band.
Sew one large layered blue flower at the center. Position smaller white flowers and pale-green leaves symmetrically on either side.
Measure the intended wearer rather than relying exclusively on an age-based headband measurement.
Mary Jane Shoes — Make 2
Yarn: white with baby-blue flower.
Size each shoe from the baby’s measured foot length rather than an age label.
Begin with an oval sole. Chain to the required length and work increases around both ends of the foundation chain.
Work one or two rounds without increases to turn the edge of the sole upward.
Begin decreasing across the toe while leaving the heel area unchanged. Continue until the upper reaches the low Mary Jane shape visible in the reference image.
For the strap, join yarn at one side of the shoe, chain across the instep and return with sc. Attach the strap securely to the opposite side or form a correctly sized button loop.
Make one small blue flower and attach it to the toe of each shoe.
These crocheted shoes are decorative soft footwear rather than protective walking shoes.
Optional Mini Handbag
Yarn: white with baby-blue and pale-green details.
Make two small rectangular panels in sc.
Join three sides with sc while leaving the upper edge open.
Create a narrow handle from a foundation chain reinforced with one return row of sc.
Attach a blue layered flower and pale-green leaves to the front panel.
The handbag is an optional accessory and does not affect the construction of the dress.
Assembly
- Block the blue bodice to the calculated finished chest measurement before attaching dimensional decorations.
- Attach the white skirt evenly around the waist and check that its gathers are distributed symmetrically.
- Position the collar halves from the center back toward each front edge, then stitch them in place without stretching the neckline.
- Sew the four front buttons opposite their buttonholes and check that the front placket remains flat.
- Pin both vertical floral garlands from the shoulders toward the waist before permanently sewing any individual flower.
- Sew the large flowers first, then distribute the daisies and smaller blue flowers between them.
- Position pale-green leaves underneath selected flowers and stitch them through the center section.
- Arrange the skirt flowers only after blocking the skirt, maintaining an even line above the blue border.
- Add the flowers to the headband and shoes separately, keeping all yarn tails enclosed on the wrong side.
- Weave every remaining tail through several stitches, inspect all attachments and remeasure the finished chest and total dress length.
The completed set consists of a collared blue bodice, full white-and-blue skirt, dimensional floral decoration, matching headband and optional shoes and handbag.
7 Technical Tips for Better Construction
- Control marker drift: place locking markers at both side seams before beginning the skirt. A repeated one-stitch shift can rotate the decorative hem away from the center front.
- Check skirt rippling: lay the first increased skirt round on a flat surface before continuing. Dense waves indicate that too many increases were added at the waist.
- Measure button bands: compare both front bands before sewing the buttons. A difference greater than approximately 5 mm can pull the collar away from the center line.
- Pin flowers first: position every bodice flower before sewing any of them permanently. Keep matching flowers on the two garlands within approximately 5 mm of the same vertical position.
- Count sleeve bases: record the number of stitches around each armhole before adding the ruffles. Unequal base counts produce noticeably different sleeve fullness.
- Correct collar curling: block both collar halves to matching dimensions before attachment. Persistent upward curling usually indicates insufficient shaping along the outer edge.
- Leave adequate sewing tails: keep approximately 10–12 cm of yarn when finishing appliqués. This provides enough length to secure the flowers and weave the yarn through several directions on the wrong side.
Conclusion
This crochet baby dress pattern depends more on gauge control and accurate decorative placement than complicated individual stitches. Make the bodice swatch first, calculate the required chest circumference, and complete the undecorated garment before attaching the floral garlands. That sequence prevents the collar, button bands and appliqués from shifting after blocking. The next step is to crochet a 10 cm DK swatch with the 4 mm hook and record its stitch count before calculating the bodice. Save the finished blue-and-white dress to Pinterest or share the completed set on Instagram with #BlueFloralBabyDress. Which detail would you repeat on the accessories: the small white daisies or the large layered blue flower?









