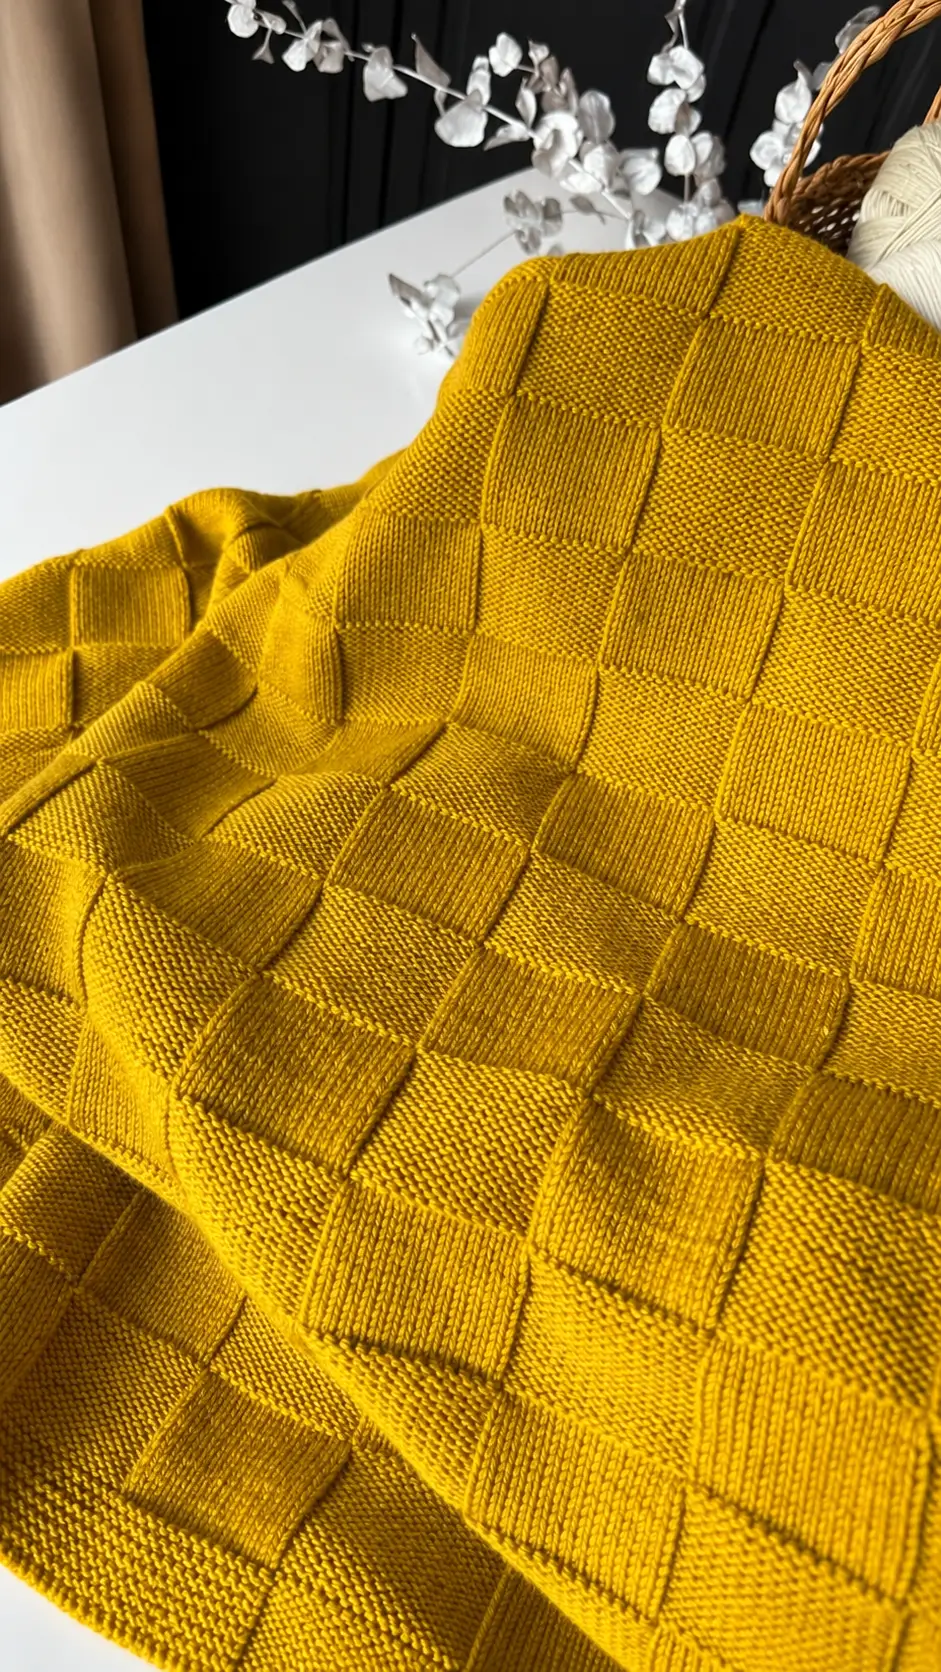
A checkerboard made entirely from knit and purl texture gives this mustard blanket its distinctive grid without requiring a second yarn color. This checkerboard knit blanket pattern uses repeating square blocks, a simple textured border, and one continuous yarn color. The photographed blanket appears suitable for an intermediate beginner who can knit, purl, cast on, bind off, and maintain an established stitch pattern.
The Design: What Makes This Checkerboard Blanket Different
The main feature is a large-scale checkerboard formed by alternating stockinette and reverse-stockinette blocks. Because both textures come from the same yarn, the pattern depends on stitch direction rather than colorwork. Each square changes orientation against its neighbors, producing the visible grid.
A textured border frames the checkerboard and helps separate the central pattern from the outer edge. The photograph also shows relatively large blocks rather than tiny checks, which keeps the design readable across a full-size throw. One common mistake with this type of knitted checkerboard blanket is losing track of the block sequence after turning the work. Marking each block boundary reduces that problem.
Project Information at a Glance
| Skill Level | Intermediate beginner |
|---|---|
| Construction | Worked flat in rows |
| Main Technique | Knit-and-purl checkerboard texture |
| Color | Mustard / golden yellow |
| Yarn | DK or worsted-weight yarn |
| Needles | Size required to obtain the desired fabric and gauge |
| Best For | Throw blanket, sofa blanket, or bed accent |
The exact dimensions, yarn weight, needle size, and gauge cannot be confirmed from a photograph alone. Make and measure a gauge swatch before calculating the final blanket size.
Materials and Tools
Yarn
- Mustard yellow yarn — DK or worsted weight — quantity depends on finished blanket dimensions.
A smooth yarn with clear stitch definition works well because the design depends on the contrast between knit-facing and purl-facing sections. Highly fuzzy yarn can obscure the boundaries between individual checkerboard blocks.
Tools
- Circular knitting needles in a size appropriate for the selected yarn and gauge
- Stitch markers for marking block boundaries
- Tapestry needle for weaving in yarn tails
- Scissors
- Tape measure
- Blocking mats and pins if wet blocking is suitable for the selected fiber
A long circular needle is preferable to straight needles for a wide blanket because the cable can support the weight of the fabric.
Abbreviations
- CO — cast on
- BO — bind off
- k — knit
- p — purl
- st/sts — stitch/stitches
- RS — right side
- WS — wrong side
- rep — repeat
Before Casting On: Calculate the Checkerboard
The photograph provides visual information but not enough information to recover an exact original stitch count. Instead, the blanket can be recreated proportionally by calculating each square from a gauge swatch.
First, knit a swatch using the selected yarn and needles. Measure the number of stitches and rows across 10 cm after blocking. Decide how wide each checkerboard square should be, then calculate the corresponding number of stitches.
For example, if the gauge is 20 stitches per 10 cm and a 10 cm square is required, each block needs approximately 20 stitches. Row gauge must be calculated separately because knitted stitches are normally wider than they are tall.
Important: do not assume that 20 stitches require exactly 20 rows to produce a square. Measure the actual row gauge.
Checkerboard Pattern Formula
The blanket is based on two alternating blocks. Block A presents stockinette on the right side. Block B presents reverse stockinette on the right side.
Block A — Stockinette
RS: Knit all stitches assigned to the block.
WS: Purl all stitches assigned to the block.
Block B — Reverse Stockinette
RS: Purl all stitches assigned to the block.
WS: Knit all stitches assigned to the block.
Place A and B next to each other across the row. After completing enough rows to reach the measured height of one square, reverse their positions.
Pattern — Step by Step
Step 1: Make a Gauge Swatch
Cast on enough stitches to create a swatch wider than 10 cm. Work several centimeters in stockinette, bind off without pulling the edge tight, and block the swatch using a method appropriate for the yarn fiber.
Measure the central 10 cm rather than the edges. Record both stitches per 10 cm and rows per 10 cm.
Step 2: Choose the Block Size
The photographed blanket uses substantial squares rather than narrow checks. A block approximately 8–12 cm wide provides a comparable visual proportion for many throw-size projects.
Multiply the desired block width by the stitch gauge. Round to a whole stitch if necessary. Calculate the block height separately from the row gauge.
Step 3: Calculate the Center Width
Choose an even number of checkerboard blocks across the blanket if you want the two textures to alternate evenly from side to side.
For a six-block center:
Block stitch count × 6 = center stitch count.
Add the stitches required for the left and right borders.
For example, a 20-stitch block with an 8-stitch border at each side would require:
20 × 6 + 16 = 136 stitches.
This is an example calculation rather than a measured stitch count from the photographed blanket.
Step 4: Cast On
CO the calculated total number of stitches using an elastic cast-on. Avoid pulling the cast-on edge tighter than the body of the blanket.
Place markers after the border stitches and between each checkerboard block. Different-colored markers can identify the two outer borders.
Step 5: Work the Bottom Border
Work the lower border entirely in garter stitch:
Row 1: Knit all stitches.
Row 2: Knit all stitches.
Repeat Rows 1–2 until the lower border reaches the desired depth. A border approximately 4–7 cm deep works proportionally with medium-to-large checkerboard squares.
Step 6: First Checkerboard Section
Maintain the side borders in garter stitch throughout the blanket.
RS: Knit border sts, *knit Block A sts, purl Block B sts; rep from * across the checkerboard center, knit border sts.
WS: Knit border sts, *purl Block A sts, knit Block B sts; rep from * across the checkerboard center, knit border sts.
Continue these two rows until the section measures the calculated height of one square.
Do not judge square dimensions only by counting rows. Measure the actual fabric.
Step 7: Second Checkerboard Section
Reverse the texture placement.
RS: Knit border sts, *purl Block A sts, knit Block B sts; rep from * across the checkerboard center, knit border sts.
WS: Knit border sts, *knit Block A sts, purl Block B sts; rep from * across the checkerboard center, knit border sts.
Continue until this section matches the height of the first checkerboard section.
Step 8: Repeat the Checkerboard
Alternate the first and second checkerboard sections until the center reaches the required blanket length.
The transition between sections should occur on the same type of row each time. Consistent transitions prevent one group of blocks from gaining an additional row.
Count completed checkerboard sections as the blanket grows. A removable marker attached to the first row of each new section makes the boundaries easier to identify.
Step 9: Work the Top Border
Once the final checkerboard section is complete, work every stitch in garter stitch.
Row 1: Knit all stitches.
Row 2: Knit all stitches.
Repeat until the top border matches the measured depth of the lower border.
Step 10: Bind Off
Bind off all stitches using a relaxed method. The bound-off edge should span approximately the same width as the cast-on edge without stretching the blanket.
Cut the yarn and pull the final tail through the last stitch.
How to Keep the Squares Visually Even
A knitted checkerboard requires separate stitch and row calculations. Matching the same numerical count in both directions will rarely create a geometrically square block because stitch gauge and row gauge differ.
Suppose the finished gauge measures 20 stitches and 28 rows per 10 cm. A 10 cm block would then require approximately 20 stitches across but 28 rows vertically. That difference is normal.
Make the calculations from the blocked gauge rather than the unblocked fabric. Blocking can change both measurements, particularly with wool and other animal fibers.
Adjusting the Blanket Size
Change the width by adding or removing complete checkerboard blocks rather than altering individual blocks. This preserves the proportions visible in the photographed design.
For additional length, work more complete checkerboard sections before beginning the upper border. Keeping complete sections prevents the blanket from ending halfway through a texture reversal.
If the finished width must be precise, calculate it from the blocked stitch gauge:
Desired center width ÷ block width = number of blocks.
Round to a practical whole number, then add the two border widths.
Finishing
- Check the blanket for dropped or incorrectly worked stitches before weaving in the yarn ends.
- Thread each yarn tail onto a tapestry needle.
- Weave the cast-on tail through stitches of the same texture.
- Secure any yarn joins across several neighboring stitches.
- Avoid pulling woven tails tightly enough to gather the fabric.
- Trim yarn ends only after they are secured.
- Measure the four outer edges before blocking.
- Wash or wet the blanket according to the yarn manufacturer’s fiber-care instructions.
- Shape the blanket to the planned dimensions and align the checkerboard grid while drying.
- Allow the fabric to dry completely before removing pins or moving it from the blocking surface.
The completed blanket should show alternating raised and recessed squares framed by an even knitted border.
7 Technical Tips for a Cleaner Checkerboard Blanket
- Marker drift: Place a stitch marker at every block boundary rather than counting a long sequence repeatedly. If a marker moves by one stitch, correct the error immediately because every following square will otherwise be offset.
- Rectangular blocks: Calculate block height from row gauge instead of making the row count equal the stitch count. A gauge of 20 stitches and 28 rows per 10 cm needs roughly 20 stitches by 28 rows for a 10 cm block.
- Loose knit-to-purl transitions: Do not pull the working yarn outward when moving it between the needles. Excess slack at each texture change can form a visible vertical channel between blocks.
- Uneven side borders: Keep exactly the same number of border stitches on both sides. Mark the border boundaries so checkerboard stitches cannot migrate into the edge section.
- Incorrect texture orientation: Check the right side after the first two rows of every new section. Adjacent squares should display opposing stockinette and reverse-stockinette surfaces.
- Tight bind-off: Compare the upper edge with the cast-on width while binding off. If the upper edge contracts noticeably, undo it and use a more elastic bind-off or a larger needle.
- Distorted blocking: Measure the blanket at several points instead of stretching individual corners into position. Pinning one corner too far can turn square checkerboard blocks into parallelograms.
Yarn Substitution
The mustard color is visually prominent in the reference image, but the construction does not depend on a particular shade. A solid yarn gives the clearest distinction between the two stitch textures.
DK yarn produces a lighter fabric with smaller individual stitches. Worsted yarn produces a denser blanket when paired with a suitable needle. Changing yarn weight also changes the gauge, so the cast-on count must be recalculated rather than copied from a different yarn.
A smooth, multi-ply yarn provides particularly clear definition around the squares. Strongly variegated yarn can compete visually with the checkerboard because frequent color changes reduce the apparent difference between stockinette and reverse stockinette.
Care and Blocking
Follow the care requirements of the yarn actually used. Wool, acrylic, cotton, and blended fibers respond differently to heat, moisture, and agitation.
Blocking is useful for aligning the checkerboard grid and evening the outer edges. Measure several blocks after blocking to confirm that their dimensions remain consistent across the blanket.
Do not apply high heat unless the yarn manufacturer’s instructions specifically permit it. Excessive heat can permanently alter some synthetic fibers.
Conclusion
The photographed design can be recreated by combining alternating stockinette and reverse-stockinette blocks with a continuous garter-style border. Start by knitting and blocking a gauge swatch, then calculate the stitch and row counts needed for genuinely square blocks. That measurement is the key next step before casting on a full-size checkerboard knit blanket pattern. Save the finished project to Pinterest or share the completed grid on Instagram with #MustardCheckerboardBlanket. When comparing your blanket with the reference image, check one detail in particular: are your mustard squares approximately as wide as they are tall after blocking?









