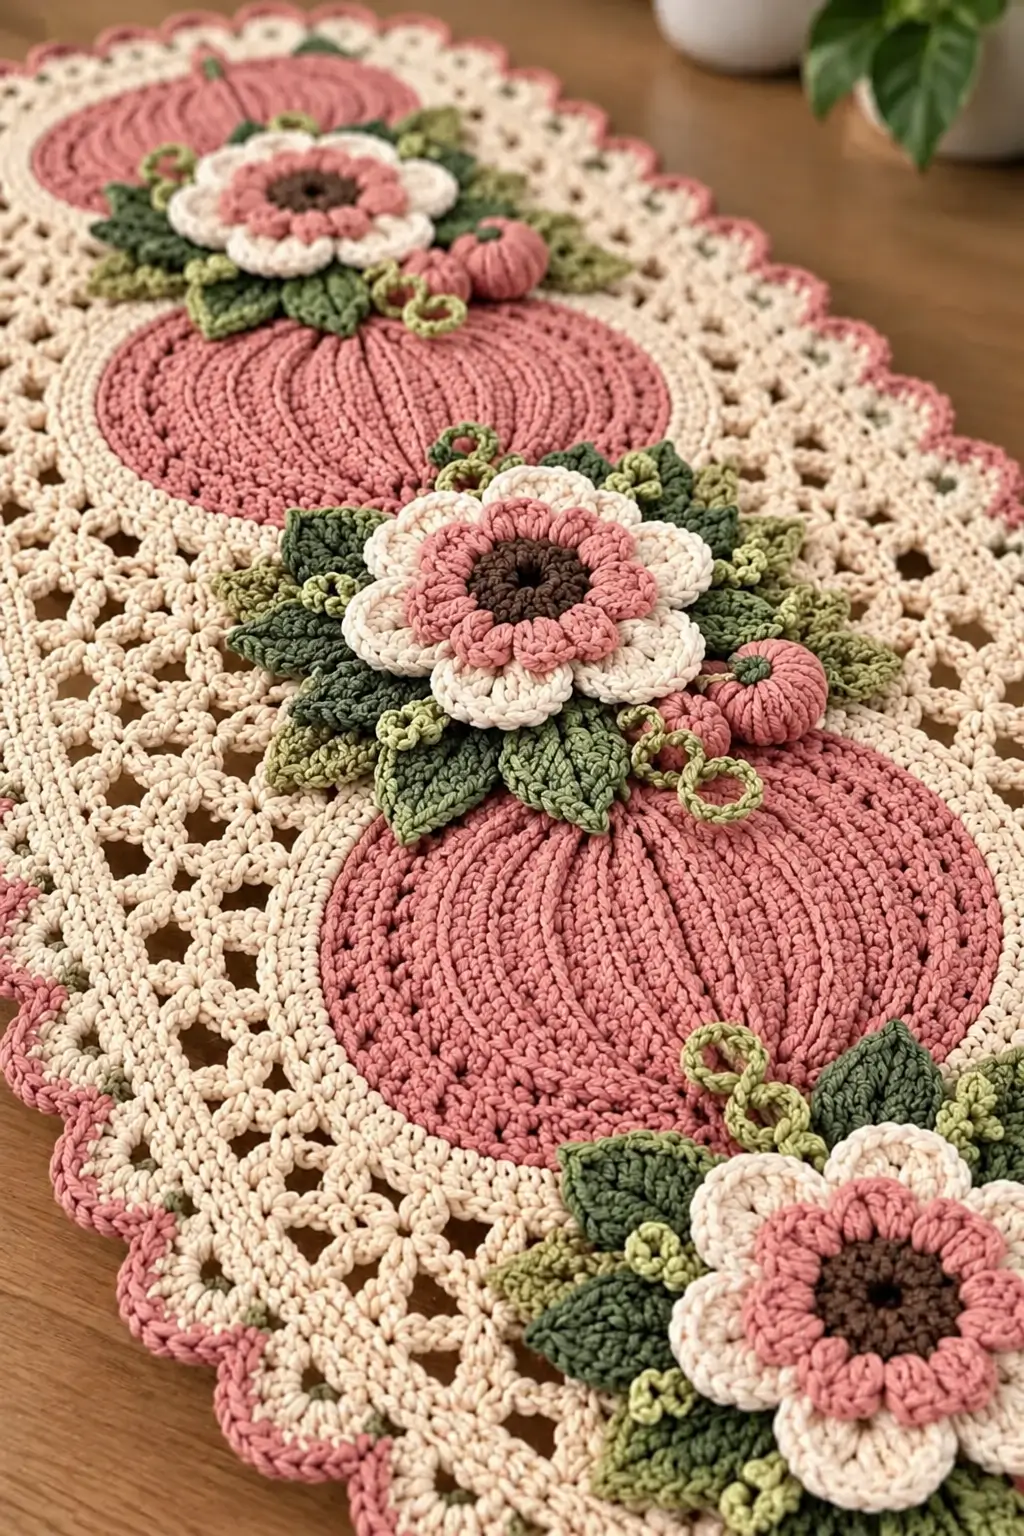
Three dusty-pink pumpkins replace the usual flat medallions in this autumn runner, so every floral cluster has to bridge a raised center and an open lace border. This pink pumpkin crochet table runner combines textured pumpkin motifs, cream lace, layered flowers, dark green leaves and curling vines. The individual components are crocheted separately, blocked to consistent measurements and joined into an elongated centerpiece measuring approximately 38 × 105 cm.
The Design: What Makes This Pumpkin Table Runner Different
The central pumpkin motifs control the scale of the entire design. Each pumpkin is a broad oval rather than a round appliqué, with raised vertical ribs that imitate natural pumpkin segments. Cream framing separates the dusty-pink centers from the surrounding openwork.
The second structural feature is the lace field. Instead of filling the spaces between pumpkins with solid crochet, chain arches and clustered stitches create an open diamond texture. A scalloped cream-and-pink border finishes the irregular outer edge.
Layered flowers sit where pumpkin sections meet. Cream outer petals, dusty-pink inner petals and brown centers repeat the runner colors without competing with the large pumpkin motifs. Dark sage leaves provide contrast. The main construction problem is distortion: all three pumpkin centers must reach nearly identical dimensions before the lace sections are joined.
Project Info at a Glance
| Skill Level | Time | Finished Size | Main Hook | Construction |
|---|---|---|---|---|
| Intermediate | 12–16 hours | Approx. 38 × 105 cm | 4.0 mm | Three pumpkin medallions joined with lace |
The dimensions are a target for this photo-inspired construction rather than a measurement taken directly from the photograph. Finished size will change with yarn thickness, hook size and blocking.
Materials and Tools
Yarn
- Dusty pink worsted-weight cotton or cotton blend — approximately 250–300 g
- Warm cream worsted-weight cotton or cotton blend — approximately 300–350 g
- Dark sage green worsted-weight yarn — approximately 70–90 g
- Light olive green worsted-weight yarn — approximately 40–50 g
- Dark brown worsted-weight yarn — approximately 20–30 g
Use yarns with closely matched thickness. The runner combines solid motifs with open lace, and changing yarn diameter between colors can alter the dimensions of both sections.
Tools
- 4.0 mm crochet hook
- 3.5 mm crochet hook for tighter flowers and leaves if required
- Large-eye yarn needle
- Scissors
- Locking stitch markers
- Blocking mat
- Rustproof pins
- Flexible measuring tape
Abbreviations
- MR — magic ring
- ch — chain
- sc — single crochet
- hdc — half double crochet
- dc — double crochet
- tr — treble crochet
- sl st — slip stitch
- FLO — front loop only
- BLO — back loop only
- FPdc — front-post double crochet
- sp — space
- st / sts — stitch / stitches
Front-post stitches are worked around the post of the stitch below. They create the raised lines that divide each pumpkin into visible segments.
Gauge and Motif Measurements
Make one pumpkin motif before producing the other two.
The finished pink center should measure approximately 25–27 cm wide and 19–21 cm high before the surrounding cream frame is added.
After framing, target approximately 31–33 cm wide for each main medallion.
Consistency matters more than matching an exact generic gauge. Measure Pumpkin 1 after blocking and use it as the template for Pumpkins 2 and 3.
Pink Pumpkin Center – Make 3
Use dusty pink yarn and a 4.0 mm hook.
The pumpkin is worked from the center outward as an oval. Strategic increases at both ends lengthen the motif while front-post stitches create the vertical rib effect visible in the reference.
Round 1
Ch 15.
Work 2 hdc in second ch from hook.
Hdc in next 12 ch.
Work 5 hdc in final ch.
Continue along the opposite side of the foundation chain.
Hdc in next 12 ch.
Work 3 hdc into the first foundation position.
Join with sl st.
Round 2
Ch 1.
Work 2 hdc in each of the first 2 sts.
Hdc across the long side.
Work increases evenly through the five stitches around the first curved end.
Hdc across the opposite long side.
Increase evenly through the remaining curved end.
Join.
Round 3
Ch 1.
Continue working hdc around the oval, placing increases only through the curved ends.
Keep both straight sides free from increases.
Join with sl st.
Round 4 – First Raised Ribs
Ch 2.
Work hdc around, replacing approximately eight evenly distributed stitches with FPdc.
Position the raised stitches so they radiate from the lower center toward the upper center of the oval.
Join.
Round 5
Hdc around.
Work increases through the curved ends as required to keep the motif flat.
Work FPdc around each FPdc from the previous textured round.
Join.
Rounds 6–9
Continue in the established pattern.
Work hdc through the main fabric, maintain the raised FPdc lines, and add increases only when the outer edge begins to cup.
The finished motif should form a broad pumpkin-shaped oval rather than a perfect circle.
Fasten off once the center measures approximately 25–27 cm across.
Adding Stronger Pumpkin Ribs
If the raised lines are not prominent enough, add surface crochet after completing the motif.
Join dusty-pink yarn near the lower center.
Surface slip stitch along one existing raised line toward the top center.
Fasten off.
Repeat along selected segment lines.
Keep the surface stitches relaxed. Tight surface crochet can pull the oval inward and produce a bowl-shaped motif.
Cream Frame Around Each Pumpkin
Make around all three pumpkin centers.
Join cream yarn at one side.
Frame Round 1
Ch 1.
Sc evenly around the entire pumpkin.
Place additional stitches through both curved ends when required to keep the frame flat.
Join.
Frame Round 2
Ch 3.
Dc in each stitch around.
At the upper and lower ends, place controlled increases approximately every fourth or fifth stitch.
Join.
Frame Round 3 – Lace Foundation
Ch 1.
*Sc in next 2 sts, ch 3, skip 2 sts.*
Repeat around.
Adjust the final repeat slightly if necessary so the arches remain evenly distributed.
Join.
Block all three framed pumpkin motifs before beginning the connecting lace.
Cream Lace Connector
The reference runner uses an open mesh between the large pumpkin centers. Build that area with chain arches rather than dense rows.
Place two framed pumpkins approximately 5–7 cm apart.
Join cream yarn to a ch-3 space on the first motif.
Ch 7.
Sl st into the corresponding ch-3 space on the second motif.
Ch 5 and return to the next available space on the first motif.
Continue alternating between the two medallions to create a loose zigzag mesh.
Add a second line of arches between the first set:
*Sc into the center of a ch-7 arch, ch 5, sc into the next arch.*
Continue until the connecting area measures approximately the same width as the cream frame.
Repeat between the second and third pumpkin motifs.
Side Lace Panels
Once all three pumpkin centers are joined in a vertical line, work cream lace along both long sides.
Lace Row 1
Join cream yarn to an outer frame space.
*Ch 7, sc into next available ch-space.*
Repeat along the long edge.
Lace Row 2
Turn.
*Ch 5, sc into center of next ch-7 arch.*
Repeat across.
Lace Row 3
Turn.
*Ch 7, sc into next ch-5 arch.*
Repeat across.
Lace Rows 4–6
Alternate the ch-5 and ch-7 arch rows.
Stop when each side panel measures approximately 7–9 cm from the cream pumpkin frame.
Repeat on the opposite long edge.
End Lace Sections
Work the same alternating chain-arch pattern across the top and bottom ends.
Increase at both outer corners by placing two arches into selected corner spaces.
The runner should gradually develop a soft rectangular outline while retaining the curved shape around the pumpkin medallions.
Large Layered Flower – Make 4
Use dark brown, dusty pink and cream yarn.
Three prominent flowers are visible along the runner, with an additional flower useful for balancing the opposite end or filling the final arrangement.
Brown Center
R1: 6 sc in MR. (6)
R2: Inc ×6. (12)
R3: [Sc, inc] ×6. (18)
R4: [Sc 2, inc] ×6. (24)
Fasten off.
Dusty-Pink Inner Petals
Join dusty pink.
*Sl st in next st, ch 3, 3 dc in next st, ch 3, sl st in next st.*
Repeat around, spacing the petal groups evenly.
The completed layer should form approximately 8 compact pink petals.
Cream Outer Petals
Turn the flower over.
Join cream yarn behind the pink petal layer.
*Ch 6. Starting in second ch from hook, sc, hdc, dc, dc, hdc. Sl st behind the next pink petal.*
Repeat around.
Shape the cream petals outward with your fingers.
Fasten off with a 30 cm sewing tail.
Dark Green Pointed Leaf – Make 16 to 20
Use dark sage yarn and a 3.5 mm hook.
Ch 13.
Starting in second ch from hook:
Sl st, sc, hdc, dc in next 5 ch, hdc, sc, sl st.
Work 3 sc in the final chain.
Continue along the opposite side of the foundation chain.
Mirror the stitch sequence back toward the base.
Join.
Surface sl st along the center foundation chain to form a visible vein.
Fasten off with a 20 cm tail.
Light Olive Leaf – Make 8 to 12
Use the same leaf construction with light olive yarn.
For variation, begin with ch 10 instead of ch 13.
The smaller olive leaves should sit behind or between the dark sage foliage.
Small Pink Pumpkin – Make 3
The floral clusters in the reference contain miniature pumpkins. These should remain small enough to function as accents.
Use dusty-pink yarn and a 3.5 mm hook.
R1: 6 sc in MR. (6)
R2: Inc ×6. (12)
R3: [Sc, inc] ×6. (18)
R4: [Sc 2, inc] ×6. (24)
R5–7: Sc around. (24)
R8: [Sc 2, dec] ×6. (18)
R9: [Sc, dec] ×6. (12)
Add a small amount of stuffing.
R10: Dec ×6. (6)
Fasten off with a 50 cm tail.
Pass the tail through the center and around the outside of the pumpkin approximately six times to create the segment grooves.
Mini Pumpkin Stem
With dark green yarn, join at the top center.
Ch 4.
Sl st back down the chain.
Fasten off.
The miniature pumpkin should finish at approximately 4–5 cm across.
Curly Green Vine – Make 8 to 12
Use light olive yarn.
Ch 18.
Work 3 sc into second ch from hook and 3 sc into every remaining chain.
The strip will curl automatically.
Fasten off with a sewing tail.
For smaller tendrils, begin with ch 10–12.
Small Green Bud Cluster – Make 6
With light olive yarn:
R1: 6 sc in MR. (6)
R2: [Sc, inc] ×3. (9)
R3: Sc around. (9)
Fasten off without stuffing.
Flatten slightly and sew near the leaf bases.
Arranging the Floral Clusters
Do not attach flowers while the lace is still being constructed.
Complete and block the entire runner first.
Place one large layered flower near the upper junction between the first and second pumpkin motifs.
Position another near the junction between the second and third motifs.
Add one flower near the lower end, slightly offset from the central axis.
Use the fourth flower only if the finished arrangement needs additional balance.
Place dark green leaves directly beneath each flower. Add smaller olive leaves behind them.
Position one miniature pink pumpkin near selected flower clusters and place curly vines around its stem.
Scalloped Border
The photographed runner has a cream openwork edge finished with dusty-pink scallops.
Border Round 1 – Cream
Join cream yarn anywhere along the outer lace edge.
Ch 1.
Work sc evenly around, placing stitches into both chain arches and solid sections.
At each corner, work 3 sc.
Join.
Border Round 2 – Cream Lace
*Sc in next 2 sts, ch 4, skip 2 sts.*
Repeat around.
Adjust the corner repeats so each corner contains one complete ch-4 arch.
Border Round 3 – Cream Shells
Sl st into the first ch-4 space.
Work 7 dc into the space.
Sc into the next ch-4 space.
Work 7 dc into the following space.
Continue alternating shells and anchoring sc around the runner.
Border Round 4 – Dusty Pink Accent
Join dusty-pink yarn at the beginning of one cream shell.
Sc in each dc across the shell.
At the center dc of each 7-dc shell, work (sc, ch 2, sc) to create a small point.
Sl st through the recessed spaces between shells.
Repeat around.
Fasten off.
Blocking the Runner
Blocking is particularly important because the design combines dense pumpkin centers with open lace.
Place the completed undecorated runner on blocking mats.
Measure the center line from top to bottom.
Pin the three pumpkin motifs so their centers align.
Next, pin the outer lace edge to approximately 38 cm wide.
Shape every scallop individually.
Dampen the runner according to the fiber instructions and allow it to dry completely before attaching the floral decorations.
Assembly
- Complete all three dusty-pink pumpkin centers and block them to matching dimensions.
- Add the cream frame around each pumpkin, then join the three motifs along one central axis with open lace connectors.
- Build the long side and end lace sections until the runner reaches approximately 38 × 105 cm before final shaping.
- Work the cream scalloped border and add the narrow dusty-pink accent around the outer edge.
- Block the complete undecorated runner and allow it to dry before positioning any three-dimensional pieces.
- Pin the large layered flowers near the pumpkin junctions, keeping the brown centers visible and the cream petals free.
- Arrange dark sage and light olive leaves beneath each flower, pointing their tips away from the floral center.
- Add the miniature pumpkins beside selected flowers and sew them through the base so their segment shaping remains visible.
- Attach curly green vines and small bud clusters to fill gaps without covering the open cream lace.
- Weave every tail into matching-color fabric, inspect the reverse side for loose joins and lay the finished runner flat for a final measurement.
The finished centerpiece should display three dominant pink pumpkin medallions surrounded by cream lace, layered flowers, green foliage, miniature pumpkins and a pink-edged scalloped border.
7 Technical Tips for a Better Pumpkin Table Runner
- Match the three pumpkin centers. A difference of more than approximately 1 cm becomes visible once the motifs share the same lace field. Block Pumpkin 1 first and use its width and height as the template for the remaining two.
- Keep surface ribs loose. Tight surface slip stitches can shorten one side of an oval by several centimeters. Lay the pumpkin flat after every two added ribs and release any line that causes cupping.
- Control lace-chain tension. A ch-7 arch worked much tighter than its neighbors creates a narrow section in the runner. Measure several arches and keep them within approximately 5 mm of one another.
- Pin flowers before sewing. A layered flower can cover 10 cm or more of the lace field. Test all floral positions at once so the cream openwork remains visible between clusters.
- Reinforce miniature pumpkins. Sewing them only through one bottom stitch allows them to rotate. Attach each small pumpkin at three points around its lower edge.
- Shape the scallops during blocking. An unpinned shell border can dry with uneven points. Pin the center of every cream shell and keep the dusty-pink tips aligned.
- Hide attachment tails by color. Dark green yarn carried through cream lace remains visible from the reverse side. Weave each tail through a matching leaf or flower before entering the runner for the final attachment.
How to Make a Shorter Pumpkin Centerpiece
Use two large pumpkin motifs instead of three for a centerpiece approximately 65–75 cm long.
Join the two framed pumpkins with the same cream lace section and build the outer lace until the proportions look balanced.
Two or three floral clusters are sufficient for the shorter version. Keep the pumpkin dimensions unchanged so the decorative details remain substantial.
How to Make a Longer Table Runner
Add one additional framed pumpkin motif before constructing the side lace.
A fourth pumpkin increases the length by approximately 28–33 cm depending on the connector spacing.
Repeat the flower cluster near the new junction. Avoid adding a large flower directly to every pumpkin center because that would hide the raised rib texture.
Choosing the Pink Yarn
A muted dusty rose, antique pink or terracotta-pink shade is closest to the reference. Bright bubblegum pink changes the autumn character of the design substantially.
Cotton produces clear stitch definition in the pumpkin ribs and lace. A cotton-acrylic blend can reduce the finished weight while retaining much of that definition.
Use the same dusty-pink yarn for the large pumpkin centers, inner flower petals, miniature pumpkins and outer border accent. Repeating one shade through all four elements ties the separate motifs together.
Choosing Cream and Green Shades
Warm cream works better than brilliant white when paired with dusty pink and olive foliage. Natural, ecru and ivory shades all suit the design.
Use at least two greens. Dark sage creates the main leaves, while light olive works for vines, buds and smaller background foliage.
Place all yarn colors together before beginning. The difference between the two greens needs to remain visible without making the foliage look disconnected.
Keeping the Lace Flat
Dense crochet and chain lace expand at different rates. Check the runner on a flat surface after every two lace rows.
If the lace begins ruffling, reduce the number or length of the chain arches. If the edge pulls toward the pumpkin centers, add a chain to selected arches or place an additional arch around the curves.
Do not rely on aggressive blocking to correct severe distortion. The lace should lie reasonably flat before it is pinned.
Care Instructions
Follow the care requirements for the yarn with the most restrictive washing instructions.
Hand washing is practical for a runner containing raised flowers and stuffed miniature pumpkins. Use cool water and avoid twisting the lace.
Press excess water between clean towels. Arrange the runner flat, straighten the central pumpkin line and reshape the scalloped edge while damp.
Lift and reshape each flower petal before drying. Store the runner flat or loosely rolled rather than folding directly through a large flower or stuffed pumpkin.
Conclusion
The three matching pumpkin centers establish the measurements for this pink pumpkin crochet table runner, while the cream lace determines its final width and length. Make and block all three pink ovals before joining them, then build the openwork field and scalloped border before attaching any raised decoration. Flowers, sage leaves, miniature pumpkins and curling vines should be added last so their placement can respond to the completed lace. Start by making one 25–27 cm pumpkin motif and record its final stitch tension for the remaining pair. Save the finished runner to Pinterest or share it on Instagram with #PinkPumpkinTableRunner. Would you keep all three pumpkins dusty pink or make the center pumpkin cream?









