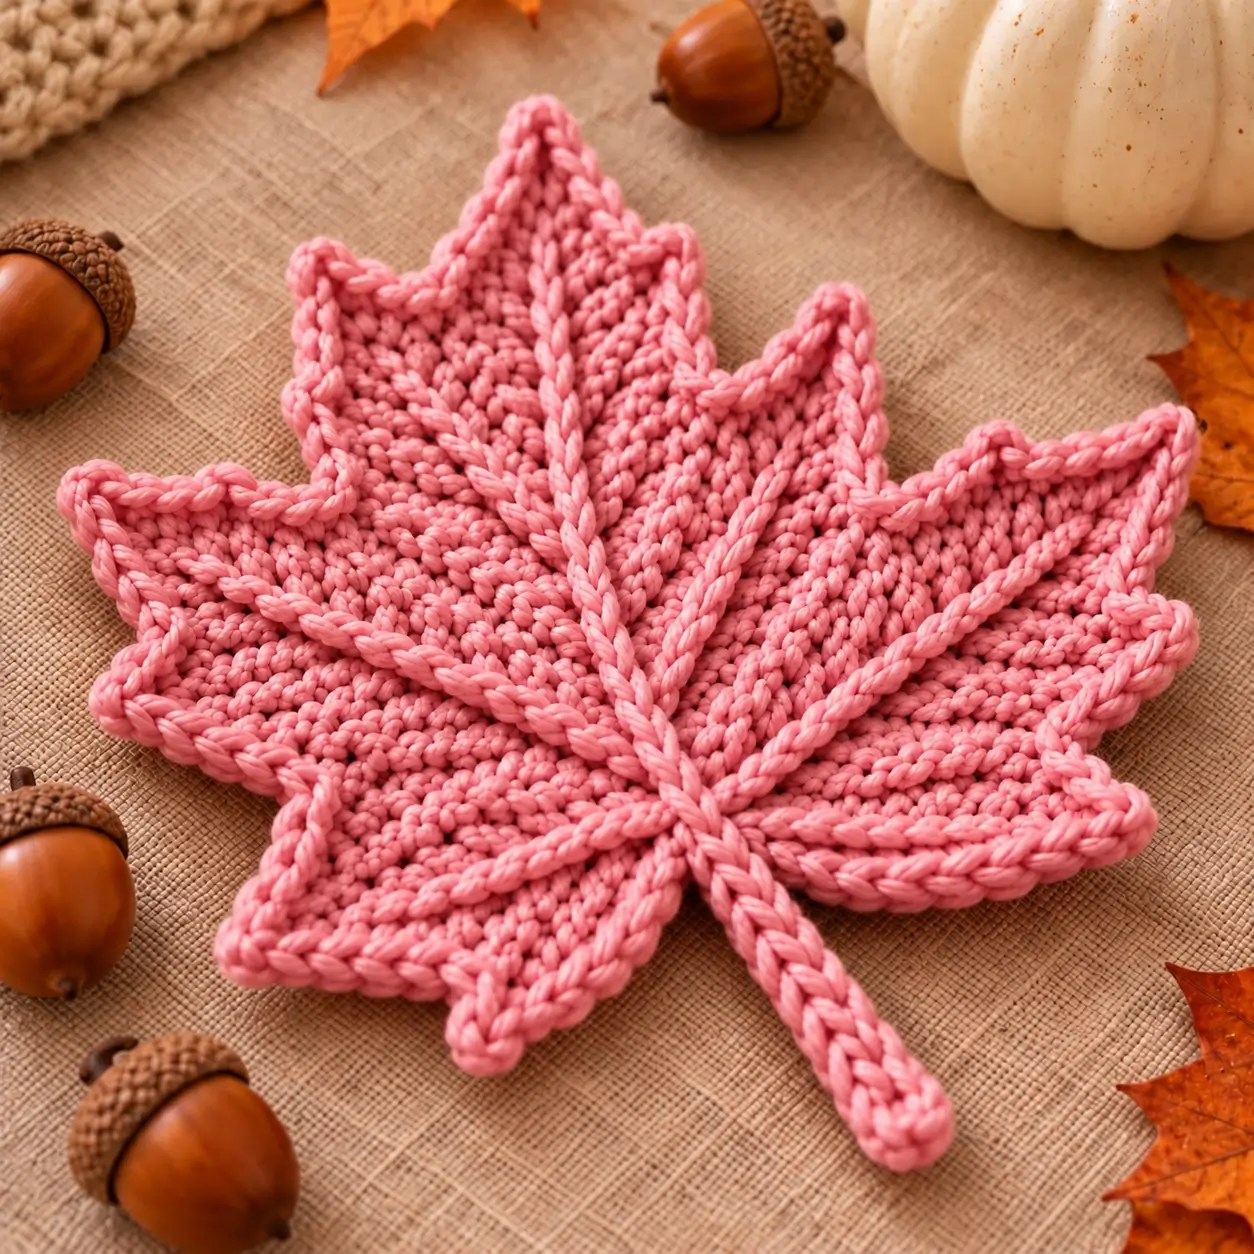
A maple leaf needs five dominant points and deep valleys before raised veins can make the shape convincing. This pink crochet maple leaf pattern uses a dense single-color body, pronounced surface-crochet veins, a corded-looking perimeter and an extended stem. Made in cotton with a 4–4.5 mm hook, the photo-inspired version targets approximately 25 cm across for use as a decorative table mat or trivet-style centerpiece.
The Design: What Makes This Pink Maple Leaf Different
The photographed leaf depends almost entirely on texture because there is no contrasting vein color. Five principal lobes establish the silhouette, while several smaller points sharpen the perimeter. Raised pink veins then radiate from one central junction and visually separate the lobes.
A second structural decision is the thick edge. Rather than finishing with lace or picots, the border follows every point and valley as a continuous raised line. The stem receives the same treatment, which connects it directly to the central vein.
The main failure mode is surface-crochet tension. If the raised veins are worked more tightly than the underlying fabric, the finished crochet maple leaf trivet cups upward. The body must therefore lie flat before any raised detail is added.
Project Info at a Glance
| Skill Level | Time | Finished Size | Hook | Best For |
|---|---|---|---|---|
| Intermediate | Approx. 3–5 hours | Approx. 25 cm wide | 4–4.5 mm | Table mat, centerpiece or decorative trivet |
The photograph contains no physical scale, so 25 cm is a target rather than a measurement taken from the image. Published maple-leaf projects vary considerably: compact crochet leaves can measure about 13–15 cm, while a cotton maple-leaf trivet can measure approximately 25 × 25 cm with a 4.5 mm hook.
Materials and Tools
Yarn
- Rose pink — worsted-weight 100% cotton — approximately 80–100 g.
- Rose pink — reserve approximately 15–20 g of the total yarn for the raised veins, stem and perimeter.
Use 100% cotton when the project is intended for table use around warm dishes. A published maple-leaf trivet measuring approximately 25 × 25 cm uses worsted 100% cotton with a 4.5 mm hook. Acrylic yarn can soften or melt under high heat, so a decorative acrylic leaf should not be treated as a heat-resistant trivet.
Tools
- 4–4.5 mm crochet hook
- Stitch markers
- Tapestry needle
- Scissors
- Tape measure
- Blocking mat
- Rust-resistant blocking pins
Abbreviations
- ch — chain
- sc — single crochet
- hdc — half double crochet
- dc — double crochet
- tr — treble crochet
- sl st — slip stitch
- inc — increase
- dec — decrease
- sc2tog — single crochet two stitches together
- sc3tog — single crochet three stitches together
- st/sts — stitch/stitches
- sp — space
- BLO — back loop only
Compact decreases are particularly important inside the valleys because loose decrease stitches soften the indentation between neighboring maple points.
Pink Crochet Maple Leaf Pattern — Step by Step
This is a photo-inspired construction rather than a transcription of a published designer pattern. The leaf body is completed first. Raised veins, the stem and the thick perimeter are added afterward so their tension can be controlled independently.
Central Foundation
Yarn: rose pink.
Ch 17.
Row 1: Sc in second ch from hook and across (16).
Row 2: Ch 1, turn, sc across (16).
Row 3: Ch 1, turn, 2 sc in first st, sc across to final st, 2 sc in final st (18).
Row 4: Ch 1, turn, sc across (18).
Row 5: Ch 1, turn, 2 sc in first st, sc across to final st, 2 sc in final st (20).
Row 6: Ch 1, turn, sc across (20).
Mark the midpoint. This position controls the central point, main vein and stem alignment.
Central Upper Lobe
Yarn: rose pink.
The center lobe must finish higher than the side lobes.
Row 1: Join yarn across the center section and sc across.
Row 2: Ch 1, turn, 2 sc in first st, sc across to final st, 2 sc in final st.
Row 3: Ch 1, turn, sc across.
Row 4: Repeat Row 2.
Rows 5–9: Sc across.
Row 10: Ch 1, turn, sc2tog, sc across to final 2 sts, sc2tog.
Row 11: Sc across.
Rows 12–19: Repeat Rows 10–11 four times.
Continue decreasing one stitch at each edge on alternate rows until 3 stitches remain.
Final Row: Sc3tog.
Fasten off.
Upper Left Lobe
Join pink yarn to the upper-left section.
Row 1: Sc across the selected stitches.
Row 2: Ch 1, turn, 2 sc in first st, sc across to final st, 2 sc in final st.
Row 3: Sc across.
Row 4: Repeat Row 2.
Rows 5–8: Sc across.
Row 9: Ch 1, turn, sc2tog, sc across to final 2 sts, sc2tog.
Row 10: Sc across.
Repeat Rows 9–10 until 3 stitches remain.
Final Row: Sc3tog.
Fasten off.
Upper Right Lobe
Repeat the upper-left lobe as a mirror image.
Use the same number of shaping rows. Compare the distance from each point to the center marker before weaving in the tails.
Middle Left Lobe
Join yarn below the upper-left lobe.
Row 1: Sc across.
Row 2: Ch 1, turn, 2 sc in first st, sc across to final st, 2 sc in final st.
Row 3: Sc across.
Row 4: Repeat Row 2.
Rows 5–7: Sc across.
Row 8: Ch 1, turn, sc2tog, sc across to final 2 sts, sc2tog.
Row 9: Sc across.
Repeat Rows 8–9 until 3 stitches remain.
Final Row: Sc3tog.
Fasten off.
Middle Right Lobe
Mirror the middle-left lobe.
These two points establish most of the finished width, so measure them from the central axis before continuing.
Lower Left Lobe
Join yarn at the lower-left section.
Row 1: Sc across.
Row 2: Ch 1, turn, 2 sc in first st, sc across to final st, 2 sc in final st.
Row 3: Sc across.
Row 4: Repeat Row 2.
Rows 5–6: Sc across.
Row 7: Ch 1, turn, sc2tog, sc across to final 2 sts, sc2tog.
Row 8: Sc across.
Repeat Rows 7–8 until 3 stitches remain.
Final Row: Sc3tog.
Fasten off.
Lower Right Lobe
Repeat the lower-left lobe on the opposite side.
Angle both lower sections toward the stem. Their tips should remain shorter than the middle side points.
Secondary Maple Points
The reference leaf contains smaller serrations between the dominant lobes.
Join yarn along the outer edge.
Work sc until reaching a secondary point position.
Work:
(Hdc, dc, tr, ch 2, sl st in second ch from hook, tr, dc, hdc) in the same edge space.
Continue in sc toward the next marked point.
Repeat around the outer sections where additional serrations are required.
Keep these secondary points approximately one-half to two-thirds the height of the neighboring major point.
Main Raised Central Vein
Yarn: rose pink.
Begin at the lower central junction.
Insert the hook through the fabric and pull up a loop.
Work surface slip stitches toward the highest point.
Stop approximately 8–10 mm before the tip.
Keep every loop relaxed. The vein should sit above the fabric without folding the leaf along its center.
Fasten off on the reverse.
Upper Left Raised Vein
Join yarn beside the lower end of the central vein.
Work surface slip stitches diagonally toward the upper-left lobe.
Follow the middle of the lobe.
Stop approximately 1 cm before the point.
Fasten off.
Upper Right Raised Vein
Mirror the upper-left vein.
Keep both branches similar in thickness and length.
Middle Left Raised Vein
Begin at the central junction and work outward toward the middle-left point.
Keep the line slightly curved rather than forcing a perfectly straight diagonal.
Fasten off before reaching the perimeter.
Middle Right Raised Vein
Repeat on the opposite side.
Lay the leaf flat after completing the pair. Neither lobe should pull inward.
Lower Left Raised Vein
Start near the stem junction.
Surface slip stitch toward the lower-left lobe.
The vein should extend more horizontally than the upper branches before turning toward the point.
Fasten off.
Lower Right Raised Vein
Mirror the lower-left vein.
Keep the two lower branches clear of the future stem attachment.
Secondary Raised Veins
The reference image contains additional shorter branches between the main vein lines.
Attach yarn approximately halfway along a principal vein.
Surface slip stitch toward the closest outer edge for approximately 3–5 cm.
Stop before the perimeter.
Repeat where an open section of fabric needs additional definition.
Avoid filling every available space. The principal vein system must remain visually dominant.
Pink Maple Leaf Stem
Join yarn at the lower central junction.
Ch 24.
Beginning in the second chain from the hook, sc in each chain back toward the leaf.
Work around the opposite side of the foundation chain.
At the lower end work 3 sc around the final chain to form a rounded tip.
Continue upward and join securely to the leaf.
The stem should measure approximately 2–2.5 cm wide after edging.
Raised Stem Center
Join yarn at the rounded end of the stem.
Work surface slip stitches along its center.
Continue directly into the main central leaf vein so the two lines appear continuous.
Fasten off.
Raised Corded Border
The photographed leaf has a substantial rounded line following its complete perimeter.
Join yarn at the stem tip.
Work sc evenly around the stem and outer leaf edge.
At each principal point work:
(Sc, ch 1, sc) in the point stitch.
Inside a deep valley work sc2tog when needed.
Continue around the entire silhouette.
Join with sl st.
For a more pronounced raised edge, work a second round of slip stitches through the back loop of the border.
Fasten off and weave in the tail.
How to Create the Raised Vein Effect
Surface slip stitch is the simplest method for reproducing the thick monochrome veins visible in the photograph. The hook works from the front while the working yarn remains behind the leaf. Pull one loop through the fabric, insert the hook at the next position and draw another loop through both the fabric and the existing loop.
Spacing matters. Insert the hook at approximately one-stitch intervals so the raised line remains continuous without becoming excessively dense.
The working yarn must remain relaxed behind the project. Tightening that strand after several stitches effectively shortens the fabric beneath the vein.
Complete the central vein first. Add paired branches afterward, working alternately on the left and right sides so changes in tension can be detected before the complete surface is covered.
Blocking the Pink Maple Leaf
- Dampen the finished cotton leaf according to the yarn care instructions.
- Place it face up and straighten the central raised vein.
- Pin the highest point directly above the stem.
- Position the upper-left and upper-right lobes at matching angles.
- Pin the two broad middle points to establish the maximum width.
- Angle the lower lobes slightly downward toward the stem.
- Pull every inner valley toward the center and pin it independently.
- Shape the secondary points without overstretching the raised perimeter.
- Straighten the stem and check that its center ridge continues into the main vein.
- Allow the cotton to dry completely before removing every pin.
The finished leaf should rest flat without a ridge running underneath it, raised edges at the valleys or curling around the outer points.
7 Technical Tips for a Better Pink Maple Leaf
- Prevent a crooked central point. Mark the foundation midpoint before shaping any lobe. The stem, main vein and highest point should remain on the same axis.
- Stop the veins from puckering. Lay the leaf flat after every 5 cm of surface crochet. Remove and remake a vein if the surrounding fabric begins lifting from the table.
- Keep paired lobes equal. Record the row count for every left-side lobe and duplicate it on the corresponding right side. Blocking cannot fully correct a lobe that is several rows shorter.
- Protect the deep valleys. Use a decrease where the perimeter begins to flare inside an indentation. Adding border stitches continuously through a valley makes the silhouette too round.
- Control the raised border. Do not pull the slip-stitch edging tighter than the single-crochet perimeter underneath it. A short outer cord forces every point to curl upward.
- Keep the stem proportional. Target approximately 2–2.5 cm of finished width for a leaf around 25 cm across. A wider stem makes the lower lobes appear undersized.
- Check heat-use materials. Use 100% cotton if the piece will sit beneath warm serving dishes. Synthetic decorative yarn should not be assumed to tolerate cookware temperatures.
Choosing Yarn for a Maple Leaf Trivet
Worsted cotton is a practical match for the thick stitch definition visible in the image. A published mosaic maple-leaf trivet uses worsted 100% cotton, a 4.5 mm hook and finishes at approximately 10 × 10 inches, or 25 × 25 cm. 0
Smaller maple leaves demonstrate how strongly yarn and hook size affect scale. One Ravelry pattern produces an approximately 5 × 5.5-inch leaf with light worsted yarn and a 3.25 mm hook, while another cotton coaster measures approximately 6 inches with a 2 mm hook. 1
For the thick pink appearance in the photograph, choose a smooth yarn rather than a fuzzy fiber. Surface slip stitches need enough definition to remain visibly separate from the underlying fabric.
How to Make a Smaller Pink Maple Leaf
For coaster size, switch to a finer cotton and smaller hook rather than removing random rows from individual lobes. Published maple-leaf coaster patterns provide useful scale references: one worsted-yarn example measures approximately 5.5 × 4.5 inches with a 4.5 mm hook, while another pattern produces an approximately 5-inch leaf with a 3.5 mm hook. 2
Reduce the stem and raised vein thickness at the same time. A border designed for a 25 cm leaf can look disproportionately heavy on a 13 cm coaster.
For a matching set, finish and block the first leaf before making the remaining pieces. Record the hook size, finished width, stem length and number of shaping rows used for every lobe.
Using the Pink Maple Leaf as Table Decor
The monochrome pink treatment makes this design less dependent on a traditional autumn palette. It can be worked in dusty rose for fall settings, pale blush for spring tables, burgundy for Thanksgiving or cream for neutral decor.
For a place setting, position the broad middle portion beneath the plate while leaving the upper and side points exposed. For centerpiece use, place a vase or decorative pumpkin over the lower-middle section so the central point and raised veins remain visible.
The same construction can also be made as a wall decoration. Add a hanging loop to the reverse rather than altering the visible stem.
Finishing the Crochet Maple Leaf
Inspect the reverse before blocking. Weave each surface-crochet tail at least 4–5 cm through dense stitches and reverse direction once. Keep the tails within nearby stitches so they do not cross open areas on the back.
Place the unblocked leaf on a flat surface and press each lobe down gently. Correct tight veins before introducing water; blocking can refine the points and valleys, but it cannot compensate for severely contracted surface crochet.
After blocking, measure from the farthest left point to the farthest right point. Record that measurement if additional matching leaves will be made.
Finally, check the raised border. Every section should rest against the table without rolling toward the front or back.
Conclusion
Complete the pink body and confirm that all major lobes lie flat before adding raised details. Work the central vein first, alternate the side branches from left to right, then finish the stem and perimeter only after the surface tension has been checked. For table use, make the first piece in 100% cotton and block it to its final measurement before starting a matching set. Save this pink crochet maple leaf pattern to Pinterest or share the finished table arrangement on Instagram with #PinkCrochetMapleLeaf. For this specific monochrome leaf, would you keep the veins pink or work them in cream for stronger contrast? “`3









