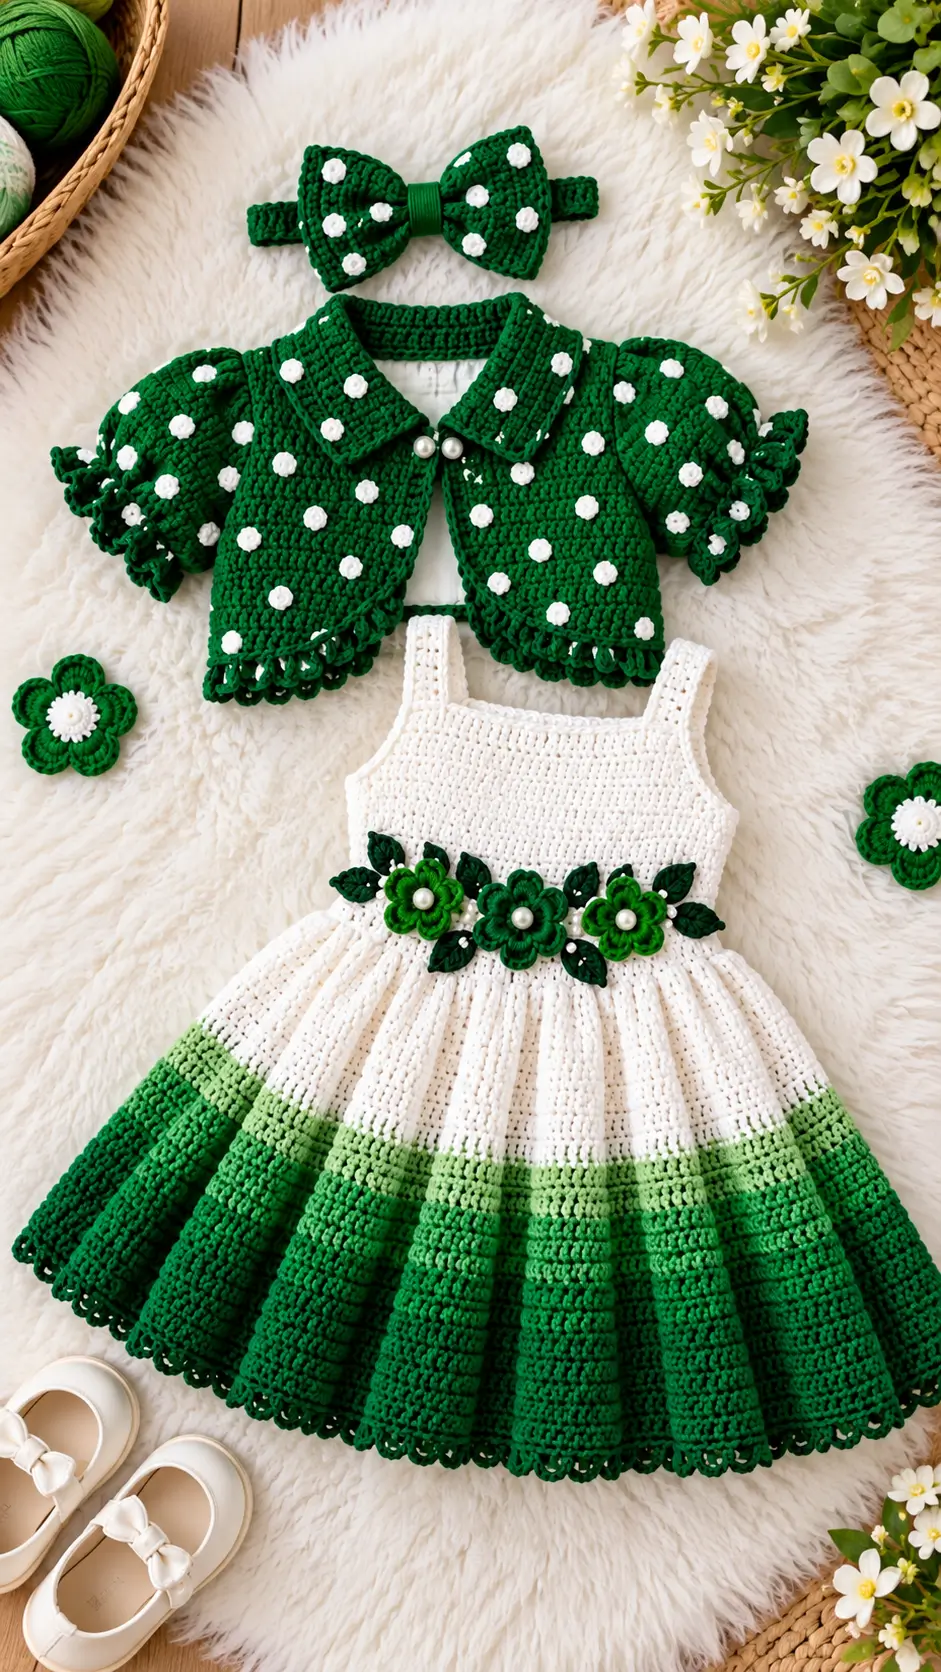
Green Crochet Dress for Girls With Flower Belt and Bolero
Introduction
Three bands of green turn this skirt into a botanical color study rather than a standard striped dress. This green crochet dress for girls combines a DK-weight fitted bodice, flared skirt, dimensional flower waistline, short bolero and matching bow. Comparable children’s garments commonly use 4–4.5 mm hooks with DK yarn. Size it from the child’s measurements; the separate jacket also makes the outfit adaptable to changing temperatures.
The Design: What Makes This Green Dress Different
The skirt carries most of the volume. A comparatively firm white bodice changes into a much wider skirt, followed by pale green, medium green and dark emerald sections. Keeping those color changes horizontal prevents the floral waistline from competing with vertical striping.
Second, the crochet flower dress pattern concept repeats emerald at three levels: waist, lower skirt and jacket. That repetition makes the separate pieces read as one coordinated set.
The bolero uses another structural contrast. Its body stays relatively dense while the sleeves gain rounded volume before terminating in narrow ruffled cuffs. Small raised white dots break up the green surface.
A frequent construction problem with a crochet dress with bolero is adding skirt volume before stabilizing the waist. Excessive increases there can stretch the bodice and pull the flower belt downward.
Project Info at a Glance
| Skill Level | Time | Finished Size | Hook | Best For |
|---|---|---|---|---|
| Intermediate garment crochet | Multi-session project | Made to child measurements | 4–4.5 mm starting range with DK | Occasion dress, portraits, coordinated handmade set |
The hook range is a practical starting point for DK children’s garments. Final hook selection should be based on the washed gauge swatch rather than the photograph.
Materials and Tools
Yarn
For an image-inspired version, start with DK/#3 yarn. Actual yarn consumption depends on the child’s measurements, gauge, skirt length and amount of flare.
- White — DK/#3 — quantity determined by size — smooth cotton or cotton-blend yarn
- Deep emerald green — DK/#3 — main contrast color — smooth cotton or cotton-blend yarn
- Medium green — DK/#3 — skirt transition color
- Pale green — DK/#3 — skirt transition color
- Small quantity of white — DK/#3 — bolero dots
- Pearl-style buttons or beads — optional decorative centers
Do not calculate an exact gram quantity from the photograph. Garment dimensions, fiber density, gauge and skirt fullness can substantially change yarn consumption.
Tools
- 4–4.5 mm crochet hook as a starting range
- Yarn needle
- Scissors
- Locking stitch markers
- Measuring tape
- Rust-resistant pins
- Small buttons for the bolero closure
- Optional pearl-style embellishments for flower centers
- Elastic or a suitable headband base for the bow
For very young children, avoid detachable bead embellishments and use securely embroidered or crocheted centers instead.
Abbreviations
- ch — chain
- sc — single crochet
- hdc — half double crochet
- dc — double crochet
- sl st — slip stitch
- st/sts — stitch/stitches
- inc — increase
- BLO — back loop only
- RS — right side
- WS — wrong side
- rep — repeat
Invisible decreases are primarily associated with three-dimensional crochet construction. For this garment, shaped decreases should follow the selected stitch pattern and measured gauge.
Gauge and Sizing Before the Pattern
Do not select a child’s garment size from the photograph alone. Begin with actual body measurements.
Make a swatch at least 12 cm square using the yarn intended for the dress. Wash and dry it in the same manner planned for the completed garment, then measure the central 10 cm.
Record these four measurements before calculating the foundation:
- Chest circumference
- Waist circumference
- Shoulder-to-waist length
- Waist-to-desired-hem length
Add the intended ease to the chest measurement. Divide the target circumference in centimeters by 10, then multiply that figure by the number of stitches measured across 10 cm of the washed swatch.
Adjust the resulting stitch count to match the repeat required by the chosen stitch pattern. This calculated number, rather than an arbitrary fixed chain count, becomes the foundation for the dress.
Pattern — Step by Step
Dress Bodice
Yarn: white DK/#3.
Foundation: Chain the calculated chest measurement plus the required turning chains.
Row 1: Work dc evenly across the foundation.
Row 2: Ch 2 or ch 3 according to the turning-chain method being used. Turn and work dc across.
Following rows: Repeat the established row until the panel reaches the required shoulder-to-waist measurement.
For a sleeveless version constructed from separate panels, divide the upper section into shoulder and neckline sections. Work the first shoulder independently, leave the calculated center-neck stitches unworked, then complete the second shoulder.
Make a corresponding back panel.
Seam the shoulders and sides while leaving the armholes open. Measure the completed bodice before beginning the skirt because the skirt should be calculated from the finished waist circumference.
Shoulder Straps
Yarn: white DK/#3.
The photographed dress uses broad straps rather than narrow cords. A width of approximately 3–4 cm provides a suitable visual starting point, but scale the straps to the garment size.
Join yarn at the upper front edge and work a strip in sc or hdc until it reaches the required shoulder length.
Fasten the strap securely to the corresponding position on the back bodice.
Repeat for the second strap.
Measure from each side seam to the strap attachment point so both straps sit symmetrically.
Flared Skirt
Yarn: white, pale green, medium green and deep emerald.
Join white yarn evenly around the lower edge of the bodice.
Round 1: Work one stitch into each available waist stitch. Join or continue according to the selected round construction.
Round 2: Increase evenly around to begin forming the skirt flare.
Following rounds: Continue in dc or another compact garment stitch. Add increases at measured intervals instead of increasing every round.
The objective is a stable waist followed by progressively increasing skirt circumference. Too many increases immediately below the bodice can produce gathers before the intended flare begins.
Continue in white through most of the upper skirt.
Change to pale green and work several rounds while maintaining the established shaping.
Change to medium green. Continue without changing the circumference unless additional flare is required by the planned measurements.
Change to deep emerald green for the largest lower color section.
The color bands do not need identical depths. White should dominate the upper skirt, pale green should create a narrow transition, and emerald should visually anchor the lower edge.
Skirt Hem
Yarn: deep emerald green.
Edging Round 1: Work sc evenly around the complete lower edge.
Edging Round 2: Work a small loop, shell or picot-style decorative edge at regular intervals.
Keep the border relatively narrow. Excessively dense edging adds weight to a full skirt and can change the way the garment hangs.
Flower Belt — Main Flowers (Make 3)
Yarn: emerald and medium green.
Round 1: Create a small center ring and work evenly spaced base stitches into the ring.
Round 2: Form five evenly spaced petal foundations using chains and anchoring stitches.
Round 3: Work around each chain space with shorter stitches at the sides and taller stitches toward the center to create rounded petals.
Fasten off and weave in the working end.
For the layered appearance shown in the photograph, make a second flower slightly smaller than the first.
Position the smaller flower over the larger motif with the petals offset. Stitch through the center several times to secure both layers.
Repeat until three main flower units are complete.
Flower Centers
Yarn: white or green.
Create a small crocheted center for each flower and sew it through both petal layers.
Pearl-style embellishments can reproduce the visual appearance of the photographed belt, but they should only be used when appropriate for the age and intended use of the garment.
An embroidered French-knot-style center or compact crocheted circle provides an alternative without a separate bead.
Leaves (Make 6–8)
Yarn: deep emerald green.
Ch 6–8.
Starting in the second chain from the hook, work progressively taller stitches toward the center of the foundation chain. Return to shorter stitches near the opposite end.
Rotate the work.
Crochet along the unused side of the foundation chain using the same progression to form a pointed oval.
Sl st into the beginning stitch.
Fasten off, leaving a sewing tail.
Arrange two or three leaves around each flower cluster. The leaves should extend beyond the petals without covering the bodice straps or side seams.
Bolero Back
Yarn: deep emerald DK/#3.
Chain to the calculated back width using the washed gauge measurement.
Work the lower section in hdc, dc or another dense garment stitch.
Continue until reaching the underarm measurement.
Shape the armholes symmetrically by leaving stitches unworked at each side or using gradual decreases according to the selected stitch pattern.
Continue to the required shoulder height.
Shape the back neckline and shoulders, keeping both sides equal.
Fasten off.
Bolero Fronts (Make 2 Mirrored Pieces)
Yarn: deep emerald DK/#3.
Calculate each front from approximately half the back width while accounting for the open center front.
Work upward to the underarm.
Shape the outer edge to correspond with the back armhole.
At the inner edge, gradually shape the neckline to produce the open-front profile visible in the reference design.
Continue until the shoulder dimensions correspond with the back panel.
Fasten off.
Make the second front as a mirror image.
Join both shoulder seams and then the side seams.
Bolero Collar
Yarn: deep emerald DK/#3.
Join yarn at one front neckline edge.
Work evenly around the neckline to the opposite front.
Use the first row as a setup row.
On subsequent rows, distribute increases around the areas where the collar needs to turn outward. A completely straight collar strip can stand vertically rather than lying across the shoulders.
For the broad pointed appearance in the photograph, shape the front collar sections independently through controlled increases and decreases.
Fasten off when the collar reaches the planned depth.
Puff Sleeves (Make 2)
Yarn: deep emerald DK/#3.
Construct each sleeve separately or work directly around the completed armhole.
Increase through the upper sleeve section to create additional circumference for the puff.
Maintain that added fullness through the central sleeve section.
Before beginning the cuff, decrease evenly around until the sleeve circumference approaches the required upper-arm measurement.
Work one firm setup round around the cuff.
For the ruffle, place multiple stitches into selected cuff stitches at consistent intervals.
Fasten off and weave in the tail.
Repeat for the second sleeve, checking that both finished sleeve lengths and cuff circumferences match.
White Bolero Dots
Yarn: white DK/#3.
The photographed bolero uses small raised white spots rather than large colorwork circles.
Create each spot as a compact crocheted circle or bobble-sized appliqué.
Fasten off while leaving enough yarn for sewing.
Make multiple dots, then place the completed bolero flat before attaching them.
Distribute the dots across the fronts, sleeves and collar. Avoid arranging them in obvious horizontal rows.
Pin all dots first. Adjust their positions until the density looks balanced across both sides of the jacket.
Sew each dot individually and weave the tails into the wrong side.
Bow Headband
Yarn: deep emerald green and white.
Crochet a rectangular panel in sc or hdc using emerald yarn.
Continue until the rectangle reaches the desired bow width and height.
Fasten off and weave in the main working tail.
Make miniature white dots using the same construction as the bolero embellishments.
Arrange and sew the dots across the bow panel.
Pinch the finished rectangle at its center to form two bow loops.
Crochet a narrow green strip long enough to wrap around the center several times.
Wrap the strip firmly around the pinched center and stitch it at the back.
Attach the completed bow to a crocheted headband or another suitable headband base.
Decorative Flower Appliqués
Yarn: emerald green and white.
Optional standalone flowers can repeat the five-petal construction used at the waist.
Start with a compact center ring.
Create five petal spaces around the ring.
Fill each space with a symmetrical sequence of short and tall stitches.
Add a smaller white or pale center if desired.
Fasten off and weave in all tails.
Assembly
- Block or wash the dress components according to the yarn instructions, then compare the finished measurements with the target dimensions.
- Join the bodice shoulder and side seams while keeping both armholes symmetrical.
- Attach the shoulder straps and reinforce each joining point with several passes of matching yarn.
- Join the skirt to the bodice waist without stretching either edge, distributing all planned fullness evenly.
- Pin the three main flowers at the center-front waist, position the leaves behind them, then sew each component securely.
- Seam the bolero shoulders and sides, then attach or complete both puff sleeves.
- Work the collar and ruffled edges after confirming that the center-front opening hangs evenly.
- Arrange and pin the white dots across the completed bolero before sewing them permanently in place.
- Finish the bow, cover its center with the narrow emerald strip and attach it securely to the headband.
- Weave structural yarn tails through several stitches on the wrong side, trim the excess and complete a final measurement check.
The completed set consists of a white-to-green flared dress, dimensional floral waist decoration, emerald spotted bolero and coordinating bow.
7 Technical Tips
- Control waist stretching: Measure the bodice waist before and after completing the first skirt round. More than approximately 1 cm of unexpected growth indicates that the joining round may be too loose.
- Prevent uneven skirt flare: Divide the skirt into four or eight equal sections with stitch markers before placing increases. Concentrating increases in one area produces visible wedges instead of evenly distributed fullness.
- Control color-change steps: Begin each new green section at the same back or seam position. Starting each band in a different location creates several visible transition points around the skirt.
- Prevent a puckered flower belt: Pin all three flowers and the surrounding leaves before sewing the first motif. Attaching each flower independently can compress the center-front waist and make the arrangement uneven.
- Match the puff sleeves: Count the stitches around both sleeves immediately before beginning the cuffs. A difference of only two stitches can become visible after the cuff gathers the fabric.
- Control bolero dot spacing: Use approximately 3–5 cm spacing as a visual starting point, adjusted for garment size. Random sewing without preliminary pinning can leave crowded clusters beside large empty areas.
- Secure structural tails: Weave waist, strap and sleeve tails through the seam in more than one direction. These joining points receive repeated movement and require more secure finishing than decorative appliqués.
Conclusion
The construction sequence should remain bodice first, skirt second and embellishment last. That order keeps the waist measurement stable while the lower section gains its substantial flare. Swatch the selected DK yarn, record the child’s chest, waist and length measurements, and calculate the foundation from the washed gauge before beginning the full garment. Plan the white, pale-green, medium-green and emerald sections on paper so their proportions remain consistent across the skirt. This green crochet dress for girls can be shared on Pinterest or Instagram with #GreenFlowerCrochetDress. For another version, would you keep the three-green gradient or work the entire lower skirt in deep emerald?









