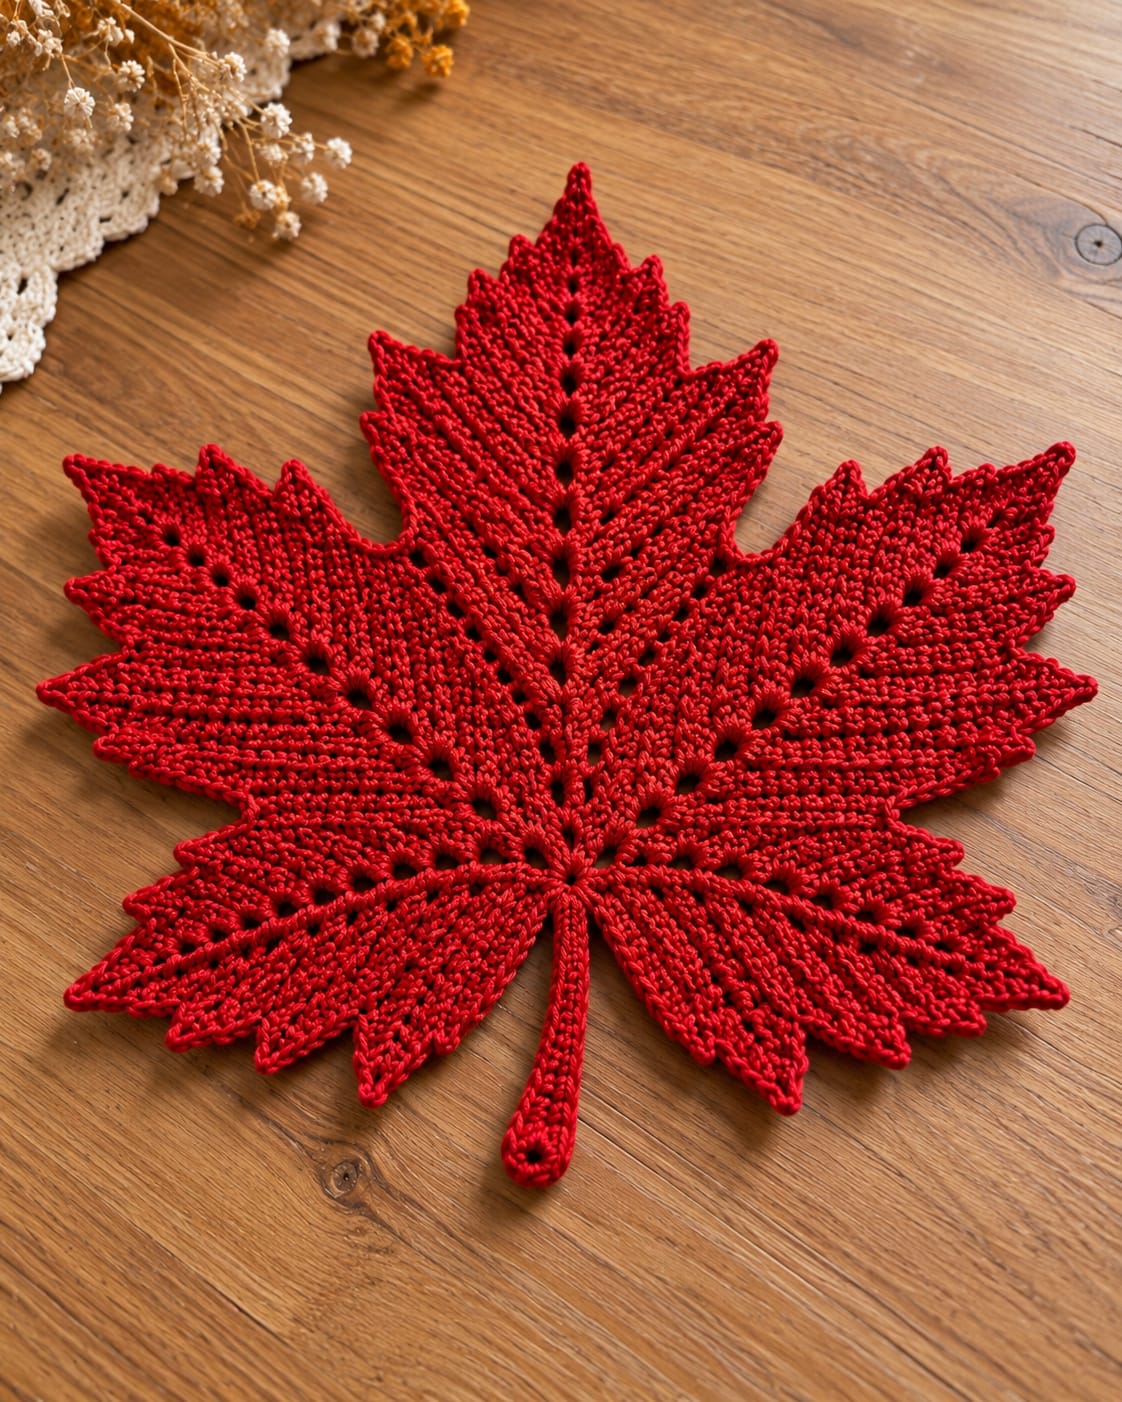
A red maple needs sharply divided lobes and a vein system that remains visible even when the entire motif is worked in one saturated color. This red crochet maple leaf placemat combines dense textured sections, open eyelet veins, pointed edges, and a narrow stem. Worked in cotton, it creates a flat autumn table mat suitable for individual place settings, centerpieces, or Thanksgiving table decor.
The Design: What Makes This Maple Leaf Different
The photographed leaf uses one color for every structural element, so shape has to do more work than color contrast. A tall central lobe establishes the main axis. Two large side lobes create width, while smaller lower points step inward toward the stem.
Open spaces form the second major feature. They travel from the center into the principal lobes and remain visible against the dense red fabric. Directional stitch lines then reinforce those veins and give each section a separate grain.
The perimeter uses multiple narrow points instead of a decorative lace border. This keeps the crochet maple leaf placemat botanical rather than doily-like. The main construction risk is uncontrolled increasing around the outer points; excess stitches create waves that blocking cannot fully correct.
Project Info at a Glance
| Skill Level | Intermediate |
|---|---|
| Construction | Flat shaped leaf with openwork vein lines |
| Recommended Yarn | Medium / worsted-weight cotton |
| Suggested Hook | 3.5–5 mm |
| Reference Finished Size | Approximately 25–38 cm depending on yarn and hook |
| Best For | Placemat, autumn centerpiece, Thanksgiving table decor |
Published maple-leaf crochet patterns vary considerably in scale. One current worsted-cotton pattern measures approximately 25.5 × 23 cm using a 3.5 mm hook, while a published Aran-weight placemat measures approximately 36.8 × 38.1 cm using a 5 mm hook. Choose the gauge according to the finished dimensions required.
Materials and Tools
Yarn
- Deep red cotton — medium/worsted weight for a placemat-size leaf
- Approximate amount — 85–140 m depending on size, gauge, and yarn thickness
A smooth, tightly spun cotton works particularly well for this design. The photograph depends on clearly defined stitches and clean eyelet openings, both of which can disappear when fuzzy yarn is used.
For a smaller decorative leaf, use DK cotton. For a larger placemat, medium-weight cotton with a larger hook provides additional scale without requiring major changes to the proportions.
Tools
- 3.5–5 mm crochet hook
- Tapestry needle
- Locking stitch markers
- Sharp scissors
- Measuring tape
- Blocking mat
- Rust-resistant blocking pins
Abbreviations
- ch — chain
- sl st — slip stitch
- sc — single crochet
- hdc — half double crochet
- dc — double crochet
- tr — treble crochet
- inc — increase
- dec — decrease
- BLO — back loop only
- ch-sp — chain space
- st(s) — stitch(es)
- rep — repeat
- RS — right side
- WS — wrong side
Use decreases consistently at corresponding points on the left and right sides. Uneven decreases change the angle of a lobe even when its final stitch count appears correct.
Red Crochet Maple Leaf Placemat Pattern
The instructions below provide an original construction approach based on the visible structure of the photographed leaf. They are not a transcription of an unidentified commercial pattern.
The design is organized around a central axis. Openwork lines branch from this center and divide the solid crochet fabric into the characteristic maple-leaf sections.
Gauge and Sizing
Make a 10 × 10 cm sample before beginning if the finished dimensions matter.
For a medium placemat, aim for a finished leaf approximately 30–38 cm across. The exact measurement will depend on yarn thickness, hook size, stitch tension, and blocking.
Published patterns demonstrate the available range. A worsted cotton maple leaf can measure approximately 25.5 × 23 cm with a 3.5 mm hook, while an Aran-weight placemat can reach approximately 36.8 × 38.1 cm with a 5 mm hook.
Make every placemat in a set with the same hook, yarn, and blocking measurements.
Central Foundation
With red yarn, make a foundation chain approximately 18–22 cm long for a medium placemat.
This foundation establishes the central axis from the lower leaf junction toward the upper point. The stem will be added separately, so do not include its length in this measurement.
Place markers at the approximate branching positions for the upper and lower side sections.
Lay the foundation flat before continuing. Twisting at this stage can shift every subsequent lobe away from the center line.
Central Openwork Vein
The photograph contains a sequence of visible openings running directly through the tall central section.
Work along the foundation with dense stitches while inserting evenly spaced chain openings.
A practical repeat is:
Work 3–5 solid stitches, ch 1, skip 1 stitch, continue in pattern.
Repeat at regular intervals.
On the return row, work around the chain spaces without filling them completely. Each opening should remain clearly visible.
Keep the holes centered. A vein that gradually moves left or right will make the tall central lobe appear crooked.
Central Upper Lobe
The central lobe is the tallest point of the leaf and should remain narrower than the total width created by the two side sections.
Increase gradually on both sides of the open central vein.
Use graduated stitch heights where additional shaping is required. A sequence moving from sc to hdc, dc, and tr creates height without adding excessive width.
Continue increasing until the central lobe reaches its broadest section.
Work a short section with minimal increases.
Begin decreasing symmetrically toward the top.
Reduce the width more rapidly over the final rows to create the long central point visible in the photograph.
Finish with a narrow pointed tip.
Upper Left Section
Join red yarn at the marked upper-left branching position.
Work outward from the center using shaped rows.
Increase along the outer edge while maintaining an openwork line running diagonally from the center toward the tip.
The eyelets should become part of the vein structure rather than appearing as isolated holes.
Continue until the lobe reaches its planned width.
Begin decreasing toward the outer point.
Use shorter stitches and controlled decreases to produce a stepped edge with several smaller points.
Fasten off only after the final tip is narrow and defined.
Upper Right Section
Join yarn at the corresponding point on the opposite side.
Repeat the same number of shaping rows used for the left section.
Match both the number and approximate position of the eyelets.
Place the leaf on a flat surface before completing the section.
Measure from the central vein to the left and right outer points. A difference greater than approximately 1 cm becomes noticeable in a table-setting motif.
Middle Left Lobe
The broad middle lobe contributes much of the leaf’s total width.
Join yarn below the upper-left section.
Increase outward more rapidly than in the tall central lobe.
Create another openwork vein beginning near the central junction.
Work dense stitches on both sides of this opening sequence.
Once the widest point has been reached, begin decreasing.
Create several stepped points along the outer edge instead of one smooth curve.
The largest point should project farther outward than the smaller points above and below it.
Middle Right Lobe
Repeat the same construction on the right side.
Count the shaping rows as they are completed.
Keep the vein opening at approximately the same angle as its counterpart on the left.
If the right section becomes narrower, correct the shaping before working the border. Adding random stitches later will create a ruffled edge rather than correcting the underlying proportion.
Lower Left Lobe
Join red yarn near the lower-left side of the central junction.
This section angles downward and outward before returning toward the stem.
Work short shaped rows to establish a broad lower section.
Add a line of open spaces extending from the center toward the outer edge.
Shape several narrow points along the perimeter.
Make the outermost point longer than the points nearest the stem.
Decrease gradually as the section returns to the center base.
Lower Right Lobe
Repeat the lower shaping on the opposite side.
Use the left section as a measurement reference.
Check the distance from the central junction to each outer point.
Both lower sections should terminate at corresponding positions beside the stem.
A difference in lower-lobe width is especially noticeable when the finished leaf is placed beneath a centered plate.
Creating the Directional Ribbed Texture
The red leaf in the photograph contains strong linear texture running toward the outer points.
One practical method is to work selected rows through the back loop only.
BLO stitches leave the unused front loops visible as narrow ridges.
Orient those ridges so they follow the direction of each lobe.
The central section should direct the eye upward. Side sections should angle outward, while lower sections should angle downward toward their respective points.
Keep corresponding left and right textures consistent.
Do not tighten BLO rows more than ordinary rows. Increased tension can shorten one section and create unwanted curling.
Openwork Vein Technique
The open veins provide contrast even though the entire red crochet maple leaf placemat uses a single yarn color.
For a small opening, work:
Ch 1, skip 1 stitch, continue in pattern.
For a more pronounced opening, work:
Ch 2, skip 1 stitch, continue in pattern.
Keep the opening size consistent along each individual vein.
Reduce the chain spaces near the pointed ends if necessary. Large holes immediately below a narrow point can weaken the shape and make blocking less predictable.
Shaping the Maple Leaf Points
Each outer point can be formed by gradually increasing and then reducing stitch height.
A useful sequence is:
sc, hdc, dc, tr, dc, hdc, sc.
For a sharper point, work a small chain tip at the highest position:
ch 2, sl st into the second ch from hook.
Continue down the opposite side using shorter stitches.
Inside each valley, return to sc or sl st as required.
Avoid placing tall stitch groups inside the valleys because extra height there softens the characteristic serrated maple outline.
Outer Edge
The photographed leaf has a narrow finished edge rather than a separate decorative border.
Join red yarn near the lower center.
Work sc evenly around the perimeter.
At each major tip, work:
sc, ch 2, sl st into the second ch from hook, sc.
Continue down toward the next valley.
Inside a deep valley, skip one underlying stitch when necessary to prevent extra fabric from accumulating.
Repeat around the complete leaf.
Check the piece on a flat surface every few points. Correct visible rippling before finishing the entire perimeter.
Red Crochet Stem
The narrow stem extends directly from the lower central junction.
From the base, ch 16–20 for a medium placemat.
Beginning in the second chain from the hook, work sc toward the leaf body.
Secure the first side at the central junction.
Work back down the opposite side of the foundation chain.
At the bottom, work several stitches into the final chain to create a rounded end.
Join with a sl st.
Fasten off and leave enough yarn to secure the stem base if necessary.
Stem With a Small Open Tip
The photographed stem includes a small opening near its rounded lower end.
To reproduce this feature, begin the stem with a small chain loop.
Work sc around the loop, then crochet along one side of the stem foundation.
Connect the upper end to the leaf body.
Return along the opposite side and join at the lower loop.
Keep the opening small and centered.
The stem should remain narrow enough that it does not compete visually with the lower leaf sections.
Blocking the Red Maple Leaf
Blocking determines whether the finished points remain crisp and symmetrical.
Dampen the completed leaf according to the yarn manufacturer’s care instructions.
Place it on a blocking mat.
Pin the tall central point first.
Stretch the stem gently downward and pin its lower end. These two pins establish the main vertical axis.
Next, pin the largest left and right points at equal distances from the center.
Continue with the upper side points.
Pin the lower lobes in corresponding pairs.
Shape the valleys only after every major point has been positioned.
Measure the total width and height before allowing the leaf to dry.
Leave the piece pinned until completely dry.
Assembly and Finishing
- Complete the central foundation and mark the major branching positions before beginning the side sections.
- Work the tall central lobe and maintain a straight sequence of open vein spaces.
- Complete the matching upper-left and upper-right sections and compare their dimensions.
- Add the broad middle lobes while keeping the diagonal vein openings balanced.
- Work the lower sections and confirm that their outer points sit at corresponding heights.
- Crochet the narrow perimeter edge and form a controlled tip at every major point.
- Work the stem from the lower center and finish its end with a small rounded opening if desired.
- Weave every yarn tail through dense stitches on the reverse side and change direction before trimming.
- Block the leaf with corresponding left and right points pinned in pairs.
- Allow the cotton to dry completely before removing the pins and recording the final dimensions.
The completed leaf should have a straight central axis, balanced side lobes, clearly visible eyelet veins, sharp stepped points, and a narrow stem centered beneath the lower sections.
7 Technical Tips for a Better Maple Leaf Placemat
- Count the eyelets on both sides. Seven openings on one lobe and six on its matching section create visible asymmetry even when the outer measurements match.
- Mark every major branching point. Moving one branch by two or three stitches changes the angle of the entire side lobe.
- Use fewer edging stitches inside valleys. Excess stitches at an inward corner cause rippling where the leaf should have a crisp indentation.
- Keep chain spaces relaxed but consistent. A tight eyelet pulls neighboring stitches inward and can bend an otherwise straight vein.
- Compare corresponding lobes before adding the final edge. Correct any left-to-right difference greater than approximately 1 cm while the shaping rows are still accessible.
- Pin the upper point and stem before the side lobes. Establishing the vertical axis first prevents the leaf from being blocked diagonally.
- Weave cotton tails at least 5–7 cm through dense fabric. Reverse direction once before trimming so the ends remain secure after washing and reblocking.
How to Make a Larger Maple Leaf Placemat
Increasing yarn thickness is the simplest way to enlarge the design without changing the relationship between the lobes.
A published Aran-weight maple-leaf placemat uses a 5 mm hook and finishes at approximately 14.5 × 15 inches, or 36.8 × 38.1 cm.
For an even larger table mat, make a gauge sample with thicker cotton before adding shaping rows.
If additional rows are required, add them symmetrically. Every extra row added to a left lobe should also be added to the corresponding right lobe.
Extend the open vein sequence proportionally so it does not end halfway through an enlarged section.
How to Make a Smaller Red Maple Leaf
Use DK, sport-weight, or crochet-thread cotton with a smaller hook.
A current worsted-cotton maple-leaf reference measures approximately 25.5 cm tall × 23 cm wide using a 3.5 mm hook. Small thread-based maple leaves can be reduced considerably further.
For a coaster-size version, shorten the central foundation and remove shaping rows evenly from corresponding lobes.
Retain the openwork veins. Eliminating them changes one of the strongest visual characteristics of this design.
Choosing Red Yarn
Solid red exposes every shaping line, which makes yarn definition important.
Choose smooth cotton with a firm twist. Mercerized cotton can produce particularly crisp eyelets and clearly separated stitch ridges.
A highly textured or fuzzy red yarn can blur the open spaces and make the pointed perimeter appear less precise.
For multiple placemats, purchase enough yarn from one dye lot. Large uninterrupted areas of saturated red make dye-lot differences easier to notice.
Red Color Variations
The photographed leaf uses a strong clear red, but several nearby shades work with the same construction.
- Scarlet red — bright traditional maple color
- Crimson — deeper formal table setting
- Burgundy — dark autumn arrangement
- Brick red — muted farmhouse palette
- Rust red — warmer Thanksgiving table decor
- Cherry red — higher-contrast seasonal centerpiece
For a coordinated autumn table, combine red leaves with separate cream, mustard, rust, and olive motifs rather than changing colors inside one leaf.
How to Keep the Leaf Flat
Flatness must be controlled during construction rather than corrected entirely through blocking.
If an outer edge begins to wave, check for excessive increases or too many stitches worked into one point.
If the leaf cups upward, inspect the valleys and openwork chains for excessive tension.
Lay the work on a flat surface after completing every major section.
A small amount of curling is normal before blocking. Strong ruffles or deep cupping indicate a stitch-distribution problem that should be corrected before proceeding.
How to Keep the Points Sharp
Build each point with graduated stitch heights rather than several identical tall stitches.
Place the tallest stitch at or immediately beside the center of the point.
Reduce the stitch height rapidly on the opposite side.
A small ch-2 tip can increase definition without adding much fabric.
During blocking, pull each point only far enough to straighten its stitch structure. Overstretching produces unnaturally long tips and can make matching lobes unequal.
Using the Red Maple Leaf as a Placemat
Position the dinner plate over the broad center of the leaf while leaving the upper point and major side lobes visible.
The stem can face directly toward the diner or angle slightly toward one side depending on the table layout.
For a rectangular dining table, alternate the direction of neighboring leaves to prevent the stems from forming one rigid line.
If making a complete set, record the finished width, height, central-lobe length, stem length, hook size, and yarn amount after completing the first placemat.
Use those measurements as the control specification for every remaining leaf.
Thanksgiving Table Arrangement
A red maple leaf works as a strong color element, so surrounding table decor can remain neutral.
Cream dishes, natural wood, beige linen, and muted greenery allow the serrated red silhouette to remain visible.
For a mixed crochet set, alternate red and cream leaves across the table.
A larger leaf can also be placed under a vase or low centerpiece. Keep candles and other heat sources off the crochet fabric and follow appropriate safety precautions for the materials being used.
Care and Reshaping
Follow the care instructions supplied with the selected cotton yarn.
After washing, do not hang the wet leaf from its stem. The weight of absorbed water can stretch the narrow stem and lower center.
Reshape the leaf flat.
Align the central upper point with the stem first. Arrange the side lobes in matching pairs and reshape the open vein spaces with your fingers.
If necessary, pin the major points while the leaf dries.
Store finished placemats flat rather than folded across the pointed sections.
Conclusion
A red crochet maple leaf placemat depends on accurate lobe placement, controlled openwork veins, and a perimeter that remains flat between its many points. Establish the central axis before shaping the sides, compare corresponding lobes before adding the final edging, and block from the upper point to the stem before positioning the outer sections. Complete one sample first and record its yarn amount, width, height, eyelet count, and stem length before producing a matching table set. Save the finished leaf to Pinterest and share the blocked version on Instagram with #RedCrochetMapleLeaf. For this specific design, would you make the full set in scarlet red or alternate red and natural cream leaves?









