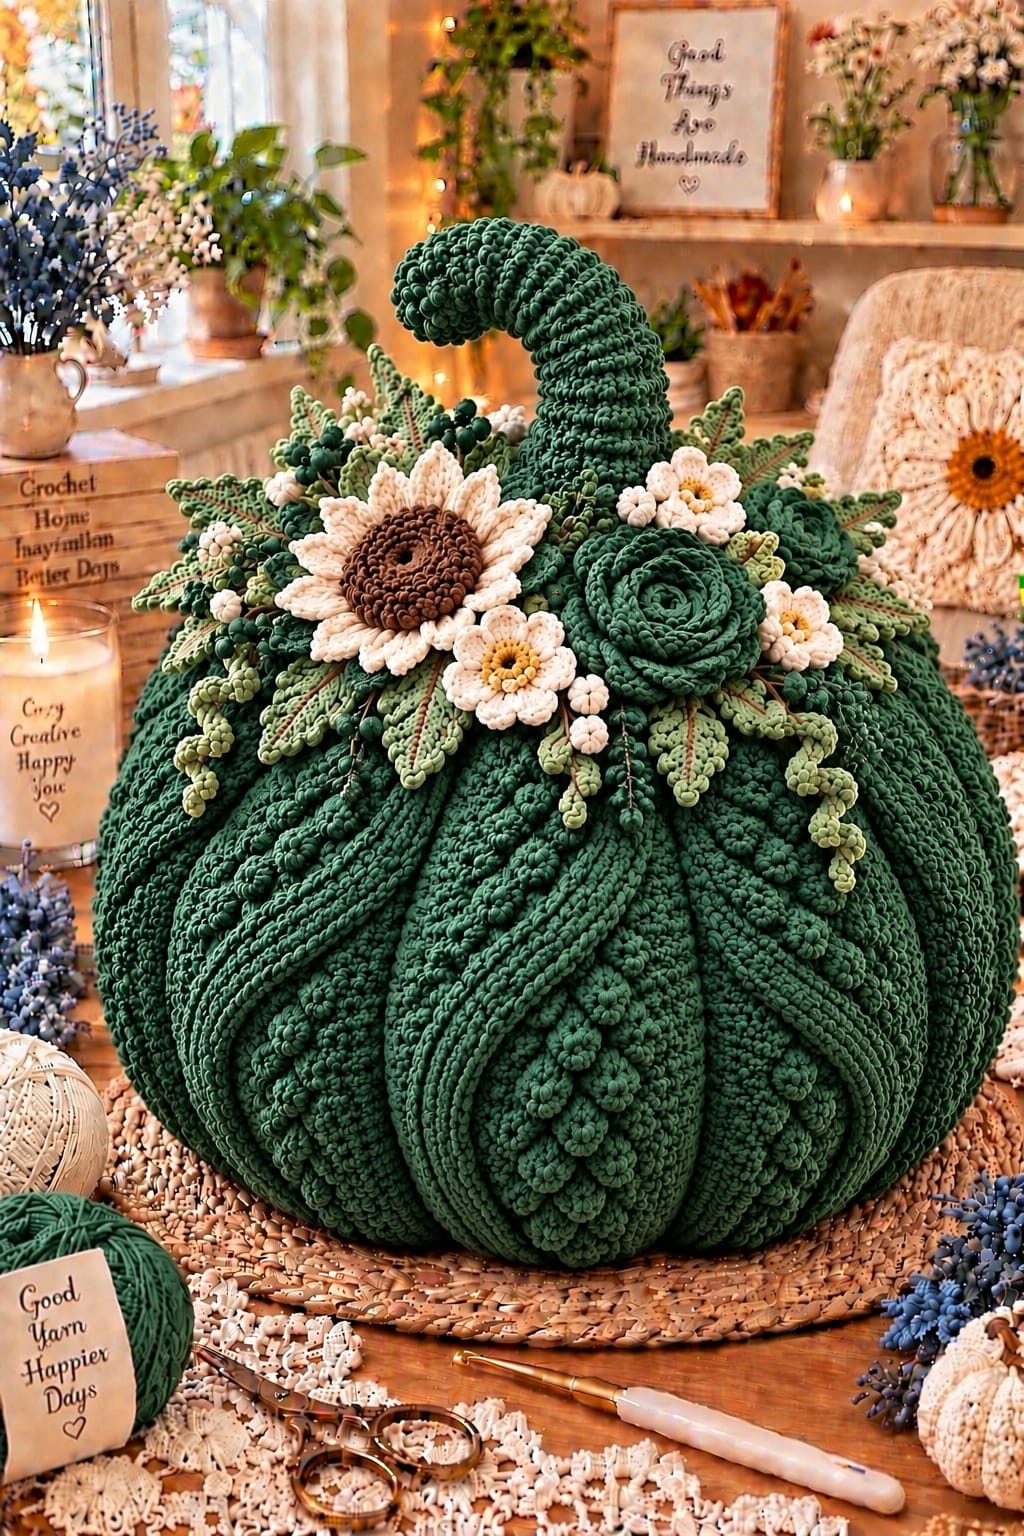
A pumpkin this wide needs more than stuffing to keep its deep lobes visible. This large crochet pumpkin pattern uses ribbed crochet fabric, controlled gathering and external shaping strands to create a substantial green pumpkin inspired by the reference image. A curved stem, layered leaves, cream flowers and a large sunflower-style accent turn the basic pumpkin form into a detailed autumn centerpiece.
The Design: What Makes This Crochet Pumpkin Different
The reference pumpkin combines an oversized rounded body with unusually deep vertical divisions. Those grooves are important because a large stuffed form can quickly become spherical when the stuffing pushes outward. Ribbed crochet provides the first level of definition; shaping strands provide the second.
The floral crown also changes the proportions. Instead of a small stem sitting alone at the center, the top carries leaves, trailing greenery, cream flowers and one dominant sunflower-style bloom. A thick curved green stem rises above them.
This textured crochet pumpkin is therefore constructed in separate components. The body is worked first, followed by the stem and botanical pieces. One common failure is overstuffing the body before adding the shaping strands. Excessive stuffing makes the grooves difficult to pull inward.
Project Info at a Glance
| Skill Level | Construction | Estimated Size | Hook | Best For |
|---|---|---|---|---|
| Intermediate | Ribbed body with separate appliqués | Approx. 30–35 cm wide | 5–6 mm body / 3.5–4 mm details | Large autumn centerpiece |
The reference photograph does not provide scale, yarn specifications or an identifiable original pattern. The dimensions above are a target for this photo-inspired version rather than measurements taken from the pictured object. Published ribbed pumpkin patterns confirm that the basic construction can be resized by changing the foundation-chain length and number of rows.
Materials and Tools
Yarn
- Dark forest green — chunky or bulky yarn — approximately 500–700 g for the pumpkin body
- Dark forest green — approximately 80–120 g for the stem and dark foliage
- Sage green — worsted weight — approximately 60–80 g for leaves and vines
- Cream — worsted weight — approximately 50–70 g for flower petals
- Dark brown — worsted weight — approximately 25–35 g for the sunflower center
- Mustard yellow — worsted weight — small amount for flower centers
These quantities are planning estimates for the large photo-inspired project. The exact yarn consumption of the object in the photograph cannot be determined visually.
Tools
- 5–6 mm crochet hook for the pumpkin body
- 3.5–4 mm crochet hook for flowers and leaves
- Polyester fiberfill
- Long upholstery or doll-making needle
- Yarn needle
- Locking stitch markers
- Scissors
- Flexible measuring tape
- Optional craft wire for a poseable curved stem
Abbreviations
- MR — magic ring
- ch — chain
- sc — single crochet
- hdc — half double crochet
- dc — double crochet
- tr — treble crochet
- inc — increase
- dec — decrease
- sl st — slip stitch
- BLO — back loop only
- FLO — front loop only
- st(s) — stitch(es)
Working half double crochet through the back loop only leaves the unused front loop visible, producing the raised ribs used in many crochet pumpkin patterns.
Gauge and Sizing
Gauge is less critical for a decorative pumpkin than for fitted crochet, but fabric density matters. The body needs enough flexibility to gather while remaining tight enough to prevent stuffing from showing between stitches.
Published ribbed pumpkin designs commonly use a flat rectangle that is seamed into a tube and gathered at both openings. The starting chain controls the height, while the number of rows controls the circumference. This makes the method particularly suitable for an oversized pumpkin.
For this large version, aim for a body rectangle approximately 32–36 cm high and 85–100 cm long before seaming. Adjust these measurements after testing the selected yarn.
Large Crochet Pumpkin Pattern
Pumpkin Body
Yarn: dark forest green.
The body is worked flat in rows. Back-loop half double crochet creates strong horizontal ridges in the rectangle; after seaming and gathering, those ridges run vertically over the pumpkin.
Foundation: Ch 41.
Row 1: Hdc in 2nd ch from hook and in each chain across. Turn. (40)
Row 2: Ch 1. Hdc BLO in each stitch across. Turn. (40)
Rows 3–64: Repeat Row 2. (40)
Do not fasten off immediately. Lay the rectangle flat and check its proportions.
The length should be considerably greater than its height. Add rows in pairs if a wider pumpkin is required.
Joining the Pumpkin Body
Fold the rectangle so the foundation edge meets the final row. Keep the ribbed surface positioned on the outside.
Slip stitch through corresponding stitches of both short edges to create a tube.
Fasten off, leaving a tail at least 80 cm long.
Turn the tube so the preferred seam surface faces inward.
Closing the Bottom
Thread the long yarn tail onto a yarn needle.
Weave the needle in and out around the entire bottom opening, catching each row end consistently.
Pull the yarn firmly until the opening closes.
Pass through the gathered center several times before knotting securely.
A large pumpkin carries significant stuffing pressure, so the gathered base needs more reinforcement than a miniature decorative pumpkin.
Stuffing the Pumpkin
Add polyester filling in small sections.
Place stuffing against the outside wall first, then fill the center. Rotate the pumpkin during this process so one side does not become firmer than the others.
Stop while the body still compresses under firm hand pressure. A rock-hard pumpkin is difficult to divide into pronounced lobes.
Leave approximately 2–3 cm of compressible space around the upper opening before gathering.
Closing the Top
Use another long strand of dark green yarn.
Run the yarn through the row ends around the upper opening.
Pull gradually while redistributing the stuffing with your fingers.
Close the opening until only a small central hole remains for attaching the stem.
Secure the gathering yarn but do not cut it until the pumpkin shape has been checked from all sides.
Creating the Deep Pumpkin Segments
The pronounced lobes visible in the reference require additional shaping. Ribbing alone creates texture but does not normally produce grooves this deep on a large stuffed form.
Cut a strand of matching dark green yarn approximately 2.5–3 metres long and thread it through a long upholstery needle.
Insert the needle through the bottom center and bring it out through the top center.
Run the yarn down the outside of the pumpkin, positioning it inside one natural rib channel. Insert through the bottom center again and return through the top.
Pull until the yarn sinks into the surface and forms a defined groove.
Repeat this process around the pumpkin to create approximately 8–10 major segments.
Maintain similar tension on every shaping strand. One strand pulled substantially tighter than the others will tilt the pumpkin toward that groove.
Secure the shaping yarn at the top where the knot can later be hidden beneath the foliage.
Curved Crochet Pumpkin Stem
Yarn: dark forest green.
The reference stem is unusually long, thick and curved. A conventional five-round pumpkin stem will not reproduce that silhouette.
Stem Base
Round 1: 6 sc in MR. (6)
Round 2: Inc ×6. (12)
Round 3: (1 sc, inc) ×6. (18)
Round 4: Sc around. (18)
Rounds 5–8: Sc around. (18)
Stem Shaft
Round 9: (1 sc, dec) ×6. (12)
Rounds 10–30: Sc around. (12)
Stuff the stem lightly as work progresses. Firm stuffing makes the stem difficult to curve.
Stem Tip
Round 31: (1 sc, dec) ×4. (8)
Rounds 32–36: Sc around. (8)
Round 37: Dec ×4. (4)
Fasten off and close the opening.
For a pronounced hook-shaped stem, insert a padded craft wire through the center before closing. Bend the stem gradually rather than creating one sharp angle.
Large Sunflower-Style Flower
The largest cream flower in the reference has an oversized dark center surrounded by long pale petals. Construct it separately before attaching it to the pumpkin.
Brown Flower Center
Yarn: dark brown.
Round 1: 6 sc in MR. (6)
Round 2: Inc ×6. (12)
Round 3: (1 sc, inc) ×6. (18)
Round 4: (2 sc, inc) ×6. (24)
Round 5: (3 sc, inc) ×6. (30)
Round 6: (4 sc, inc) ×6. (36)
Fasten off brown.
Cream Petals
Join cream yarn to the outer round.
For each petal, work:
Ch 7, sc in 2nd ch from hook, hdc, dc, 2 tr, dc, sl st into the next available base stitch.
Repeat evenly around the flower center.
Keep the petals close together so the dark center is surrounded by a dense ring rather than isolated individual petals.
Fasten off with a long tail for sewing.
Small Cream Flowers
Make 5–7.
Use cream yarn for petals and mustard yellow for the centers.
Flower Center
Round 1: With mustard yellow, 6 sc in MR. (6)
Round 2: Inc ×6. (12)
Fasten off yellow.
Petals
Join cream.
In the first stitch work:
(sc, hdc, dc, hdc, sc)
Sl st in the next stitch.
Repeat around, spacing the petals evenly.
Fasten off, leaving a sewing tail.
Dark Green Crochet Rose
The reference includes a large layered green flower beside the sunflower-style bloom. A spiral rose creates a similar dimensional focal point.
Yarn: dark forest green.
Ch 61.
Row 1: Dc in 4th ch from hook. Work 2 dc in each chain across.
The strip will begin curling naturally.
Fasten off, leaving approximately 60 cm for sewing.
Beginning at one end, roll the strip into a tight spiral. Keep the center compact and allow the outer layers to loosen gradually.
Use the long tail to stitch through the underside of every layer.
The completed rose should be approximately 9–12 cm across depending on yarn and hook size.
Pointed Crochet Leaves
Make 10–14 in sage and dark green.
Ch 16.
Beginning in the second chain from the hook, work:
sl st, sc, hdc, dc, dc, tr, tr, dc, dc, hdc, sc, sl st.
Work 3 sc into the final chain to turn around the tip.
Continue along the opposite side of the foundation chain using the reverse sequence.
Join with sl st.
For additional definition, surface crochet a line of slip stitches along the center of the leaf in a contrasting green.
Fasten off with a long tail.
Small Round Leaves
Make 8–12.
Ch 7.
Sc in 2nd chain from hook, hdc in next, dc in next 2 chains, hdc in next, 3 sc in final chain.
Work along the opposite side with hdc, dc, dc, hdc and sc.
Sl st to finish.
These smaller leaves fill gaps between the large pointed foliage and flowers.
Crochet Berry Clusters
The reference contains small rounded green elements distributed through the foliage.
Make approximately 12–18 berries.
Round 1: 6 sc in MR. (6)
Round 2: Inc ×6. (12)
Round 3: Sc around. (12)
Round 4: Dec ×6. (6)
Add a very small amount of stuffing.
Fasten off and close.
Sew berries individually or group three together before attaching them to the floral crown.
Crochet Trailing Vines
Make 4–6.
Using sage green, ch 35–50 depending on the desired vine length.
Work 3 sc in each chain back toward the foundation.
The excess stitches cause the chain to twist naturally into a spiral.
Fasten off with a long tail for attachment.
Assembly
- Place the pumpkin on a flat surface and confirm that all 8–10 shaped segments have similar depth.
- Position the curved stem in the small opening at the top and sew through both the stem base and pumpkin body several times.
- Pin the large sunflower-style flower slightly off-center rather than directly in front of the stem.
- Position the dark green crochet rose on the opposite side to balance the large cream flower.
- Arrange the pointed sage leaves beneath both large flowers, allowing their tips to extend beyond the flower edges.
- Add the smaller cream flowers around the front and sides of the floral crown.
- Fill visible spaces with small round leaves and green berry clusters.
- Attach the spiral vines so several hang downward over the upper pumpkin segments.
- Sew every large component directly to the pumpkin body rather than relying on neighboring flowers for support.
- Remove all pins, weave in remaining tails and check that the pumpkin sits flat without leaning toward the floral arrangement.
The finished piece should have a broad stable base, clearly defined vertical segments, a curved central stem and a floral arrangement concentrated around the upper third of the pumpkin.
7 Technical Tips for a Large Crochet Pumpkin
- Do not pack the stuffing completely firm. Overstuffing is the main failure mode when deep external grooves are required because the shaping yarn cannot compress the body sufficiently.
- Use at least 8 shaping divisions. Fewer divisions on a 30–35 cm pumpkin can produce oversized lobes that read as a ball with shallow grooves.
- Use a long upholstery needle for shaping. A standard yarn needle may not pass through the center of a large stuffed pumpkin without bending or becoming trapped.
- Mark every eighth row while making the body. Missing or adding several BLO rows changes the circumference and can make the final pumpkin unexpectedly narrow or wide.
- Stuff the stem lightly. A densely packed stem resists the strong curve visible in this design and may pull against its attachment stitches.
- Pin the floral arrangement before sewing. Attaching the heavy sunflower too far from the center can make the pumpkin visually and physically unbalanced.
- Leave 40–60 cm sewing tails on large appliqués. Short tails may require extra joins while attaching thick flowers through multiple layers of crochet fabric.
How to Make the Pumpkin Larger or Smaller
The ribbed rectangle construction makes resizing this large crochet pumpkin pattern relatively simple. The foundation chain determines the approximate height of the body, while the number of rows controls its circumference.
For a smaller pumpkin, reduce both dimensions. A foundation of approximately 25–30 stitches with 40–48 rows produces a more compact form with medium-weight yarn.
For an even larger centerpiece, increase the foundation to 45–50 stitches and continue the BLO rows until the rectangle wraps comfortably around the intended volume.
Published ribbed pumpkin instructions use the same principle: more foundation chains increase height, while additional rows increase the body circumference. :chatgpt-content-reference{index=”0″}
Why Back Loop Crochet Works for Pumpkin Ribs
Half double crochet normally forms a relatively uniform fabric. Working only through the back loop changes the surface structure because the unused loop remains visible across the row.
Repeated over many rows, those unused loops create parallel ridges. Once the rectangle is turned into a tube, the ridges run vertically from the bottom gathering point toward the stem.
This technique is widely used in documented crochet pumpkin construction. Published examples use either BLO half double crochet or BLO single crochet to create the ribbed body before seaming and gathering. :chatgpt-content-reference{index=”1″}
Flower Placement and Balance
Attach the largest flower first because it establishes the scale of the entire arrangement. Position it below the stem and slightly toward one side.
The green rose should occupy the opposite side but sit at a different height. Matching the two focal flowers perfectly would make the crown look mechanically symmetrical.
Place pointed leaves behind the flowers before adding small blossoms. The leaves create the outer silhouette, while the smaller cream flowers cover transitions between the large elements.
Trailing vines should be added last. Keep most of their weight near the upper body and allow only the curled ends to hang over the pumpkin ribs.
Keeping an Oversized Pumpkin Stable
A decorative pumpkin of this scale needs a broad base. Before closing the bottom completely, press the lower stuffing outward and slightly upward so the gathered center does not form a hard protruding point.
After shaping the segments, place the pumpkin on a flat table. If it rocks, massage stuffing away from the lowest lobe rather than immediately tightening the shaping strands.
The stem and floral crown also add weight to the upper section. Sew the stem through several body stitches around the central opening instead of attaching it only to the gathered yarn.
Large flowers should be anchored at multiple points. Stitch the center firmly, then add two or three discreet attachment stitches beneath the outer petals.
Yarn Substitution
Chunky yarn creates a larger pumpkin with fewer stitches, while worsted yarn produces a denser and more detailed surface. Published pumpkin patterns demonstrate that ribbed rectangle construction can be adapted to different yarn weights. :chatgpt-content-reference{index=”2″}
If substituting yarn for the body, make a small BLO swatch first. Stretch it sideways and check the spaces between stitches. Visible gaps indicate that the hook is too large for a stuffed object.
The flowers and leaves can use a lighter yarn than the body. In fact, a slightly finer yarn helps the botanical details retain sharper edges against the thick pumpkin surface.
Conclusion
Build the pumpkin body before making the botanical pieces so the flowers and leaves can be scaled against the actual finished form. Keep the stuffing compressible, divide the body into 8–10 controlled segments and secure the curved stem through several body stitches. Arrange the large cream flower and green rose first, then fill the remaining crown with leaves, small blossoms, berries and trailing vines. Save this large crochet pumpkin pattern to Pinterest and share the finished centerpiece on Instagram with #ForestFloralCrochetPumpkin. Record the body row count before making another version. Would you keep the pumpkin forest green or work the same floral design over a cream pumpkin?









