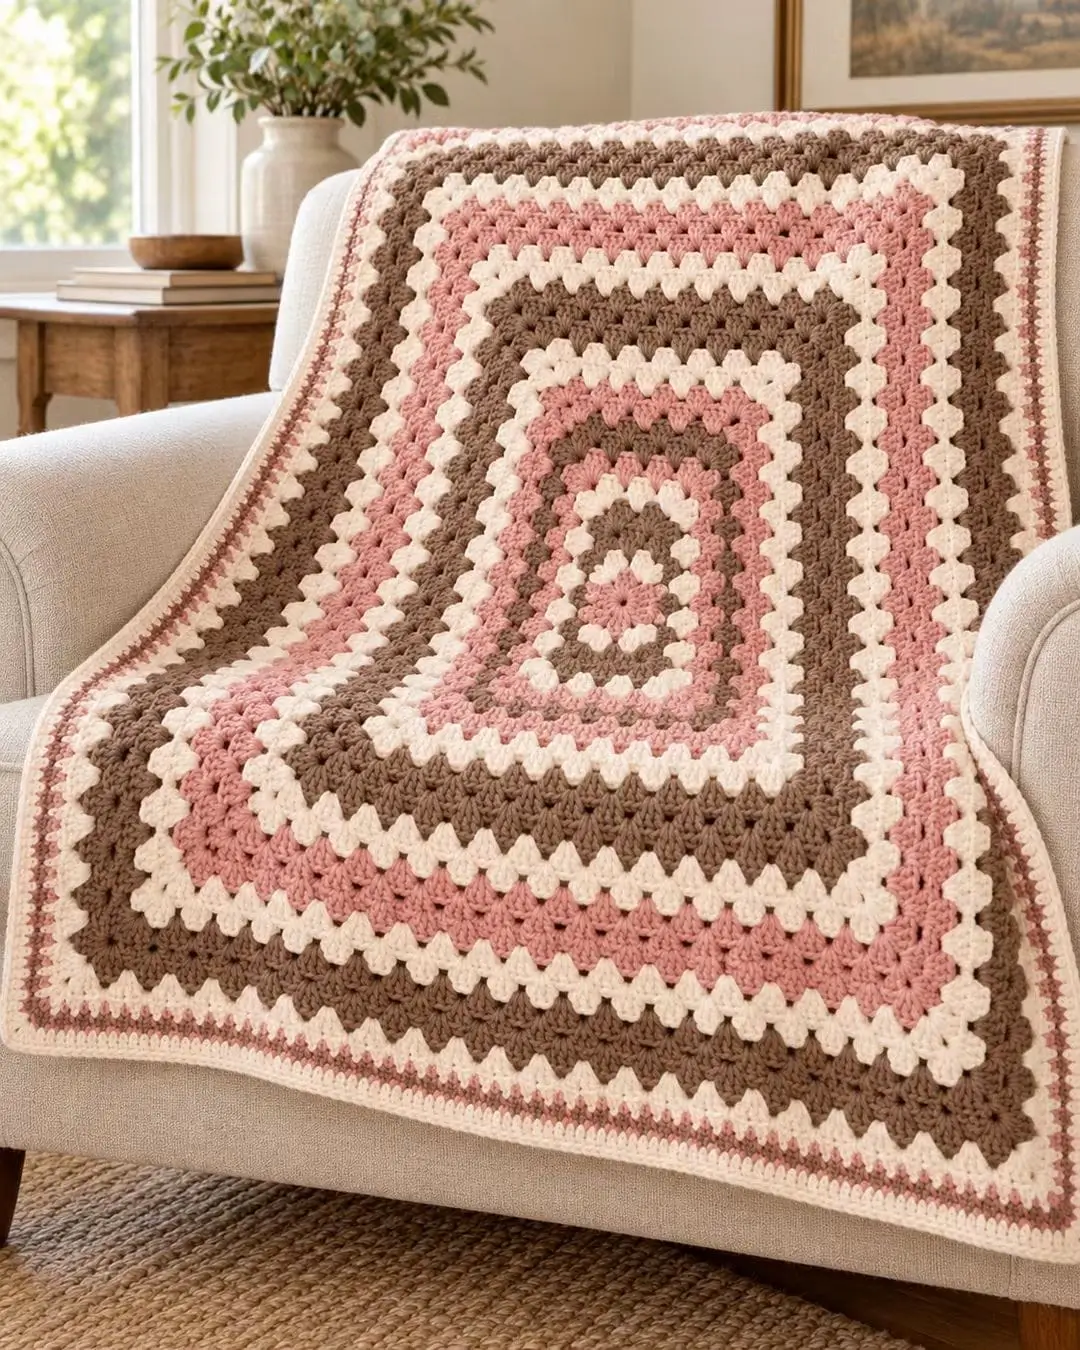
A granny square grows evenly in four directions; this blanket has to grow longer than it grows wide. This granny rectangle crochet blanket pattern solves that geometry with an elongated center surrounded by repeating double-crochet clusters. Worked in cream, dusty pink and taupe worsted-weight yarn, it creates a practical throw using basic stitches and center-out construction.
The Design: What Makes This Granny Rectangle Different
The blanket in the reference image is built from the center outward rather than from the bottom edge upward. That construction creates nested rectangles, with every new round increasing the overall width and length while preserving the proportions established at the center.
Three-double-crochet clusters form the dominant texture. Chain spaces separate those clusters, while increased corner spaces provide enough stitches for the fabric to turn without cupping. The cream, dusty pink and taupe sequence makes each concentric section visible without changing the underlying stitch structure.
The main technical risk in a rectangle granny blanket is incorrect corner placement. Missing a corner increase pulls the fabric inward; adding an extra cluster can create a wave. Count all four corners on every completed round rather than relying only on the appearance of the fabric.
Project Info at a Glance
| Skill Level | Construction | Finished Size | Hook | Yarn Weight |
|---|---|---|---|---|
| Beginner to Intermediate | Center-out rectangle | Approx. 142 × 182 cm | 5 mm | Aran / Worsted |
The finished-size and hook benchmarks come from a published granny rectangle blanket measuring approximately 56 × 72 inches (142 × 182 cm), worked with Aran-weight yarn and a 5 mm hook. Exact dimensions of the blanket in the reference photograph cannot be established from the image alone.
Materials and Tools
Yarn
Choose an Aran or worsted-weight yarn with similar yardage across all three colors. A published 56 × 72-inch granny rectangle uses approximately 3,550–3,615 yards of Aran-weight yarn, providing a useful benchmark for a large throw.
- Taupe — Aran/worsted weight — approximately 700–800 g
- Dusty pink — Aran/worsted weight — approximately 550–650 g
- Cream — Aran/worsted weight — approximately 550–650 g
The individual color quantities are planning estimates for the photo-inspired version. Actual consumption depends on finished dimensions, gauge, stripe arrangement and border depth.
Tools
- 5 mm crochet hook
- Yarn needle
- Scissors
- 4 locking stitch markers
- Flexible measuring tape
Abbreviations
- ch — chain
- dc — double crochet
- sc — single crochet
- sl st — slip stitch
- sp — space
- ch-1 sp — chain-1 space
- ch-2 sp — chain-2 space
- st(s) — stitch(es)
- rep — repeat
One granny cluster consists of 3 dc worked into the same space. Unless stated otherwise, clusters are separated by a chain space.
Gauge and Finished Size
Granny rectangle blankets are particularly adaptable because additional rounds increase both dimensions. Published patterns range from baby blankets to bed-sized versions using the same basic center-out principle.
For this version, target approximately 142 × 182 cm for a generous throw. Work a gauge sample before buying the entire yarn quantity if exact dimensions matter.
The reference photograph suggests a medium-weight yarn rather than plush super-bulky yarn. A 5 mm hook with Aran or worsted yarn is therefore an appropriate starting combination.
If your clusters feel stiff and compressed, move up one hook size. If the chain spaces appear excessively open and the clusters lack definition, test a smaller hook.
How the Granny Rectangle Construction Works
A traditional granny square starts from a central ring. A granny rectangle starts from an elongated foundation so that two sides are longer from the beginning.
The foundation determines the basic proportions. After the setup round, each additional round follows the same structural rule: work one granny cluster into each side space and increased cluster groups into the four corner spaces.
This means there is no need to calculate a different stitch count for every subsequent round. The number of clusters increases naturally as the rectangle expands.
Granny Rectangle Crochet Blanket Pattern
Center Foundation
Begin with dusty pink.
Foundation: Ch 26.
The foundation length can be modified if a longer or shorter center rectangle is preferred. When resizing the starting chain, maintain a length compatible with the three-double-crochet cluster spacing.
Round 1
Work along the foundation chain to establish the first long side.
Ch 3 to count as the first dc. Work 2 dc into the appropriate starting space to complete the first granny cluster.
Continue working groups of 3 dc separated by chain spaces along the foundation.
At the end of the foundation, create the first turning section with additional clusters and ch-2 spaces. Rotate the work and crochet along the opposite side of the foundation chain.
Mirror the cluster placement from the first long side.
Complete the second end in the same manner and join with a sl st.
Before proceeding, identify the four corner ch-2 spaces. Place one locking marker in each corner.
Round 2
Sl st to the first corner space.
Ch 3, then work 2 dc into the same space.
Ch 2, 3 dc into the same corner space.
This creates the first corner:
(3 dc, ch 2, 3 dc)
Ch 1.
Work 3 dc into each ch-1 space along the side, placing ch 1 between adjacent clusters.
At the next marked corner, work:
(3 dc, ch 2, 3 dc)
Continue around the rectangle using one granny cluster in every side space and two clusters separated by ch 2 at every corner.
Join with sl st.
Round 3
Continue in dusty pink.
Move into the first corner space.
Work:
(3 dc, ch 2, 3 dc)
Ch 1.
Work 3 dc in every ch-1 space along the first side, with ch 1 between clusters.
Repeat the corner sequence in each of the four ch-2 spaces.
Join with sl st.
Round 4
Repeat Round 3.
The center should now show a clearly defined dusty-pink rectangular section. Check that all four corners remain flat and that the two long sides are visually parallel.
Cream Section
Round 5
Fasten off dusty pink and join cream in a corner ch-2 space.
Work:
(3 dc, ch 2, 3 dc) in the corner.
Ch 1 and continue with 3 dc in every side ch-1 space.
At each remaining corner, work:
(3 dc, ch 2, 3 dc)
Join with sl st.
Rounds 6–7
Continue in cream using the same granny rectangle repeat.
Each new round contains more side spaces than the previous round. Do not skip a space to make the clusters line up vertically. Granny clusters naturally sit between the clusters of the preceding round.
After Round 7, fasten off cream.
Taupe Section
Round 8
Join taupe in any corner ch-2 space.
Work the standard corner:
(3 dc, ch 2, 3 dc)
Continue around with one granny cluster in every ch-1 space and the standard increase in all four corners.
Rounds 9–11
Repeat the established granny rectangle round in taupe.
Check the blanket after each round. If the corners begin to cup upward, first confirm that every corner contains both three-dc clusters and the ch-2 space.
If the fabric ripples despite correct stitch placement, check hook size and tension before adding more rounds.
Second Cream Section
Rounds 12–14
Change to cream.
Continue the same rectangle construction for three rounds.
Keep the cream joins on the same general side of the blanket when possible. This makes yarn-tail management easier and prevents joins from being distributed randomly across the visible edges.
Second Pink Section
Rounds 15–18
Change to dusty pink.
Work four complete granny rounds.
Continue using:
3 dc, ch 1 across ordinary side spaces.
At every corner use:
3 dc, ch 2, 3 dc
The wider pink section creates a stronger band between the narrower cream sections, matching the layered color treatment visible in the reference blanket.
Third Cream Section
Rounds 19–21
Change to cream.
Work three rounds in the established pattern.
Count the four corner spaces before beginning each round. As the blanket becomes larger, accidentally treating an ordinary side space as a corner becomes easier.
Second Taupe Section
Rounds 22–26
Join taupe.
Work five rounds using the standard granny rectangle construction.
This wider neutral band visually anchors the outer portion of the blanket and creates contrast against the narrower cream stripe that follows.
Outer Cream Section
Rounds 27–29
Change to cream.
Work three rounds.
At this stage, measure the blanket before proceeding. Additional rounds can be added in any of the three colors if a larger throw is required.
Keep additions symmetrical in appearance by completing whole rounds rather than stopping partway through a color band.
Outer Pink Section
Rounds 30–33
Join dusty pink.
Work four rounds in the established granny stitch.
Continue checking that the corners remain approximately 90 degrees when the blanket is laid flat.
Final Taupe Granny Section
Rounds 34–38
Change to taupe.
Work five rounds of granny clusters.
Finish the final taupe round and inspect the dimensions. Add further complete rounds if the blanket has not reached the desired size.
For a photo-inspired arrangement, finish the major granny sections with cream before beginning the narrow decorative edging.
Cream Transition Round
Round 39
Join cream.
Work one complete granny round using the established cluster construction.
This narrow cream section separates the large taupe granny band from the finer outer edging.
Decorative Pink and Taupe Border
The blanket in the reference image has a narrower border than the main granny-cluster field. Changing to smaller stitches at this point gives the outer edge a more controlled finish.
Border Round 1 — Cream
Continue with cream.
Ch 1 and work sc evenly around the entire blanket.
Place 3 sc in each corner.
Join with sl st.
Border Round 2 — Dusty Pink
Join dusty pink in a corner.
Ch 1 and sc in each stitch around.
Work 3 sc in each corner stitch.
Join with sl st.
Border Round 3 — Taupe
Change to taupe.
Sc evenly around, maintaining three stitches at each corner increase point.
Join with sl st.
Border Round 4 — Dusty Pink
Change back to dusty pink.
Work one complete sc round.
Keep tension slightly relaxed. A tight single-crochet border can pull inward even when the granny section lies completely flat.
Border Round 5 — Cream
Join cream.
Work sc in every stitch around.
Place 3 sc at each corner.
Join with sl st.
Final Border Round
Continue in cream for one final sc round.
Work consistently around all four sides and maintain the corner increases.
Fasten off, leaving a 15–20 cm tail.
How to Change Colors Cleanly
Complete the final yarn-over of the last stitch with the new color when a crisp transition is required. For full-round color changes, another clean method is to finish the old color, fasten off and join the new yarn in a different corner.
Changing the joining point periodically prevents a noticeable stack of joins from developing in one location.
Leave sufficient yarn tails for weaving. A short tail can work loose after repeated washing or use.
How to Resize the Granny Rectangle Blanket
The center-out construction makes resizing this granny rectangle crochet blanket pattern practical. Continue adding rounds until the required dimensions are reached.
A published granny rectangle pattern provides sizes ranging from a 30 × 37-inch baby stroller blanket to a 66 × 90-inch twin, demonstrating how the same construction can be expanded substantially.
The starting foundation controls the relationship between width and length. A longer foundation produces a more elongated rectangle, while a shorter foundation creates proportions closer to a square.
If the center proportions already match the intended project, simply continue adding complete rounds.
Keeping the Blanket Flat
A granny rectangle should rest flat without aggressive blocking. Persistent waves or cupping usually indicate a structural or tension problem.
First inspect every corner. Each corner needs the prescribed increase construction on every round. A missed corner cluster removes stitches from the perimeter and pulls the fabric inward.
Next inspect the side spaces. Each ordinary ch-1 space should receive one granny cluster. Accidentally adding two clusters to a side space increases the perimeter and can produce rippling.
Finally, assess tension. If all stitch placement is correct but the fabric still cups, test the next hook size up on a small sample.
Assembly and Finishing
- Lay the completed blanket on a large flat surface.
- Check all four corners for matching increase placement.
- Inspect every color-change point for unsecured yarn tails.
- Thread each tail through a blunt yarn needle.
- Weave tails through stitches of the matching color.
- Reverse weaving direction at least once before trimming each tail.
- Measure the blanket across the center rather than along a stretched edge.
- Check that the border lies flat without curling toward either surface.
- Block lightly if required for the selected yarn fiber.
- Record the final dimensions, yarn amounts and hook size for the next blanket.
The finished blanket should form a stable rectangle with four defined corners, concentric granny-cluster bands and an even outer border.
7 Technical Tips for Granny Rectangle Crochet
- Mark all four corners. A misplaced corner is one of the fastest ways to distort a granny rectangle, especially after the blanket becomes too large to view as a whole while crocheting.
- Count the clusters on opposite sides. The two long sides should contain matching cluster counts, as should the two short sides.
- Do not add clusters between established spaces. An accidental extra cluster increases the perimeter and creates a localized ripple that becomes more obvious on later rounds.
- Leave at least 15 cm for yarn tails. Very short tails are difficult to weave securely through several directions.
- Check the blanket every three to five rounds. Detecting one incorrect corner after two rounds requires far less unraveling than finding it after fifteen.
- Keep the ch-2 corner spaces consistent. Tight corner chains can pull the rectangle inward even when both required clusters are present.
- Measure without stretching the blanket. Pulling the granny fabric lengthwise temporarily opens the chain spaces and produces an inaccurate finished measurement.
Choosing the Three Colors
The reference uses a restrained palette: warm taupe, dusty pink and cream. The contrast is sufficient to separate individual bands without making every round compete visually.
For a similar result, assign the darkest shade to the broad neutral sections, the strongest color to the secondary bands and the lightest shade to separating rounds.
Keep yarn weight and fiber composition consistent across all three colors. Combining a thin worsted yarn with a heavy Aran yarn can change the depth of individual rounds and distort the rectangle.
The same construction can also be worked in three blues, neutral browns, sage and cream, or a monochromatic gradient without changing the underlying pattern.
Yarn Planning
A large granny rectangle consumes progressively more yarn per round because every new round has a greater circumference than the previous one. Do not assume that one outer round uses the same quantity as one center round.
Weigh the yarn before and after one complete outer round if supply is limited. The difference provides a practical estimate of the amount needed for the next round.
Keep extra yarn for the border. Running out of the final cream shade halfway around the last edging round creates a more visible substitution than changing dye lots within an interior stripe.
Conclusion
Complete the center first, mark all four corners and check the rectangle after every few rounds before committing additional yarn. The dusty pink, cream and taupe arrangement can be expanded simply by repeating complete granny rounds until the required dimensions are reached. Record the final weight of each color so another version can be planned more accurately. Save this granny rectangle crochet blanket pattern to Pinterest and share the finished blanket on Instagram with #PinkTaupeGrannyRectangle. For your version of this specific blanket, would you make the broad outer granny band taupe as shown, or switch that section to dusty pink?









