Red and White Crochet Baby Dress Pattern With Flowers
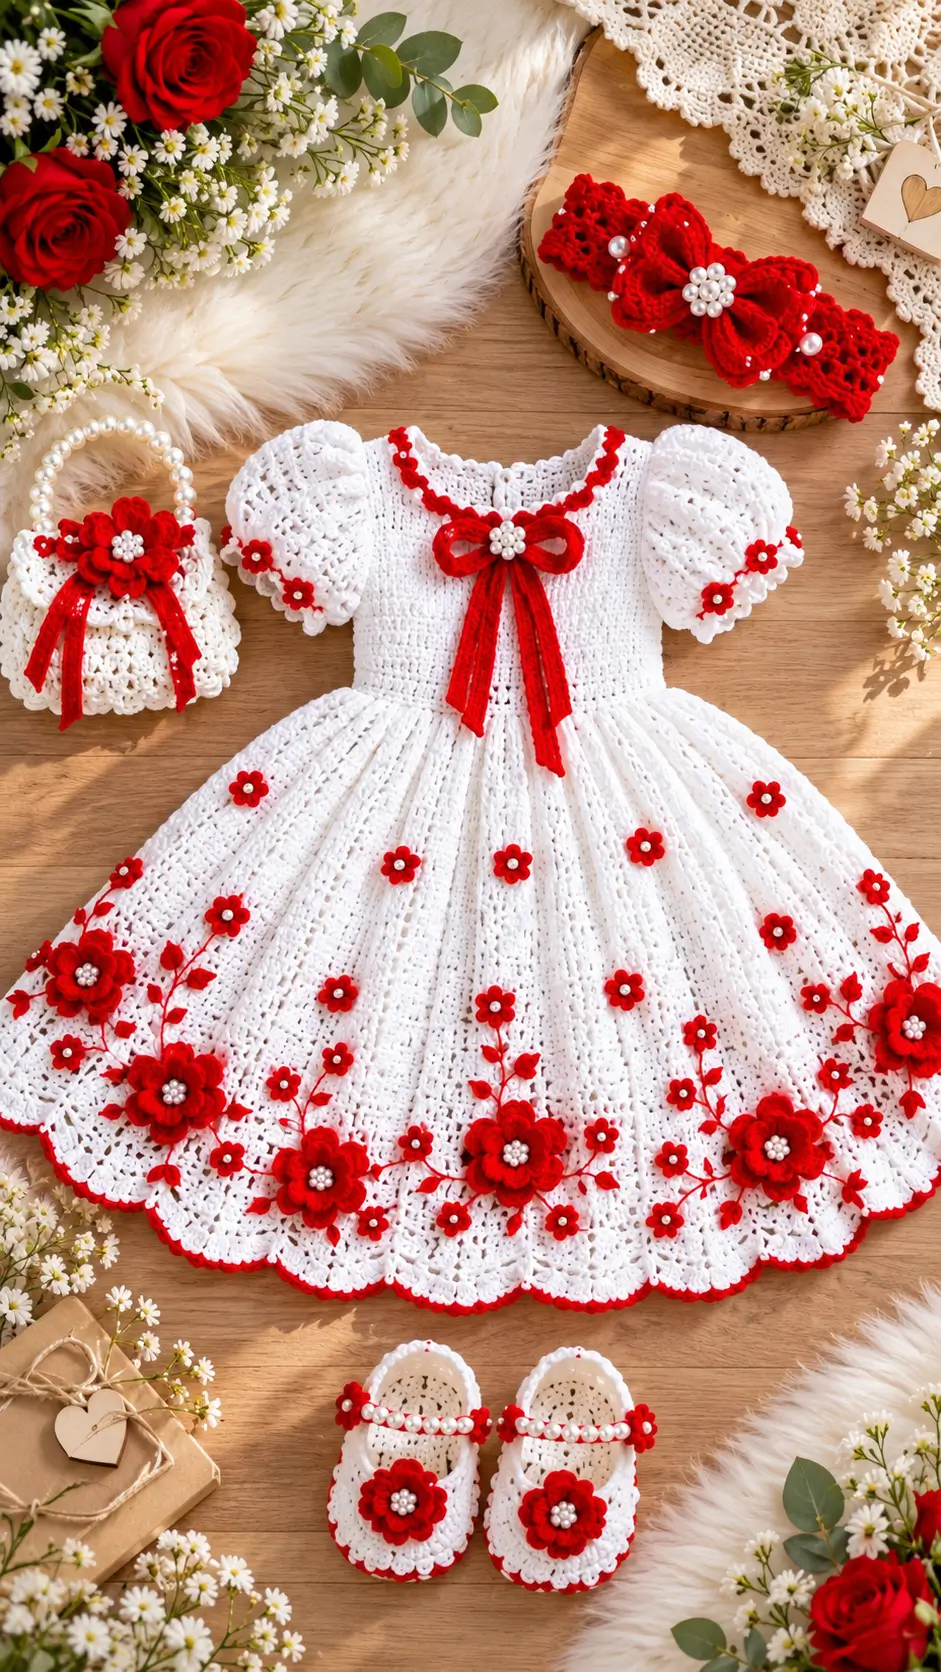
A border carrying dozens of raised red flowers needs far more skirt circumference than the fitted white bodice above it. This red and white crochet baby dress pattern uses a DK-weight reference, 4 mm hook and a 48 cm chest target for a 6–12-month garment. It is an intermediate, gauge-based project with puff sleeves, floral decoration, a matching headband, handbag and shoes, making one construction plan useful for a coordinated set.
The Design: What Makes This Red and White Dress Different
Three structural decisions define this dress. The bodice is relatively dense, giving the neck trim, bow and sleeve seams a stable foundation. Below it, the skirt expands dramatically so the lower edge can carry dimensional flowers without the appliqués pulling the circumference inward. Finally, the crochet flower baby dress repeats red motifs across the skirt, sleeves and accessories instead of treating each component as a separate design.
The photographed crochet baby dress with headband also depends heavily on proportion. Large flowers belong near the lower border, while smaller motifs fill the open skirt above them.
One common mistake is copying an apparent stitch count directly from a photograph. Garment counts depend on gauge, chest measurement and stitch repeat. The finished chest measurement should therefore control the bodice before skirt shaping begins.
Project Info at a Glance
| Skill Level | Time | Finished Size | Hook | Best For |
|---|---|---|---|---|
| Intermediate | Multi-session project | Approx. 48 cm chest × 38 cm length | 4 mm | 6–12-month reference size |
The dimensions above are working reference measurements. Always compare them with the intended wearer’s measurements and your blocked gauge before making the complete garment.
Materials and Tools
Yarn
- White DK or light-worsted yarn — main color for the bodice, sleeves, skirt, shoes, handbag and headband.
- Red DK or light-worsted yarn — accent color for flowers, leaves, edging, bow and accessory details.
- Red embroidery or crochet yarn — small quantity for stems, leaves and fine decorative details if required.
The exact yarn quantity depends heavily on gauge, garment size and skirt fullness. Purchase enough yarn from the same dye lot to complete the main white sections, especially the skirt.
Tools
- 4 mm crochet hook
- Stitch markers
- Flexible measuring tape
- Blunt yarn needle
- Scissors
- Blocking pins
- Washable sewing thread, if needed for appliqués
If the finished set is intended for a baby, avoid loosely attached beads, pearls or similar small decorative pieces. Embroidered knots or firmly crocheted yarn centers can reproduce the visual effect without adding loose embellishments.
Abbreviations
- MR — magic ring
- sc — single crochet
- hdc — half double crochet
- dc — double crochet
- tr — treble crochet
- sl st — slip stitch
- ch — chain
- st/sts — stitch/stitches
- sp — space
- rep — repeat
- BLO — back loop only
- RS — right side
An invisible decrease is primarily useful for three-dimensional crochet shaping and is not required for the main bodice or skirt construction in this project.
Gauge and Sizing
This dress should be constructed from gauge and physical measurements rather than fixed amigurumi-style stitch mathematics.
For the pictured style, approximately 48 cm finished chest circumference and 38 cm shoulder-to-hem length provide useful working dimensions for a 6–12-month reference size.
Make a gauge swatch larger than 10 × 10 cm using the white yarn and 4 mm hook. Wash and dry the swatch using the same method planned for the completed garment. Measure the central section only, avoiding distorted edge stitches.
Calculate the starting width from the blocked gauge. Check the bodice against the required chest measurement before beginning the skirt because adding more skirt stitches cannot correct an undersized bodice.
Pattern — Step by Step
Bodice
Yarn: white. Gauge-based construction.
Create the foundation width according to your blocked gauge and required finished chest measurement.
Row 1: Work dc evenly across the established foundation.
Row 2: Ch 2, turn, dc across.
Repeat Row 2 while checking the physical width against the required garment measurement.
Divide the upper section symmetrically for the armholes and neckline. Maintain matching stitch counts on the left and right sides.
Continue until the bodice reaches the intended waist position.
Check shoulder width, armhole depth and chest circumference before fastening off.
Puff Sleeves — Make 2
Yarn: white.
Join white yarn evenly around one armhole.
Round 1: Work evenly around the complete armhole opening.
Round 2: Increase at regular intervals to create the additional volume required for the puff.
Rounds 3–5: Maintain the expanded circumference.
Round 6: Begin reducing evenly around the sleeve.
Round 7: Continue the reductions until the lower sleeve reaches the required circumference.
Add a narrow decorative edge around the sleeve opening.
The sleeve volume should remain concentrated around the shoulder rather than continuing as a wide tube to the lower edge. Make the second sleeve with the same measurements and shaping.
Skirt Transition
Yarn: white.
Join the white yarn evenly around the lower edge of the completed bodice.
Round 1: Work evenly around the waist.
Round 2: Add increases at regular intervals.
Round 3: Increase again, distributing the additional stitches around the complete circumference.
Continue adding circumference gradually until the fabric begins to flare without creating sharp corners.
The lower portion of this dress carries multiple dimensional flower appliqués. Adequate skirt circumference is therefore important. Insufficient width can cause the decorated hem to pull inward after assembly.
Main Lace Skirt
Yarn: white.
Work downward using a repeating dc-based openwork structure. Keep each vertical repeat aligned with the previous round.
Add periodic increases through the upper portion of the skirt instead of placing every increase directly below the waist. This spreads the additional circumference over a larger area and produces a more gradual flare.
Once the required fullness has been established, maintain the stitch pattern through the lower section.
Measure the dress regularly from the shoulder to the current lower edge. For the reference size, stop the main white fabric early enough to accommodate the final decorative edging while keeping the total length close to 38 cm.
Red Scalloped Hem
Yarn: red.
Round 1: Join red yarn at the back of the skirt and sc evenly around the entire hem.
Round 2: Establish evenly spaced shell anchors around the circumference.
Round 3: Work grouped dc stitches into each anchor to create rounded scallops.
Check the repeat before completing the entire round. If the final scallop would be incomplete, adjust the anchor spacing rather than forcing an uneven final repeat.
Fasten off and weave the yarn tail through the denser foundation stitches.
Small Five-Petal Flowers
Yarn: red.
R1: Work 5 sc in MR and join. (5)
R2: Work one petal into each stitch using a combination of chains and dc stitches. (5 petals)
Fasten off and leave approximately 15–20 cm of yarn for sewing.
Make enough small flowers to distribute them across the skirt, sleeves and accessories. Complete and block the dress before deciding the final number because flower spacing depends on the finished skirt circumference.
Large Layered Flowers
Yarn: red.
R1: 6 sc in MR. (6)
R2: Work one broad petal group into each stitch. (6 petals)
For the upper layer, crochet a second, slightly smaller flower.
Place the smaller flower concentrically over the larger flower. Sew securely through the center and selected inner sections while allowing the outer petals to remain raised.
Make several large flowers for the lower border. Position these major motifs before adding the smaller flowers.
Small Leaves
Yarn: red.
Foundation: Ch 6.
Row 1: Sl st in the second chain from the hook, sc in the next chain, hdc in the next 2 chains, then work multiple stitches into the final chain to turn.
Continue along the opposite side of the foundation chain to complete the leaf shape.
Fasten off with a sewing tail.
Arrange the leaves in small opposing groups around the lower floral border. Avoid placing every leaf at the same angle because the decoration should follow the circular movement of the skirt.
Neckline Trim
Yarn: red.
Join red yarn at the back neckline.
Round 1: sc evenly around the neckline.
Round 2: Work a compact decorative shell or picot repeat.
Lay the bodice flat while working. If the neckline begins to pucker, the red edging contains too few stitches or has been worked too tightly.
Fasten off and weave the tail into the wrong side.
Front Bow
Yarn: red.
Crochet two compact rectangular or oval bow loops in red.
Place the loops side by side and wrap a narrow crocheted band around their center. Stitch the band securely from the reverse.
Make two long red tails and position them behind the center wrap.
Pin the completed bow to the center front of the neckline before sewing. Check that the tails hang symmetrically down the bodice.
Flower Headband
Yarn: white and red.
Measure the intended head circumference before making the band.
With white yarn, crochet a flexible band to the required width and length. Check the stretch before joining the ends.
Make one large layered red flower for the center. Add smaller flowers toward either side if required.
Sew the flowers firmly to the crocheted band. Yarn centers are preferable to detachable bead centers for a baby accessory.
Mary Jane-Style Crochet Shoes — Make 2
Yarn: white and red.
Measure the intended foot before beginning the sole.
Crochet an oval white sole that matches the required finished length.
Work upward around the perimeter of the sole to form the shoe wall.
Reduce across the front section to shape the toe while maintaining sufficient room around the heel.
Add a narrow strap across the instep.
Finish the visible outer edge with red yarn.
Make one dimensional red flower for each shoe and attach it centrally over the toe.
Complete both soles before beginning the uppers. Place them together and check that their finished lengths differ by no more than approximately 5 mm.
Floral Crochet Handbag
Yarn: white and red.
Crochet two matching white circular or softly gathered panels.
Place the panels together and join around the lower and side edges while leaving the top open.
Add a short white handle. Keep the handle proportionate to the small decorative bag.
Make one large red layered flower and attach it to the center front.
Add smaller red flowers toward the sides. Two narrow red crocheted tails can be positioned below the main flower to reproduce the coordinated bow effect used elsewhere in the set.
Secure every appliqué with multiple stitches through the main bag fabric.
Assembly
- Block the undecorated dress to the intended chest circumference and shoulder-to-hem length.
- Check both puff sleeves for matching depth and circumference before weaving in their final tails.
- Complete the red neckline trim and position the front bow on the garment center line.
- Lay every small skirt flower in position before permanently attaching any of them.
- Attach the largest flowers around the lower skirt, keeping their centers at a consistent distance above the scalloped edge.
- Position the red leaves and decorative stems between the large lower flowers without pulling the lace fabric sideways.
- Sew the smaller flowers across the upper skirt, distributing them between the major lower motifs.
- Finish the matching headband and handbag separately, using the same flower proportions and red yarn.
- Complete both shoes from matching measurements, then attach the red toe flowers.
- Weave every yarn tail through several wrong-side stitches, reverse its direction, trim it and inspect each applied component before the set is used.
The completed project consists of a floral puff-sleeve dress, matching flower headband, decorative handbag and pair of Mary Jane-style crochet shoes.
7 Technical Tips for a Cleaner Finish
- Measure the chest before adding skirt volume. A bodice that finishes 1–2 cm too small cannot be corrected by adding more skirt stitches. For the reference size, check the bodice against approximately 48 cm finished chest circumference before proceeding.
- Mark the center front and center back. Losing these reference points can cause the floral border to drift visibly toward one side. Keep removable stitch markers in both positions until all large motifs have been pinned.
- Block before sewing the flowers. Attaching appliqués before blocking can create irregular spaces after the lace relaxes. Bring the skirt to its final dimensions first, then calculate flower placement.
- Measure both puff sleeves. One additional increase repeat can make one sleeve visibly larger than the other. Compare sleeve depth and lower circumference before fastening off.
- Pin the large flowers before the small ones. Starting with tiny motifs can leave insufficient room for the dominant border flowers. Establish the large lower motifs first and fill the remaining spaces afterward.
- Keep the two shoe soles within about 5 mm of each other. A larger difference becomes increasingly visible after the toe and strap are added. Finish and compare both soles before crocheting either upper.
- Reverse direction when weaving yarn tails. A tail passed through open lace in only one direction can gradually work loose. Pass it through a denser section, reverse direction and then trim the excess.
Final Finishing
Complete the garment dimensions before committing to the floral layout. For the 6–12-month reference, approximately 48 cm around the chest and 38 cm from shoulder to hem provide practical working targets, but the blocked gauge and intended wearer’s measurements should determine the final dimensions.
Make one large and one small red flower first. Block both motifs and place them against the finished skirt before producing the remaining appliqués. This gives you a reliable way to check flower scale and spacing while avoiding an overcrowded lower border.
The finished red and white crochet baby dress pattern can then be coordinated with the matching headband, handbag and crochet shoes shown in the design. If you make the set, save it to Pinterest or share the finished version on Instagram with #RedWhiteFlowerBabyDress.
Would you keep every flower red, or add a few white layered flowers between the large red motifs?









