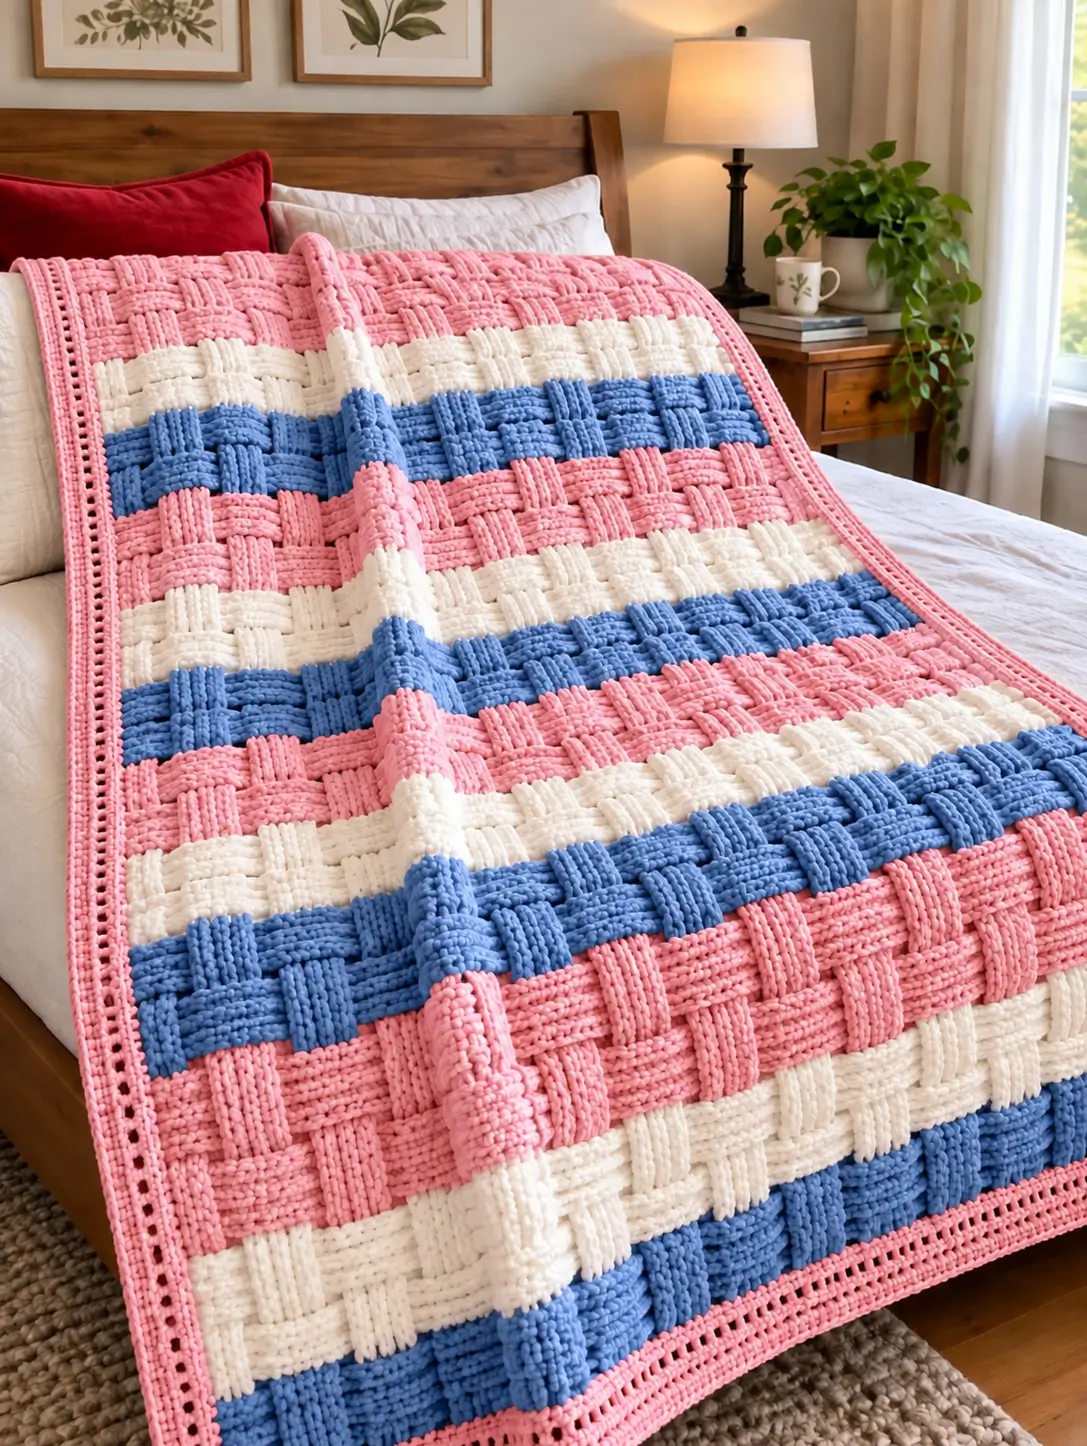
A basketweave blanket only looks woven because alternating crochet posts force neighboring blocks to project in opposite directions. This basketweave crochet blanket pattern translates that structure into pink, cream and blue stripes using super-bulky yarn and an 8 mm hook. The comparable finished size is about 140 × 114 cm. It suits an intermediate crocheter and produces a dense bed or sofa blanket with relatively few finishing seams.
The Design: What Makes This Basketweave Blanket Different
The photographed blanket combines two visual systems: broad horizontal color bands and raised blocks that alternate direction inside each band. Color creates the stripes, while front-post and back-post double crochet stitches create the apparent over-and-under construction.
A super-bulky yarn is a practical choice for producing the pronounced relief visible in this style of blanket. The second structural decision is block alignment. Reversing FPdc and BPdc groups after a fixed number of rows makes one rectangle project forward while its neighboring block recedes.
A common mistake in a chunky crochet blanket pattern of this type is accidentally offsetting a post-stitch group after changing colors. Count the posts rather than judging alignment only from the surface texture. This keeps the basket weave crochet stitch consistent from one stripe to the next.
Project Info at a Glance
| Skill Level | Time | Finished Size | Hook | Best For |
|---|---|---|---|---|
| Intermediate | Multi-session project | Approx. 140 × 114 cm | 8 mm | Throw or bed layering |
Note: The finished dimensions and hook size are technical reference values for a comparable super-bulky basketweave blanket. The exact dimensions, yarn brand and hook used for the blanket in the reference photograph cannot be determined from the image alone.
Materials and Tools
Yarn
Plan for approximately 2,100 g of super-bulky yarn for a large chunky blanket of comparable dimensions. The color quantities below are practical planning estimates because exact yarn consumption cannot be calculated from the photograph.
- Pink — super bulky (6) — approximately 900 g
- Cream/white — super bulky (6) — approximately 600 g
- Medium blue — super bulky (6) — approximately 650 g
Use the same yarn line for all three colors when possible. Matching fiber content and yardage keeps the three stripe colors at a similar gauge.
When substituting yarn, compare yardage as well as grams. Two super-bulky yarns can contain substantially different lengths per 100 g.
Tools
- 8 mm crochet hook
- Yarn needle
- Locking stitch markers
- Scissors
- Flexible measuring tape
Abbreviations
- ch — chain
- sc — single crochet
- dc — double crochet
- FPdc — front-post double crochet
- BPdc — back-post double crochet
- sl st — slip stitch
- st(s) — stitch(es)
- RS — right side
- WS — wrong side
- rep — repeat
A post stitch is worked around the vertical post of the stitch below instead of through the normal top loops. FPdc brings the post toward the front of the fabric, while BPdc moves the post toward the reverse surface.
Gauge and Sizing
Work a basketweave swatch with your selected super-bulky yarn before calculating the foundation chain. Do not attempt to determine gauge directly from the reference photograph.
Yarn thickness, hook size and individual tension affect both the width of each basket block and the height of the finished stripe. A foundation count taken from a pattern written for another yarn weight may produce a substantially different blanket.
For a blanket approximately 140 × 114 cm, make a swatch first and calculate how many complete basketweave repeats are required for the desired width.
The pattern below uses groups of four post stitches. Keeping the foundation compatible with the eight-stitch texture repeat prevents incomplete basket blocks at the opposite edge.
Pattern — Step by Step
Construction: Work the main blanket flat in rows. The basket texture is formed by alternating groups of front-post and back-post double crochet stitches.
Main Blanket Panel
Yarn: Begin with pink.
This version uses groups of four post stitches. One four-stitch group projects toward the front while the neighboring four-stitch group recedes. Their positions are reversed after four texture rows.
Foundation: Chain to the calculated blanket width while maintaining the required eight-stitch basket repeat plus the selected edge stitches.
Row 1: Dc across. Turn.
Row 2: Ch 2. Dc in first edge stitch. *FPdc around next 4 posts, BPdc around next 4 posts.* Repeat across the basketweave field. Dc in final edge stitch. Turn.
Row 3: Ch 2. Maintain the established post orientation across the row. Keep every four-post group vertically aligned. Dc in final edge stitch. Turn.
Row 4: Repeat Row 3.
Row 5: Repeat Row 3.
At this point, the first set of raised rectangular blocks should be clearly defined.
Row 6: Ch 2. Dc in first edge stitch. Reverse every group. Work BPdc around the four posts that previously formed an FPdc block and FPdc around the four posts that previously formed a BPdc block. Dc in final edge stitch. Turn.
Rows 7–9: Maintain the new post orientation established in Row 6.
Row 10: Reverse all post groups again.
Continue repeating this construction, reversing the direction of each four-post block after every four completed texture rows.
Pink Stripe
Continue the basketweave repeat in pink until the stripe reaches the required depth.
Finish the stripe after a complete vertical basket section. Avoid changing yarn midway through a four-row block because the color boundary will cut through the raised rectangle instead of following the structural grid.
When the pink section is complete, change color at the edge of the blanket.
Cream Stripe
Join cream or white at the beginning of the next row.
Continue the same four-post basket repeat without changing its horizontal position. A yarn color change does not restart the basketweave sequence.
Check the position of the first FPdc and BPdc groups against the stripe below. Each block should remain vertically aligned with the established grid.
Work the cream section for the same number of texture rows as the pink section when equal-width stripes are required.
Blue Stripe
Join medium blue at the row edge.
Continue the established basketweave pattern. Check the first complete eight-stitch repeat before working across the entire row.
An FPdc group worked where a BPdc group belongs will face the wrong direction and become more noticeable after several additional rows.
Continue until the blue stripe matches the planned stripe depth.
Stripe Sequence
For the pink, cream and blue appearance shown in the reference, use the following repeating sequence:
Pink → Cream → Blue → Pink → Cream → Blue
Repeat the sequence until the blanket approaches the required finished length.
Always finish the final stripe after a complete basket block. Stopping halfway through the vertical repeat produces a visibly truncated row of blocks along the bottom.
Measure the blanket while it is lying flat. Do not pull the fabric lengthwise during measurement because the raised post stitches can temporarily stretch.
Pink Crochet Border
The pink border visually connects the separate color bands and provides a consistent edge around all four sides.
Border Setup Round
Yarn: Pink.
Join pink yarn at one corner.
Round 1: Ch 1. Work sc evenly around the entire blanket. Place 3 sc in each corner. Join with sl st.
Along the side edges, distribute stitches consistently. Do not force one stitch into every visible strand if doing so causes the border to ripple.
Openwork Border
Round 2: Ch 1, sc in the same stitch. *Ch 1, skip 1 stitch, sc in next stitch.* Repeat around. Adjust the final repeat before each corner when necessary. At each corner, work sc, ch 2, sc into the corner space. Join with sl st.
Round 3: Ch 1. Sc in each sc and each ch-1 space around. Work 3 sc into each corner ch-2 space. Join with sl st.
Round 4: Repeat the openwork construction from Round 2.
Round 5: Sc evenly around the entire blanket, placing 3 sc in each corner.
Fasten off. Leave a 15–20 cm yarn tail for weaving.
Assembly and Finishing
- Lay the blanket flat and identify the front surface before completing the final finishing work.
- Check every pink, cream and blue transition for loose yarn ends.
- Thread each yarn tail onto a blunt yarn needle.
- Weave each tail through stitches of the same color whenever possible.
- Reverse direction at least once while weaving each tail into the fabric.
- Trim the yarn only after the tail has been worked securely through the stitches.
- Inspect all four border corners for cupping or excessive ruffling.
- Measure the finished width at the top, center and bottom.
- Lay the blanket flat according to the yarn manufacturer’s care instructions without aggressively stretching the post stitches.
- Record the final dimensions, hook size and yarn consumption for future versions.
The completed blanket should have aligned raised blocks, uninterrupted horizontal color bands and a pink border that lies flat around all four sides.
7 Technical Tips for a Cleaner Basketweave Blanket
- Mark the first stitch of every row. Losing one edge stitch can make the blanket progressively narrower and move the basket repeats out of alignment.
- Check every four-post group. One misplaced FPdc where a BPdc belongs produces a raised rectangle facing in the wrong direction.
- Make color changes only at row edges. Joining a new color inside a basket block leaves a visible interruption across the raised texture.
- Measure stripes after complete block repeats. A difference of one texture row becomes increasingly obvious when several horizontal stripes are stacked.
- Watch the border corners for ruffling. Too many stitches around a corner make the edging flare, while too few stitches pull the corner inward.
- Place stitch markers at all four corners. Corner markers separate the increase points from ordinary side stitches and reduce accidental asymmetry.
- Test the 8 mm hook before making the full foundation. If the basketweave swatch is excessively stiff or loose, change hook size and measure the new swatch before calculating the blanket width.
How to Keep the Basketweave Blocks Aligned
Block alignment matters more than individual stitch appearance. Each group contains four post stitches, and two neighboring groups create one eight-stitch horizontal repeat.
Place a locking marker between several repeats on the first texture row. On later rows, the markers provide fixed reference points. If a group reaches a marker with fewer or more than four posts, correct the error before continuing.
Also count groups after every color change. Thick yarn can obscure the base of a post, particularly where the new color begins.
Adjusting the Blanket Size
The easiest way to resize this basketweave crochet blanket pattern is to change the number of complete horizontal basket repeats.
Make a swatch containing several eight-stitch repeats and measure its width without stretching it. Divide the desired blanket width by the measured repeat width to estimate the required number of repeats.
For length, add or remove complete vertical basket sections. Keeping the changes in complete blocks preserves the proportions of the woven-looking texture.
Remember that a wider or longer blanket requires additional yarn. Record the grams used for the first several completed stripes; that figure can be used to estimate how much yarn the remaining sections will require.
Managing Three Yarn Colors
The three-color layout works best when each yarn has the same fiber composition, weight and approximate yardage per ball. A thicker cream yarn paired with thinner pink and blue yarn can alter both stripe depth and blanket width.
Change colors at the outer edge after completing the final stitch of a row. Leave enough tail for secure weaving rather than cutting directly beside the join.
If a color will not be used again for several rows, cutting and rejoining generally produces a cleaner edge than carrying a long unused strand up the side.
Before adding the border, inspect both long edges. Any carried strands or color-change tails should be secured so they can be covered by the border setup round.
Conclusion
Finish the swatch before purchasing the full three-color yarn quantity because super-bulky yarns can produce different dimensions with the same hook. Once gauge is recorded, calculate the foundation width, mark each basket repeat and keep every color transition at a row edge. Photograph the finished blanket flat so the pink, cream and blue stripe sequence and alternating post texture remain visible. Save this basketweave crochet blanket pattern to Pinterest and share the completed version on Instagram with #PinkBlueBasketweaveBlanket. Record the final yarn weights for planning another blanket. Which stripe would you place first at the top edge: pink, cream or blue?









