Introduction
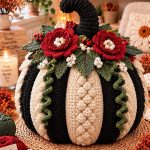
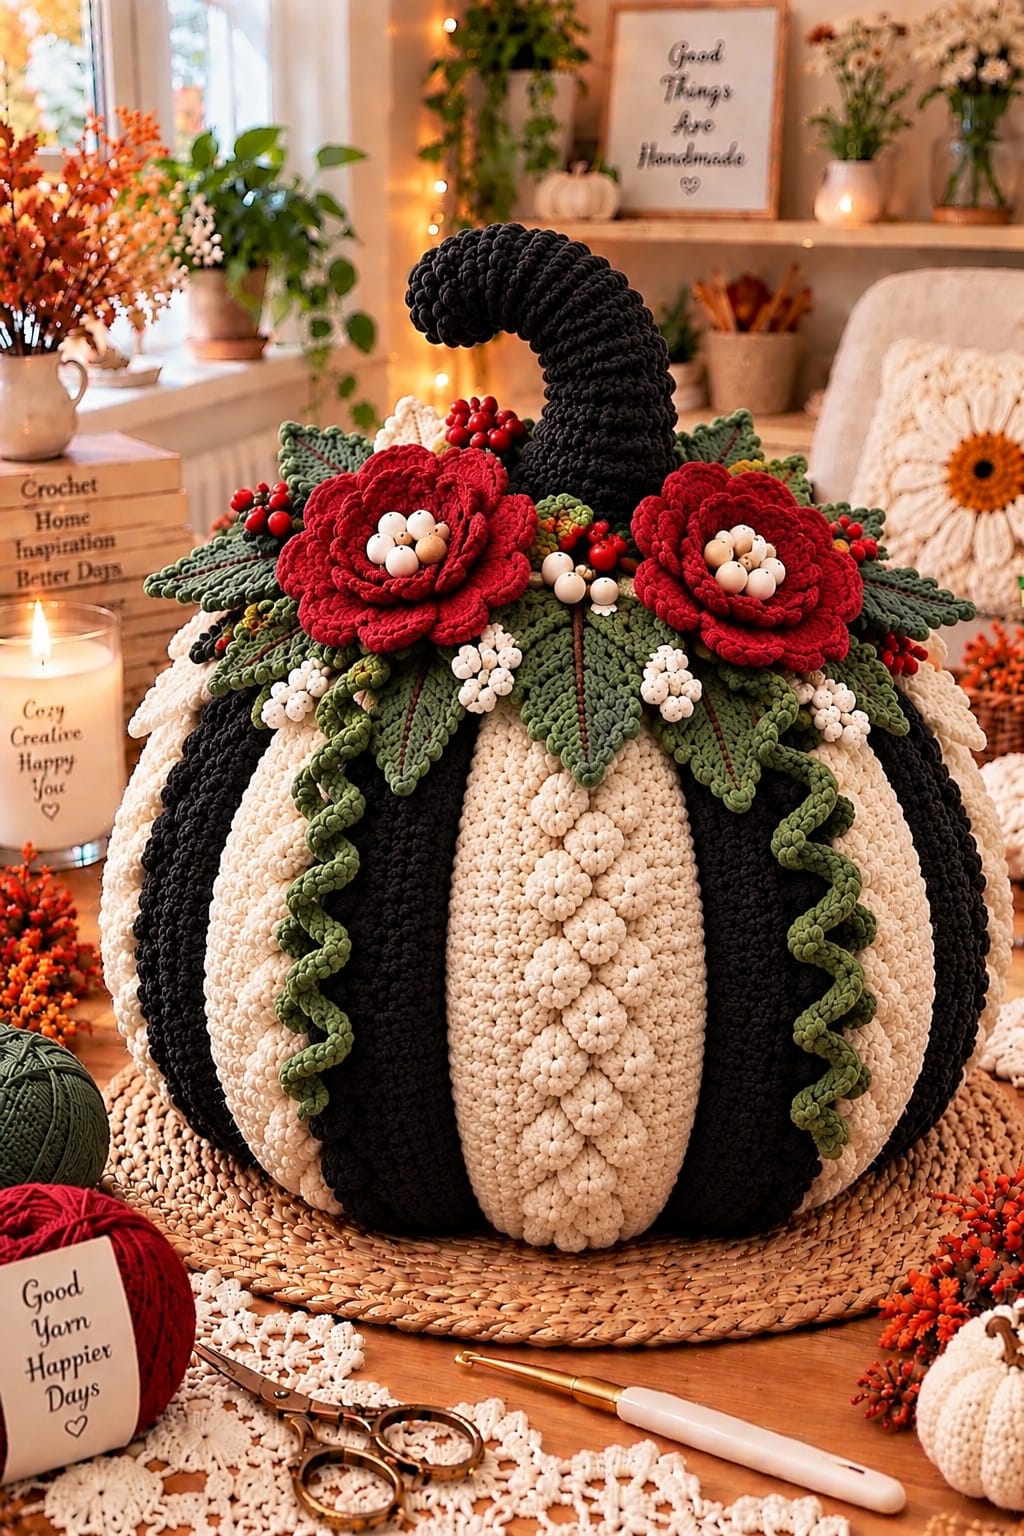
Alternating black and cream ribs turn this oversized pumpkin into a striped structure before a single flower is attached. This giant crochet pumpkin pattern combines a sculpted two-color body with a curved black stem, dimensional burgundy flowers, sage leaves, berries and cascading vines. Super-bulky yarn builds the pumpkin, while finer yarn gives the botanical crown sharper definition. The finished piece is designed as a large tabletop centerpiece.
The Design: What Makes This Crochet Pumpkin Different
The body uses alternating cream and black vertical sections rather than changing color within continuous rounds. Separate ribbed panels make the stripes easier to control and create deep valleys between sections after assembly. The cream panels also carry raised floral texture, adding another level of contrast against the dense black ribs.
A tall curved stem forms the vertical focal point. Two oversized burgundy flowers sit on opposite sides of its base, while sage leaves spread horizontally across the crown. Berry clusters and cream buds occupy the smaller gaps.
The primary construction failure is uneven panel width. If one stripe is significantly wider than its neighbors, stuffing exaggerates the difference. Measure every completed panel before assembly and keep corresponding black and cream sections within approximately 1 cm of one another.
Project Info at a Glance
| Skill Level | Construction | Approx. Size | Hook | Best For |
|---|---|---|---|---|
| Intermediate / Advanced | Joined ribbed panels with stuffed body | Approx. 40–45 cm wide | 8–9 mm body; 3.5–5 mm motifs | Fall centerpiece and large seasonal display |
The final dimensions depend on yarn thickness, gauge and stuffing density. Make one black panel and one cream panel before completing the full body so their finished dimensions can be compared.
Materials and Tools
Yarn
- Black super-bulky yarn — approximately 350–500 g for body sections and stem.
- Cream super-bulky yarn — approximately 350–500 g for body sections.
- Burgundy worsted yarn — approximately 100–140 g for large flowers.
- Sage green worsted yarn — approximately 100–140 g for leaves and vines.
- Dark olive yarn — approximately 30–50 g for secondary foliage.
- Red yarn — approximately 20–30 g for berries.
- Cream worsted yarn — approximately 30–50 g for buds and small flowers.
- Brown yarn — small quantity for leaf veins and berry stems.
Tools
- 8 mm crochet hook for pumpkin panels
- 5 mm crochet hook for large flowers
- 4 mm crochet hook for leaves and vines
- 3.5 mm crochet hook for berries and buds
- Polyester fiberfill
- Long doll needle
- Yarn needles
- Stitch markers
- Scissors
- Tape measure
- Blocking mat and pins
Abbreviations
- MR — magic ring
- ch — chain
- sl st — slip stitch
- sc — single crochet
- hdc — half double crochet
- dc — double crochet
- tr — treble crochet
- inc — increase
- dec — decrease
- BLO — back loop only
- st / sts — stitch / stitches
For small stuffed components, make invisible decreases through the front loops of the next two stitches to reduce visible gaps.
Giant Striped Crochet Pumpkin Pattern
The pumpkin body is assembled from eight tall ribbed panels: four cream and four black. Joining contrasting panels produces the alternating vertical sections visible in the reference image.
Black Ribbed Panel — Make 4
Yarn: black super bulky.
Foundation: Ch 37.
Row 1: Hdc in second ch from hook and across. Turn. (36)
Row 2: Ch 1. Hdc BLO in each st across. Turn. (36)
Rows 3–14: Repeat Row 2. (36)
Fasten off with a 40 cm tail.
Measure the panel before making the remaining three. Each black panel should have the same height and width.
Cream Ribbed Panel — Make 4
Yarn: cream super bulky.
Foundation: Ch 37.
Row 1: Hdc in second ch from hook and across. Turn. (36)
Row 2: Ch 1. Hdc BLO in each st across. Turn. (36)
Rows 3–14: Repeat Row 2. (36)
Fasten off with a 40 cm tail.
Raised Cream Floral Texture
The cream sections in the reference image contain raised clusters running vertically down the center. Add these before assembling the pumpkin.
Lay one cream panel flat with the ribs vertical.
Mark approximately 5–7 positions down its center, spacing them evenly.
Small Raised Flower
R1: 6 sc in MR. Join. (6)
R2: In each stitch work sl st, ch 2, 2 dc, ch 2, sl st.
Fasten off with a long sewing tail.
Make enough flowers to create a vertical trail down one or more cream panels.
Sew each flower through its center only. Leaving the petal edges free produces the raised texture visible on the pumpkin body.
Joining the Pumpkin Panels
Arrange the eight panels in this sequence:
Cream – Black – Cream – Black – Cream – Black – Cream – Black.
With right sides facing, sl st or whipstitch the long edges together.
Keep every seam flexible. A tight seam shortens one valley and causes the finished pumpkin to twist.
After joining the eighth panel, connect it to the first panel to form a large tube.
Turn the body right side out.
Closing the Pumpkin Bottom
Thread approximately 120 cm of strong matching yarn onto a long needle.
Run the yarn through the lower row ends around the entire tube.
Pull gradually while distributing the gathers evenly.
When the opening becomes small, pass the yarn across the center several times.
Knot securely.
The joined seams should radiate outward from the bottom center like spokes.
Stuffing the Pumpkin
Add polyester fiberfill around the outer wall first.
Push stuffing into every black and cream section so the stripes expand evenly.
Rotate the body after every few handfuls.
Keep the central core less dense than the outer circumference. The crown and bottom need to compress toward one another during final shaping.
Check the pumpkin on a flat surface periodically. Redistribute stuffing if one panel projects farther than the others.
Closing the Crown
Thread a long strand through the upper row ends.
Pull until the crown opening measures approximately 6–8 cm.
Do not close it completely because the tall black stem must be inserted through the center.
Secure the gathering strand temporarily.
Deepening the Eight Pumpkin Ribs
The panel seams create natural valleys, but additional shaping makes them more pronounced.
Cut a long strand of strong yarn for each valley.
Insert a doll needle through the bottom center and bring it out through the crown.
Carry the yarn down one panel seam.
Return through the bottom and crown.
Pull until the valley becomes visibly deeper.
Repeat along all eight seams.
Check the pumpkin from above before securing the strands. The eight sections should have similar widths.
Tall Curved Black Stem
Yarn: black super bulky.
R1: 6 sc in MR. (6)
R2: Inc ×6. (12)
R3: (1 sc, inc) ×6. (18)
R4: BLO sc around. (18)
R5–R12: Sc around. (18)
R13: (1 sc, dec) ×6. (12)
R14–R30: Sc around. (12)
Stuff the lower section firmly.
R31: (2 sc, dec) ×3. (9)
R32–R45: Sc around. (9)
Add lighter stuffing through this section.
R46: (1 sc, dec) ×3. (6)
R47–R54: Sc around. (6)
Fasten off and close.
Bend the lightly stuffed upper third gradually to form the hooked profile.
Attaching the Stem
Insert approximately 8–10 cm of the stem into the crown.
Pack additional fiberfill around its base.
Pull the crown gathering yarn firmly around the stem.
Sew through the pumpkin body and lower stem at several points.
Test the stem before adding flowers. If the base tilts, add attachment stitches rather than additional stuffing to the curved upper section.
Large Burgundy Layered Flower — Make 2
The image uses two large burgundy flowers with broad layered petals. They resemble open roses or peonies rather than tightly rolled roses.
Flower Center
R1: 6 sc in MR. Join. (6)
R2: Inc ×6. Join. (12)
Inner Petals
Create six ch-3 spaces around the center.
In each space work:
Sc, hdc, 3 dc, hdc, sc.
Middle Petals
Working behind the first layer, create six ch-5 spaces.
In each space work:
Sc, hdc, 2 dc, 3 tr, 2 dc, hdc, sc.
Outer Petals
Create eight ch-6 spaces behind the middle layer.
In each space work:
Sc, hdc, 3 dc, 4 tr, 3 dc, hdc, sc.
Fasten off with a 60 cm sewing tail.
Curve the inner petals upward and allow the outer petals to spread outward.
Optional Berry Center for Large Flowers
The reference image shows pale round elements concentrated inside the burgundy flowers.
For a fully crocheted interpretation, make several tiny cream balls instead of using hard beads.
R1: 6 sc in MR. (6)
R2: Sc around. (6)
Add a tiny amount of stuffing.
Fasten off and close.
Make approximately 5–7 for each flower and sew them tightly into the center.
Large Sage Leaf — Make 10–14
Yarn: sage or olive.
Foundation: Ch 20.
Beginning in second ch from hook work:
Sl st, sc, hdc, dc, dc, tr, tr, tr, tr, dc, dc, hdc, hdc, sc, sc, sl st.
At the tip work:
Ch 3, sl st in first ch.
Rotate the work and mirror the stitch sequence along the opposite side.
Sl st at the base.
Fasten off with a 30 cm sewing tail.
Leaf Edging
Join yarn at the base.
Work sc around the leaf.
At regular intervals work ch 2, sl st in second ch from hook to form subtle serrations.
At the main tip work a ch-3 picot.
Fasten off.
Leaf Vein
Using brown or darker green yarn, surface-stitch along the foundation chain from the base to the tip.
Add short diagonal stitches toward the leaf edges.
This contrasting center line reproduces the pronounced veins visible in the reference image.
Small Sage Leaves — Make 8–12
Foundation: Ch 12.
Starting in second ch work:
Sl st, sc, hdc, dc, tr, tr, dc, dc, hdc, sc, sl st.
Work a ch-2 picot at the tip.
Rotate and mirror the sequence along the second side.
Fasten off with a long sewing tail.
Red Crochet Berries
Make approximately 20–30.
R1: 6 sc in MR. (6)
R2: Inc ×6. (12)
R3: Sc around. (12)
Add a small amount of stuffing.
R4: Dec ×6. (6)
Fasten off and close.
Leave a 15 cm tail.
Berry Clusters
Combine approximately three to five berries per cluster.
Attach each berry to a short brown or green yarn stem.
Join the stems together before sewing the cluster to the floral crown.
Keep the berry heights uneven so the cluster retains dimension.
Cream Berry Sprigs
Make approximately 4–6 sprigs.
Use the tiny berry construction with cream yarn.
Make each cream berry slightly smaller by omitting the increase round:
R1: 6 sc in MR. (6)
R2: Sc around. (6)
Fasten off and close.
Make five to eight berries for each sprig.
Attach them along a green or brown stem, leaving approximately 1–2 cm between neighboring berries.
Green Corkscrew Vines
Make 3–5.
Foundation: Ch 50.
Work 3 sc in each chain across.
The increases cause the strand to curl into a spiral.
Fasten off with a 30 cm sewing tail.
For different lengths, vary the starting chain between approximately 35 and 65 stitches.
Small Cream Accent Flowers
Make 3–6 if additional crown coverage is needed.
R1: 10 sc in MR. Join. (10)
R2: *Ch 3, skip 1 st, sl st in next.* Repeat around to create five loops.
R3: In each loop work:
Sc, hdc, 3 dc, hdc, sc.
Fasten off with a 20 cm sewing tail.
Planning the Floral Crown
Place the completed pumpkin on its final display surface before arranging the decorations.
Position one large burgundy flower to the left of the stem and the second to the right.
Do not place them at exactly the same height. Lowering one flower by approximately 2–4 cm creates a less rigid composition.
Slide the largest sage leaves behind the flowers so their pointed tips extend outward.
Position additional leaves across the rear of the stem.
Add red berry clusters near the outer edges and cream sprigs closer to the flower centers.
Pin the corkscrew vines beneath the crown so they fall over the cream and black body sections.
Assembly
- Join the four black and four cream body panels in alternating order, close the bottom and add the fiberfill.
- Deepen all eight panel seams with shaping strands before closing the crown around the curved black stem.
- Position the two large burgundy flowers on opposite sides of the stem and pin them through their lowest petal layers.
- Arrange the largest sage leaves behind the flowers, keeping their tips visible beyond the burgundy petals.
- Add smaller leaves between the large foliage pieces and around the back of the stem.
- Position red berry clusters near the outside edges of the floral crown and cream berry sprigs in smaller central gaps.
- Sew the foliage first, followed by the large flowers, berry clusters and small accent flowers.
- Attach the green corkscrew vines beneath the crown and allow them to cascade down selected pumpkin sections.
- Check that the raised cream body flowers remain visible and reposition any vine that completely covers them.
- Weave all tails into dense stitches, reshape the eight pumpkin sections and verify that the stem remains stable.
The completed pumpkin should retain a clear alternating black-and-cream body beneath a dense but concentrated botanical crown.
Attaching the Large Flowers
Each burgundy flower is heavy enough to require several attachment points.
Sew through the lowest petal layer at approximately five to seven positions.
Pass the needle into dense pumpkin stitches near the crown rather than through a shaping strand.
Leave the upper halves of the petals free.
After sewing, gently tip the pumpkin forward and backward. The flower should remain in position without rotating around its center.
Keeping the Stripes Even
Alternating colors make small size differences more visible than they would be on a solid-color pumpkin.
Measure each panel before joining.
If one panel is more than approximately 1 cm wider than the others, correct it before assembly.
During stuffing, push equal amounts of fiberfill into each section.
Finally, tighten the eight shaping strands gradually rather than completing one valley at full tension before beginning the next.
Adjusting the Pumpkin Size
For a smaller version, reduce the panel foundation to approximately 27–31 chains and work 10–12 ribbed rows per panel.
For a larger floor-display pumpkin, increase the foundation to approximately 43–47 chains and make each panel 16–18 rows wide.
Maintain eight total panels if you want the same alternating stripe arrangement.
The flower scale should change with the body. A much smaller pumpkin needs fewer outer petal rounds and shorter leaves.
Alternative Two-Color Arrangements
Black and cream create the strongest contrast, but the same panel construction supports other combinations.
Use burgundy and cream for a warmer fall centerpiece, burnt orange and oatmeal for a conventional harvest palette, or charcoal and sage for a muted version.
Another option is making six cream panels and two black panels. That produces isolated dark ribs instead of an alternating stripe sequence.
When the body colors become less contrasting, use a darker shaping yarn inside the valleys only if it can be concealed from the front.
7 Technical Tips for the Striped Crochet Pumpkin
- Measure all eight panels before joining. A width difference greater than about 1 cm becomes more obvious after stuffing because the wider panel expands farther from the center.
- Keep joining seams flexible. Tight slip stitches shorten the valley and can make the pumpkin lean toward one side.
- Distribute stuffing by section. Fill one cream and one black section alternately instead of completing one side first, which reduces the risk of an uneven body.
- Mark all eight shaping valleys. Tighten them in opposite pairs so one side does not become compressed before the other side is shaped.
- Keep the stem base firm. Pack the lower 8–10 cm densely while leaving the upper third lighter so the stem bends rather than collapsing.
- Use multiple flower attachment points. Five to seven stitches around the base prevent each large burgundy flower from rotating when the pumpkin is moved.
- Limit the cascading vines. Two or three prominent curls on the front are enough; covering every stripe hides the alternating black-and-cream construction.
Display and Storage
Support the pumpkin from underneath whenever it is moved. Do not lift it by the curved stem, flowers or vines.
A broad woven mat or wooden tray helps distribute the weight of an oversized stuffed body.
During storage, keep pressure away from the stem and flower crown. Large crochet petals can remain creased if compressed for an extended period.
Spot cleaning is generally more practical than soaking a heavily stuffed centerpiece. Follow the care instructions for the specific yarn used.
Make sure the pumpkin is completely dry before seasonal storage.
Conclusion
Construct the striped body first because its proportions determine the scale of every decorative component. Match the four cream and four black panels carefully, join them in alternating order, and distribute stuffing evenly before tightening the eight valleys. Secure the tall stem before arranging the botanical crown. The two burgundy flowers establish the focal line, while sage leaves, berries and cream sprigs fill the surrounding space without concealing the striped body. Finish by adding only a few cascading vines. Save this giant crochet pumpkin pattern to Pinterest and share the finished centerpiece on Instagram with #StripedCrochetPumpkin. Would you keep the black-and-cream stripes or replace the cream sections with burnt orange?