Introduction
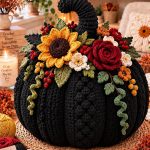
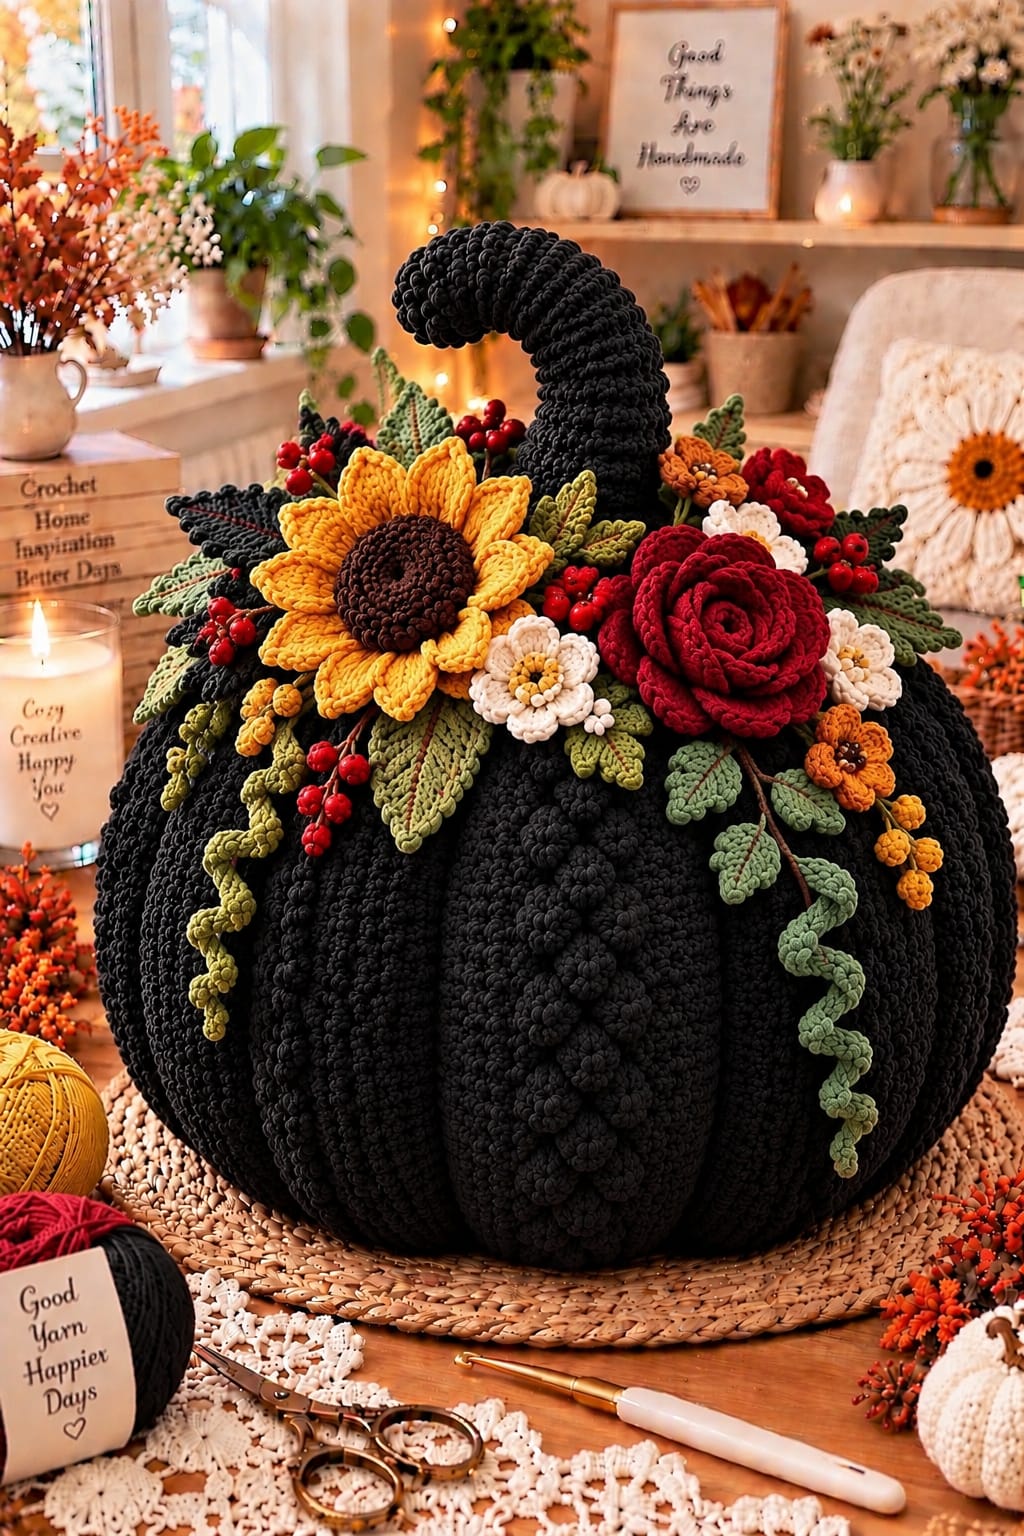
Black yarn hides shallow pumpkin grooves, so this oversized design needs deep ribs to keep its silhouette readable. This giant black crochet pumpkin pattern combines a super-bulky sculpted body with a tall curved stem, sunflower, burgundy rose, small flowers, berries, leaves and curling vines. A 7–9 mm hook suits the pumpkin body, while smaller hooks give the botanical decorations sharper definition.
The Design: What Makes This Black Crochet Pumpkin Different
The body is deliberately broad and heavily sculpted. A conventional round stuffed pumpkin can lose definition in black yarn because there is little color contrast between neighboring sections. External shaping strands compress this design into eight pronounced lobes, creating physical shadow between the ribs.
The second structural feature is the tall hooked stem. It rises above the floral crown instead of disappearing behind the sunflower and rose. Its lower section needs firm stuffing for support, while the upper section remains softer so it can curve.
Finally, the floral arrangement is intentionally unbalanced. The sunflower sits left of center, the burgundy rose sits to the right, and foliage spreads across the crown. Centering every component would produce a rigid bouquet rather than the cascading arrangement visible in the reference image.
Project Info at a Glance
| Skill Level | Construction | Approx. Size | Hook | Best For |
|---|---|---|---|---|
| Intermediate / Advanced | Stuffed and externally sculpted | Approx. 40–45 cm wide; 48–55 cm high including stem | 7–9 mm body; 3.5–5 mm flowers | Large autumn and Halloween centerpiece |
Super-bulky crochet pumpkin patterns commonly use large hooks; documented ribbed versions use a 9 mm hook. The exact finished dimensions of this photo-adapted version depend on yarn thickness, stuffing density and shaping tension.
Materials and Tools
Yarn
- Black super-bulky yarn — approximately 600–900 g for the pumpkin body and curved stem.
- Golden yellow worsted yarn — approximately 40–60 g for the sunflower and small accent flowers.
- Dark brown worsted yarn — approximately 20–30 g for the sunflower center.
- Burgundy worsted yarn — approximately 60–90 g for the large rose and small flowers.
- Cream worsted yarn — approximately 30–50 g for small flowers.
- Olive green worsted yarn — approximately 70–100 g for leaves and vines.
- Sage green worsted yarn — approximately 30–50 g for secondary foliage.
- Red yarn — approximately 20–30 g for berry clusters.
The body quantities are working estimates for a large decorative pumpkin. Crochet one gauge sample before purchasing yarn if exact consumption matters.
Tools
- 8 mm crochet hook as the starting size for the pumpkin body
- 5 mm crochet hook for larger flowers
- 4 mm crochet hook for roses, leaves and small flowers
- 3.5 mm crochet hook for berries and compact details
- Polyester fiberfill
- Long doll or upholstery needle
- Yarn needles
- Locking stitch markers
- Scissors
- Tape measure
- Blocking mat and pins
Abbreviations
- MR — magic ring
- ch — chain
- sl st — slip stitch
- sc — single crochet
- hdc — half double crochet
- dc — double crochet
- tr — treble crochet
- inc — increase
- dec — decrease
- BLO — back loop only
- FLO — front loop only
- st / sts — stitch / stitches
Use an invisible decrease through the front loops of the next two stitches whenever decreases are required in a stuffed component.
Giant Black Crochet Pumpkin Pattern
The pumpkin body is made as a large ribbed panel, joined into a tube, gathered, stuffed and externally sculpted. This method allows the diameter to be adjusted without rewriting a long sequence of circular increases.
Black Pumpkin Body
Yarn: black super bulky.
Foundation: Ch 43.
Row 1: Hdc in second ch from hook and in each ch across. Turn. (42)
Row 2: Ch 1. Hdc BLO in every st across. Turn. (42)
Rows 3–84: Repeat Row 2. (42)
Measure the panel before joining it. The long dimension becomes the pumpkin circumference, while the 42-stitch dimension controls the approximate body height.
If your yarn produces a substantially narrower panel, continue adding rows in pairs until the proportions are suitable.
Joining the Pumpkin Body
Fold the panel so Row 1 meets the final row.
Sl st through both layers from top to bottom, keeping the seam flexible.
Fasten off with a 100 cm tail.
The resulting piece should form a wide tube.
Closing the Bottom
Thread the long tail onto a large yarn needle.
Run the yarn through the row ends around one opening. Catch each raised rib so the gathers are distributed evenly.
Pull the opening closed gradually.
Pass the needle across the center several times and secure the yarn.
Turn the body so the gathered opening becomes the bottom.
Stuffing the Giant Pumpkin
Add fiberfill in layers.
Begin by lining the outer wall with stuffing. Rotate the pumpkin after every several handfuls so one section does not become firmer than the others.
Keep the center slightly softer than the outside.
The body should be full enough to support its own weight but still compress when pressed from the crown toward the base.
Do not fill the final 5–8 cm at the crown until the stem and sculpting requirements have been checked.
Closing the Crown
Thread a long strand of black yarn through the row ends around the upper opening.
Pull until the opening narrows to approximately 5–7 cm.
Do not close it completely. The curved stem will be inserted through this opening.
Sculpting the Pumpkin Ribs
Cut eight long strands of black yarn. Each strand should measure at least twice the pumpkin circumference plus additional length for knotting.
Thread the first strand onto a long doll needle.
Insert through the bottom center and bring the needle out through the crown.
Carry the yarn down the exterior, positioning it inside one natural crochet valley.
Pass the needle through the bottom center and back through the crown.
Pull firmly until the strand compresses the body and creates a deep groove.
Repeat around the circumference to create 8 major lobes.
Check the pumpkin from directly above after every second groove. Adjust tension before knotting if one section is noticeably narrower than its neighbors.
Secure all sculpting strands inside the crown.
Tall Curved Crochet Stem
The stem is worked separately in continuous rounds. The lower portion remains wide and firm; the upper section gradually narrows.
Yarn: black super bulky.
R1: 6 sc in MR. (6)
R2: Inc ×6. (12)
R3: (1 sc, inc) ×6. (18)
R4: BLO sc around. (18)
R5–R12: Sc around. (18)
R13: (1 sc, dec) ×6. (12)
R14–R28: Sc around. (12)
Begin stuffing the lower section firmly.
R29: (2 sc, dec) ×3. (9)
R30–R42: Sc around. (9)
Stuff the upper portion lightly.
R43: (1 sc, dec) ×3. (6)
R44–R50: Sc around. (6)
Fasten off and close the final opening.
Bend the lightly stuffed upper third into a hook. The curve should begin gradually rather than forming one sharp angle.
Attaching the Stem
Insert approximately 7–10 cm of the lower stem into the pumpkin crown.
Add stuffing around the stem base if the opening contains empty space.
Pull the crown gathering yarn firmly around the stem.
Sew through the stem base and pumpkin body at several points.
The stem should remain upright when the pumpkin is moved but should retain enough flexibility in its upper portion to maintain the curved profile.
Large Crochet Sunflower
Make 1 large sunflower using dark brown and golden yellow.
Worsted-weight sunflower patterns commonly use hooks around 4–5 mm, with documented appliqués around 10–12 cm across. Increase the hook or yarn thickness when a larger focal flower is required.
Sunflower Center
Yarn: dark brown.
R1: 6 sc in MR. (6)
R2: Inc ×6. (12)
R3: (1 sc, inc) ×6. (18)
R4: (2 sc, inc) ×6. (24)
R5: (3 sc, inc) ×6. (30)
R6: (4 sc, inc) ×6. (36)
R7: Sc around. (36)
Fasten off.
Sunflower Petals
Join golden yellow yarn to the outer round.
Petal: Ch 9. Starting in second ch from hook, sl st, sc, hdc, dc, tr, dc, hdc, sc. Sl st into the next available center stitch.
Repeat around, spacing the petals evenly.
For the fuller flower visible in the reference image, work a second layer of petals behind the first.
Join yellow yarn to the back of the brown center.
Make the second-layer petals one chain longer than the front petals.
Fasten off with a 40 cm sewing tail.
Large Burgundy Crochet Rose
Make 1 large dimensional rose.
Layered crochet roses can be constructed from successive petal rounds; worsted-weight botanical roses commonly use hooks around 4 mm.
Rose Center
R1: 5 sc in MR. Join. (5)
Petal Layer 1: In each st work sl st, ch 1, 3 dc, ch 1, sl st.
Five compact petals form the center.
Second Petal Layer
Work behind the first petals.
Create five ch-3 spaces around the back of the flower.
In each ch-3 space work:
Sc, hdc, 4 dc, hdc, sc.
Third Petal Layer
Create five ch-5 spaces behind the second layer.
In each space work:
Sc, hdc, 2 dc, 3 tr, 2 dc, hdc, sc.
Fourth Petal Layer
Create seven evenly distributed ch-6 spaces behind the flower.
In each space work:
Sc, hdc, 3 dc, 4 tr, 3 dc, hdc, sc.
Fasten off with a 60 cm sewing tail.
Shape the petals upward around the center and progressively outward toward the final layer.
Small Cream Flowers
Make approximately 5–7.
R1: 10 sc in MR. Join. (10)
R2: *Ch 3, skip 1 st, sl st in next st.* Repeat around to create 5 loops.
R3: In each loop work sc, hdc, 3 dc, hdc, sc.
Fasten off with a 20 cm sewing tail.
Add a small yellow center with embroidery stitches after assembly.
Small Orange and Burgundy Flowers
Make approximately 5–8 in mixed colors.
R1: 6 sc in MR. Join. (6)
R2: *Ch 4, 2 dc in same st, ch 3, sl st in same st.* Repeat once in each stitch.
Fasten off.
These smaller flowers should fill gaps rather than compete with the sunflower and rose.
Large Olive Crochet Leaf
Make approximately 8–12.
Foundation: Ch 18.
Starting in second ch from hook work:
Sl st, sc, hdc, dc, dc, tr, tr, tr, dc, dc, hdc, hdc, sc, sc, sl st.
At the tip work ch 2, sl st in second ch from hook.
Rotate the work and mirror the stitch sequence along the opposite side of the foundation chain.
Sl st at the base.
Fasten off with a 25 cm sewing tail.
Leaf Vein
Thread a contrasting olive or brown strand onto a yarn needle.
Surface-stitch from the base to the tip along the foundation chain.
Add two or three short diagonal vein stitches on each side if additional definition is required.
Small Sage Leaves
Make approximately 8–10.
Foundation: Ch 11.
Starting in second ch from hook:
Sl st, sc, hdc, dc, tr, tr, dc, hdc, sc, sl st.
Work a small picot at the tip.
Rotate and mirror the stitches down the opposite side.
Fasten off with a long sewing tail.
Red Crochet Berries
Make approximately 18–25.
R1: 6 sc in MR. (6)
R2: Inc ×6. (12)
R3: Sc around. (12)
Add a small amount of stuffing.
R4: Dec ×6. (6)
Fasten off and close the opening.
Leave a 15 cm tail for attaching each berry.
Berry Clusters
Arrange berries in clusters of three to five.
Join them to short brown or green yarn stems before sewing the group onto the pumpkin.
Vary the height of individual berries so the clusters do not form flat horizontal rows.
Crochet Corkscrew Vines
Make 3–5 using olive or sage yarn.
Foundation: Ch 45–60 depending on required vine length.
Work 3 sc in each chain across.
The concentrated increases cause the strip to spiral automatically.
Fasten off with a 25 cm tail.
For a looser curl, work 2 sc in alternating chains instead of 3 sc in every chain.
Black Accent Leaves
Make approximately 3–5.
Use the large leaf instructions with black yarn.
These leaves should be positioned primarily behind the sunflower and burgundy rose.
The black foliage extends the pumpkin color into the floral crown and makes the yellow sunflower appear more distinct.
Planning the Floral Crown
Complete every major decoration before sewing anything to the pumpkin.
Place the sunflower first, slightly left of the stem.
Position the large burgundy rose on the opposite side and slightly lower than the sunflower.
Add black and olive leaves behind both focal flowers.
Place cream flowers in the gap between the sunflower and rose. Their lighter color separates the two saturated focal flowers.
Distribute orange and burgundy flowers toward the outside edges.
Add berry clusters last, using them to fill small spaces where another full flower would be too large.
Assembly
- Complete the black pumpkin body, add stuffing and sculpt eight deep lobes before attaching decorations.
- Insert and secure the curved black stem in the crown, checking that it remains stable when the pumpkin is moved.
- Pin the large sunflower slightly left of the stem and position several black and olive leaves behind it.
- Pin the burgundy rose to the right side of the crown, slightly lower than the sunflower.
- Add cream flowers between the two major focal blooms to create separation between the yellow and burgundy sections.
- Arrange olive and sage leaves around the outer edge, allowing some leaves to extend down the upper pumpkin lobes.
- Add red berry clusters between leaves and flowers, keeping most groups to three to five berries.
- Attach orange and burgundy accent flowers in remaining gaps without covering the main pumpkin ribs.
- Sew the corkscrew vines beneath the floral crown and allow two or three to cascade down the pumpkin body.
- Turn the pumpkin through 360 degrees, secure every motif, weave in the attachment tails and reshape the ribs if the decoration has compressed the crown.
The finished arrangement should cover the crown while leaving most of the lower black pumpkin visible.
Attaching Heavy Flowers
A large sunflower or layered rose should not be attached through a single center point.
Sew the sunflower at approximately four to six points around its brown center. Keep the outer petals free.
Attach the rose at five to eight points around the lowest petal layer.
Pass the needle into dense pumpkin stitches rather than wrapping yarn around a raised sculpting strand.
Test the attachment by gently tipping the pumpkin. Neither focal flower should rotate or fold away from the crown.
Adjusting the Pumpkin Size
The starting chain determines the approximate height of the body. The number of ribbed rows determines circumference.
For a smaller pumpkin, begin with approximately 31–35 chains and work 60–68 ribbed rows.
For an even larger statement pumpkin, increase the foundation to approximately 47–51 chains and continue the panel until it wraps around the desired circumference.
Do not increase only the height. A tall narrow panel produces a vertically stretched pumpkin instead of the broad shape shown in the reference image.
Adjusting the Sunflower Size
The reference arrangement requires a large sunflower because the pumpkin body is oversized.
Worsted-weight sunflower patterns commonly produce flowers around 10–12 cm across with approximately 4.5–5 mm hooks. For a larger flower, use two strands of worsted yarn together or move to bulky yarn.
Another option is adding a second petal layer rather than dramatically increasing hook size. Layering increases visual diameter while keeping individual petals firm.
The finished sunflower should remain smaller than the pumpkin crown and should not extend farther than the widest point of the body.
Keeping the Curved Stem Upright
The stem has two conflicting requirements. Its base must be firm enough to stand, while its upper portion must remain flexible enough to bend.
Pack the lower 10–15 cm firmly with fiberfill.
Reduce the stuffing density gradually toward the top.
Do not leave the upper stem completely empty. An unstuffed section can fold sharply instead of forming a controlled curve.
If the stem leans at its base, the problem is usually the crown attachment rather than the upper curve. Add additional stitches between the stem base and pumpkin body before adding more stuffing.
7 Technical Tips for a Giant Black Crochet Pumpkin
- Make the grooves physically deep. Black yarn provides little visual separation between neighboring lobes, so each shaping strand should create a visible indentation of approximately 2–4 cm on a pumpkin this large.
- Count every body row. An uneven ribbed panel makes the joining seam drift diagonally and produces unequal lobes after stuffing.
- Keep the center softer than the outer wall. Excess stuffing in the middle prevents the crown and base from compressing toward one another.
- Use eight evenly spaced sculpting strands. Mark the crown positions before tightening them; correcting one misplaced groove after all eight are knotted is difficult.
- Stuff the stem in zones. Keep the lower 10–15 cm firm and the upper third lighter so the hook-shaped curve forms without collapsing the base.
- Attach heavy flowers at multiple points. Four to eight attachment points distribute the load and prevent a large rose or sunflower from twisting on the pumpkin crown.
- Leave part of every major rib visible. If foliage extends more than halfway down every lobe, the botanical decoration hides the sculpting that identifies the object as a pumpkin.
Color Variations
The black body provides strong contrast with saturated botanical colors. Golden yellow, burgundy, cream and olive reproduce the reference palette particularly well.
For a darker Halloween version, replace the cream flowers with plum and use burnt orange instead of yellow. Keep several sage or olive leaves so the arrangement does not become entirely red, orange and black.
For a neutral version, combine the black pumpkin with cream roses, beige flowers and muted eucalyptus-green foliage.
The pumpkin can also be made in charcoal rather than pure black. Slightly lighter yarn reveals stitch texture more readily while preserving the dramatic appearance.
Displaying the Finished Pumpkin
Place the pumpkin on a stable surface that supports its full base. A woven mat, wooden tray or broad tabletop works better than a narrow pedestal.
Rotate the body until the cleanest sculpted ribs face forward.
The sunflower should sit slightly left of the visual center, with the burgundy rose balancing it from the opposite side. Allow the curled vines to extend below the floral crown without reaching the supporting surface.
Because the piece contains dimensional flowers and a tall stem, lift it from beneath the pumpkin body rather than carrying it by the stem or foliage.
Care and Storage
Use the yarn manufacturer’s cleaning instructions for the fibers selected.
Spot cleaning is generally easier for a large stuffed decorative pumpkin than full immersion because the dense filling can take considerable time to dry.
Store the pumpkin without weight resting on the stem or floral crown.
If compression flattens a rose or sunflower, reshape individual petals by hand rather than pulling on the entire flower.
Before seasonal storage, check that the body and stuffing are completely dry.
Conclusion
Build the black body before calculating the final scale of the botanical decorations. Stuff the outer wall firmly, leave the center compressible, and use eight external shaping strands to create grooves deep enough to remain visible in dark yarn. Add the curved stem next, then position the sunflower and burgundy rose before filling the crown with leaves, berries, smaller flowers and vines. Keep the lower lobes largely uncovered so the sculpted form remains readable. Save this giant black crochet pumpkin pattern to Pinterest and share the finished centerpiece on Instagram with #GiantBlackCrochetPumpkin. Would you place the sunflower or the burgundy rose closest to the curved stem?