Introduction
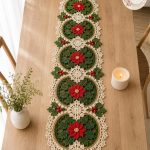
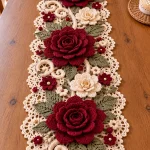
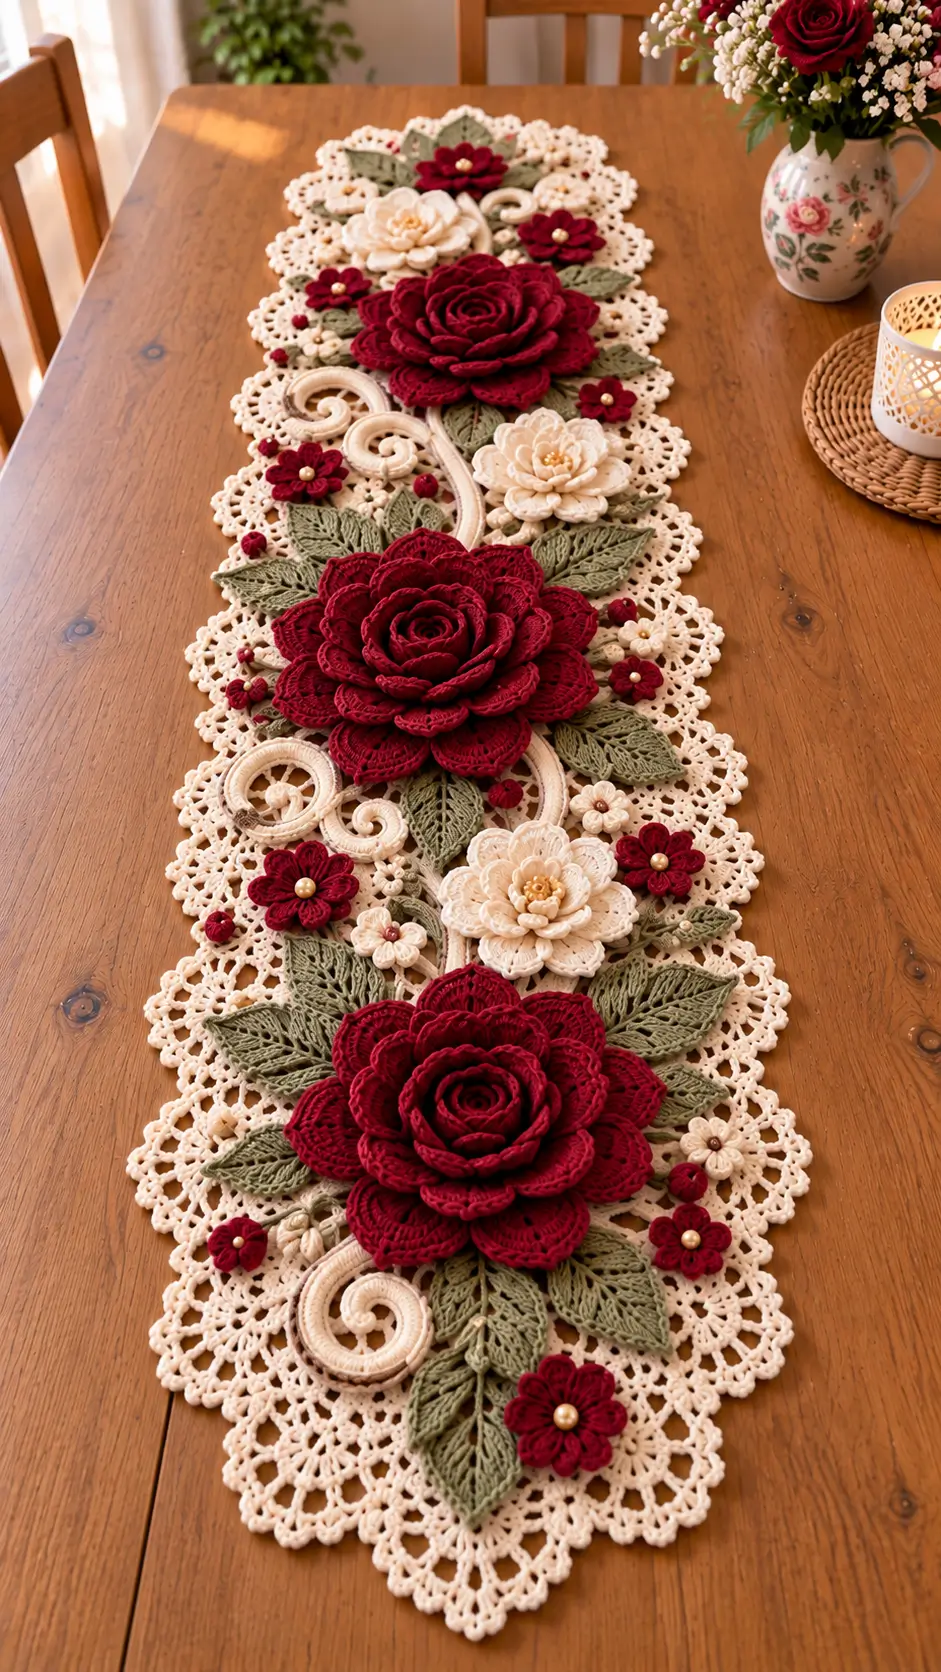
Three oversized burgundy roses control the entire architecture of this runner; every leaf, scroll and smaller flower exists to connect those focal blooms. This crochet rose table runner pattern combines an ivory lace foundation with dimensional roses, cream flowers, sage leaves and curled vine motifs. Cotton yarn and several hook sizes keep the lace flexible while giving the raised floral pieces enough structure for table display.
The Design: What Makes This Floral Table Runner Different
The runner is built in layers rather than crocheted as one flat rectangle. An openwork ivory foundation establishes the long oval silhouette and scalloped perimeter. Large three-dimensional roses are then positioned along the centerline, with smaller cream and burgundy flowers filling the spaces between them.
Sage leaves provide the second structural layer. Their pointed shapes extend diagonally from the large flowers and prevent the arrangement from becoming a narrow column. Cream scrolls fill remaining spaces without introducing another color.
The primary construction mistake is sewing the flowers down before checking the complete composition. A large rose can cover more than 15 cm of the foundation. Pin every major flower and leaf first, then inspect the runner from both ends before permanently attaching any motif.
Project Info at a Glance
| Skill Level | Construction | Approx. Finished Size | Hooks | Best For |
|---|---|---|---|---|
| Intermediate / Advanced | Lace foundation with separately attached motifs | Approximately 110–130 cm × 30–35 cm | 2.5–3.5 mm | Dining tables, sideboards and decorative displays |
The runner length is adjustable. Work additional foundation repeats before beginning the end shaping when a longer table runner is required.
Materials and Tools
Yarn
- Ivory cotton yarn — sport or DK — approximately 250–350 g for the lace foundation, scrolls and cream flowers.
- Burgundy cotton yarn — sport or DK — approximately 180–250 g for the large roses and small accent flowers.
- Sage green cotton yarn — sport or DK — approximately 100–150 g for leaves.
- Cream cotton yarn — approximately 60–100 g if using a separate shade for dimensional flowers.
- Matching sewing yarn — optional for attaching heavy motifs discreetly.
Mercerized cotton gives the lace and leaf stitches strong definition. A softer cotton blend can be used for the roses when a more flexible petal is preferred.
Tools
- 3.5 mm crochet hook for the lace foundation
- 3 mm crochet hook for large flowers
- 2.5–3 mm crochet hook for leaves and smaller motifs
- Yarn needle
- Scissors
- Locking stitch markers
- Blocking mat
- Rust-resistant blocking pins
- Tape measure
- Pearl beads for optional flower centers
Abbreviations
- MR — magic ring
- ch — chain
- sl st — slip stitch
- sc — single crochet
- hdc — half double crochet
- dc — double crochet
- tr — treble crochet
- dtr — double treble crochet
- st / sts — stitch / stitches
- sp — space
- rep — repeat
Maintain loose chain spaces in the lace foundation. Tight chains shorten the perimeter relative to the solid stitches and can cause the completed runner to cup.
Crochet Rose Table Runner Pattern
The runner consists of five main components: an ivory lace foundation, large burgundy roses, smaller flowers, sage leaves and decorative scrolls. Crochet and block the foundation first. Make all separate motifs before beginning final assembly.
Ivory Lace Foundation
Yarn: ivory cotton.
Foundation: Ch 61.
Row 1: Dc in 4th ch from hook and in each ch across. Turn. (58 dc)
Row 2: Ch 4, skip next st, dc in next st. *Ch 1, skip next st, dc in next st.* Repeat across. Turn.
Row 3: Ch 3. Work 2 dc in each ch-1 sp across, placing 1 dc in each dc between spaces. Turn.
Row 4: Ch 5, skip 2 sts, sc in next st. *Ch 5, skip 2 sts, sc in next st.* Repeat across, adjusting the final repeat if necessary. Turn.
Row 5: Ch 3. Work 5 dc in each ch-5 sp across. Turn.
Row 6: Ch 5. Sc in the center dc of the first shell. *Ch 5, sc in center dc of next shell.* Repeat across. Turn.
Row 7: Ch 3. Work 5 dc into each ch-5 sp. Turn.
Repeat Rows 4–7 until the foundation reaches approximately 95–110 cm, or about 15–20 cm shorter than the desired finished runner length.
The decorative end sections and border add additional length.
Shaping the First End
Work across progressively fewer shell groups to taper the rectangular foundation into an oval point.
End Row 1: Sl st across the first shell. Begin in the next ch-space and work the established shell pattern, leaving the final shell unworked.
End Row 2: Sl st to the next shell center. Work across, leaving one shell unworked at the opposite end.
Continue reducing one shell from each side until approximately three central shell groups remain.
Fasten off.
Shaping the Opposite End
Join ivory yarn to the foundation edge at the opposite end.
Repeat the same gradual reduction used for the first end.
Count the remaining shell groups on each shaping row. Both ends should contain the same number of reduction rows before the border is added.
Scalloped Lace Border
Join ivory yarn at one side of the runner.
Border Round 1: Ch 1. Work sc evenly around the entire perimeter. Place additional stitches around the tapered ends as required to prevent pulling. Join with sl st.
Border Round 2: Ch 5, skip approximately 2 sts, sc in next st. Repeat around, spacing the ch-5 loops evenly. Join.
Border Round 3: Sl st into first ch-5 sp. Work 7 dc into the space, sc in next ch-5 sp. *7 dc in next ch-5 sp, sc in next ch-5 sp.* Repeat around.
Border Round 4: Work around each 7-dc shell as follows: sc, hdc, dc, ch 3, sl st in first ch, dc, hdc, sc.
Work one sc in each valley between shells.
Fasten off and weave in the tail.
Block the entire foundation before attaching flowers. Pin every scallop separately so the perimeter forms a consistent outline.
Large Dimensional Burgundy Rose
Make 3 large roses.
The large roses are constructed from a long strip of graduated petals. The strip is rolled from the smallest petals outward and stitched at the base.
Rose Foundation
Foundation: Ch 75.
Row 1: Dc in 4th ch from hook. *Ch 1, skip 1 ch, dc in next ch.* Repeat across.
This creates a flexible mesh foundation that can curve as the flower is rolled.
Inner Rose Petals
Turn.
Work into the first five ch-1 spaces:
(sc, 3 dc, sc) in each space.
These compact petals form the tight central bud.
Middle Rose Petals
In the next eight ch-1 spaces work:
(sc, hdc, 4 dc, hdc, sc) in each space.
The additional stitch height increases the diameter gradually rather than producing an abrupt change from the center to the outer petals.
Outer Rose Petals
In each remaining ch-1 space work:
(sc, hdc, 2 dc, 3 tr, 2 dc, hdc, sc).
Fasten off with a 70 cm sewing tail.
Forming the Rose
Begin at the end containing the smallest petals.
Roll the first three petals tightly around one another to establish the center.
Continue spiraling the strip around the center while allowing each new petal to overlap approximately one-third of the previous petal.
Do not pull the foundation chain tight.
When the full strip has been rolled, turn the rose over.
Thread the long tail through the foundation edge, crossing from one side of the flower base to the other.
Make several passes through the base until every layer is secured.
The large flower should remain dimensional rather than flattening into a disc.
Medium Cream Rose
Make 3–4 cream flowers.
Foundation: Ch 51.
Row 1: Dc in 4th ch from hook. *Ch 1, skip 1 ch, dc in next.* Repeat across.
For the first five spaces work:
(sc, 3 dc, sc).
For the next seven spaces work:
(sc, hdc, 4 dc, hdc, sc).
For the remaining spaces work:
(sc, hdc, 5 dc, hdc, sc).
Fasten off with a long tail.
Roll the strip from the smallest petals outward and sew through all foundation layers.
Small Burgundy Five-Petal Flowers
Make approximately 10–14.
Round 1: MR. Ch 1, work 10 sc into ring. Join with sl st. (10)
Round 2: *Ch 3, skip 1 st, sl st in next st.* Repeat around to form 5 loops.
Round 3: In each ch-3 loop work sc, hdc, 3 dc, hdc, sc.
Join with sl st.
Fasten off with a 20 cm tail.
Sew a pearl bead into the center after the flower has been attached to the runner. If the runner will be used around small children, omit detachable bead embellishments.
Small Cream Five-Petal Flowers
Make approximately 6–10.
Use the same construction as the burgundy flowers.
For a smaller motif, replace the three double crochet stitches in each petal with:
sc, hdc, 2 dc, hdc, sc.
Fasten off with a long sewing tail.
Small Crochet Berries
Make approximately 15–25 in burgundy.
R1: 6 sc in MR. (6)
R2: Inc ×6. (12)
R3: Sc around. (12)
R4: Dec ×6. (6)
Add a tiny amount of stuffing before completing the final decreases if a rounded berry is required.
Fasten off, close the opening and leave a 15 cm sewing tail.
Large Sage Crochet Leaf
Make approximately 16–20.
Foundation: Ch 20.
Beginning in the second ch from hook:
Sl st in first ch, sc in next, hdc in next 2, dc in next 3, tr in next 4, dc in next 3, hdc in next 2, sc in next 2 and sl st in final ch.
Work ch 2, sl st in second ch from hook to create the leaf tip.
Rotate the work and crochet into the unused loops on the opposite side of the foundation chain.
Mirror the stitch sequence:
Sl st, sc in next 2, hdc in next 2, dc in next 3, tr in next 4, dc in next 3, hdc in next 2, sc and sl st at the base.
Do not fasten off.
Leaf Vein and Edge
Ch 1 and work sc around the outer edge.
At approximately every third stitch, work:
Ch 2, sl st in second ch from hook
to create a subtle serrated point.
At the leaf tip work:
Sc, ch 3, sl st in first ch, sc.
Continue down the second edge.
Fasten off with a 25 cm sewing tail.
Thread a separate strand of sage yarn onto a needle and surface-stitch along the foundation chain from base to tip to emphasize the central vein.
Small Sage Leaf
Make approximately 8–12.
Foundation: Ch 14.
Beginning in second ch from hook work:
Sl st, sc, hdc, dc, dc, tr, tr, dc, dc, hdc, sc, sc, sl st.
Ch 2 and sl st in the second chain to form the tip.
Rotate and mirror the sequence along the opposite side.
Fasten off with a 20 cm sewing tail.
Ivory Crochet Scrolls
Make approximately 6–10 in mixed sizes.
The scroll motifs reproduce the curled cream elements visible between the flowers and leaves.
Small Scroll
Foundation: Ch 30.
Work 3 sc in the second chain from hook.
Work 2 sc in each of the next 10 chains.
Work 1 sc in each remaining chain.
The concentrated increases force the first section into a spiral while the final section remains stem-like.
Fasten off with a 25 cm tail.
Large Scroll
Foundation: Ch 45.
Work 3 sc in second ch from hook.
Work 2 sc in each of the next 15 chains.
Work 1 hdc in each of the next 10 chains.
Work sc in the remaining chains.
Fasten off with a 30 cm sewing tail.
Shape the spiral by hand before pinning it to the foundation.
Optional Double Scroll
Ch 55.
Mark the center chain.
Beginning at one end, work 2 sc in every chain until reaching the marker.
Fasten off.
Join yarn at the opposite end and repeat toward the center.
Both ends will curl inward, producing an S-shaped or double-scroll element.
Planning the Floral Layout
Place the blocked ivory foundation on a flat surface.
Position the three large burgundy roses first. Place one near the lower third, one near the center and one near the upper third rather than spacing them at mechanically equal intervals.
The large flowers should establish a visual path along the center of the runner.
Add cream roses between the burgundy focal flowers. Rotate them so their outer petals do not align with neighboring flowers.
Next, position sage leaves beneath the large flowers. Use approximately five to seven leaves around each major rose, but allow some leaves to disappear partially beneath the petals.
Add ivory scrolls through the remaining open areas.
Finish the composition with small burgundy flowers, cream flowers and berries.
Do not sew anything at this stage.
Assembly
- Block the ivory lace foundation to its final measurements and allow it to dry completely.
- Position the three large burgundy roses along the centerline and pin each flower through its base.
- Arrange five to seven sage leaves around each large rose, keeping the pointed ends visible beyond the petals.
- Add the medium cream roses between the three main burgundy flowers to break up the dark central color.
- Place ivory scrolls through the open sections, allowing some curves to pass beneath leaves and flower edges.
- Add small burgundy and cream flowers around the major motifs without covering the scalloped lace perimeter.
- Distribute the small berries in groups of one to three rather than creating a continuous dotted line.
- Sew the leaves and scrolls first, followed by the large roses, medium flowers and small accent motifs.
- Add pearl centers only after each small flower is securely attached, and omit beads when detachable embellishments are unsuitable.
- Turn the completed runner over, weave all attachment tails through dense stitches and check that no thread crosses a large open lace space.
The completed runner should remain predominantly flat at the perimeter while the floral center rises several centimeters above the lace foundation.
Attaching the Large Roses Securely
Do not sew only through the center of a large rose. A single attachment point allows the heavy flower to rotate or tilt when the runner is moved.
Use matching yarn and attach the flower at approximately five to eight points around its base.
Pass the needle through the rolled foundation rather than through the decorative outer edge of the petals.
Keep the upper half of each outer petal free. This maintains the layered three-dimensional appearance.
After sewing, lift the runner gently by the foundation beside the flower. The rose should remain stable without pulling the lace into a deep depression.
Blocking the Leaves
Dampen each leaf according to the yarn’s care instructions.
Pin the base first, then stretch the central tip until the leaf reaches its intended length.
Pin both sides symmetrically.
If using the serrated edging, place a separate pin at each major edge point.
Do not stretch the center wider than the outer stitches allow. Excessive width reduces the pointed botanical shape.
Allow every leaf to dry fully before removing the pins.
Adjusting the Runner Length
Measure the usable length of the table rather than the complete tabletop if place settings will surround the runner.
For a 150 cm table, a runner around 100–120 cm keeps the floral arrangement away from the table ends.
For a 180 cm table, extend the lace foundation to approximately 130–150 cm.
Increase length by repeating the central lace rows. Do not lengthen the tapered end sections, because that changes the proportions of the oval foundation.
For a substantially longer runner, add another medium flower arrangement rather than increasing the empty distance between the three large roses.
Adjusting the Runner Width
The visible width comes from both the lace foundation and the projecting leaves.
For a narrow table, reduce the foundation chain and use fewer large leaves along the sides. Keep the large roses close to the centerline.
For a wider table, increase the foundation width before beginning the lace repeat. Add width symmetrically so the centerline remains aligned.
A finished width around 30–35 cm works well for a decorative centerpiece runner of this style.
Color Placement
Burgundy should remain the dominant flower color if reproducing the reference arrangement. Use it for the three largest roses and several small flowers.
Cream works as the secondary flower color and connects visually with the ivory lace background.
Sage green should appear primarily in leaves rather than throughout the foundation. This keeps the foliage distinct from the neutral lace.
For an alternative palette, replace burgundy with dusty rose, plum or deep blue while retaining cream and sage. Another option is rust flowers with olive foliage for an autumn version.
Making a Shorter Centerpiece
The same motifs can be used for a compact centerpiece instead of a full table runner.
Work the lace foundation to approximately 60–70 cm.
Use one large burgundy rose at the center, two medium cream roses and approximately eight to ten leaves.
Add four small flowers and two or three scrolls around the central arrangement.
Maintain the scalloped perimeter so the shorter version still has a finished lace outline.
7 Technical Tips for a Dimensional Crochet Flower Runner
- Block the foundation before assembly. Attaching flowers to an unblocked base can lock a 2–4 cm distortion permanently into the lace.
- Attach each large rose at five or more points. A heavy flower secured only at its center can rotate and pull the surrounding openwork out of shape.
- Keep outer petals free. Sew through the lowest 1–2 cm of the petal base rather than its upper edge so the rose retains its layered profile.
- Pin leaves before sewing. Leave at least one-third of each large leaf visible beyond the rose; otherwise the foliage disappears beneath the flower.
- Watch lace-chain tension. A chain loop that is substantially shorter than adjacent loops creates a local indentation that becomes more visible after blocking.
- Keep motifs away from the border. Maintain approximately 2–4 cm of exposed ivory lace around most of the perimeter so the scalloped outline remains visible.
- Weave attachment tails through dense stitches. Carry each tail for at least 4–5 cm through solid crochet rather than across an open chain space where it can show from the front.
Care and Storage
The dimensional flowers require more careful storage than a conventional flat table runner.
Do not fold a large rose directly through its center. Place acid-free tissue or another clean lightweight support around the raised flowers before storing the runner loosely rolled or laid flat.
If washing is required, follow the yarn manufacturer’s instructions. Hand washing is generally easier on three-dimensional motifs than aggressive machine agitation.
Reshape petals and leaves while damp.
Block the lace perimeter again if washing causes the scallops to contract.
Do not iron directly over dimensional roses, synthetic embellishments or pearl beads.
Finishing
Place the completed runner on a flat table and inspect it from both long ends.
The three large burgundy roses should form the primary visual line without appearing mechanically spaced. Cream flowers and ivory scrolls should interrupt that line, while sage leaves extend the arrangement toward the lace perimeter.
Check the underside for loose yarn tails and attachment strands crossing open spaces.
Trim tails only after pulling gently on every large flower and leaf to confirm that the attachment is stable.
Re-pin any distorted scallops and lightly block the perimeter without flattening the dimensional flowers.
Conclusion
Complete the lace foundation before making final decisions about flower placement. Block it to the intended dimensions, position the three large burgundy roses first, and build the remaining composition around those fixed focal points. Sage leaves should extend beyond the large petals, while cream flowers and scrolls fill the spaces without hiding the scalloped ivory edge. Sew the heaviest motifs at several base points so the lace does not distort when the runner is moved. Save this crochet rose table runner pattern to Pinterest and share the finished piece on Instagram with #CrochetRoseTableRunner. Would you keep all three focal roses burgundy or make the center rose cream?