A bow nearly as wide as the bodice changes the engineering of this baby dress before it changes the decoration. This crochet baby dress pattern plan pairs DK yarn with a fitted square bodice, full skirt, oversized bow, headband, and shoes. Use a 3.75–4 mm working range and a 6–12-month reference size. Intermediate crochet skills are appropriate. The modular accessories can also be made separately.
The Design: What Makes This Bow Dress Different
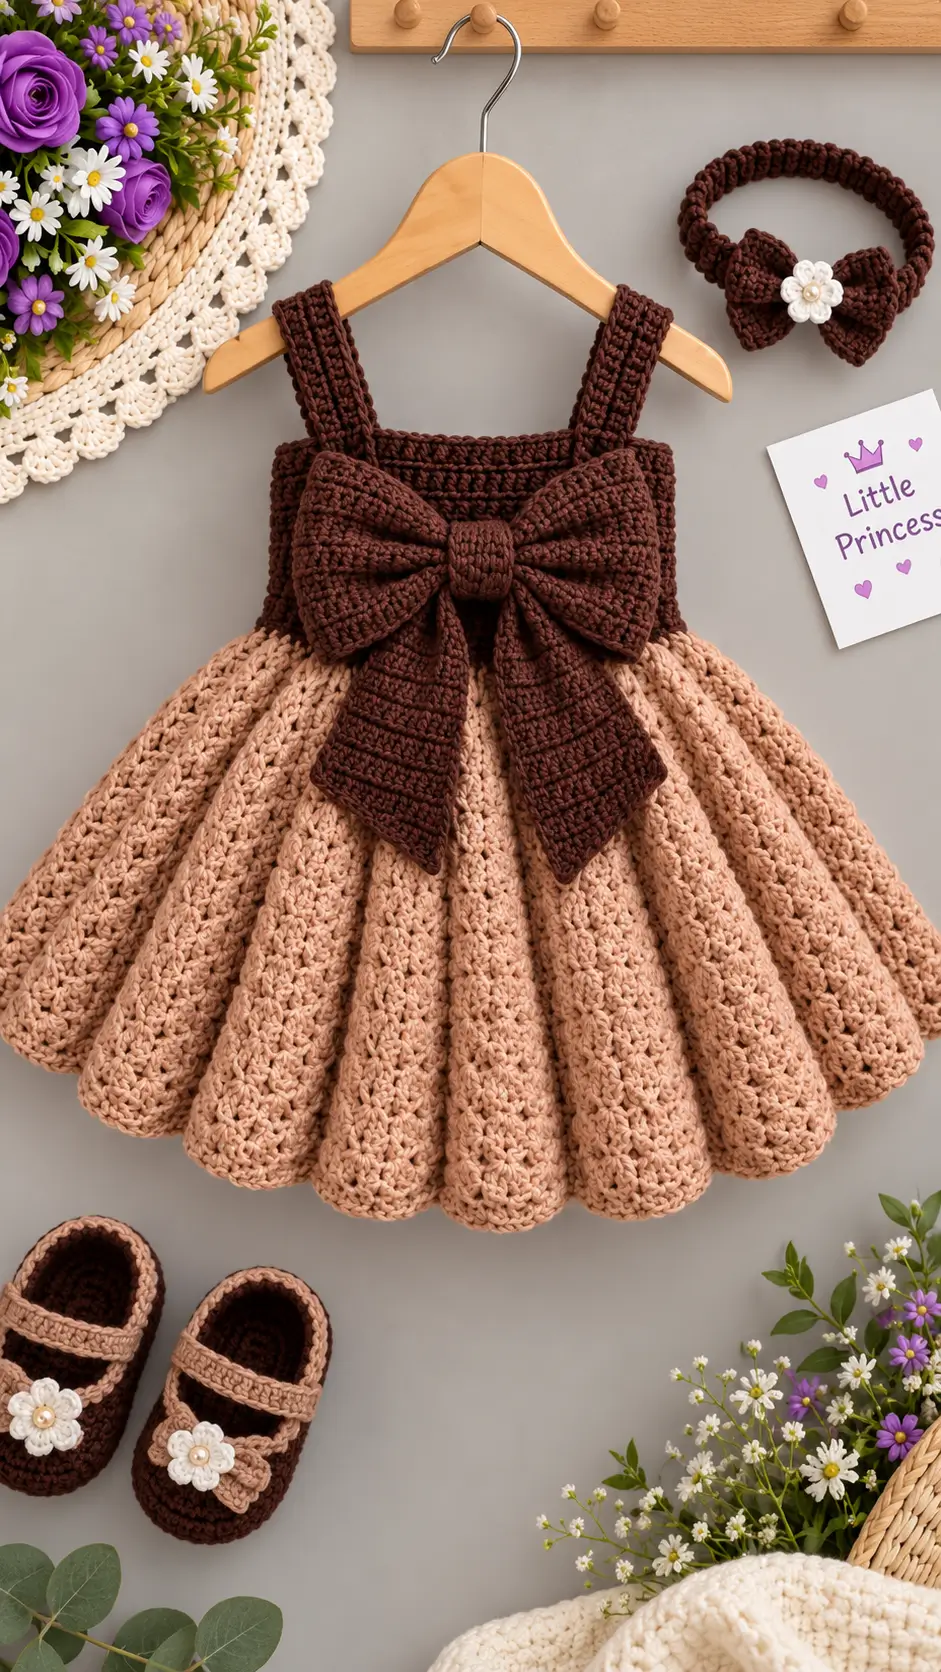
Three structural choices control the photographed silhouette. First, the shoulder straps connect to a dense square bodice rather than a conventional round yoke. That construction gives the oversized bow a stable attachment area. Second, the skirt gains considerable circumference immediately below the waist; vertical textured columns then exaggerate the flare without requiring a rigid hem. Third, the chocolate accent is repeated at the straps, bow, headband, and shoes, preventing the large waist feature from becoming visually isolated.
A common mistake in a crochet dress with bow is attaching a heavy bow only at its center. The sides can droop and pull the bodice forward. Hidden attachment stitches near both inner loops distribute the load. For a crochet baby girl dress, that structural detail matters more than simply enlarging a standard bow.
Project Info at a Glance
| Skill Level | Time | Finished Size | Hook | Best For |
|---|---|---|---|---|
| Intermediate | Multi-session project | 48 cm chest × 38 cm length reference | 3.75–5 mm depending on section | 6–12-month reference fit |
The 48 × 38 cm benchmark comes from a published 6–12-month baby-dress pattern rather than from measurements inferred from the photograph. Always compare the finished garment with the intended child’s actual chest and required ease.
Materials and Tools
Yarn
The closest comparable bow-dress construction uses category 3/DK yarn, making that a practical starting point for reproducing the visual scale.
- Blush/peach — DK/category 3 — quantity determined by gauge and skirt fullness — soft washable cotton blend or baby acrylic
- Chocolate brown — DK/category 3 — for bodice trim, straps, oversized bow, headband, and shoes
- Cream/white — DK/category 3 — small quantity for flower appliqués
- Gold or beige — scrap yarn or securely sewn embroidery for flower centers
Yarn requirements vary substantially with size, stitch pattern, gauge, and skirt fullness. Purchase enough yarn from the same dye lot to complete the main skirt and bodice.
Tools
- 3.75 mm crochet hook for a firm bodice
- 4–5 mm crochet hook for the skirt fabric after swatching
- Yarn needle
- Locking stitch markers
- Measuring tape
- Scissors
- Rustproof pins
- Small removable markers for bow placement
Avoid loose beads or detachable decorative pieces on garments intended for unsupervised infant wear. Embroidered centers provide a lower-profile alternative to the pearl-like decorations visible in the reference design.
Abbreviations
- ch — chain
- sc — single crochet
- hdc — half double crochet
- dc — double crochet
- sl st — slip stitch
- st/sts — stitch/stitches
- BLO — back loop only
- inc — two stitches worked into one stitch
- dec — decrease
Invisible decreases are primarily an amigurumi technique and are not required for the main dress; when used in accessory shaping, insert the hook through the front loops of the next two stitches before completing one sc.
Construction Plan — Step by Step
Unlike amigurumi, a fitted baby garment should not be generated from a six-stitch magic-ring progression. Chest circumference, gauge, wearing ease, armhole depth, and strap length determine the stitch counts. For that reason, this dress is best reproduced from measurements rather than arbitrary toy mathematics.
Gauge Swatch
Yarn: blush/peach.
Work a swatch at least 12 × 12 cm using the intended bodice stitch. Wash and dry it exactly as the finished dress will be treated.
Measure the center 10 cm horizontally and vertically. Record the number of stitches per 10 cm and rows per 10 cm.
Gauge must be tied to the selected yarn, hook, and stitch combination rather than copied from another project. Even a small difference across 10 cm can create a substantial sizing error around the complete bodice.
Square Bodice
Yarn: chocolate brown or blush/peach.
The design uses a straight upper edge and essentially vertical sides. Construct the bodice as a rectangle sized to the required finished chest circumference plus appropriate wearing ease.
For the 48 cm reference chest, calculate the foundation using the washed gauge:
Required stitches = stitches per cm × desired garment circumference
Round the result to a number compatible with the selected stitch repeat.
Work the bodice back and forth until it reaches the required underarm-to-waist depth. Add a back opening when the finished chest and neckline cannot pass comfortably over the child’s head and shoulders.
Finish the upper and lower edges with one firm row of sc.
Do not determine wearable fit from age alone. Actual chest circumference and required ease are more useful measurements.
Shoulder Straps — Make 2
Yarn: chocolate brown.
Chain to the measured strap length plus approximately 2 cm for attachment.
Row 1: Sc in second ch from hook and across.
Rows 2 onward: Ch 1, turn, sc across.
Continue until each strap measures approximately 3–4 cm wide, matching the substantial straps used in the reference design.
Fasten off and leave approximately 20 cm of yarn for sewing.
Pin both straps before permanent attachment. Check front-to-back alignment and confirm that the neckline cannot slide excessively off the shoulders.
Full Textured Skirt
Yarn: blush/peach.
The skirt is considerably fuller than a basic A-line shape. Its upper edge is densely gathered beneath the bodice, followed by long vertical textured sections.
Create a foundation circumference approximately 1.75–2 times the bodice waist circumference, adjusting the multiplier after swatching. Join only after checking that the foundation is not twisted.
Round 1: Work evenly around in the selected base stitch.
Round 2: Establish the repeated vertical panels.
For a ribbed interpretation, alternate groups of front-post and back-post double crochet, or select another relief-stitch repeat that produces pronounced raised columns.
Maintain the same number of panels around the skirt.
Continue without additional increases once the required fullness has been established. Repeated increases throughout the skirt can create a ruffled silhouette rather than the long bell-shaped folds visible in the design.
Continue until the dress reaches the required shoulder-to-hem measurement. A useful 6–12-month reference length is approximately 38 cm, but the actual child’s measurements take priority.
Finish the lower edge with a firm but non-constricting border.
Oversized Crochet Bow
Yarn: chocolate brown.
The bow spans most of the front bodice, so construct it from separate pieces rather than attempting to form the complete shape from one narrow chain.
For the main bow panel, chain to approximately 60–70% of the finished bodice width.
Row 1: Hdc across.
Rows 2 onward: Turn and hdc across.
Continue until the rectangle is approximately half as tall as it is wide.
Fasten off.
Fold the rectangle into shallow accordion pleats through its center. Crochet a separate narrow band and wrap it firmly around the middle. Stitch the band closed at the back.
The completed bow should remain flexible rather than forming a rigid plate across the front of the garment.
Bow Tails — Make 2
Yarn: chocolate brown.
Chain to the required tail width.
Work hdc rows until each tail reaches approximately the waist-to-mid-skirt distance shown by the design.
For an angled lower edge, shorten the final rows progressively or finish each tail with a diagonal stepped edge.
Fasten off with a long sewing tail.
Position both tails behind the center bow so their lower ends separate instead of completely overlapping.
Matching Crochet Headband
Yarn: chocolate brown.
The matching headband consists of a narrow textured ring with a smaller bow mounted toward the front.
Measure the intended head circumference before beginning. For a crochet fabric with limited elasticity, test horizontal stretch using a swatch before determining the final band length.
Work a narrow band in rows until the measured length is reached, then seam the short ends securely.
For an adjustable infant accessory, ties can be substituted for a tight closed ring.
Headband Bow
Yarn: chocolate brown.
Make a small rectangle approximately one-third the width of the main dress bow.
Work hdc rows until the rectangle has balanced bow proportions, then fasten off.
Pleat the center and wrap it with a narrow crocheted band. Sew the completed bow securely to the headband.
Flower Appliqués — Make 3
Yarn: cream/white.
Three small flowers coordinate the headband and shoes.
Ch 4 and join to form a small ring, or begin with a magic ring.
Round 1: Work five evenly spaced anchoring groups into the center ring.
Round 2: Form one rounded petal over each anchoring space using a short-to-tall-to-short stitch progression.
Fasten off and close the center securely.
For infant wear, embroidered centers are preferable to loose beads or other detachable decorations.
Crochet Shoes — Make 2
Yarn: chocolate brown and blush/peach.
Baby footwear is size-sensitive, so begin from an actual foot or sole measurement instead of selecting the foundation chain solely from an age category.
Start with an oval sole sized to the intended foot length. Work around both sides of a foundation chain, placing multiple stitches at the toe and heel ends to form smooth curves.
Once the sole reaches the required dimensions, work one round without increases to turn the fabric upward.
Shape the upper by decreasing gradually around the toe while maintaining the heel stitches.
Add a blush strap across the instep. Stitch the strap permanently at one side and use a secure, suitable closure at the opposite side when an opening is required.
Attach one cream flower to each shoe.
These are decorative soft crochet shoes rather than protective footwear for walking outdoors.
Assembly
- Block the bodice and skirt components to their required measurements before joining them.
- Attach the skirt evenly around the lower bodice edge. Distribute the fullness instead of concentrating the gathers at the center front.
- Pin the shoulder straps to the front and back upper edges. Confirm equal spacing before sewing through several rows of fabric.
- Place the oversized bow at the center front with its upper edge close to the waist seam.
- Sew the bow center firmly, then place discreet anchoring stitches beneath both inner bow loops to prevent rotation and drooping.
- Position the two long tails behind the bow center and secure their upper edges across a wider area than the center wrap alone.
- Seam the headband and attach its smaller bow without producing a hard knot against the inside surface.
- Sew one cream flower to the headband bow and one to each shoe. Keep all decorative centers permanently secured.
- Weave every yarn tail through several changes of direction. Trim the ends only after gently stretching each joined area to check that the yarn does not withdraw.
- Measure chest circumference, total dress length, strap length, skirt hem, and accessory dimensions after final washing and drying.
The completed set consists of one square-bodice dress, one oversized bow with two tails, one coordinating bow headband, and two matching crochet shoes.
7 Technical Tips for Better Construction
- Control skirt fullness. Concentrating increases into a few repeated locations can produce visible wedges. Distribute the initial fullness evenly around the complete waist.
- Check strap stretch. DK cotton can lengthen after washing. A difference of only 1 cm between finished straps can tilt the square neckline.
- Prevent bow sag. Attaching the oversized bow only through its center allows the sides to rotate downward. Add concealed anchoring stitches approximately 2–3 cm from the center when the bow dimensions permit.
- Monitor gauge drift. Tighter skirt tension can remove several centimeters from the final hem circumference. Check the working gauge again after approximately 10 cm of skirt depth.
- Measure the headband. A closed crochet band with inadequate stretch can become too tight. Calculate its circumference from an actual head measurement and the tested stretch of the fabric rather than an age label.
- Match both shoe soles. One misplaced increase at the toe can make the two shoes visibly different. Mark both ends of the foundation and compare the sole dimensions after each shaping section.
- Secure structural yarn tails. Short woven ends can withdraw during repeated washing. Leave approximately 10–15 cm for structural seams and weave each end through multiple directions before trimming.
Final Measurements and Finishing
Record the washed gauge before converting this photo-inspired construction into final stitch counts. That measurement determines the bodice circumference, strap dimensions, skirt foundation, and finished fit more reliably than an age label.
After blocking, attach the oversized bow at three structural points and remeasure the chest before completing the matching accessories. For the 6–12-month reference, the comparison measurement is approximately 48 cm around the finished chest and 38 cm in overall length, but actual body measurements should control the final dimensions.
Save this crochet baby dress pattern idea to Pinterest and share the completed color combination on Instagram with #OversizedBowBabyDress. Record the yarn, hook, gauge, finished chest, and dress length so the sizing can be reproduced accurately.
Which detail would you change first: the width of the chocolate bow or the depth of the skirt folds?