Introduction
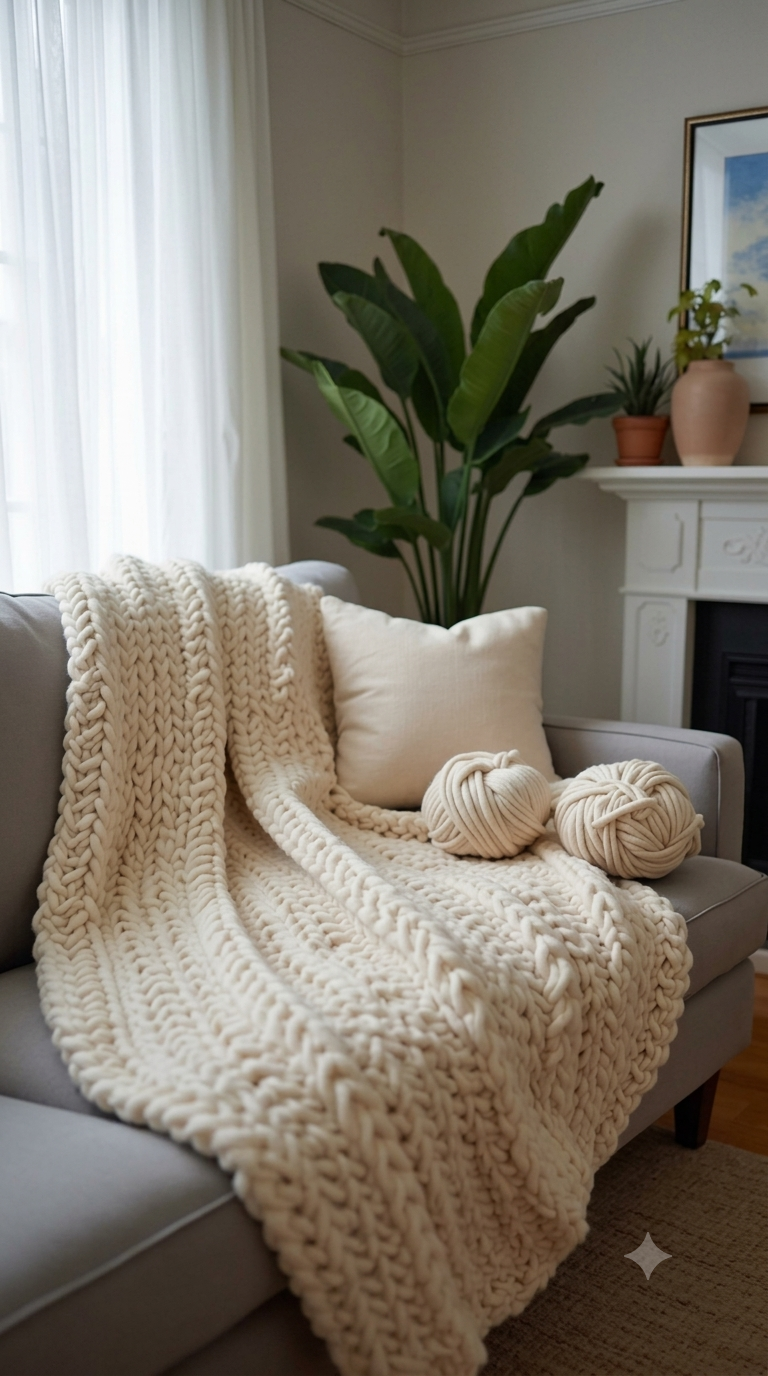
Oversized ivory cables need enough background fabric to separate their crossings instead of merging into one thick ridge. This chunky knit blanket pattern translates the photographed throw into a 135 × 200 cm reference project using jumbo yarn and 25 mm needles. It suits an intermediate knitter familiar with knit, purl, and cable stitches. The single-color construction also removes color-management work from a large-format blanket.
The Design: What Makes This Ivory Cable Throw Different
The photographed blanket depends on three structural choices: oversized yarn, vertical cable columns, and quieter fabric between those columns. The cable panels create the dominant raised lines, while flatter sections stop a large ivory surface from becoming visually uniform. A substantial edge also limits curling and gives the throw a defined perimeter.
For this chunky cable blanket, the cable spacing matters as much as the crossing itself. Put large cables too close together and the fabric contracts sharply across its width. A super bulky knit blanket can therefore finish considerably narrower than its cast-on measurement suggests.
One frequent mistake is choosing the needle from yarn weight alone. Cable fabric pulls inward. The knitter should establish gauge in the actual panel arrangement before calculating the final cast-on.
Project Info at a Glance
| Skill Level | Time | Finished Size | Needle | Best For |
|---|---|---|---|---|
| Intermediate | Multi-session project | 135 × 200 cm reference | 25 mm / US 50 | Sofa or large throw |
The size and needle reference are based on a published jumbo-yarn chunky blanket using six 300 g balls. The photographed throw appears broadly comparable in scale, but exact dimensions cannot be recovered from a photograph.
Materials and Tools
Yarn
- Ivory / cream — jumbo weight — approximately 1,800 g reference quantity.
- Accent yarn — 0 g — the photographed design is monochrome.
The quantity is a planning reference rather than a guarantee. Cable fabric can consume substantially more yarn than plain stockinette because the crossings add density and reduce effective width.
Tools
- 25 mm / US 50 circular knitting needles
- Large tapestry needle
- Locking stitch markers
- Cable needle
- Scissors
- Measuring tape
- Blocking mats suitable for the yarn fiber
Circular needles are useful even though the blanket is knitted flat. They carry the mass of a large project more effectively than giant straight needles.
Abbreviations
- CO — cast on
- BO — bind off
- K — knit
- P — purl
- C6F — slip 3 stitches to cable needle and hold in front, knit 3, knit 3 from cable needle
- C6B — slip 3 stitches to cable needle and hold behind, knit 3, knit 3 from cable needle
- RS — right side
- WS — wrong side
- PM — place marker
- SM — slip marker
- st/sts — stitch/stitches
Cable abbreviations describe stitch movement rather than an increase or decrease, so a C6F still contains six stitches after the crossing.
Chunky Knit Blanket Pattern — Step by Step
Gauge Swatch
Yarn: ivory jumbo yarn.
Make the swatch in the actual combination of stockinette or reverse stockinette and cable stitches planned for the blanket. Large-needle chunky blankets can have extremely low stitch counts per 10 cm, but cable construction changes that measurement considerably.
Cast on enough stitches for at least a 20 cm sample. Work several plain rows, establish one cable column with purl stitches beside it, then continue until the sample is at least 20 cm tall.
Measure the central section without stretching it.
Do not calculate the blanket from the yarn-label gauge if that gauge was measured in stockinette.
Foundation and Lower Border
Yarn: ivory.
For a 135 cm target width, determine the cast-on from the washed or rested cable swatch. The exact stitch count must come from that gauge rather than being treated as a universal number.
CO the calculated number of stitches.
Rows 1–8: K all sts.
The eight-row garter border gives the lower edge additional depth and reduces stockinette curl.
Main Cable Panel
The photographed throw shows multiple vertical textured bands rather than a single centered cable. Divide the usable width into an odd number of sections so that the layout remains symmetrical from the center outward.
A practical cable module is:
P2, K6, P2
The six knit stitches form the cable. Two purl stitches on either side recess the background and sharpen its outline.
For a forward cable:
Cable Row: P2, C6F, P2.
For the next crossing in the same column:
Cable Row: P2, C6B, P2.
Alternating front and back crossings can produce a braided effect. Repeating only C6F produces a more conventional rope cable.
Texture Between Cable Columns
The photographed blanket contains broad, quieter sections between raised features. Use stockinette, reverse stockinette, or a simple knit-purl texture in these spaces.
For stockinette:
RS: K across the panel.
WS: P across the panel.
For reverse stockinette:
RS: P across the panel.
WS: K across the panel.
Reverse stockinette gives cables stronger relief because the purl background recedes behind the knit cable.
Eight-Row Cable Repeat
Once the lower border is complete, establish the panel markers.
Row 1 RS: Work border stitches, then work each background and cable panel as established.
Row 2 WS: Work stitches as they appear.
Row 3 RS: Repeat the established panel sequence.
Row 4 WS: Work stitches as they appear.
Row 5 RS: Work C6F or C6B at each scheduled cable column.
Row 6 WS: Work stitches as they appear.
Row 7 RS: Continue the established panel sequence.
Row 8 WS: Work stitches as they appear.
Repeat Rows 1–8.
A larger gap between crossings produces the long, open cable seen in oversized home textiles. Crossing too frequently makes jumbo cables dense and shortens the blanket vertically.
Side Borders
Keep a permanent garter or seed-stitch border at both sides.
For garter edging, knit the first and last 5–8 stitches on every row. The exact number should be proportional to the yarn and total width.
Do not place a cable crossing immediately beside the edge. A small buffer of background fabric helps the border lie flatter.
Working to Length
Continue the established cable repeat until the piece measures approximately 195 cm, or about 5 cm short of the target 200 cm length.
Finish on the same point in the cable repeat for every column. This prevents one cable from ending immediately after a crossing while another ends in an extended straight section.
The target finished measurement for this version is approximately 135 × 200 cm.
Upper Border
Work the final border to match the lower border.
Rows 1–8: K all sts.
Bind off loosely in knit.
A tight bind-off can pull a 135 cm blanket several centimeters narrower along its top edge. If the edge contracts visibly while binding off, use a larger needle or a stretchier bind-off method.
Finishing
Cut the yarn with a tail of approximately 20–25 cm.
Thread the tail through a large tapestry needle and weave it through the reverse side of neighboring stitches. Change direction once so that a thick yarn tail is less likely to work free.
Trim only after the fabric has rested and the tail remains secure.
Assembly and Finishing Order
- Lay the completed blanket flat without stretching the cable panels.
- Compare the top and bottom borders for equal depth.
- Check that both side borders measure the same length.
- Inspect every cable crossing for an accidental front/back reversal.
- Weave the cast-on tail through at least 10–15 cm of neighboring fabric.
- Weave the bind-off tail in the opposite direction after the first pass.
- Secure any joined skein ends on the wrong side rather than inside a cable opening.
- Block according to the yarn manufacturer’s fiber instructions.
- Allow the blanket to reach stable dimensions before measuring the final 135 × 200 cm target.
- Trim secure tails and reshape the borders by hand.
The finished piece should form a rectangular monochrome throw with uninterrupted vertical cable columns and balanced borders.
7 Technical Tips for a Chunky Cable Blanket
- Marker migration: Jumbo stitches can push small markers underneath neighboring loops. Use locking markers large enough to remain visible and count each panel at every cable row.
- Excessive cable contraction: A six-stitch cable can pull the fabric inward compared with stockinette. Measure a cable swatch at rest before calculating the cast-on for a 135 cm finished width.
- Loose cable crossings: A cable needle much smaller than the working needle can stretch the held stitches. Keep the six cable stitches compact and avoid pulling extra yarn into the crossing.
- Edge flare: A loose cast-on paired with a firm body creates a wider lower edge. Compare the border width with the main fabric after roughly 15 cm and restart early if the difference is substantial.
- Uneven panel spacing: One misplaced background stitch shifts every cable above it. Mark the boundaries of each cable panel rather than relying on visual counting across a large ivory surface.
- Over-blocking: Stretching the blanket aggressively can flatten the raised cables that define this design. Block to dimensions while preserving the vertical relief instead of pulling each panel flat.
- Tail escape: Very thick yarn can work loose when only a short end is hidden. Leave approximately 20–25 cm at joins and weave the tail back through the fabric in more than one direction.
Yarn Quantity and Substitution
Yarn requirements vary widely across chunky blankets because chunky, super bulky, and jumbo yarns have very different diameters.
For this large-format version, use approximately 1,800 g of jumbo yarn as the initial planning quantity for a blanket around 135 × 200 cm. Cable density, yarn construction, gauge, and border width can all change the final requirement.
Buying yarn solely by skein count is unreliable. Compare total meterage, grams per meter, fiber composition, and your measured swatch gauge.
For the oversized appearance in the photograph, choose yarn thick enough to produce visibly large individual stitches rather than substituting conventional worsted yarn at the same total gram weight.
Why the Cable Layout Matters
A blanket this pale relies heavily on shadows from the stitch structure. Color cannot separate one design section from another.
That makes cable relief functional as well as decorative. Purl channels beside a knit cable create a recessed zone. The cable then sits above the surface, while flatter sections provide scale.
The photograph also shows why cable width should be proportional to yarn diameter. A tiny four-stitch cable worked in extremely large yarn can look like an accidental twist. Six active stitches give the crossing enough width to read as an intentional structural column.
Spacing is equally important. Several centimeters of calmer fabric between major columns prevent the surface from becoming uniformly bulky.
How to Size the Chunky Knit Blanket
Chunky blankets can be made in substantially different dimensions. For the sofa-scale appearance shown in the photograph, 135 × 200 cm provides a practical reference size because enough fabric is available to cover the seat and produce a substantial front drop.
Measure the intended sofa before buying the full yarn quantity. Record the seat width, desired side coverage, and desired front drop.
Next, knit the cable swatch and measure the number of stitches across 10 or 20 cm. Use that measurement to calculate the cast-on required for your target width.
Do not add an arbitrary number of stitches when enlarging the blanket. The additional stitches must also fit the established cable-and-background panel repeat. Adjust the number of complete panels first, then use border stitches to fine-tune the final width.
Conclusion
The photographed throw is best constructed as a large monochrome cable project using substantial borders and widely spaced vertical cable columns. Start by knitting and measuring the cable swatch, then calculate the cast-on from the actual gauge and intended sofa width. A 135 × 200 cm reference size, jumbo yarn, 25 mm needles, and six-stitch cable sections reproduce the main structural features visible in the image. Save this chunky knit blanket pattern to Pinterest or share the completed throw on Instagram with #IvoryCableThrow. Before casting on, decide whether the central cable should twist in one direction throughout or alternate directions to create a braided center.