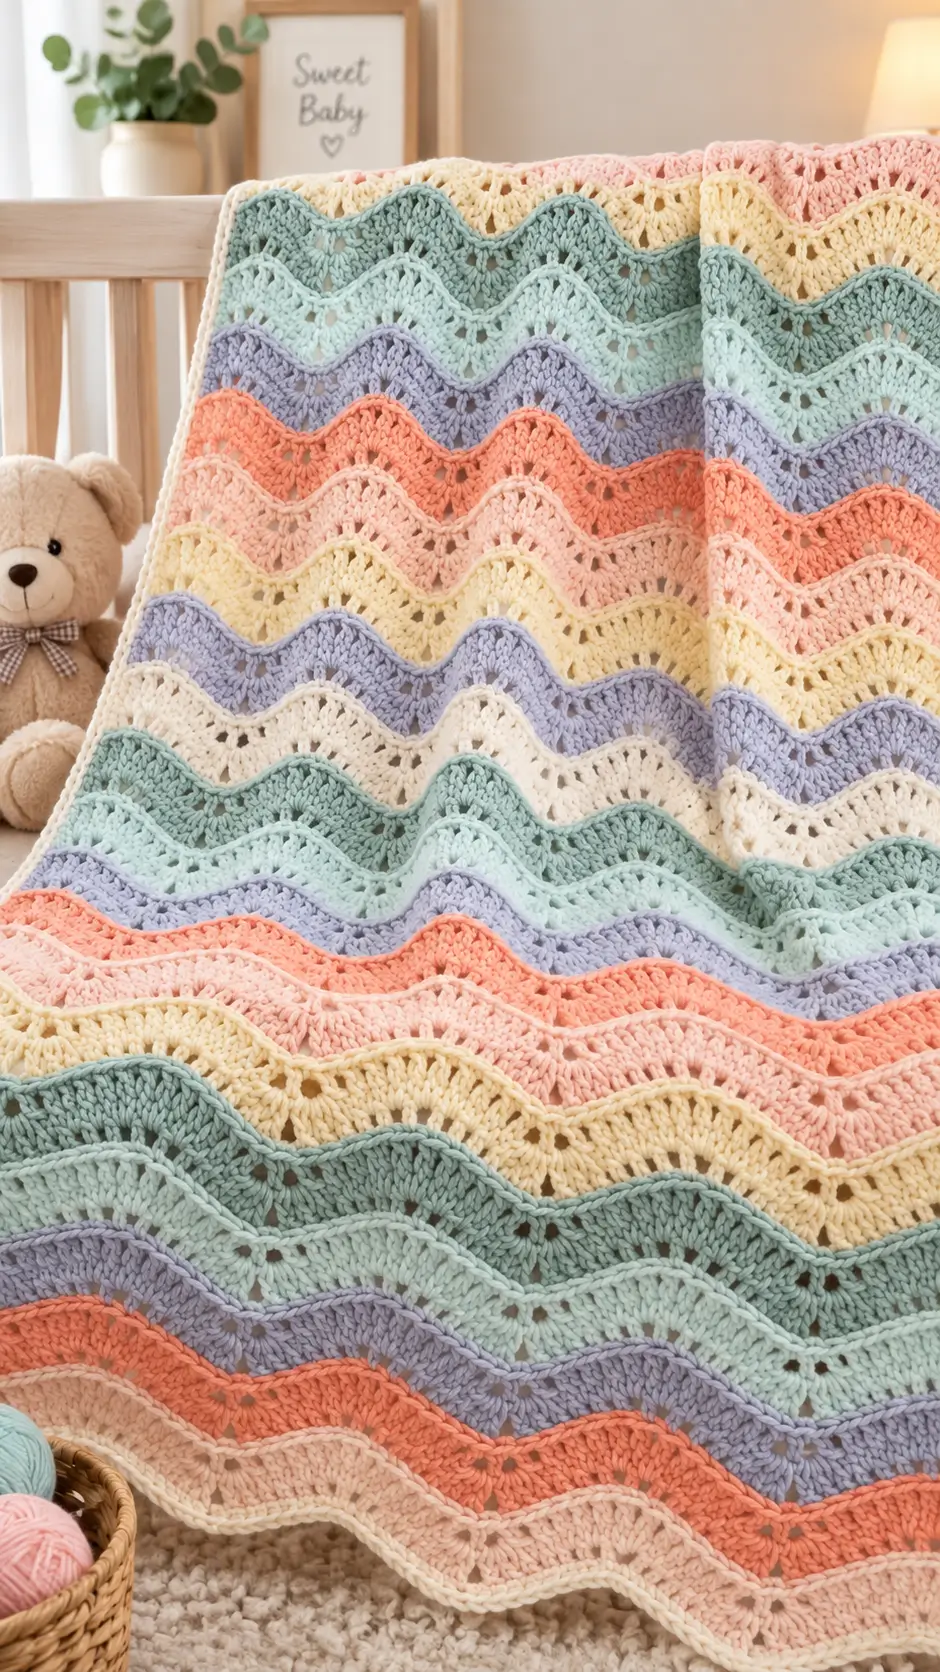
Each stripe in this blanket has to climb a peak, open into an eyelet, and return to a valley without changing the overall width. This pastel ripple crochet baby blanket uses DK yarn, a 4 mm hook, and seven colors to produce a roughly 75 × 100 cm project. The skill level is intermediate. Its repeating horizontal construction also makes the design practical for using coordinated partial skeins.
The Design: What Makes This Ripple Blanket Different
The photographed blanket differs from a basic zigzag because its peaks are rounded rather than sharply angular. Fan-shaped groups of tall stitches spread across each rise, while controlled spaces create the small openings visible near the upper part of each wave. The result sits between a conventional chevron and a shell pattern.
Color placement is the second structural decision. Sage, mint, lavender, coral, blush, yellow, and cream appear in narrow horizontal sections so the shape remains visible even when neighboring colors have similar values. That makes this a fan ripple crochet blanket rather than a plain striped afghan.
The common failure in a shell ripple baby blanket is width drift. Missing a stitch at either edge or putting an extra stitch into a valley gradually changes the rectangle into a trapezoid. Count repeats, not just total stitches, while working.
Project Info at a Glance
| Skill Level | Time | Finished Size | Hook | Best For |
|---|---|---|---|---|
| Intermediate | Approx. 18–25 hours | Approx. 75 × 100 cm | 4 mm | Stroller, nursery, supervised floor use |
The 75 × 100 cm dimensions and 4 mm/DK combination have direct precedent in published DK ripple baby blanket specifications.
Materials and Tools
Yarn
Use smooth DK / light #3 yarn. A cotton-acrylic or baby acrylic yarn gives enough definition for the fan openings without making the fabric unnecessarily heavy.
For a blanket close to 75 × 100 cm, start with approximately 500–650 g total. Actual consumption depends on gauge, yarn composition, and finished dimensions.
- Sage green — DK — 100 g
- Mint — DK — 100 g
- Lavender — DK — 100 g
- Coral — DK — 100 g
- Blush pink — DK — 100 g
- Pale yellow — DK — 100 g
- Cream — DK — 100 g
You will not necessarily consume every gram. Seven full 100 g skeins provide enough reserve to alter stripe placement or extend the blanket.
Tools
- 4 mm crochet hook
- Tapestry needle
- Yarn scissors
- Locking stitch markers
- Flexible tape measure
- Blocking pins or blocking combs
Abbreviations
- ch — chain
- sc — single crochet
- dc — double crochet
- tr — treble crochet
- st/sts — stitch/stitches
- sp — space
- sk — skip
- sl st — slip stitch
- rep — repeat
- RS — right side
- WS — wrong side
Invisible decreases are an amigurumi technique and are not used here; the ripple shaping is produced with skipped stitches, grouped stitches, and controlled fan placement.
Gauge and Sizing
Before beginning the full blanket, make a ripple swatch at least three repeats wide. The target is not simply a fixed number of stitches per 10 cm because a wave contracts horizontally after the first several rows.
For this version, treat one completed wave repeat as the primary gauge unit. Measure after at least six rows.
A narrower stroller blanket can use fewer repeats. Add complete repeats for a larger cot-size version. Do not judge the final width from the foundation chain alone because the chain contracts after the first complete wave rows.
Pastel Ripple Crochet Baby Blanket Pattern
Construction: This blanket is worked flat in turned rows rather than in a continuous spiral.
Foundation
Yarn: Cream
Work a foundation chain long enough for the required number of complete repeats and approximately 75 cm of finished width after the ripple has formed.
For accurate resizing, make a test strip first. Determine the exact number of foundation stitches consumed by one complete peak-to-peak repeat in your swatch, then add or subtract whole repeats.
Place a locking marker after every completed repeat in Row 1. This catches counting errors before a one-stitch discrepancy becomes difficult to locate.
Setup Row
Work across the foundation using evenly distributed sc stitches, creating the first valleys by skipping corresponding foundation chains and creating the peaks by placing multiple stitches at each marked peak position.
The number of stitches added at every peak must balance the number removed around its neighboring valley. That balance maintains the blanket width.
Turn.
Row 2 — Structural Ripple Row
Ch 3.
Work dc stitches toward the first peak. Place additional dc stitches into the peak stitch to spread the fabric outward.
Continue down the opposite slope.
At the valley, skip the designated central stitches without adding chains. Continue upward in dc.
Repeat the same peak-and-valley sequence across the row.
Work the final edge stitch into the turning chain. Turn.
Row 3 — Eyelet Fan Row
Ch 3.
Work toward the center of the first rising section. At each fan position, work a grouped series of tall stitches into the same stitch or space.
Ch 1 to form the small opening near the crest.
Work the mirrored half of the fan.
Move down toward the valley with progressively spaced stitches. Keep the valley compact. Adding unnecessary chains at the lowest point can flatten the wave.
Repeat across.
Turn.
Row 4 — Stabilizing Row
Ch 1.
Work sc across the entire ripple while maintaining the established peak and valley locations.
At each eyelet, work into the chain space rather than piercing individual chains. At each valley, keep the stitch placement symmetrical on both sides.
Turn.
This row locks the tall fan stitches into a firmer ridge and prepares the fabric for the next color.
Row 5 — Second Structural Row
Join the next shade at the edge.
Ch 3 and repeat the structural ripple shaping established in Row 2. Peaks must sit directly above peaks. Valleys must remain vertically aligned.
Do not shift the increase point by one stitch to compensate for tension. Correct the underlying stitch count instead.
Turn.
Row 6 — Fan Row
Repeat the fan construction from Row 3.
The new fan should visually nest above the previous stripe rather than leaning left or right. Count from the valley to the peak on both sides. Those counts should match.
Turn.
Row 7 — Ridge Row
Work a complete row of sc following the established wave.
Change color in the final yarn-over of the final stitch if the next stripe begins immediately.
Cut the old yarn with a tail of at least 15 cm.
Turn.
Rows 8–67 — Main Blanket
Repeat the three-row structural sequence:
- Row A: Structural ripple row
- Row B: Eyelet/fan row
- Row C: Stabilizing sc ridge
Rotate colors to reproduce the photographed pastel distribution.
A useful seven-color sequence is:
Sage → Mint → Lavender → Coral → Blush → Yellow → Cream
Reverse selected sections later in the blanket:
Cream → Yellow → Blush → Coral → Lavender → Mint → Sage
This keeps the finished blanket from looking like one short color sequence copied mechanically from top to bottom.
Measure the blanket after every six rows. Stop adding full repeats when the piece is approximately 98–99 cm long before finishing.
Final Ripple Row
Use cream or the shade that gives the clearest contrast against the last full stripe.
Work one structural ripple row without changing the established stitch placement.
Check every peak. The upper edge should contain the same number of complete waves as the foundation edge.
Final Stabilizing Row
Ch 1.
Work sc across while following every rise and valley. Do not attempt to make the upper edge straight; the scalloped silhouette is part of the design.
Fasten off. Leave a 15 cm tail for weaving.
Color Planning
The blanket works because adjacent stripes are separated by hue and value rather than relying only on random pastel changes. Coral sits effectively between cooler lavender and pale pink. Sage and mint can appear next to one another, but cream or yellow periodically breaks up the cool sections.
Lay all seven skeins on a table before beginning. Photograph the proposed order in grayscale on a phone. If several neighboring colors become almost indistinguishable in grayscale, redistribute them.
For the photographed effect, avoid running all seven colors in exactly the same sequence for the full length. Reversing or interrupting the sequence makes the stripes look intentionally distributed.
Edge Treatment
A conventional straight border fights the geometry of this blanket. Allowing the fan ripple to remain visible preserves the decorative peaks and valleys.
If the side edges look uneven, work one restrained row of sc down each vertical side only.
Aim for roughly two or three sc per row-end group depending on row height. Do not force one stitch into every visible strand. Too many border stitches can make the sides flare, while too few can pull them inward.
Finishing and Assembly
- Lay the blanket flat with all wave peaks facing in their natural direction.
- Measure the width at the top, center, and bottom before blocking.
- Identify loose color-change tails and joins that need securing.
- Thread each tail through a tapestry needle.
- Weave each tail through at least 5 cm of same-color fabric.
- Reverse direction once so normal handling cannot pull the tail directly out.
- Trim only after the woven section remains stable under light stretching.
- Wet-block or steam-block according to the yarn manufacturer’s fiber instructions.
- Shape every wave peak and valley rather than stretching the edge into a straight line.
- Allow the blanket to dry completely before taking the final measurement.
The completed blanket should retain an equal number of peaks along corresponding edges and maintain a rectangular overall footprint.
7 Technical Tips for a Cleaner Ripple Blanket
- Prevent width drift: Place a marker in the first and last true stitch of every row. Losing one edge stitch repeatedly can remove several centimeters from the upper width before the problem becomes obvious.
- Check misaligned valleys: Count the stitches from peak to valley on both slopes. A difference of even one stitch moves the next fan sideways and becomes increasingly visible after three or four stripes.
- Control oversized eyelets: Keep chain spaces consistent and avoid pulling the working loop upward before making the next tall stitch. An eyelet that is 3–4 mm larger than neighboring openings can remain visible after blocking.
- Correct loose tall stitches: Fan stitches need controlled first loops. If the double-crochet or treble posts flare at their bases, reduce the working-loop height rather than changing hook size halfway through the blanket.
- Avoid puckered color changes: Leave at least a 15 cm tail and join the new yarn without tightening the previous final stitch. An overly tight join pulls one side edge upward.
- Block every wave: Pin peaks and valleys rather than only the four blanket corners. Stretching a 75 cm edge from its corners alone can flatten the outside waves while leaving the center waves deeper.
- Hide woven tails: Weave each tail horizontally through stitches of the same color, reverse direction once, then trim. Passing a dark tail vertically through a pale stripe can make it visible through the eyelets.
Why DK Yarn Works for This Design
DK gives the blanket enough structure for the fan openings to remain clearly defined without producing the bulk associated with substantially heavier yarn. This matters when seven colors are competing with the stitch texture.
A 4 mm crochet hook is a practical starting point for DK yarn. Individual tension can require adjustment, so the ripple swatch should determine whether the hook needs to move up or down by 0.5 mm.
Changing yarn weight changes more than the finished dimensions. Heavier yarn enlarges the fans, deepens the visual ridges, and produces a heavier blanket. Finer yarn creates smaller waves and requires more repeats to reach the same width.
For a baby-size project resembling the supplied photograph, DK provides an appropriate balance between stitch definition and overall scale.
Adjusting the Blanket Size
Do not resize the pattern by randomly adding foundation chains. First make one full repeat and measure its finished peak-to-peak width after several rows.
Suppose one completed repeat measures approximately 7.5 cm. Ten repeats would produce a width near 75 cm before accounting for individual tension and any side-edge treatment.
Length is easier to adjust. Continue complete row sequences until the desired measurement is reached.
Finish after a stabilizing row rather than halfway through a fan sequence. This keeps the upper and lower sections visually balanced.
For a wider child blanket, add complete horizontal repeats. For a longer stroller blanket, retain the original width and add additional color sections vertically.
How to Keep the Fan Pattern Straight
Ripple errors compound across rows. One misplaced stitch in an ordinary straight blanket may remain local, but one misplaced stitch in a repeated wave can move every later peak.
Use the valleys as checkpoints. After completing a wave, count the stitches on the first slope and compare that number with the second slope. The two sides should mirror each other.
Next, look vertically down the blanket. Every new peak should sit above the peak below it. If a crest gradually moves left or right, stop and inspect the previous rows before continuing.
Stitch markers provide a second control. Place one marker at each valley while learning the repeat. After the construction becomes familiar, markers can be reduced to the first stitch, last stitch, and selected repeat points.
Blocking the Finished Blanket
Blocking should refine the fan shape rather than erase it. Measure the blanket before adding moisture so you know how much adjustment is required.
Shape the project to approximately 75 × 100 cm if that is your target finished size. Position the peaks first, then shape the valleys between them.
Acrylic, wool, cotton, and blended yarns react differently to heat and water. Follow the care information supplied for the specific yarn rather than applying the same blocking method to every fiber.
Allow the blanket to dry completely while supported in its final shape. Remove the pins only after the fabric is dry, then measure the width at three positions to confirm that the sides remain parallel.
Conclusion
Block the final blanket to approximately 75 × 100 cm, then photograph one complete wave repeat close enough that the eyelet and ridge construction can be seen. For the next version, record the peak-to-peak gauge before changing yarn brands; that measurement is more useful than relying on foundation-chain length alone. Save the pastel ripple crochet baby blanket to Pinterest with a vertical finished-project image, and share the completed color sequence on Instagram with #PastelFanRippleBlanket. When documenting your project, note one detail other makers can compare: which of the seven colors did you place directly above the first coral fan?