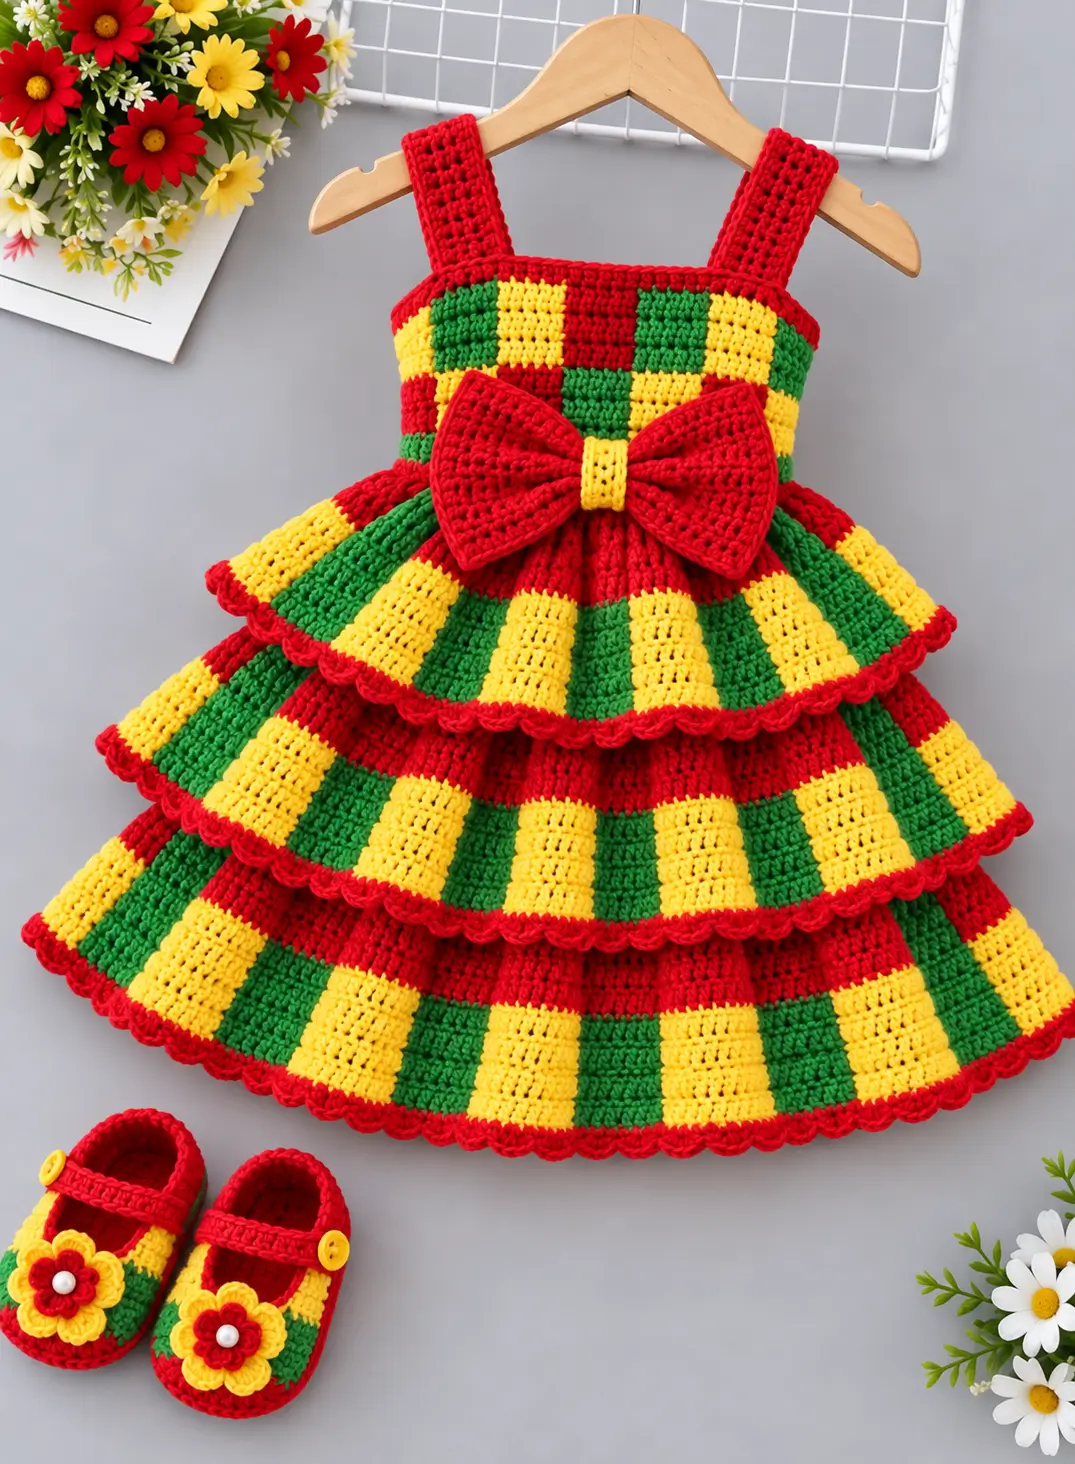
Three alternating red, green, and gold skirt tiers turn this Christmas dress into a color-placement project before it becomes a shaping project. This Christmas crochet baby dress pattern concept uses DK/light-worsted yarn, a 3.5 mm hook, a checked bodice, large bow, scalloped tiers, and matching shoes. Comparable constructions cover baby sizes with intermediate-level crochet techniques. The separated tiers also make skirt length easier to adjust.
The Design: What Makes This Christmas Dress Different
The photograph combines three structures that are often treated separately: a fitted checked bodice, an exaggerated bow, and a tiered circular skirt. The bodice needs comparatively little flare because its job is to stabilize the straps and carry the skirt. Below it, each skirt layer requires additional circumference so the tiers overlap rather than hanging as three narrow tubes.
Color placement matters just as much. Red forms the visual framework, while green and yellow blocks break the larger surfaces into a holiday checkerboard. A crochet baby dress with bow can become front-heavy when the bow is densely worked, so a flatter rectangular construction works better than an overstuffed one.
A frequent error in a tiered crochet baby dress is adding too much expansion in one row. That creates rippling instead of controlled flare.
Project Info at a Glance
| Skill Level | Time | Finished Size | Hook | Best For |
|---|---|---|---|---|
| Intermediate | Varies by size and gauge | Based on wearer measurements | 3.5 mm starting point | Holiday outfit, photography, display |
A 3.5 mm hook with DK/light-worsted yarn provides a practical starting point. Always make a gauge swatch before calculating the final garment measurements.
Materials and Tools
Yarn
Use smooth, washable yarn with clear stitch definition so the red, green, and yellow checks remain distinct.
- Red: DK/light-worsted yarn — approximately 80–120 g for a small baby size — main color
- Green: DK/light-worsted yarn — approximately 40–70 g — contrast color A
- Yellow/Gold: DK/light-worsted yarn — approximately 40–70 g — contrast color B
These quantities are planning estimates for this photo-inspired construction. Actual yarn consumption changes with garment size, gauge, skirt length, number of tiers, and individual crochet tension.
Tools
- 3.5 mm crochet hook
- 12–15 mm buttons or buttons scaled to the finished shoes
- Yarn needle
- Locking stitch markers
- Scissors
- Flexible measuring tape
- Rustproof pins
- Matching sewing thread where required
For clothing intended for an infant or young child, securely attach every decorative component. Crocheted or embroidered details can be substituted for detachable beads and other small embellishments.
Abbreviations
- ch — chain
- sc — single crochet
- hdc — half double crochet
- dc — double crochet
- inc — increase
- dec — decrease
- sl st — slip stitch
- st/sts — stitch/stitches
- BLO — back loop only
- RS — right side
- WS — wrong side
For an invisible decrease, insert the hook through the front loops of the next two stitches before completing one single crochet.
Gauge and Sizing Before the Pattern
This is a garment rather than an amigurumi project, so sizing needs to be calculated from gauge and body measurements instead of fixed stuffed-toy stitch counts.
Make a gauge swatch using the selected yarn and 3.5 mm hook. Wash and dry the swatch in the same manner planned for the finished dress before measuring it.
Measure the intended wearer’s chest circumference, shoulder-to-waist length, waist-to-desired-hem length, and required strap length. Add suitable wearing ease. For an infant garment, check the neckline and arm openings carefully so the finished dimensions are appropriate for the intended wearer.
Christmas Crochet Baby Dress Pattern — Step by Step
The photographed project uses garment construction rather than magic-ring amigurumi construction. The following instructions provide a photo-inspired framework that can be adjusted to the required measurements.
Bodice
Yarn: red, green, and yellow.
Make a foundation chain long enough to equal the required chest circumference plus the selected wearing ease.
Join the chain only when the completed bodice can comfortably pass over the intended wearer’s body. Otherwise, leave a back opening and add an appropriate fastening band.
Work single crochet rows to begin forming the bodice.
Divide the total stitch count into equal-width color blocks. Work alternating sections of red, green, and yellow to reproduce the checkerboard appearance.
After completing the first horizontal band, offset the color sequence in the next section. Green, yellow, and red blocks should alternate rather than forming continuous vertical stripes.
Continue until the bodice reaches the required waist measurement.
Finish the upper edge with one firm row or round of single crochet.
Fasten off and weave yarn tails into matching color sections.
Shoulder Straps — Make 2
Yarn: red.
Chain to the required strap width plus one turning chain.
Row 1: Work 1 sc in each chain across.
Row 2: Ch 1, turn, sc across.
Repeat Row 2 until the strap reaches the required shoulder length.
The photograph uses broad straps rather than narrow ties. Check their width against the finished bodice before attaching them.
Fasten off and leave a long sewing tail.
Upper Skirt Tier
Yarn: red, green, and yellow.
Join red yarn around the lower edge of the bodice.
Row/Round 1: Work evenly around the waist without excessive increases.
Row/Round 2: Distribute increases evenly across the row or round.
Continue adding circumference gradually until the fabric develops a controlled flare.
Divide the tier into vertical color panels. Alternate red, green, and yellow sections while maintaining consistent block widths.
Continue until the first tier reaches the required depth.
For the red scalloped edge, attach red yarn and work a repeating shell such as: skip 1 stitch, 5 dc in the next stitch, skip 1 stitch, sl st in the next stitch.
Repeat around the hem, adjusting the final spacing when necessary.
Fasten off.
Middle Skirt Tier
Yarn: red, green, and yellow.
Attach the middle tier beneath the first layer so the joining line is covered by the upper tier.
Begin with sufficient circumference for the tier to hang freely underneath the first layer.
Distribute increases through the first rows rather than placing a large number of increases into one row.
Continue the red, green, and yellow block pattern. Offset selected blocks from the upper tier to prevent the entire skirt from appearing as continuous vertical stripes.
Continue until the middle layer extends visibly below the upper tier.
Finish the hem with the same red scalloped border.
Fasten off.
Lower Skirt Tier
Yarn: red, green, and yellow.
Join the lower tier beneath the middle skirt layer.
This section requires the greatest circumference. Spread the required increases over multiple rows to maintain a smooth flare.
Continue alternating red, green, and yellow blocks until the skirt reaches the intended finished length.
Place the dress on a flat surface before working the final border. The lower tier should flare without producing repeated waves around the edge.
Attach red yarn and work the same scalloped edging used on the previous tiers.
Fasten off and weave in all remaining color-change tails.
Oversized Crochet Bow
Yarn: red and yellow.
Using red yarn, chain to the required bow width.
Row 1: Work sc across.
Row 2: Ch 1, turn, sc across.
Repeat until the rectangle reaches approximately twice the desired finished bow-wing depth.
Fasten off.
Pinch or accordion-fold the center of the rectangle so equal bow wings form on both sides.
For the yellow center band, chain to the required width and work short rows of sc until the strip is long enough to wrap around the gathered bow center.
Wrap the yellow section around the center and sew it closed at the back.
Attach the completed bow to the front waistline through several structural stitches.
Crochet Shoe Sole — Make 2
Yarn: red.
Measure the intended foot before beginning. The exact shoe size cannot be determined from the photograph.
Chain to approximately the required sole length minus the allowance needed for the rounded heel and toe.
Work around both sides of the foundation chain.
Place several stitches into each end of the chain to create the toe and heel curves.
During subsequent rounds, place increases around the curved ends while keeping the long sides relatively straight.
Stop increasing when the sole reaches the required length and width.
The completed sole should lie flat before the upper is added.
Crochet Shoe Upper — Make 2
Yarn: red, green, and yellow.
Join red yarn around the completed sole.
Work one round without increasing to begin turning the fabric upward.
Continue working single crochet around the shoe.
At the toe, distribute decreases symmetrically across several rounds. Concentrating all decreases into a single row can create an abrupt ridge.
Introduce green and yellow sections across the front to coordinate the shoes with the dress.
Continue until the heel and side walls reach the required height.
Finish the opening with red yarn.
Fasten off.
Mary Jane Shoe Straps — Make 2
Yarn: red.
Join yarn at one side of the shoe opening.
Chain across the instep until the strap reaches the opposite side without excessive tension.
Work back along the chain using sc or hdc.
Create a button loop at the end according to the diameter of the selected button.
Fasten off.
Securely sew the button to the opposite side of the shoe.
Crochet Shoe Flowers — Make 2
Yarn: yellow and red.
Using red yarn, make a small adjustable ring.
Round 1: Work 6 sc into the ring and join. (6)
Change to yellow.
Round 2: Form one petal over each base stitch. A simple petal can be made with ch 2, several dc into the same stitch, ch 2, then sl st into the same stitch.
Repeat until six petals have been formed.
Fasten off and leave a sewing tail.
Sew one flower firmly across the toe of each shoe.
For an infant garment, a crocheted or embroidered flower center is preferable to a loose bead or similar detachable embellishment.
Assembly
- Block the bodice lightly to the required chest measurement before attaching the skirt.
- Pin both red shoulder straps symmetrically. Check the neckline depth, strap length, and arm openings before sewing them permanently.
- Attach the upper skirt tier at the waist and distribute its increases evenly around the garment.
- Position the middle tier beneath the first layer. Keep its attachment row covered while leaving enough of the colored section visible.
- Attach the lower tier underneath the middle layer and check the total dress length before completing its scalloped edging.
- Center the red-and-yellow bow on the front waistline. Sew through the center band, bodice, and skirt attachment area at several points.
- Weave checkerboard yarn tails into matching color areas. Avoid carrying red tails through yellow sections where they may remain visible.
- Compare both completed shoe soles before finishing the uppers. Their length, width, and toe shaping should match.
- Attach the Mary Jane straps and crochet flowers. Secure every retained decorative component firmly.
- Wash or wet-block according to the yarn manufacturer’s care instructions. Dry the dress flat, remeasure the bodice and shoes, and inspect all attachment points before use.
The completed set should have three clearly separated skirt tiers, a centered waist bow, symmetrical shoulder straps, consistent checkerboard color placement, and two matching Mary Jane shoes.
7 Technical Tips for Better Construction
- Control checkerboard drift. A one-stitch error at a color boundary becomes increasingly obvious as additional rows are added. Place a locking stitch marker at every planned color-block boundary before starting the next band.
- Prevent skirt rippling. Too many increases concentrated into one row create an uncontrolled ruffle instead of a gradual flare. Spread increases across several rows and lay each tier flat after an increase section.
- Keep the bow structured. A narrow center band can crush the red bow wings into two small tubes. Test the yellow band around the folded rectangle and keep both wings equal before sewing.
- Measure both straps. A difference of only 1 cm can alter the neckline angle on a small baby garment. Measure both straps under identical light tension before attaching either one permanently.
- Stop dark yarn showing through. Red carried behind yellow blocks can remain visible between stitches. Use separate small yarn bobbins for high-contrast areas and weave each tail into its matching color.
- Duplicate shoe decreases. Toe decreases added by eye can produce two shoes with different shapes or lengths. Record the exact decrease positions on the first shoe and repeat those positions on the second.
- Check small attachments. Buttons, beads, and poorly anchored flowers can detach from children’s clothing. Inspect every decorative component before use and substitute crocheted or embroidered details where appropriate.
Conclusion
The defining feature of this design is not simply its Christmas palette. The construction combines a checked fitted bodice with three independently flared skirt layers, a broad red bow, scalloped edging, and matching Mary Jane shoes. Before cutting yarn, make a gauge swatch and convert the bodice circumference, strap length, skirt depth, and shoe sole to the intended wearer’s measurements. That step matters more than copying a stitch count from an unrelated garment size. Save this Christmas crochet baby dress pattern idea to Pinterest or share the finished red-green-gold version on Instagram with #ChristmasCheckerDress. Which detail would you repeat on the shoes: the bodice checkerboard or the skirt’s wider color panels?