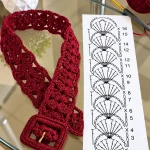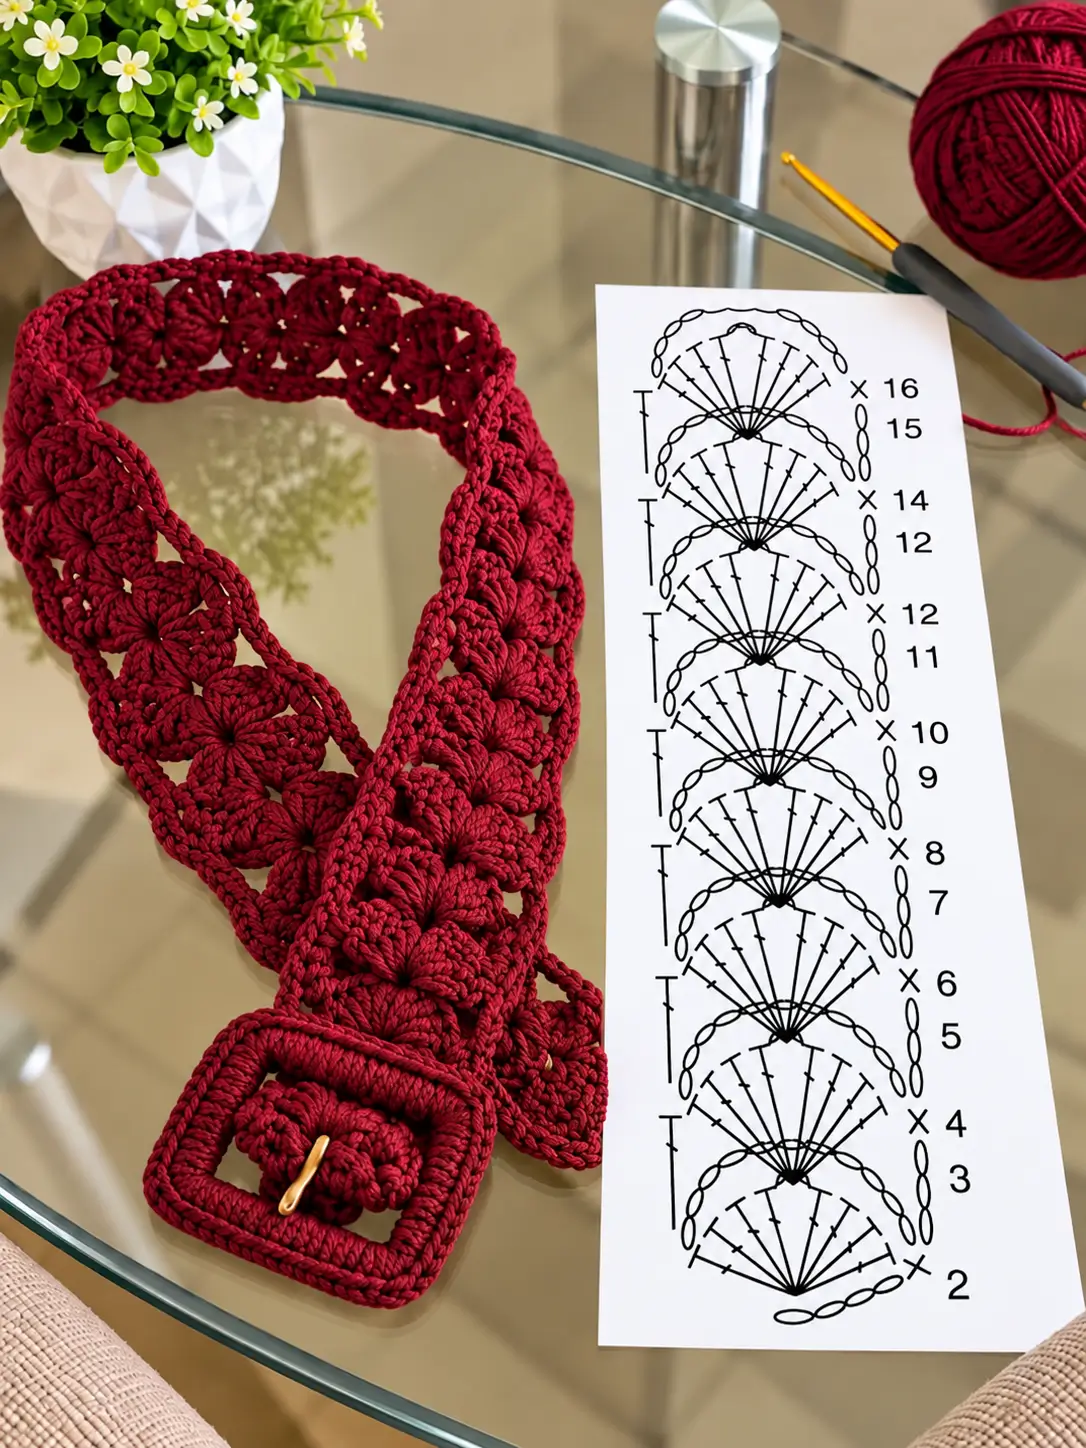
Eight radiating stitches have to do two jobs here: form each burgundy flower and keep the belt from collapsing lengthwise. This crochet flower belt pattern uses DK yarn, a 3 mm hook, connected fan motifs and a covered rectangular buckle. Comparable motif belts measure roughly 3.7–4 cm wide. The project suits an advanced beginner and produces an adjustable accessory without sewing separate flowers together.
The Design: What Makes This Flower Belt Different
The photographed belt is built around repeated radial fans rather than isolated appliqué flowers. That distinction matters. Connecting each motif directly to the previous repeat reduces bulky joins and creates a continuous structural line through the belt.
A second decision concerns the border. Narrow crochet edging runs along both sides of the motif strip, limiting lateral stretch while visually connecting the petals. The rectangular buckle adds another requirement: its crochet covering must remain substantially firmer than the floral section or the frame can twist during fastening.
This crochet floral belt is therefore better treated as a textile strap with decorative openwork, not as a row of ornaments. A common error in a crochet motif belt is adding too many chain stitches between fans. Excess chain length opens large gaps and lets individual flowers rotate instead of staying aligned.
Project Info at a Glance
| Skill Level | Time | Finished Size | Hook | Best For |
|---|---|---|---|---|
| Advanced beginner | 4–6 hours | Approx. 4 cm wide; length made to measure | 3.0 mm | Dresses, trousers, skirts and tunics |
A comparable published motif belt measures approximately 3.7 cm wide, with 16 flowers covering a 67.5 cm motif section. Different yarn can increase the width to approximately 4 cm.
Materials and Tools
Yarn
- Burgundy DK cotton or cotton-blend yarn — approximately 40 g
- Accent yarn — none required
A tightly twisted cotton or smooth cotton blend works well because the individual fan stitches remain defined. The 40 g quantity provides an allowance for the motif strip, borders, fastening section and crochet-covered buckle.
Tools
- 3.0 mm crochet hook
- Rectangular belt buckle, approximately 40–45 mm internal width
- Tapestry needle
- Scissors
- Locking stitch markers
- Measuring tape
- Rust-resistant sewing thread, optional for reinforcing the buckle
Abbreviations
- MR — magic ring
- sc — single crochet
- hdc — half double crochet
- dc — double crochet
- tr — treble crochet
- inc — 2 sc in one stitch
- dec — single crochet decrease
- sl st — slip stitch
- ch — chain
- sp — space
- BLO — back loop only
- st/sts — stitch/stitches
- rep — repeat
An invisible decrease is worked through the front loops of the next two stitches before completing one single crochet; it reduces bulk where a solid section needs narrowing.
Crochet Flower Belt Pattern — Step by Step
Construction note: This belt is worked as a flat motif strip rather than in an amigurumi spiral. The flower geometry requires rows, joins and repeated fan sections.
Foundation and Lower Fan Motif
Yarn: burgundy DK.
Ch 4.
Row 1: Work 8 dc into the fourth ch from hook. Turn. (8 dc)
Row 2: Ch 3, dc in same st, 2 dc in each of next 7 sts. (16 dc)
The resulting semicircle creates the first half of the flower-like repeat.
Do not fasten off.
After light blocking, aim for a motif width of approximately 3.5–4 cm. Make the first motif as a gauge sample before committing to the entire belt.
Connecting Bridge
Ch 3.
Sl st into the outer edge of the completed fan, ch 3, then begin the next lower fan from the final chain space.
Keep this bridge compact. Too many chain stitches create an unsupported opening between flowers and allow the motifs to rotate when the belt is worn.
Repeated Flower/Fan Section
Repeat until the decorative section reaches the required length.
Repeat 1: Ch 4; work 8 dc into fourth ch from hook. (8)
Repeat 2: Ch 3; work 2 dc in each st across. (16)
Join: Sl st to the corresponding outer edge of the previous motif.
Continue the same sequence across the belt.
A useful reference length is approximately 16 motifs for a decorative section around 67.5 cm, but the correct number depends on yarn, tension, buckle dimensions and the wearer’s measurement.
For this buckle design, stop when the unstretched motif section measures approximately:
Required finished belt length − buckle length − fastening allowance.
For example, a 75 cm finished belt with a 5 cm buckle and 8 cm fastening overlap requires approximately 62 cm of primary motif fabric before finishing.
Upper Fan Row
Turn the completed lower strip so the unfinished edges face upward.
Join burgundy yarn to the first motif.
Row 1: Ch 3. Work 8 dc evenly into the exposed center or upper edge of the first motif. (8)
Row 2: Ch 3, 2 dc in each of the 8 sts. (16)
Sl st into the connecting bridge.
Repeat the same two-row fan across every lower motif. Join each completed fan to its corresponding bridge before starting the next repeat.
This second pass fills the upper section of the motif strip and produces the connected flower or medallion appearance.
Lower Edge
Join burgundy yarn at the buckle end.
Row 1: Ch 1, sc evenly along the lower edge, placing approximately 2 sc into each row-end space and 1 sc at narrow joins.
The exact stitch total depends on the number of motifs. Concentrate on keeping the border flat rather than forcing an arbitrary stitch count.
Row 2: Ch 1, sc in every st across.
Fasten off. Leave a 15 cm tail.
The narrow band stabilizes the openwork and reduces distortion without covering the flower outline.
Upper Edge
Repeat the edging process along the opposite side.
Row 1: Sc evenly across.
Row 2: Ch 1, sc in every st across.
Fasten off, leaving a 15 cm tail.
Place the belt on a flat surface and compare both edges before weaving in the tails. Both sides should have approximately the same finished length.
Buckle Tab
Yarn: burgundy DK.
Measure the straight internal bar of the rectangular buckle.
For a belt approximately 4 cm wide, make the tab around 3.5–4 cm wide.
Row 1: Ch 9. Sc in second ch from hook and each ch across. (8)
Rows 2–12: Ch 1, turn, sc across. (8)
Test the tab around the buckle bar after Row 8. Continue only until the strip wraps around the bar with enough overlap for secure stitching.
Fasten off with a 30 cm tail.
Thread the tab through the buckle frame, fold it around the bar and sew the free edge firmly to the reverse of the motif belt.
Crochet Buckle Cover
The rectangular frame can be covered with the same burgundy yarn to reproduce the strong monochrome border visible in the design.
Attach yarn around one long side of the buckle.
Round 1: Work sc closely around the frame. Pack the stitches firmly enough to cover the hardware without forcing them to overlap.
At each corner, work 3 sc around the corner section before continuing along the next side.
Continue around all four sides.
Sl st into the first sc.
Round 2: Ch 1, sc in every sc around, working 3 sc at each corner.
Sl st to join.
Fasten off and weave the yarn tail beneath the dense buckle stitches.
Keep the central opening unobstructed. Any buckle tongue or fastening mechanism must move without catching the crochet covering.
Fastening End
Join burgundy yarn to the opposite end of the floral strip.
Row 1: Sc evenly across the belt width.
Rows 2–10: Ch 1, turn, sc across.
For a narrower or pointed end, begin decreasing after the straight section.
Row 11: Dec, sc across to final 2 sts, dec.
Row 12: Sc across.
Row 13: Dec, sc across to final 2 sts, dec.
Continue narrowing only when required by the selected buckle.
Fasten off with a 20 cm tail.
If the buckle uses a tongue, replace the central 2 sc on the required row with ch 2, skip 2. On the following row, work 2 sc into that chain space.
Optional Belt Keeper
Ch 5.
Row 1: Sc in second ch from hook and across. (4)
Rows 2–12: Ch 1, turn, sc across. (4)
Wrap the strip around the completed belt close to the buckle. Join the short ends securely on the reverse using whipstitch.
The keeper should be large enough for the fastening end to pass through without allowing the loose end to hang away from the belt.
Assembly
- Lay the motif strip flat and confirm that every flower faces the same direction.
- Measure the strip without stretching it and compare the measurement with the required finished belt length.
- Sew the buckle tab to the first end with its seam positioned on the reverse.
- Attach the rectangular buckle and test all moving hardware before securing the final stitches.
- Work the crochet buckle covering around all exposed frame sections.
- Attach the fastening tab to the opposite end and align its center with the center of the buckle.
- Mark any required tongue hole while the belt is actually threaded through the buckle.
- Sew the optional keeper immediately behind the buckle while leaving clearance for the belt end.
- Weave each structural yarn tail through at least 3 cm of dense stitches, reverse direction, then weave through another 2 cm.
- Lightly block the floral section to approximately 3.7–4 cm wide. Keep metal components dry unless their care instructions permit washing.
The completed belt consists of a stabilized floral motif strip, crochet-covered buckle, fastening tab and optional keeper.
7 Technical Tips for a Better Crochet Flower Belt
- Mark every fifth motif. Losing the repeat count can produce a belt several centimeters longer than planned, particularly when each motif contributes roughly 4 cm.
- Keep the motifs completely flat. This is an openwork accessory, so adding filling or creating raised centers will distort the approximately 4 cm belt width.
- Keep decreases out of the flower fans. Reducing stitches inside a radial fan changes its geometry and makes one flower visibly narrower than its neighbors.
- Check buckle alignment before completing the seam. A displacement of only 5 mm can make the entire motif strip enter the buckle at an angle.
- Watch tension between motifs. A fan that finishes more than 5 mm wider than adjacent motifs should be remade instead of being forced into shape during blocking.
- Pin both borders every 5 cm before final finishing. Uneven border tension can shorten one edge and cause the finished belt to curve.
- Secure structural tails thoroughly. Weave each buckle-area tail for at least 3 cm, reverse direction, then weave another 2 cm so repeated fastening tension does not loosen the join.
How to Size the Crochet Flower Belt
Measure the exact position where the belt will be worn rather than relying only on standard clothing sizes. A belt positioned at the natural waist requires a different finished length from one worn lower around the hips.
Do not make the decorative strip equal to the entire body measurement. The buckle, fastening tab and overlap contribute additional length.
Use this working formula:
Decorative motif length = desired finished length − buckle length − fastening overlap.
For the first fitting, temporarily pin the buckle and fastening tab instead of sewing them permanently. Thread the belt through the buckle exactly as it will be worn.
Mark the primary fastening position and any additional adjustment holes. Remove the belt and finish the hardware only after those positions have been confirmed.
This method prevents a common construction problem: measuring the crochet strip correctly but forgetting the extra effective length created by the buckle and fastening system.
Choosing Yarn and Checking Gauge
Cotton and cotton-blend yarns are practical choices for this design because the belt requires lateral definition. A smooth yarn also keeps the openings between the radiating stitches clearly visible.
DK yarn with a 3.0 mm hook provides a useful starting combination for the compact structure shown here. If the selected DK yarn is particularly thick, a 3.5 mm hook may produce a flatter fan.
Gauge should be checked at motif level rather than by making a traditional square swatch.
Make one complete flower/fan repeat first. Aim for approximately 3.5–4 cm across the repeat.
If the motif is substantially wider, reduce the hook by approximately 0.5 mm. If the fabric becomes too rigid for the fan to lie flat, increase the hook size by one increment.
Every motif should finish close to the same measurement. Small inconsistencies multiply across a long belt.
Why the Connected Motif Construction Matters
Separate crochet flowers can be stitched together after completion, but every sewn connection becomes another point capable of rotating or stretching.
A continuous motif structure distributes pulling force through a larger section of crochet fabric. That characteristic is particularly useful near a buckle, where repeated fastening puts more tension on the belt than a decorative appliqué normally receives.
The upper and lower borders have a structural role as well. They create two continuous lines running along the length of the openwork section.
Do not make these borders excessively loose. Loose edging allows the flowers to spread sideways. Borders that are too tight cause the entire strip to curve.
Place the belt flat after every several motifs and check both long edges. Correcting tension after three or four motifs requires far less work than correcting it after the entire belt is finished.
Finishing the Burgundy Crochet Belt
Weave the ordinary motif tails through stitches of the same color and direction so they remain hidden inside the dense sections. Buckle-area tails require additional reinforcement because they receive repeated mechanical stress.
Light blocking can correct small differences between adjacent flower motifs. Pin the belt to the intended width without stretching it lengthwise.
Do not use blocking to correct major gauge differences. A flower that is visibly larger than the surrounding repeats should be remade.
After blocking, thread the belt through its buckle several times. Check the buckle cover for movement, inspect the fastening tab and confirm that the floral strip enters the frame squarely.
The final measurement should be taken after the belt is completely dry and all hardware is installed.
Conclusion
Measure the intended wearing position before choosing the final motif count; that measurement controls the floral section, fastening overlap and buckle placement. Make one fan first, check for a width near 3.5–4 cm, then repeat the motif until the required working length is reached. Finish by adding both stabilizing borders and testing the buckle before permanently sewing its tab. This crochet flower belt pattern uses the structural features visible in the reference: connected burgundy fans, narrow borders and a substantial rectangular buckle. Save the finished belt to Pinterest or share your version on Instagram with #BurgundyFlowerBelt. Which buckle finish will you use: fully crochet-covered burgundy or exposed gold-tone hardware?