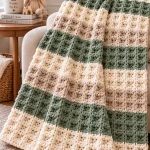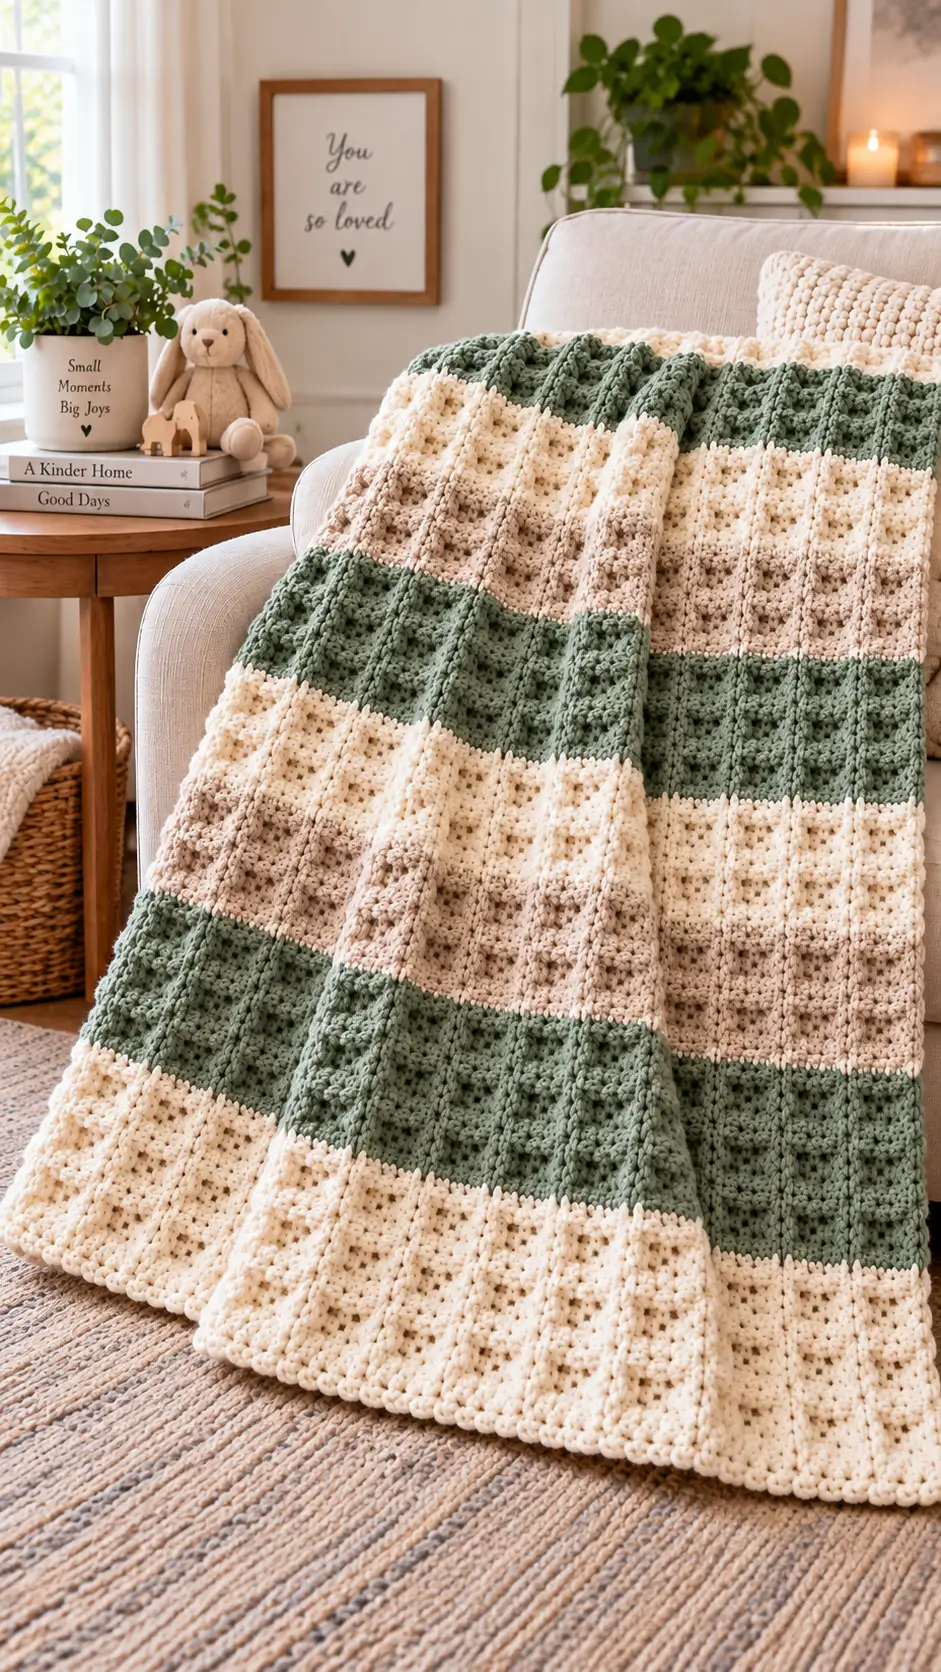
Broad sage bands interrupted by cream relief columns are the defining geometry of this blanket. This chunky striped crochet blanket pattern uses #6 super bulky yarn, a 10 mm hook and raised post-stitch sections to target a 127 × 152.5 cm throw. The skill level is intermediate because the texture requires consistent post placement. Its broad horizontal repeats also make the finished dimensions easy to modify.
The Design: What Makes This Textured Throw Different
Three structural decisions control this design. First, broad sage, cream and oatmeal blocks reproduce the large-scale color rhythm visible in the reference rather than using narrow conventional stripes.
Second, raised columns break those blocks vertically. Front-post crochet is particularly useful here because it lifts selected stitches above the main fabric and creates the pronounced relief required for this design.
Third, the blanket is worked flat rather than assembled from panels. That keeps every color boundary continuous across the full width.
The common mistake with a textured crochet blanket pattern of this type is allowing post-stitch rows to tighten. The maker starts with a rectangular foundation, but repeated tension changes gradually pull the sides inward. Measure the width after every major stripe.
Project Info at a Glance
| Skill Level | Time | Finished Size | Hook | Best For |
|---|---|---|---|---|
| Intermediate | Approx. 15–25 hours | 127 × 152.5 cm | 10 mm N/P | Sofa throw / large lap blanket |
The target dimensions are approximately 127 × 152.5 cm. A 10 mm crochet hook paired with #6 super bulky blanket yarn provides the heavy fabric and pronounced stitch definition needed for this version.
Materials and Tools
Yarn
Use the same yarn weight for all three colors. A #6 super bulky chenille or blanket yarn works well for reproducing the thick structure shown in the reference image.
- Sage green — #6 Super Bulky — approximately 900 g
- Warm cream — #6 Super Bulky — approximately 900 g
- Light oatmeal — #6 Super Bulky — approximately 600 g
Plan for approximately 2,100–2,400 g of yarn for a heavily textured throw around the stated dimensions. Actual consumption changes with gauge, yarn construction, tension and final blanket size.
Tools
- 10 mm N/P crochet hook
- Large tapestry needle
- Locking stitch markers
- Scissors
- Flexible tape measure
- Optional 12 mm hook for the foundation chain
Abbreviations
- ch — chain
- sc — single crochet
- hdc — half double crochet
- dc — double crochet
- FPdc — front post double crochet
- BPdc — back post double crochet
- st(s) — stitch(es)
- RS — right side
- WS — wrong side
- rep — repeat
- sk — skip
Invisible decreases are not required because this rectangular blanket uses no three-dimensional shaping.
Chunky Striped Crochet Blanket Pattern
Construction: The blanket is worked flat in turned rows.
Gauge
Target approximately 7 stitches × 7 rows = 10 × 10 cm in the main textured fabric after the swatch has rested.
Make a minimum 15 × 15 cm gauge swatch before beginning the full blanket. Do not use the foundation chain itself as the gauge measurement.
Width Formula
For a target width of approximately 127 cm at seven stitches per 10 cm:
127 ÷ 10 × 7 = approximately 89 stitches.
Because the design uses repeating relief columns, the pattern starts with 91 chains and works 90 stitches across.
Your own gauge controls the actual finished width. Add or subtract stitches according to your swatch while preserving the texture repeat.
Foundation
Yarn: warm cream.
Foundation: Ch 91 loosely.
Row 1: Hdc in second ch from hook and each ch across. Turn. (90)
Row 2: Ch 1, hdc in each st across. Turn. (90)
Row 3: Ch 2, dc in each st across. Turn. (90)
Do not count the turning chain as a stitch throughout the pattern.
Raised Ridge Section
The raised columns provide the main structural detail of the blanket.
Row 4: Ch 2, dc in first 4 sts, *FPdc around next 2 sts, dc in next 6 sts*; repeat the sequence across as evenly as the 90-stitch width permits. Work remaining stitches in dc. Turn. (90)
Row 5: Ch 2, dc in each ordinary dc; work BPdc around each raised post from the previous row. Turn. (90)
Row 6: Repeat Row 4. (90)
Row 7: Repeat Row 5. (90)
Rows 8–11: Repeat Rows 4–5 twice. (90 each row)
The alternating FPdc and BPdc placement keeps the ridge projecting consistently on the right side of the blanket.
Sage Green Block
Change to sage green during the final yarn-over of the last cream stitch.
Row 12: Ch 1, hdc across. Turn. (90)
Row 13: Ch 2, dc across. Turn. (90)
Row 14: Work the established raised-ridge sequence. (90)
Row 15: Work the corresponding reverse-side post sequence. (90)
Rows 16–23: Repeat Rows 14–15 four times. (90 each row)
Row 24: Hdc across. (90)
The sage section should read as one broad color block. Keep the stitch count at 90 throughout.
Cream Block
Change to warm cream.
Row 25: Hdc across. (90)
Row 26: Dc across. (90)
Rows 27–36: Alternate the established right-side and wrong-side post-stitch rows. (90 each row)
Row 37: Hdc across. (90)
Measure the side edge at this point. A color block that is noticeably shorter on one side usually indicates missed turning stitches.
Oatmeal Accent Block
Change to light oatmeal.
Row 38: Hdc across. (90)
Row 39: Dc across. (90)
Rows 40–47: Continue the established relief sequence. (90 each row)
Row 48: Hdc across. (90)
The oatmeal section functions as a low-contrast transition between the stronger cream and sage blocks. Keep all three yarn colors in the same weight category.
Second Cream Block
Change to warm cream.
Rows 49–60: Repeat the cream-block construction while maintaining 90 stitches on every row.
A front-post double crochet is worked around an existing stitch. Do not accidentally add another stitch beside the post stitch.
Second Sage Block
Change to sage green.
Rows 61–73: Repeat the sage-block construction. (90 each row)
Lay the blanket flat without stretching it at approximately the halfway point. Compare the current width with the foundation width.
Third Cream Block
Change to warm cream.
Rows 74–86: Work the established texture. (90 each row)
The blanket should now show its primary design structure: broad horizontal color fields crossed by raised vertical details.
Second Oatmeal Accent
Change to light oatmeal.
Rows 87–97: Work the established texture. (90 each row)
Keep this accent section slightly narrower than the main cream and sage sections to maintain the proportions visible in the reference design.
Final Sage Block
Change to sage green.
Rows 98–110: Work the established pattern. (90 each row)
Check the overall blanket length before beginning the final cream section. Additional pairs of texture rows can be added here when more length is required.
Final Cream Section
Change to warm cream.
Rows 111–121: Continue the established relief sequence. (90 each row)
Row 122: Hdc in each stitch. (90)
Row 123: Sc in each stitch. (90)
Fasten off, leaving approximately 20 cm for weaving.
Continue additional two-row texture repeats before Row 122 when necessary to reach approximately 152.5 cm. Finished measurements take priority over an exact row count because super bulky chenille yarn can produce substantial gauge differences.
Side Edging
Join the cream yarn at one lower corner.
Edging Round 1: Sc evenly up the first side. Work 3 sc in the corner, sc across the top, 3 sc in the next corner, sc evenly down the second side, 3 sc in the corner, sc across the foundation edge, then work 2 additional sc in the starting corner. Join with sl st.
Edging Round 2: Ch 1, sc in each stitch, working 3 sc into each corner stitch. Join.
Fasten off and weave in the remaining tail.
The border is optional when the raw edges already lie square. Its primary function is to stabilize the perimeter.
Color Sequence
For a result close to the reference image, use this sequence:
Cream → Sage → Cream → Oatmeal → Cream → Sage → Cream → Oatmeal → Sage → Cream.
The visual structure depends on unequal stripe widths. Making every band identical changes the design into a conventional striped throw rather than the large-block composition shown here.
How to Adjust the Blanket Size
The blanket can be resized by changing the foundation count for width and adding or removing complete row repeats for length.
For a smaller lap blanket, aim for approximately 90–105 cm wide. A general sofa throw can measure around 120–130 cm wide. Larger bed-oriented blankets can exceed 150 cm, but yarn requirements increase substantially.
At the target gauge of seven stitches per 10 cm, calculate a new approximate stitch count with this formula:
Desired width in centimeters × 0.7 = approximate stitch count.
Round the result to a number that works with your chosen relief-stitch repeat. Always confirm the calculation with a gauge swatch before purchasing yarn for a substantially larger blanket.
Assembly and Finishing
- Lay the completed blanket on a flat surface without stretching the corners.
- Confirm that both long sides measure within approximately 2 cm of each other.
- Check every color-change point for an unsecured yarn tail.
- Thread each tail onto a large tapestry needle.
- Weave tails through the dense backs of stitches rather than through exposed chenille loops.
- Reverse direction at least once before trimming each tail.
- Inspect all four corners for puckering after completing the border.
- Measure the final width through the center of the blanket rather than only along the upper edge.
- Measure the length through the center and add rows if the blanket remains below the target measurement.
- Follow the washing and drying instructions printed on the selected yarn label.
The completed project is a rectangular three-color throw with broad stripes and regularly repeated raised relief columns.
7 Technical Tips for a Better Textured Crochet Blanket
- Count drift: Place a locking marker in the first and last stitch of every row. Missing an edge stitch repeatedly can reduce a 90-stitch blanket by several centimeters before the problem becomes obvious.
- Foundation curl: If the lower edge bows inward, make the 91-chain foundation with a hook approximately 2 mm larger than the working hook. Return to the 10 mm hook for Row 1.
- Post-stitch contraction: FPdc stitches can make a relief section narrower than surrounding hdc fabric. Measure the width after every 10–12 rows and loosen the post-stitch tension if the sides begin drawing inward.
- Color-change bumps: Complete the final yarn-over of the preceding stitch with the new color. Changing yarn only after completing the stitch can leave a visible step along the side edge.
- Chenille shedding: Avoid repeatedly pulling short chenille tails through dense stitches. Leave approximately 20 cm at each final cut so each tail can be secured with fewer passes.
- Uneven stripe depth: Count rows instead of judging stripe width while the blanket is folded or bunched. Place a removable marker in the first row of every new color section.
- Border flare: Too many stitches along the long edges produce a ruffled perimeter. If the first border round waves noticeably, remove it and reduce the number of side-edge stitches.
Why Super Bulky Yarn Works for This Blanket
The design depends heavily on stitch scale. Thin yarn would reduce the raised columns to relatively fine surface details, while #6 super bulky yarn makes the ridges substantial enough to remain visible across the broad color sections.
Chenille-style blanket yarn also creates a thick fabric without requiring several strands to be held together. A 10 mm crochet hook gives enough space for the post stitches while maintaining the dense structure required for a sofa throw.
If you substitute #7 jumbo yarn, make a new gauge swatch before starting. A larger yarn can require a 12–15 mm hook and substantially fewer foundation stitches. Do not use the 90-stitch count unchanged after moving to a different yarn category.
Choosing the Sage, Cream and Oatmeal Colors
The color balance matters as much as the stitch texture. Sage is the strongest color in the reference, but it does not occupy every section. Warm cream creates the largest areas of contrast, while oatmeal provides a quieter transition between the two dominant shades.
Avoid using three colors with identical visual strength. If the oatmeal shade becomes too dark, the blanket begins to read as three equally weighted stripes instead of two primary colors with a softer accent.
For substitutions, keep the darkest color in the sage position, the lightest yarn in the cream position and choose an oatmeal shade that sits between them.
Checking the Blanket Before Fastening Off
Do not use the final row number as the only indication that the project is finished. Place the blanket flat and measure through its center.
The target is approximately 127 cm wide × 152.5 cm long. A small difference is acceptable, but a significant difference indicates that the working gauge did not match the sample gauge.
Check the relief columns at the same time. They should remain vertically aligned through each color block. A column that shifts sideways usually indicates a misplaced post stitch in an earlier row.
Finally, inspect the side edges. Both should remain reasonably straight before the border is added. A border can stabilize a minor variation, but it cannot correct major stitch-count loss.
Conclusion
Measure the finished width before committing the full yarn supply to this chunky striped crochet blanket pattern. A 15 cm gauge swatch will show whether the 90-stitch foundation produces the intended width with your selected yarn and tension. Once the measurement is confirmed, label the sage, cream and oatmeal yarn and record each color change as the rows progress. Save the finished blanket to Pinterest or share the completed version on Instagram with #SageRidgeBlanket. For your version, would you keep the oatmeal transition bands shown in the reference, or replace them with a second shade of sage?