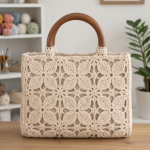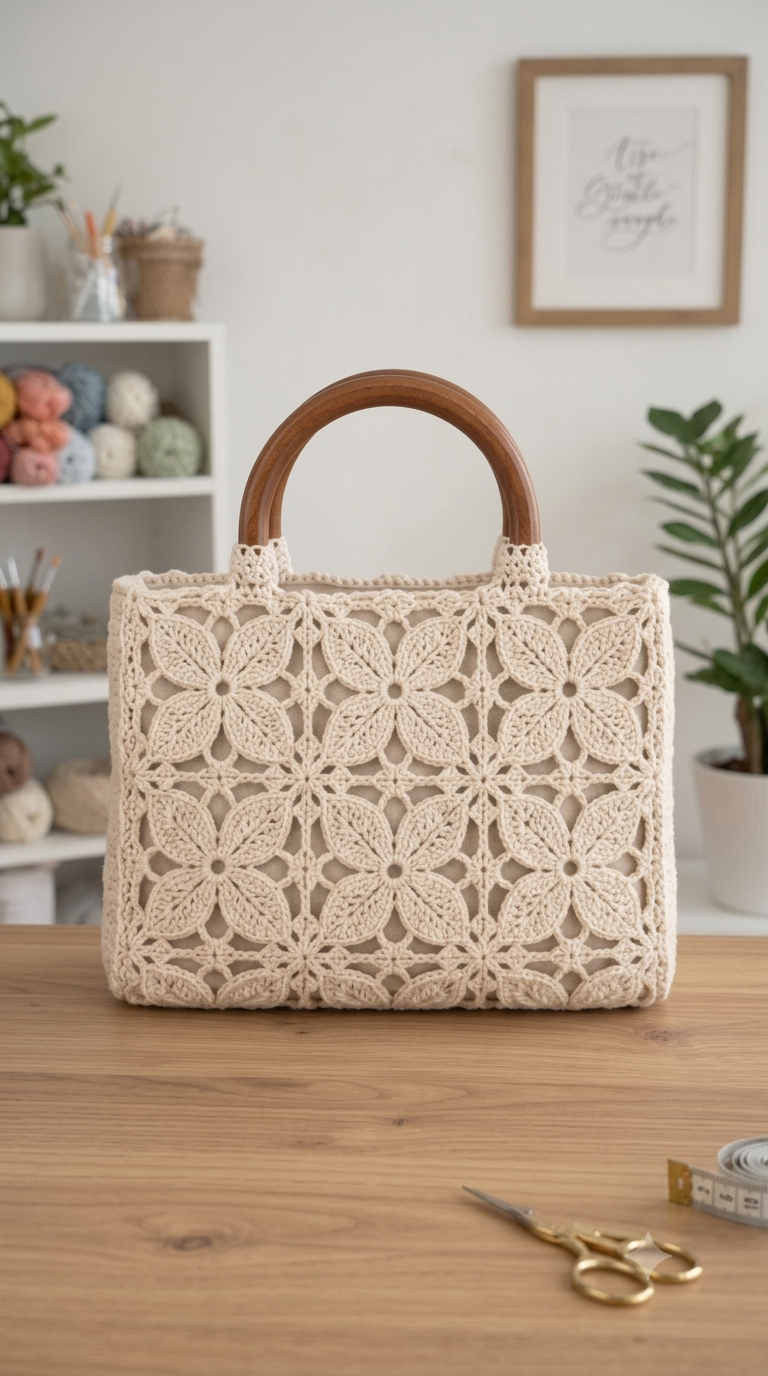
Five broad petals meeting around an open center define the geometry of this bag before its handles are even attached. This crochet flower bag pattern recreates that structure with cotton yarn, joined lace motifs, small connector flowers, and rigid wooden handles. Plan for roughly 300 g of yarn and an intermediate skill level. The rectangular construction also makes the finished bag practical for adding a fabric lining.
The Design: What Makes This Floral Bag Different
The photographed bag does not use ordinary solid granny squares. Large flowers dominate the front panel, with elongated petals filling most of each motif and open chain spaces connecting neighboring flowers.
That distinction controls the construction. Each large flower needs enough structure along its outer edges to resist stretching, while the smaller connector motifs fill the spaces where four flowers meet. A reinforced upper edge then carries the load from the wooden handles.
This floral crochet bag also differs from a typical crochet flower tote bag because its handles do not depend on long crocheted straps. Rigid handles transfer force into short attachment tabs instead.
A common mistake is making the joining chains too loose. The flowers then separate under load and the rectangular panel becomes wider at the top than at the bottom.
Project Info at a Glance
| Skill Level | Time | Finished Size | Hook | Best For |
|---|---|---|---|---|
| Intermediate | 8–12 hours, estimated | About 35–38 cm wide × 26–29 cm high | 3–4.5 mm according to yarn | Handbag, lined tote, project bag |
Published floral bags show considerable dimensional variation, from compact handbag proportions to considerably larger totes. The target measurement here is chosen to reproduce the proportions of the photographed bag rather than claiming the exact dimensions of the original object.
Materials and Tools
Yarn
- Natural ivory cotton — DK/light-worsted cotton or approximately 2 mm cotton cord — 250–300 g.
- Accent yarn — none required for the monochrome version.
A firm, low-stretch cotton works particularly well for this construction. The flower motifs contain large open spaces, so a yarn with excessive elasticity can allow the finished panel to lengthen once the bag is loaded.
Tools
- 3.0–4.5 mm crochet hook, matched to the selected cotton
- 2 rigid wooden handles, approximately 14–18 cm across
- Tapestry needle
- Locking stitch markers
- Sharp scissors
- Tape measure
- Blocking pins
- Optional fabric lining
- Optional magnetic snap
A smaller hook relative to the yarn produces the firmer fabric needed around the base and handle attachments.
Abbreviations
- MR — magic ring
- ch — chain
- sc — single crochet
- hdc — half double crochet
- dc — double crochet
- tr — treble crochet
- inc — two stitches in one stitch
- sl st — slip stitch
- sp — space
- st/sts — stitch/stitches
- BLO — back loop only
Invisible decrease is an amigurumi technique and is not required for this openwork motif construction.
Crochet Flower Bag Pattern — Step by Step
This is an original photo-inspired construction based on the visible geometry of the reference bag.
Large Five-Petal Flower Motif — Make 16
Yarn: natural ivory.
R1: MR, ch 1, work 10 sc into ring, sl st to first sc. (10)
Pull the ring firmly while retaining a small central opening if you want the open lace appearance shown in the reference.
R2: *Ch 8, skip 1 sc, sl st in next sc.* Repeat five times. (5 petal loops)
R3: Into each ch-8 loop work: 1 sc, 1 hdc, 2 dc, 3 tr, 2 dc, 1 hdc, 1 sc. Repeat around all five loops.
You should now have five broad petals.
R4: Sl st along the edge until reaching approximately the midpoint of the first petal. Ch 5, sc into the tip area of the next petal; repeat around, creating five outer joining arches.
R5: Work 5 sc into each ch-5 arch. At each petal tip, add ch 3 between neighboring arches to create joining points.
Fasten off with a 15 cm tail when motifs will be sewn. For join-as-you-go construction, retain the working loop and substitute joining slip stitches for selected chains.
The finished motif should lie flat. If it cups, increase the outer chain spaces by one chain. If it ripples, reduce them by one.
Small Connector Flower — Make 12–18 as Required
Yarn: natural ivory.
These motifs fill the larger openings between the main flowers and reproduce the small floral intersections visible in the reference.
R1: MR, ch 1, 8 sc in ring, sl st to first sc. (8)
R2: *Ch 4, sl st in next sc.* Repeat eight times. (8 loops)
R3: Into each loop work 1 sc, 2 dc, 1 sc. Repeat around all eight loops.
Fasten off with a 15 cm tail.
The exact number of connector flowers depends on the joining layout and finished motif dimensions. Arrange the large motifs first, then make only the number of connectors required to fill the visible intersections.
Front Panel
Yarn: natural ivory.
Arrange 8 large flowers four across and two high, matching the dominant layout visible in the reference photograph.
Pin every motif to a blocking board first. Measure from flower center to flower center rather than judging the spacing by the tips of the petals.
Join adjacent outer arches with whip stitch or slip stitch. Keep each seam short enough that neighboring petals nearly touch but do not overlap.
Place the small connector flowers in the open junctions between the large motifs. Sew the relevant petals of each connector to the surrounding flower arches.
After joining, block the completed front panel into a clean rectangle.
Back Panel
Yarn: natural ivory.
Repeat the same arrangement used for the front panel.
Arrange 8 large flowers four across and two high, then add the required small connector motifs.
Check the dimensions against the front panel before proceeding. Both panels need to have the same width and height or the gussets will twist during assembly.
Block the second panel to exactly the same finished measurements as the first.
Side Gusset — Make 2
Yarn: natural ivory.
The reference bag has visible depth rather than behaving like two flat panels sewn directly together.
Row 1: Ch 9. Sc in second ch from hook and across. (8)
Row 2: Ch 1, turn, sc across. (8)
Repeat Row 2 until the strip equals the measured side height of the blocked flower panel.
Fasten off with a 25 cm sewing tail.
Make the second side gusset to exactly the same length.
For a deeper handbag, begin with 11 or 13 chains instead. The depth should be selected before making the bottom strip so all three gusset pieces match.
Bottom Gusset
Yarn: natural ivory.
Row 1: Ch 9. Sc in second ch from hook and across. (8)
Row 2: Ch 1, turn, sc across. (8)
Repeat Row 2 until the strip matches the finished width of the blocked front panel.
Do not calculate this measurement from an unblocked motif panel. Openwork flowers can change noticeably in width during blocking.
Fasten off with a 30 cm tail.
Top Reinforcement — Make 2
Yarn: natural ivory.
Join yarn at the upper-left corner of the first panel.
Row 1: Sc evenly across the entire upper edge. Record the final stitch count.
Row 2: Ch 1, turn, sc across, maintaining the same stitch count.
Row 3: Ch 1, turn, sc across.
Row 4: Ch 1, turn, sc across.
Fasten off.
Repeat on the second panel using exactly the same number of stitches. This dense section stabilizes the openwork before the wooden handles are installed.
Wooden Handle Tabs — Make 4
Yarn: natural ivory.
Row 1: Ch 9, sc in second ch from hook and across. (8)
Rows 2–12: Ch 1, turn, sc across. (8)
Test the strip around the lower bar of the wooden handle.
Add additional rows if required until the tab can fold around the handle and overlap the reinforced upper edge of the bag by approximately 2 cm.
Fasten off with a 30 cm sewing tail.
Repeat until four identical tabs have been completed.
The handle tabs carry a large percentage of the bag’s loaded weight. They should be sewn into the dense reinforcement band rather than attached only to chain spaces or flower petals.
Optional Top Edge
Join the natural ivory yarn beside the first handle tab.
R1: Sc evenly around the entire bag opening, working through the reinforced upper sections. Maintain equal stitch density on the front and back.
R2: Ch 1, sc in each stitch around.
Sl st to finish and fasten off.
This additional edge is useful when a fabric lining or magnetic closure will be installed.
Assembly
- Block all large flower motifs to the same finished diameter before joining them.
- Arrange four flowers across and two flowers down for each panel, checking that every motif faces the same direction.
- Join the large motifs at corresponding outer arches, then position the small connector flowers in the remaining open intersections.
- Sew the first side gusset to the front panel using a firm mattress stitch or whip stitch, beginning at the reinforced upper edge.
- Attach the bottom gusset while keeping both lower corners square rather than rounding the strip around them.
- Sew the second side gusset into position, then attach the back panel to the complete gusset structure.
- Work the upper reinforcement bands and compare their finished lengths before installing the wooden hardware.
- Center each wooden handle. Position its two tabs at equal distances from the nearest side seams and sew securely through several rows of the reinforcement band.
- Add the optional fabric lining or magnetic closure, keeping the hand-sewn attachment stitches below the visible upper edge.
- Weave each structural yarn tail through at least 5 cm of dense crochet, reverse direction, and trim after checking the loaded bag.
The completed bag should form a rectangular floral tote with matching panels, symmetrical wooden handles, a flat base, and an even upper edge.
7 Technical Tips for a Better Flower Crochet Bag
- Mark every motif’s joining points before assembly. A one-arch alignment error compounds across four flowers and can pull the upper edge several centimeters away from square.
- Block every large flower to one measured diameter. A difference greater than approximately 5 mm per motif becomes visible when four flowers are arranged in one horizontal row.
- Keep connector motifs under light tension while sewing. Loose connectors create oversized gaps at the intersections and permit the larger flowers to rotate after the bag is loaded.
- Test the wooden handle tabs with 1–2 kg of temporary weight before adding a lining. Visible stretching at an attachment point indicates that additional stitches are required through the reinforcement band.
- Avoid concentrating yarn tails behind a single motif. Multiple thick tails woven through the same area can produce a raised section behind an otherwise flat flower panel.
- Pin both bottom corners before permanently sewing the gusset. If one side strip extends more than 5 mm beyond the other, correct its row count instead of forcing the excess into the seam.
- Keep handle placement symmetrical to within approximately 5 mm. Measure from each side seam to the outside edge of the nearest handle tab rather than positioning the wooden handles by eye.
Sizing and Yarn Substitution
The selected yarn determines much of the final geometry of a crochet flower bag pattern. Cotton cord produces a firmer, more architectural panel, while conventional DK or light-worsted cotton creates a softer fabric.
Make one complete large flower before committing to the full quantity. Block the sample exactly as the finished motifs will be blocked, then measure its maximum width.
For example, four motifs measuring approximately 9 cm across produce a floral section close to 36 cm wide before adjustments from joining and edging. That scale works well for the proportions visible in the reference image.
If a test flower measures 8 cm, four motifs produce roughly 32 cm of base width. A 10 cm flower pushes the same four-motif arrangement toward 40 cm. Small changes in hook size therefore have a substantial effect on the finished handbag.
Do not switch hook sizes midway through the motif set. Even when the same yarn is retained, the resulting gauge difference can prevent the panel from forming a clean rectangle.
Why the Wooden Handles Need Reinforcement
A crocheted shoulder strap distributes tension across a comparatively long section of fabric. A rigid wooden handle works differently. Its attachment tabs concentrate the weight of the bag into four small areas.
That mechanical difference is the reason for the four-row single-crochet reinforcement band.
Sew each handle tab through this dense band rather than through a flower petal or open mesh chain. Several passes with matching cotton yarn can be used at each attachment point.
For a bag intended to carry heavier objects, place a narrow strip of cotton webbing behind the upper reinforcement before installing the fabric lining. The webbing remains hidden but reduces vertical stretching around the handles.
The tabs should also wrap closely around the wooden hardware. Excess clearance allows the handles to move independently from the crochet, increasing friction at the points where the yarn contacts the wood.
Optional Fabric Lining
The open floral structure makes a lining practical when the bag will carry keys, pens, cosmetics, coins, or other small objects.
Measure the completed interior only after the crochet has been blocked and fully assembled. Cut the lining fabric with approximately 1–1.5 cm seam allowance on every sewn edge.
For a three-dimensional lining, create two main rectangles and a separate gusset corresponding to the crochet sides and bottom. Sew the fabric structure separately before inserting it into the bag.
Place the lining inside with its wrong side facing the crochet. Fold the raw upper edge toward the wrong side and hand-sew it immediately below the reinforced top band.
Do not stretch the fabric tightly against the crochet shell. A small amount of ease allows the lining to carry the contents without forcing the openwork flowers to support the entire load.
Finishing the Crochet Flower Bag
Inspect every joining point after assembly. The large petals should remain flat, the small connector flowers should sit centrally between the main motifs, and neither side panel should twist toward the handles.
Place the empty bag on a flat surface and check the bottom gusset. If the base pulls upward at either corner, examine the side-to-bottom seam before final blocking.
Perform the final block with particular attention to the top edge. Both wooden handles should sit at the same height, and the distance between each handle tab and its nearest side seam should match on both sides.
Allow the crochet to dry completely before loading the bag. Cotton can change dimensions while damp, particularly in open lace structures.
Conclusion
The key measurement in this crochet flower bag pattern is the blocked flower diameter. Establish it before producing the full motif set, then calculate the panel dimensions from four flowers across and two high. After joining, add the gussets, reinforce the upper edges, and attach each wooden handle through dense crochet rather than open chain spaces. The next practical step is to crochet and block one five-petal test flower in the selected cotton. Save the finished bag to Pinterest or share the completed construction on Instagram with #WoodenHandleFlowerBag. For this specific design, would you keep the natural ivory finish shown in the reference or make the five-petal flowers in separate colors?