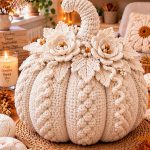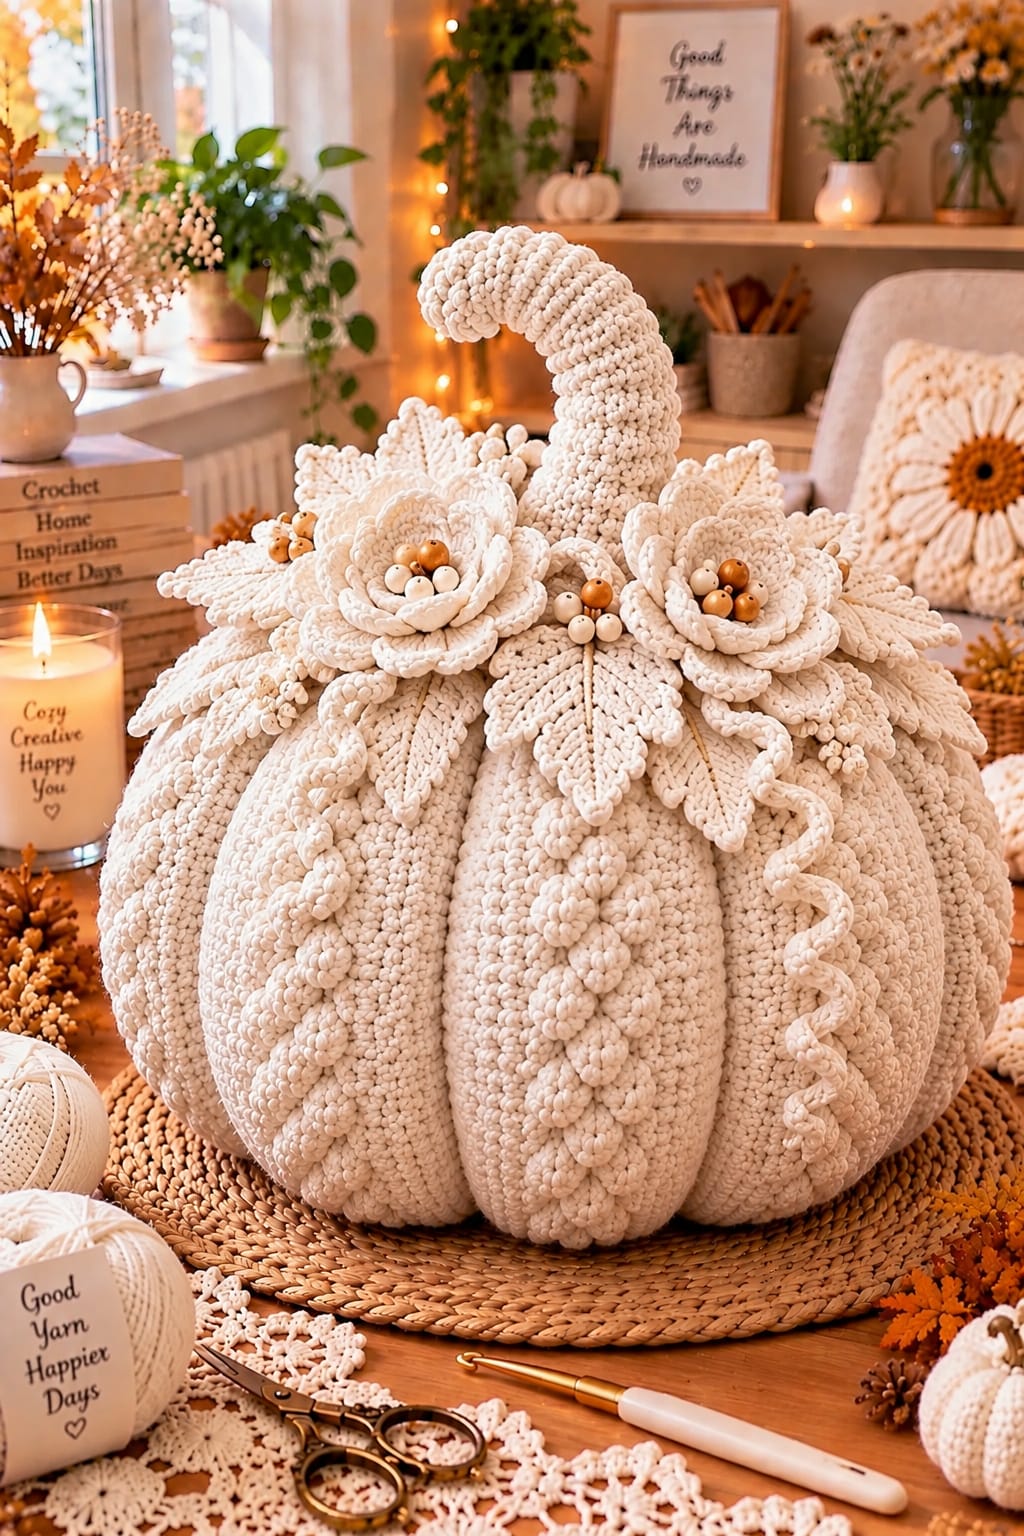
A cream pumpkin this large needs deep sculpted ribs to keep the monochrome body from losing its pumpkin shape. This giant cream crochet pumpkin pattern combines an oversized stuffed body with a tall curved stem, layered crochet flowers, pointed leaves, raised floral trails and curling vines. The photo-inspired decoration targets approximately 40–45 cm across and 50–55 cm high including the stem. Super-bulky yarn gives the body enough structure for pronounced shaping.
The Design: What Makes This Cream Pumpkin Different
The design uses texture instead of strong color contrast. Approximately ten broad lobes divide the body, while raised flower trails run vertically along selected sections. These details keep the cream surface readable without interrupting the monochrome palette.
The crown adds a second level of construction. A tall hooked stem rises behind two large layered flowers, multiple pointed leaves and smaller berry-like details. Warm wooden or caramel-colored centers provide the only concentrated contrast.
Proportion is critical for an oversized crochet pumpkin. Small leaves disappear against a body this wide, while an undersized stem makes the crown look compressed. Another common failure is excessive stuffing. A rigid center prevents the sculpting strands from sinking deeply enough to produce the characteristic pumpkin channels.
Project Info at a Glance
| Skill Level | Time | Finished Size | Body Hook | Yarn Weight |
|---|---|---|---|---|
| Intermediate | 14–18 hours | Approx. 40–45 cm wide × 50–55 cm high | 7–8 mm | Super Bulky #6 |
These measurements are targets for a reconstruction based on the photographed design rather than measurements taken from the finished object. Yarn thickness, hook size, stuffing density and sculpting tension will affect the final dimensions.
Materials and Tools
Yarn
- Warm cream — Super Bulky #6 — approximately 750–900 g for the pumpkin body
- Warm cream — Super Bulky #6 — approximately 120–150 g for the stem
- Warm cream — Bulky #5 — approximately 180–220 g for flowers and leaves
- Warm cream — Bulky #5 — approximately 50–70 g for vines and raised flower trails
- Caramel or golden brown — small quantity for optional flower-center accents
Allow approximately 1.1–1.3 kg of yarn for the complete pumpkin. The total increases if additional leaves or heavily textured surface decorations are added.
Tools
- 7–8 mm crochet hook — pumpkin body
- 6 mm crochet hook — curved stem
- 4.5–5.5 mm crochet hook — flowers, leaves and vines
- Polyester fiberfill — approximately 1–1.4 kg
- Long upholstery needle
- Large tapestry needle
- Locking stitch markers
- Rust-resistant pins
- Sharp scissors
- Tape measure
Abbreviations
- MR — magic ring
- ch — chain
- sc — single crochet
- hdc — half double crochet
- dc — double crochet
- tr — treble crochet
- inc — 2 sc in one stitch
- dec — invisible decrease
- sl st — slip stitch
- BLO — back loop only
- FLO — front loop only
- st/sts — stitch/stitches
For an invisible decrease, insert the hook through the front loops of the next two stitches, yarn over, pull through both front loops and complete one single crochet.
Gauge and Construction
A useful target is approximately 9–10 single crochet stitches per 10 cm with super-bulky yarn. The fabric should remain dense when stretched between two fingers because cream fiberfill showing through cream stitches can still create irregular pale patches.
The pumpkin is first crocheted as one oversized rounded body. After stuffing and closing, strong yarn strands compress the body into approximately ten deep lobes.
Complete all sculpting before attaching the stem or floral crown. The central attachment area must remain accessible until every channel has been adjusted.
Giant Cream Crochet Pumpkin Pattern
Cream Pumpkin Body
Yarn: warm cream. Work continuously in a spiral.
R1: 6 sc in MR. (6)
R2: inc ×6. (12)
R3: (sc, inc) ×6. (18)
R4: (2 sc, inc) ×6. (24)
R5: (3 sc, inc) ×6. (30)
R6: (4 sc, inc) ×6. (36)
R7: (5 sc, inc) ×6. (42)
R8: (6 sc, inc) ×6. (48)
R9: (7 sc, inc) ×6. (54)
R10: (8 sc, inc) ×6. (60)
R11: (9 sc, inc) ×6. (66)
R12: (10 sc, inc) ×6. (72)
R13: (11 sc, inc) ×6. (78)
R14: (12 sc, inc) ×6. (84)
R15–R32: Sc in every stitch around. (84)
The 84-stitch plateau forms the broad middle of the pumpkin. Keep the stitch marker at the beginning of every round because cream yarn can make round transitions difficult to see.
R33: (12 sc, dec) ×6. (78)
R34: (11 sc, dec) ×6. (72)
R35: (10 sc, dec) ×6. (66)
R36: (9 sc, dec) ×6. (60)
Begin stuffing. Place small amounts around the lower side walls before filling the center.
R37: (8 sc, dec) ×6. (54)
R38: (7 sc, dec) ×6. (48)
R39: (6 sc, dec) ×6. (42)
Continue adding stuffing around the circumference. Leave the central core slightly softer.
R40: (5 sc, dec) ×6. (36)
R41: (4 sc, dec) ×6. (30)
R42: (3 sc, dec) ×6. (24)
Correct flat areas and finish most of the stuffing now.
R43: (2 sc, dec) ×6. (18)
R44: (sc, dec) ×6. (12)
R45: dec ×6. (6)
Fasten off with a long tail. Thread the tail through the remaining six front loops, pull the opening closed and secure it inside the body.
Sculpting the Pumpkin Ribs
The photographed pumpkin shows deep vertical channels rather than shallow decorative lines. External sculpting creates that structure.
Cut a strong doubled cream strand approximately 250–300 cm long. Thread it through a long upholstery needle.
Insert through the bottom center and bring the needle out at the crown. Run the yarn down the exterior and return through the bottom center.
Pull only until the first channel becomes visible.
Repeat around the pumpkin until approximately ten sections have been established. Check their spacing from above before applying maximum tension.
Work around the body again, tightening every strand gradually. Massage stuffing away from the channel as the yarn sinks into the fabric.
Knot the strands securely at the crown where the flowers and leaves will cover them.
Tall Curved Cream Stem
Yarn: warm cream. Use a 6 mm hook.
R1: 6 sc in MR. (6)
R2: inc ×6. (12)
R3: (sc, inc) ×6. (18)
R4: BLO sc around. (18)
R5–R9: Sc around. (18)
R10: 13 sc, sl st in next 5 sts. (18)
R11: Sc around. (18)
R12: 12 sc, sl st in next 6 sts. (18)
R13–R14: Sc around. (18)
R15: 11 sc, sl st in next 7 sts. (18)
R16–R17: Sc around. (18)
R18: (sc, dec) ×6. (12)
R19–R25: Sc around. (12)
R26: 8 sc, sl st in next 4 sts. (12)
R27–R30: Sc around. (12)
R31: dec ×6. (6)
Fasten off and close the tip.
Stuff the lower half firmly, the middle moderately and the upper third lightly. Shape the hook while the stuffing remains adjustable.
Large Layered Cream Flower — Make 2
Yarn: cream. Use a 4.5–5.5 mm hook.
Flower Center
R1: 6 sc in MR. (6)
R2: inc ×6. (12)
R3: (sc, inc) ×6. (18)
Inner Petal Layer
R4: *Sl st in next stitch, ch 4, 2 dc, 1 tr, 2 dc into the same base area, ch 4, sl st.* Repeat six times around.
Middle Petal Layer
Working behind the first layer, create six ch-6 loops anchored between the inner petals.
Into each ch-6 loop work:
Sc, hdc, 3 dc, 2 tr, 3 dc, hdc, sc.
Outer Petal Layer
Create six ch-8 loops behind the middle petals.
Into each loop work:
Sc, hdc, 2 dc, 4 tr, 2 dc, hdc, sc.
Fasten off with a 35 cm sewing tail.
The flower should remain dimensional. Do not press the three petal layers flat during blocking.
Small Cream Flower — Make 1
R1: 6 sc in MR. (6)
R2: inc ×6. (12)
R3: Work six petals using *(sl st, ch 3, 3 dc, ch 3, sl st)* around.
R4: Create six ch-5 loops behind the first petals.
R5: Into each loop work (sc, hdc, 4 dc, hdc, sc).
Fasten off with a long tail.
Large Pointed Leaves — Make 10
Yarn: cream.
Row 1: Ch 16.
Starting in the second chain from the hook work:
Sl st, sc, hdc, dc, tr in next 5 chains, dc, hdc, sc, then 3 sc in the final chain.
Rotate and work along the unused foundation loops:
Sc, hdc, dc, tr in next 5 loops, dc, hdc, sc, sl st.
Row 2: Sc around the complete leaf. At the point work (sc, ch 2, sc).
Row 3: Sl st along the center foundation chain from base to tip to form the raised vein.
Fasten off with a 25–30 cm sewing tail.
Medium Pointed Leaves — Make 8
Ch 12.
Use the same construction as the large leaf, shortening the treble-crochet section to three stitches.
Work a pointed ch-2 tip and raised slip-stitch center vein.
Fasten off with a 25 cm tail.
Small Crown Leaves — Make 6
Ch 9.
Starting in the second chain work:
Sl st, sc, hdc, dc in next 2 chains, hdc, sc, then 3 sc in the final chain.
Mirror the sequence along the opposite side.
Sc around once and form a ch-2 point at the tip.
Fasten off.
Raised Floral Trail Motif — Make 15–20
The body in the photograph includes small raised cream motifs arranged vertically along several ribs.
R1: 6 sc in MR. (6)
R2: In each stitch work (sl st, ch 2, 2 hdc, ch 2, sl st).
Fasten off with a 15 cm sewing tail.
Each motif should remain compact. Make enough to decorate approximately three prominent pumpkin lobes.
Long Cream Corkscrew Vine — Make 2
Ch 48.
Starting in the second chain from the hook, work 3 sc into every chain.
The dense stitches force the chain into a spiral.
For irregular movement, work 4 sc in every fourth chain through the final 12 chains.
Fasten off with a 25 cm attachment tail.
Short Curling Vines — Make 3
Ch 28.
Starting in the second chain, work 3 sc into each chain.
Fasten off and allow the curl to form naturally.
Crochet Berry Centers — Make 12
Use cream for a monochrome result or caramel yarn for the warm accent visible in the reference.
R1: 6 sc in MR. (6)
R2: Sc around. (6)
Insert a tiny amount of yarn scrap or fiberfill.
R3: Dec ×3. (3)
Fasten off and close.
Group the berries in sets of three or four for the flower centers.
Building the Floral Crown
Arrange the large leaves first. Their tips should extend beyond the flower edges and create an irregular crown around the stem.
Place the two large flowers toward the front of the stem rather than positioning one directly on each side. Slight asymmetry gives the crown more depth.
Add the smaller flower between or slightly behind them.
Insert medium and small leaves into visible gaps. Several leaf tips can overlap neighboring petals, but the flowers should remain clearly defined.
Place the berry clusters inside the flower centers and between selected leaves.
Pin the entire crown before permanently sewing any component.
Assembly
- Complete the pumpkin body, stuffing, closure and all ten sculpted ribs before beginning the decorative assembly.
- Position the tall curved stem over the crown center and sew through its lower two rounds using several attachment points.
- Arrange the ten large pointed leaves around the stem and secure each leaf at the base plus one additional point 2–3 cm outward.
- Add the medium and small leaves between the first layer, varying their angles and visible lengths.
- Place the two large layered flowers across the front of the crown and attach through their centers and inner petal bases.
- Add the smaller flower and berry clusters without sewing the outer flower petals flat.
- Sew the raised floral motifs vertically along three selected pumpkin lobes, leaving approximately 1–2 cm between motifs.
- Attach the short curling vines beneath the leaf crown and allow most of each spiral to remain free.
- Position the two long corkscrew vines on different sides so they hang down separate pumpkin channels.
- Hide all remaining yarn tails beneath the foliage, reshape the stem hook and separate the layered petals and leaves.
The completed decoration should show a deeply ribbed cream pumpkin, a prominent curved stem, layered monochrome foliage and three-dimensional floral details concentrated around the crown.
7 Technical Tips for This Cream Crochet Pumpkin
- Shallow ribs: Leave the central stuffing approximately 15–20% softer than the outer lobes. A fully rigid center prevents the sculpting yarn from sinking into the body.
- Unequal pumpkin sections: Mark all ten channel positions before fully tightening the first strand. A 2–3 cm spacing difference becomes obvious on a 40 cm body.
- Visible stuffing: Stretch a sample of the body fabric before filling. If fiberfill is clearly visible, reduce the hook by 0.5–1 mm.
- Stem collapse: Pack the bottom 8–10 cm more firmly than the hooked upper section. Equal stuffing density throughout the stem makes controlled bending difficult.
- Rotating leaves: Secure every large leaf at two points at least 2 cm apart. One stitch at the base allows a heavy leaf to twist underneath the flower crown.
- Flattened flowers: Sew through the center and inner petal bases rather than around the outside perimeter. Perimeter stitching removes the layered profile visible in the design.
- Stretched vines: Attach only the upper 1–2 cm of each corkscrew. Sewing the complete spiral against the body destroys its three-dimensional curl.
How to Create Deeper Pumpkin Channels
Deep sculpting begins with controlled stuffing. Push more fiberfill toward the outer walls and maintain a slightly softer vertical core.
Establish every channel at moderate tension before tightening any one groove completely. View the pumpkin from above and compare the widths of all ten sections.
On the second pass, tighten each strand incrementally. Use your fingers to move stuffing away from the channel as the yarn sinks inward.
If a groove remains shallow, run a second strand along exactly the same path. Do not position the new strand beside the first because two parallel lines create an unnaturally wide channel.
Stuffing the Giant Pumpkin Correctly
Add fiberfill in small quantities. Begin around the base and push each portion firmly against the side wall.
Continue upward in layers. Rotate the body after every few handfuls to check for flat sections.
The outer circumference should feel firm enough to maintain a rounded lobe after sculpting. The center should still compress under deliberate hand pressure.
Before completing the final decrease rounds, place the pumpkin on a flat table. Correct any unstable section while the opening remains large enough to reach inside.
Keeping a Monochrome Pumpkin Detailed
When the body, stem, flowers and leaves share one color, texture becomes the primary method of separation. Combine dense single crochet with raised veins, layered petals, bobbles and open spaces between overlapping components.
Do not place every cream leaf directly against another cream leaf at the same angle. Rotating neighboring pieces changes the direction of their stitch texture and makes their edges easier to distinguish.
The optional caramel berry centers add a small amount of contrast without changing the overall neutral palette. Keep these accents concentrated near the flowers rather than distributing them across the pumpkin body.
Making the Raised Flower Trails
Arrange the small flower motifs only after the ribs are completely sculpted. Position them along the center of a broad lobe rather than inside the compressed groove.
Begin several centimeters below the crown and continue downward. Stop before reaching the lowest curve of the pumpkin so the motifs do not interfere with the stable base.
Vary the spacing slightly between individual flowers. A perfectly measured vertical line can appear rigid against the organic rib shape.
Sew through the motif center and one petal only. The remaining petals should project slightly from the surface.
Shaping the Hooked Stem
The stem needs a stable lower section and a flexible upper section. Stuffing distribution controls most of the final curve.
After stuffing, bend the upper portion gradually rather than folding it sharply at one point. The curve should begin around the middle of the stem and continue toward the tip.
Rotate the stem before attachment. Point the hook toward an open area of the floral crown where its outline remains visible.
If the stem repeatedly straightens, add several hidden stitches through the inside curve to shorten that edge slightly.
Adjusting the Pumpkin Size
For a medium pumpkin, stop the body increases at 60 stitches. Work approximately 12–14 plain rounds before beginning the matching decrease sequence.
For a smaller version, stop at 42 stitches and work approximately 9–11 plain rounds.
Reduce the stem, flowers and leaves proportionally. The large crown pieces in this pattern are designed for a body approximately 40–45 cm across.
Alternative Neutral Color Schemes
An ivory body can be paired with oatmeal leaves and camel flower centers for slightly more separation between components.
For a cooler neutral version, use pale stone for the body, warm white flowers and taupe berries.
A natural cotton palette can combine unbleached cream, flax and muted tan. Keep the main pumpkin lighter than the small accent components if the sculpted ribs need stronger visual definition.
Finishing and Display
Inspect every sculpting groove after the crown has been attached. Large leaves can place additional pressure on the upper body and slightly alter the channel tension.
Check the stem by moving it gently at the base. If it shifts separately from the pumpkin, add another hidden attachment round beneath the leaf layer.
Separate the flower petals and leaves with your fingers. Re-form the corkscrew vines without stretching them lengthwise.
Support the pumpkin underneath whenever it is moved. The curved stem and floral crown are decorative components and should not be used as handles.
Conclusion
Finish the oversized cream body and tighten all ten sculpted ribs before constructing the floral crown. Those channels determine where the raised flower trails can sit and how far the large leaves should extend without hiding the pumpkin silhouette. Make the curved stem and one layered flower next, pin them temporarily at the crown and compare their scale before producing the remaining pieces. Save this giant cream crochet pumpkin pattern to Pinterest or share the finished version on Instagram with #CreamFloralCrochetPumpkin. For this specific design, would you keep the flower centers completely cream or use the small caramel accents shown in the reference?