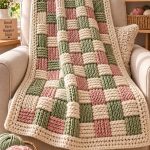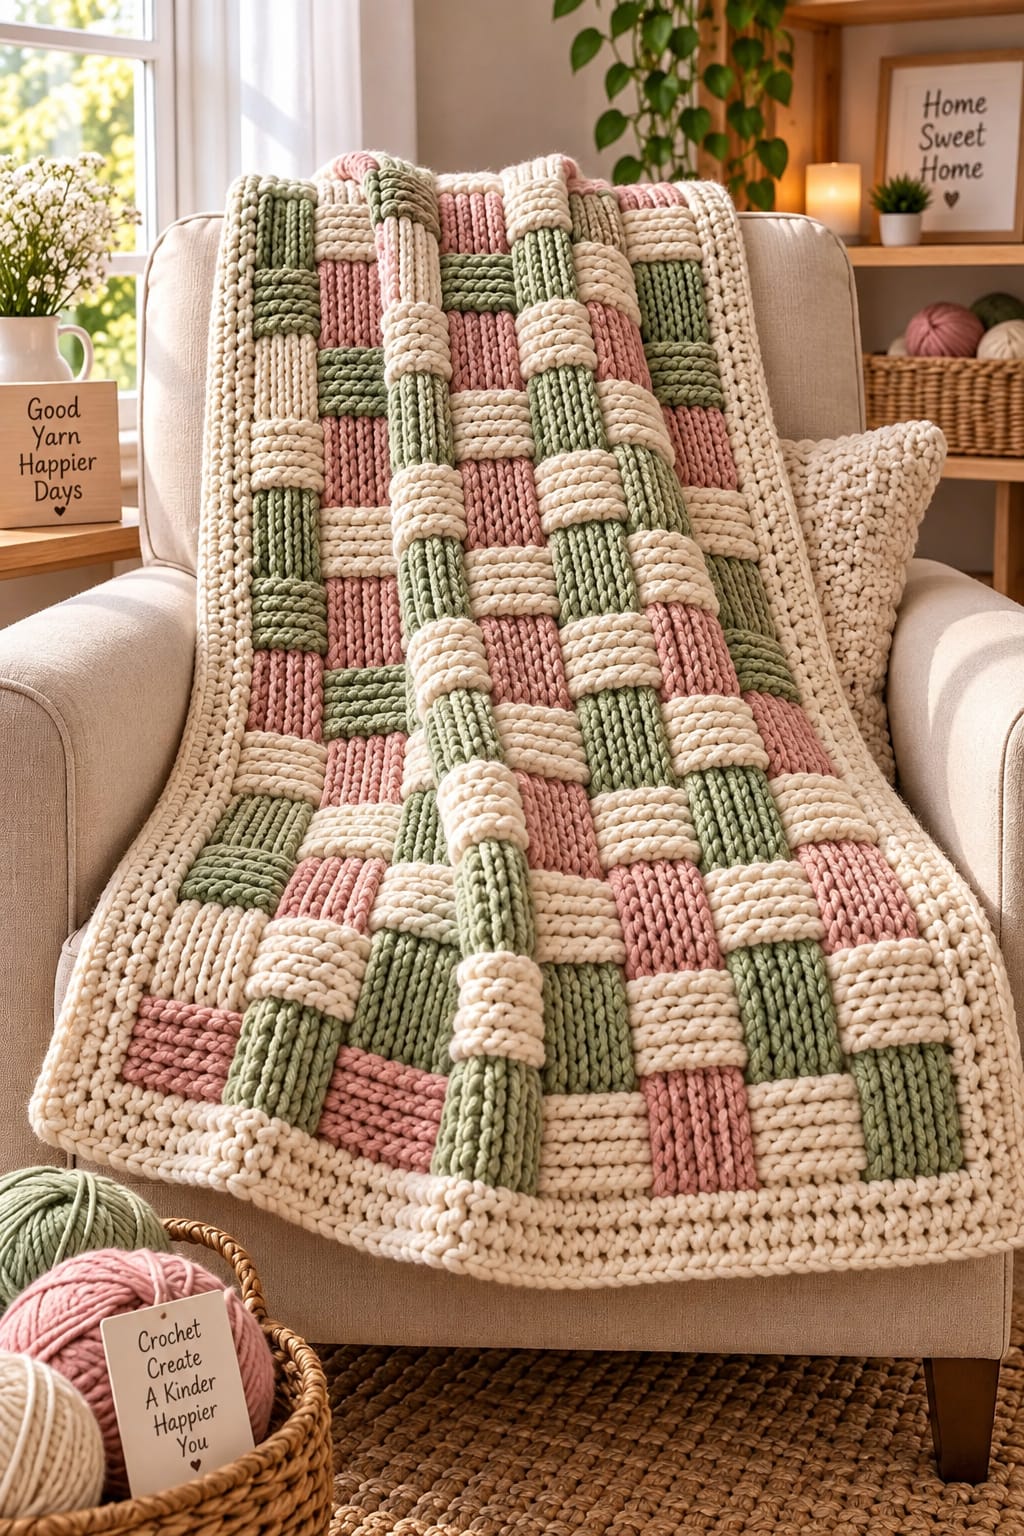
Wide crochet strips have to pass convincingly over and under one another or this blanket loses its woven-basket illusion. This basket weave crochet blanket pattern uses chunky sage green, dusty pink and warm cream strips arranged as an oversized interlaced grid. A substantial cream border stabilizes the edges and frames the woven construction. The photo-inspired blanket targets approximately 110 × 150 cm, making it suitable as a sofa throw or substantial lap blanket.
The Design: What Makes This Woven Blanket Different
This blanket gets its structure from separate crocheted strips rather than a conventional basketweave stitch worked across continuous rows. Vertical strips and horizontal strips cross repeatedly, with alternating sections passing above and below their neighbors. That construction produces the exaggerated woven appearance visible in the reference.
Three colors clarify the intersections. Sage green and dusty pink provide muted contrast, while warm cream separates adjacent colored sections and connects the palette to the outer border. The strips need similar width and tension; even a small difference becomes noticeable after several crossings.
The most common mistake with an interwoven crochet blanket is sewing every intersection flat. Only selected contact points should be secured. Leaving most crossings free preserves the dimensional over-under effect that defines this chunky design.
Project Info at a Glance
| Skill Level | Time | Finished Size | Hook | Yarn Weight |
|---|---|---|---|---|
| Intermediate | 18–24 hours | Approx. 110 × 150 cm | 8–10 mm | Super Bulky #6 |
The finished measurements are targets for a photo-inspired reconstruction rather than measurements taken directly from the photographed blanket. Adjust the number and length of strips to change the dimensions.
Materials and Tools
Yarn
- Warm cream — Super Bulky #6 — approximately 900–1100 g
- Sage green — Super Bulky #6 — approximately 650–800 g
- Dusty pink — Super Bulky #6 — approximately 650–800 g
Allow approximately 2.2–2.7 kg of yarn for a 110 × 150 cm blanket. The exact quantity changes considerably with strip width, yarn construction, hook size and border depth.
Tools
- 8–10 mm crochet hook
- Large tapestry needle
- Locking stitch markers — at least 20 recommended
- Sharp scissors
- Tape measure
- Blocking mats — optional
- Rust-resistant pins
Abbreviations
- ch — chain
- sc — single crochet
- hdc — half double crochet
- sl st — slip stitch
- BLO — back loop only
- st/sts — stitch/stitches
- RS — right side
- WS — wrong side
Invisible decreases are not required because the blanket is constructed from flat rectangular strips and an outer border.
Gauge and Strip Measurements
Target approximately 8–10 stitches per 10 cm in single crochet or half double crochet, depending on the selected super-bulky yarn.
Each strip should finish approximately 9–11 cm wide. Maintaining consistent strip width matters more than matching an exact stitch gauge.
Make one sample strip approximately 30 cm long before beginning the full blanket. Measure it without stretching. If the strip is narrower than 9 cm, increase the foundation stitch count or use a larger hook.
Blanket Construction
The blanket is assembled in three stages. First, crochet the long vertical strips. Second, make shorter horizontal strips and weave them across the vertical foundation. Third, secure selected intersections and crochet a cream border around the assembled rectangle.
The pattern below creates a blanket approximately 110 cm wide using ten vertical strips. Horizontal strips cross the width and are spaced tightly enough to create the chunky basket effect.
Long Vertical Strips — Make 10
Use a repeating color sequence of cream, sage, pink, cream, sage, pink, cream, sage, pink and cream. Rearrange the sequence if a less regular color distribution is preferred.
Vertical Strip
Make each strip approximately 142–145 cm long before adding the border.
Foundation: Ch 9.
Row 1: Hdc in second chain from hook and in each chain across. (8)
Row 2: Ch 1, turn. Hdc BLO in each stitch across. (8)
Rows 3 onward: Repeat Row 2 until the strip measures approximately 142–145 cm.
Fasten off with a 25 cm tail.
The back-loop construction creates long raised lines similar to the pronounced vertical texture visible in the photograph.
Optional Denser Vertical Strip
If the selected yarn produces a loose fabric, substitute single crochet for half double crochet.
Foundation: Ch 11.
Row 1: Sc in second chain from hook and across. (10)
Row 2 onward: Ch 1, turn, sc BLO across. (10)
Continue until the strip reaches the required length.
Do not mix the hdc and sc versions within the same blanket unless their finished widths and thicknesses match closely.
Preparing the Vertical Foundation
Place all ten long strips parallel on a flat surface.
Arrange them in the desired color order. Keep approximately 0–5 mm between neighboring strips; large gaps will expose the surface beneath the blanket after weaving.
Align the upper ends. Clip neighboring strips together temporarily at the top and bottom using locking stitch markers.
Measure the complete width. Target approximately 95–100 cm before the border.
If the width exceeds the target significantly, reduce the gaps rather than stretching individual strips sideways.
Horizontal Woven Strips — Make Approximately 14–16
The horizontal pieces need enough length to cross all ten vertical strips with small sewing allowances at both sides.
Target length: approximately 100–105 cm before assembly.
Horizontal Strip
Foundation: Ch 9.
Row 1: Hdc in second chain from hook and across. (8)
Row 2: Ch 1, turn. Hdc BLO across. (8)
Rows 3 onward: Repeat Row 2 until the strip measures approximately 100–105 cm.
Fasten off with a 25 cm tail.
Make horizontal strips in cream, sage and dusty pink. Distribute the colors so identical colors do not dominate one section of the blanket.
First Horizontal Weaving Row
Lay the first horizontal strip across the bottom of the vertical foundation.
Pass it over Vertical Strip 1, under Strip 2, over Strip 3, under Strip 4 and continue alternating across the width.
Pull the horizontal strip through until equal lengths remain at both sides.
Do not tighten the strip. Its edges should remain straight rather than curling around the vertical pieces.
Second Horizontal Weaving Row
Position the second horizontal strip directly above the first.
Reverse the weaving sequence:
Under Strip 1, over Strip 2, under Strip 3, over Strip 4 and continue across.
This reversal creates the basket structure.
Push the second strip gently toward the first until the gap between them is minimal but the strips are not compressed.
Continue the Basket Weave
Repeat the two weaving sequences for every remaining horizontal strip.
Odd-numbered horizontal strips begin over the first vertical strip. Even-numbered strips begin under it.
Check the pattern after every crossing. One missed over-under transition can travel through the complete row and becomes harder to correct after neighboring strips are installed.
Continue until the woven section measures approximately 140–145 cm long.
Creating the Raised Crossing Effect
The reference blanket has thick raised intersections rather than a flat checkerboard surface. Do not press or stitch the complete crossing area.
At each intersection, allow the upper strip to arch naturally over the lower strip.
If the yarn is very soft, gently pinch the upper strip at both edges after weaving. This concentrates its thickness at the crossing and produces a more pronounced raised band.
Alternating upper and lower strips across every row creates the dimensional grid.
Securing the Outer Intersections
Before adding the border, secure the strips around the perimeter.
Thread a tapestry needle with matching yarn.
At every outer intersection, make two or three small stitches through the back loops of both pieces.
Keep the sewing stitches on the wrong side where possible.
Do not pull tightly enough to narrow the strip.
Repeat around all four sides.
Securing Interior Intersections
The blanket does not need to be sewn at every crossing. Excessive sewing removes much of the woven movement.
Secure approximately every second or third interior intersection.
Use one or two small stitches through the hidden underside of the upper strip and a few fibers from the lower strip.
Aim to prevent long strips from shifting during washing while preserving the visible over-under construction.
Checking the Blanket Before the Border
Spread the assembled blanket on a flat surface.
Measure the width at the top, center and bottom. These measurements should remain within approximately 2 cm of one another.
Measure both long sides. If one side is noticeably longer, redistribute the horizontal strips rather than stretching the shorter edge.
Check every row for weaving errors before beginning the border.
Cream Foundation Border
Use warm cream yarn and the same hook used for the strips.
Join cream yarn at one corner.
Border Round 1: Ch 1. Work sc evenly around all four sides.
Across strip ends, place stitches firmly enough to capture every strip without gathering the fabric.
At each corner work (sc, ch 2, sc).
Join with sl st to the first sc.
The first round is structural. It locks the woven strip ends into one continuous perimeter.
Second Border Round
Round 2: Ch 1. Sc in every stitch around.
In each ch-2 corner space work (sc, ch 2, sc).
Join with sl st.
Lay the blanket flat after completing this round. If the border begins to ruffle, reduce unnecessary stitches along the sides before continuing.
Textured Border Round
Round 3: Ch 1. Hdc BLO in every stitch around.
At each corner work (hdc, ch 2, hdc).
Join with sl st.
The back-loop round adds a raised line that visually separates the basket grid from the final edging.
Final Cream Border
Round 4: Ch 1. Sc in every stitch around.
Work 3 sc into each corner space.
Join with sl st.
Round 5: Ch 1. Sc around once more, working 3 sc in each corner stitch.
Fasten off with a 30 cm tail.
Weave the tail through several dense border stitches before trimming.
Alternative Rounded Border
For a softer outer edge, replace the final single crochet round with a shallow shell.
Work *sl st in next stitch, 3 hdc in next stitch, sl st in next stitch* around the perimeter.
At the corners, increase the shell size to 5 hdc if required to prevent cupping.
This option creates a more decorative edge than the substantial straight cream frame visible in the reference.
Color Placement
The photographed blanket distributes sage, dusty pink and cream throughout the grid rather than separating them into large blocks.
Start with a cream vertical strip near one outer edge, then alternate green and pink through the center. Insert additional cream strips at irregular intervals.
For the horizontal pieces, avoid copying the exact vertical sequence. Shifting the color order creates more varied intersections.
Before weaving, arrange every horizontal strip on the floor in its planned order. Photograph or number the sequence so the layout remains consistent during assembly.
Assembly Order
- Crochet all ten long vertical strips to the same finished length.
- Arrange the vertical strips parallel and temporarily connect their upper and lower ends with stitch markers.
- Crochet approximately 14–16 horizontal strips and arrange their color order before weaving.
- Weave the first horizontal strip over and under alternating vertical strips.
- Reverse the sequence for the next horizontal strip and continue alternating through the complete blanket.
- Square the woven panel and correct any strips that have twisted during assembly.
- Sew all perimeter intersections with matching yarn to stabilize the outer edges.
- Secure selected interior intersections while leaving most crossings free enough to retain their raised profile.
- Crochet five cream border rounds around the assembled panel, adjusting the side stitch distribution where necessary.
- Weave in all tails, reshape the crossings and measure the completed blanket before final blocking.
The completed blanket should form a stable rectangular throw with clearly alternating raised and recessed crossings.
7 Technical Tips for a Chunky Basket Weave Blanket
- Different strip widths: Measure every strip after the first 20 cm. A difference greater than approximately 5 mm will accumulate into visibly uneven grid sections.
- Twisted strips: Check the right side before passing each strip beneath the next crossing. A half-turn trapped inside the weave creates a permanent ridge that cannot be corrected after the border is attached.
- Loose intersections: Secure at least every second or third crossing if the yarn slides easily. Large unsecured sections can shift several centimeters during washing.
- Flat basket texture: Do not stitch through all four edges of an intersection. One or two hidden anchoring stitches preserve the raised upper strip.
- Ruffled border: Check the blanket after the first cream round. If the edge waves by more than approximately 1–2 cm, remove excess side stitches before adding another round.
- Narrowed strip ends: Keep sewing tension relaxed when attaching strips to the perimeter. Pulling the joining yarn tightly can reduce a 10 cm strip to 8–9 cm at the border.
- Uneven finished length: Measure both long edges before crocheting the border. A difference greater than approximately 2 cm should be corrected by redistributing the horizontal strips first.
How to Make the Blanket Wider
Add complete vertical strips before weaving. Each additional strip adds approximately 9–11 cm to the unfinished width, depending on yarn and gauge.
Horizontal strips must then be lengthened to cross the expanded vertical foundation.
For a blanket around 130 cm wide, add approximately two additional vertical strips and measure the complete arrangement before making the horizontal pieces.
Do not attempt to gain substantial width through the border. An excessively wide border changes the proportions of the basket grid and can become heavier than the central panel.
How to Make the Blanket Longer
Start by making every vertical strip longer. For a bed-length version, target approximately 175–185 cm before adding the border.
Additional horizontal strips will be required to fill that length. Maintain the same alternating over-under sequence from one end to the other.
Measure after every three or four added strips. The actual number depends on the finished width of each horizontal band.
Making a Baby-Size Version
A smaller version can use six vertical strips and approximately eight to ten horizontal strips.
Target a finished size near 75 × 95 cm. Use a lighter bulky yarn if the super-bulky fabric feels excessively heavy at that scale.
For items intended for babies, secure every intersection rather than leaving widely movable strips. Keep all joins closed and eliminate long loose yarn ends.
Controlling the Woven Texture
Strip flexibility determines how strongly the basket effect appears. A dense strip stays relatively flat, while a softer strip rises noticeably over every crossing.
If the fabric feels rigid, move up one hook size for the strips while retaining the original hook for the border.
If the strips collapse or stretch excessively, move down one hook size.
The ideal strip should bend over another strip without folding sharply at the edges.
Keeping the Grid Square
Measure frequently during weaving. The vertical strips should remain parallel from top to bottom.
After installing each horizontal strip, compare its left and right ends. Both should project by approximately the same amount beyond the outer vertical strips.
Every three rows, measure diagonally from opposite corners of the completed section. Large differences indicate that the grid is beginning to skew.
Correct the alignment immediately by shifting the unsecured crossings.
Working With Super-Bulky Yarn
Super-bulky yarn creates substantial weight before the blanket is complete. Support the woven panel on a table or your lap rather than allowing the full piece to hang from the active strip.
Use a hook with a smooth throat. The repeated back-loop stitches can become difficult if the hook catches individual fibers.
Join a new ball near the end of a strip rather than in the middle of a visible crossing. Place the knot or woven tails on the wrong side.
Keep all yarn from the same dye lot when possible, particularly for cream, because slight shade changes can become visible across large solid strips.
Blocking the Finished Blanket
This construction usually needs light shaping rather than aggressive stretching.
Lay the blanket flat and square the four corners. Align the outer cream border first, then adjust the internal strips.
For washable synthetic yarn, follow the yarn manufacturer’s care instructions. Avoid excessive heat because some bulky fibers can flatten permanently.
For wool or wool blends, wet blocking can help relax uneven strips. Support the full weight of the blanket when wet rather than lifting it from one edge.
Washing and Care
The woven construction contains multiple overlapping layers, so drying takes longer than for an ordinary flat crochet blanket.
Use a gentle wash cycle only when permitted by the yarn label. Place the blanket inside a large mesh laundry bag if the machine has an aggressive agitator.
Reshape the grid while damp. Check that horizontal strips have not migrated sideways inside unsecured intersections.
Dry flat whenever the yarn care instructions permit. Hanging a wet super-bulky blanket can stretch both the long strips and the outer border.
Finishing the Blanket
Inspect the wrong side and weave every tail through at least 6–8 cm of dense crochet. Reverse direction once before trimming because bulky yarn can work loose more easily than finer yarn.
Run your hands across the front and check every intersection. Correct any strip that has folded inward or twisted.
Check the cream border for narrow areas caused by tight joining stitches. Gently redistribute the surrounding fabric rather than pulling directly on one strip.
Lay the finished throw on a flat surface and confirm that all four corners sit without curling.
Conclusion
Make one sage strip, one dusty-pink strip and one cream strip first, then compare their widths before producing the full set. Consistent strip dimensions control the grid more effectively than corrections made after weaving. Arrange the ten vertical strips next and test one horizontal strip through the complete over-under sequence before cutting or fastening anything permanently. Save this basket weave crochet blanket pattern to Pinterest or share the completed throw on Instagram with #ChunkyWovenCrochetBlanket. For this specific three-color design, would you keep the cream as the dominant shade or increase the number of sage-green strips?