Introduction
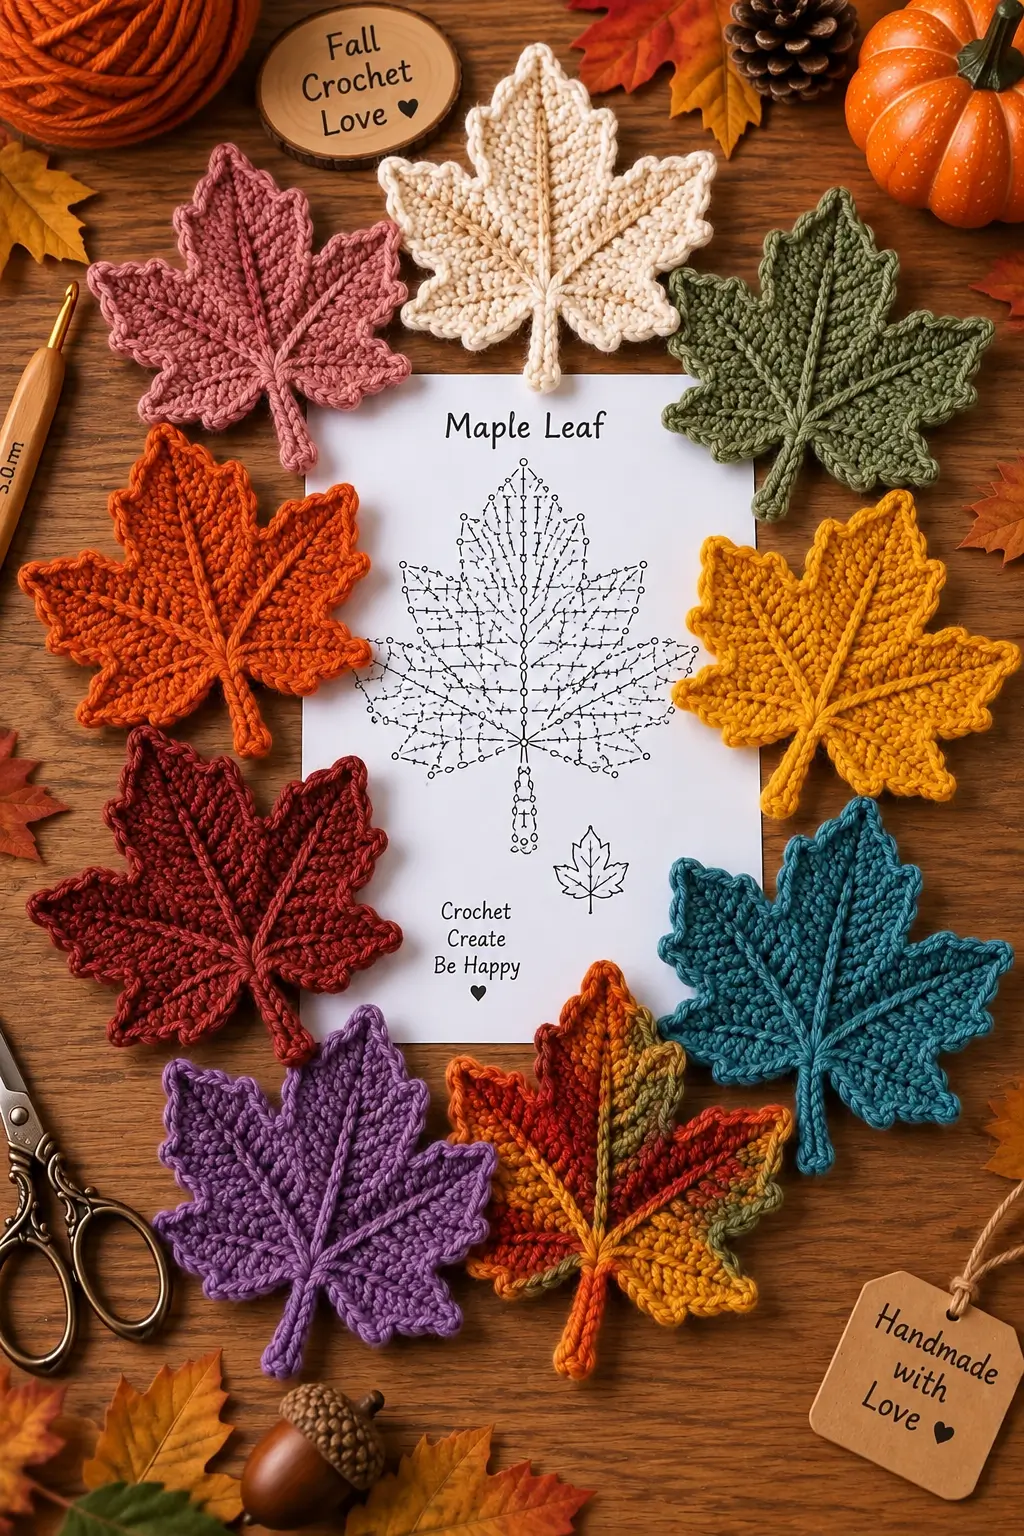
A maple leaf needs five dominant points without turning those points into five identical triangles. This maple leaf crochet pattern uses fine cotton, a 3 mm hook and shaped sections to produce a flat motif near 12 cm across. The project suits intermediate crocheters familiar with increases, taller stitches and surface crochet. Its flat construction makes it practical for garlands, table decorations and appliqués.
The Design: What Makes This Maple Leaf Different
The silhouette depends on hierarchy. The center lobe is longest, the two upper side lobes sit slightly lower, and the bottom lobes spread outward rather than upward. That arrangement prevents the crochet maple leaf from reading as a five-petal flower.
A second decision concerns the valleys. Each indentation must remain visibly lower than the neighboring points, so chains and slip stitches are used to interrupt the otherwise expanding edge. The raised central vein is added after the main fabric because surface work gives stronger visual separation than trying to build every vein into the foundation.
The common failure is excessive expansion around the outer edge. Too many tall stitches make a fall crochet leaf ripple instead of lying flat. Blocking can correct minor distortion, but it cannot fully correct a badly over-expanded lobe.
Project Info at a Glance
| Skill Level | Time | Finished Size | Hook | Best For |
|---|---|---|---|---|
| Intermediate | About 1–2 hours | Approx. 12 × 12 cm | 3 mm | Appliqué, garland, table décor, seasonal display |
The 12 cm specification and 3 mm hook provide a practical target for a compact decorative maple leaf. Your exact dimensions can vary according to yarn, tension and blocking.
Materials and Tools
Yarn
- Burnt orange, mustard, olive, cream, burgundy, teal or purple — fine #2 cotton — about 8 g / 20 m.
- Matching or contrasting vein color — fine #2 cotton — approximately 1–2 m for surface details.
The photographed pieces also suit a slightly heavier interpretation. DK cotton paired with a 3.5 mm hook can produce a thicker, more pronounced leaf. Make a test motif before committing yarn to a complete set because changing yarn weight alters both dimensions and edge definition.
Tools
- 3 mm crochet hook
- Tapestry needle
- Scissors
- Stitch markers
- Blocking mat
- Rust-resistant pins
- Measuring tape
No stuffing or safety eyes are required because this version is a flat crochet leaf motif rather than a stuffed amigurumi figure.
Abbreviations
- MR — magic ring
- ch — chain
- sc — single crochet
- hdc — half double crochet
- dc — double crochet
- tr — treble crochet
- inc — increase
- sl st — slip stitch
- st/sts — stitch/stitches
- sp — space
- FO — fasten off
- RS — right side
Invisible decreases are mainly relevant to three-dimensional amigurumi. This flat motif controls narrowing with skipped stitches, slip stitches and graduated stitch heights instead.
Maple Leaf Crochet Pattern — Step by Step
The photographed object is not constructed as a spiral amigurumi body. Work this motif in joined rounds and shaped sections. The central foundation establishes the geometry, while individual sections create the five recognizable maple-leaf lobes.
Central Foundation
Yarn: main leaf color.
R1: Make MR. Ch 2, work 12 dc into MR. Join with sl st to first dc. (12)
R2: Ch 1, 2 sc in each st around. Join with sl st. (24)
R3: Ch 1, *(sc in next 3 sts, 2 sc in next st)* ×6. Join. (30)
The 30-stitch base is intentionally compact. Mark stitches 1, 7, 13, 19 and 25. These markers establish the approximate axes for the five major lobes.
Do not cut the yarn.
Center Lobe
Yarn: main color.
Row 1: Sl st to marked st, ch 1, sc in same st, hdc in next st, dc in next 2 sts, tr in next st, ch 3, sl st in first ch to form a pointed picot, tr in next st, dc in next 2 sts, hdc in next st, sc in next st.
The sequence rises gradually toward the center tip and then descends. This height progression creates the long central point instead of a rounded petal.
Row 2: Turn. Sl st in first st, sc in next 2 sts, hdc in next 2 sts, dc toward the point, work (dc, ch 2, sl st in second ch, dc) at the tip, then mirror the stitch heights down the opposite edge.
Fasten off. Leave a 10 cm tail.
Upper Side Lobe — Left
Yarn: main color.
Attach yarn approximately five foundation stitches left of the center lobe.
Row 1: Ch 1, sc, hdc, dc, tr, ch 2, sl st in second ch, tr, dc, hdc, sc.
Row 2: Turn, sl st, sc, hdc, dc, work a small ch-2 picot at the highest point, then mirror with dc, hdc, sc and sl st.
Fasten off. Leave a 10 cm tail.
The upper side lobe should finish slightly shorter than the central point. This difference in height is important to the maple silhouette.
Upper Side Lobe — Right
Repeat the left upper lobe in mirrored placement on the opposite side.
Before fastening off, place the leaf flat. The two upper side points should terminate at approximately equal distances from the centerline. A difference of 3–5 mm can normally be corrected during blocking. A larger difference indicates inconsistent stitch height or tension.
Fasten off. Leave a 10 cm tail.
Lower Lobe — Left
Yarn: main color.
Attach yarn at the lower-left section of R3.
Row 1: Ch 1, sc, hdc, dc, dc, ch 2, sl st in second ch, dc, hdc, sc.
Row 2: Turn. Sl st, sc, hdc, dc at the outer point, ch 2, sl st into the second ch, then hdc, sc and sl st back toward the foundation.
Fasten off.
Keep this point directed outward. If the lower lobe points vertically, the finished motif begins to resemble a star rather than a maple leaf.
Lower Lobe — Right
Repeat the lower-left lobe on the opposite side.
Match the width of both lower sections before cutting the yarn. Pinning the unfinished leaf to a blocking mat provides a quick symmetry check.
Fasten off.
Serrated Edge Points
Yarn: main color.
Rejoin the yarn at the base of the center lobe.
Work around the perimeter using sc on low sections and hdc or dc where additional height is required.
At selected outer corners, work:
Small point: (sc, ch 2, sl st in second ch, sc) in the same edge space.
At each deep valley between major lobes, use a slip stitch instead of an increase. This creates a clear difference between the projecting points and recessed valleys.
Continue around all five lobes and join near the lower center.
Fasten off. Weave the tail into the back.
Stem
Yarn: main color.
Join yarn at the lower center.
Row 1: Ch 11. Starting in second ch from hook, sc in next 10 ch. Sl st into the leaf base. (10 sc)
Row 2: For a thicker stem, work surface slip stitches down the center instead of adding another full-width row.
Fasten off. Leave a 12 cm tail, then weave it through the wrong side.
A 10-stitch stem provides enough length to remain visually separate from the lower lobes without dominating a motif around 12 cm wide.
Raised Central Vein
Yarn: matching or contrasting accent color.
Insert the hook at the stem base from the right side. Surface slip stitch upward through the middle of the leaf toward the center point.
Keep every surface loop loose enough for the leaf to remain flat. Stop approximately 5–8 mm before the center tip.
Fasten off on the wrong side.
Left Branch Veins
Attach the accent yarn along the central vein.
Surface slip stitch diagonally toward the first left lower lobe. Stop before reaching the outer edging.
Repeat the process toward the left upper lobe.
Each branch should terminate roughly 5 mm inside the perimeter. Running a vein directly into the edging can visually divide the point into separate sections.
Fasten off and hide the tails on the wrong side.
Right Branch Veins
Mirror the left-side vein placement.
The branching lines should radiate outward from the central area. They do not need to be mathematically identical, but the left and right sides should maintain comparable visual weight.
Fasten off.
Optional Multicolor Maple Leaf
The multicolor example in the reference image changes shades between lobes instead of using one uniform body color.
Work the center foundation in the dominant shade. Attach rust, gold, olive and orange separately while shaping individual lobes.
Avoid carrying several unused strands across the back because the extra yarn can make a flat motif bulky. Cut and weave individual colors where practical.
Use one dominant shade for the raised central vein. This continuous line visually reconnects the differently colored sections.
Blocking and Shaping
Blocking is an important construction stage for a maple leaf because the silhouette depends on sharp points and clearly recessed valleys.
Pin the stem first. Next, pin the center point on the vertical axis. Stretch the upper side lobes outward by equal amounts, followed by the two lower lobes.
Measure across the widest points. For the fine-cotton version, target approximately 12 cm across and 12 cm tall rather than stretching every point to maximum tension.
Pin the smaller serrations only after the five major lobes are positioned. Doing this in reverse can distort the overall outline.
For cotton yarn, damp blocking works well. Allow the motif to dry completely while pinned. When substituting another fiber, follow the care instructions supplied for that yarn.
Assembly and Finishing
- Place the finished leaf right side up and identify the centerline from stem to center point.
- Pin the stem so it continues the centerline rather than leaning toward either lower lobe.
- Position the center lobe vertically and pin its tip.
- Spread the upper-left and upper-right lobes to matching angles.
- Pin both lower lobes outward, keeping their tips below the upper pair.
- Shape the small serrated points individually rather than stretching the entire perimeter.
- Check that every deep valley remains lower than its neighboring tips.
- Adjust the central surface-crochet vein if it pulls the fabric inward.
- Weave all remaining tails along existing stitches on the wrong side.
- Block to the target dimensions and allow the piece to dry completely in position.
The completed motif should lie flat with five clearly defined major points, a centered stem and visible radiating veins.
7 Technical Tips for a Better Crochet Maple Leaf
- Mark all five lobe axes. Losing one marked foundation position can shift a major point by several stitches and create obvious left-right asymmetry.
- Keep the center vein under low tension. A surface chain only 5–10% shorter than the fabric beneath it can make the entire leaf cup along its vertical axis.
- Check the center tip before fastening off. A rounded center point usually results from omitting the picot or pulling its chain too tightly.
- Measure the upper side lobes before blocking. A difference greater than about 5 mm is better corrected by reworking the shorter lobe than by aggressively stretching it.
- Pin the valleys as well as the tips. If only the five main points are pinned, the valleys can bow outward and weaken the recognizable maple silhouette.
- Keep the stem near 10 foundation stitches at this scale. A substantially longer stem changes the balance of a 12 cm leaf and may curl because of its narrow construction.
- Weave tails parallel to existing stitches. Pulling a yarn tail directly across a lobe can shorten that section and leave a visible ridge on a flat appliqué.
Size and Yarn Substitutions
The scale of a crochet maple leaf changes considerably when yarn weight and hook size change. Fine cotton and a 3 mm hook can produce a detailed motif around 12 × 12 cm.
DK cotton with a 3.5 mm hook creates a slightly heavier fabric with more pronounced stitches. Worsted yarn can produce a smaller or larger leaf depending on construction and tension, so yarn weight alone does not determine the finished dimensions.
Do not mix measurements from different patterns as though they represent one universal gauge. Different stitch structures, lobe depths and edging methods alter the final size.
For a garland or coordinated table set, make one complete test leaf first. Block it, record its finished width and height, and use that piece as the measurement standard for the remaining motifs.
Why the Raised Veins Matter
The reference design gives unusual emphasis to vein structure. A strong central line extends from the stem toward the highest point while diagonal branches visually divide the major lobes.
This treatment performs two structural jobs. First, it makes the five lobes read as sections of one botanical form rather than independent crochet petals. Second, the raised line adds definition to an otherwise flat piece.
Surface crochet is particularly useful because the veins can be positioned after the leaf reaches its final shape. This allows small placement corrections without changing the foundation stitches.
Embroidery can also be used when a flatter result is preferred. For the closest match to the reference image, however, use a raised crochet line approximately one stitch wide.
Color Planning for Autumn Maple Leaves
A single-color leaf gives the stitch structure maximum visibility. Burnt orange, mustard, burgundy and olive reproduce conventional autumn palettes, while cream, teal and purple create more decorative versions like those visible in the reference.
For multicolor leaves, place the darkest shade near one side or around the central vein rather than changing color at random. A controlled transition from orange through rust, gold and olive makes the individual lobes remain readable.
Keep the stem and central vein in one color when several shades appear in the body. The continuous line acts as a visual anchor across the color changes.
Conclusion
Block the first leaf to its final dimensions before making a complete set; that sample establishes the actual gauge for your yarn, hook and tension. Then repeat the maple leaf crochet pattern in rust, mustard, olive, burgundy or the multicolor arrangement visible in the reference. For a garland, record the finished width of every motif and maintain consistent spacing during joining. Photograph blocked leaves directly overhead before sharing them on Pinterest or Instagram so the five-point silhouette remains visible. Use #MapleLeafCrochetPattern when posting the project. Which central vein will you use: matching yarn, a contrasting autumn shade or a multicolor treatment?









