Introduction
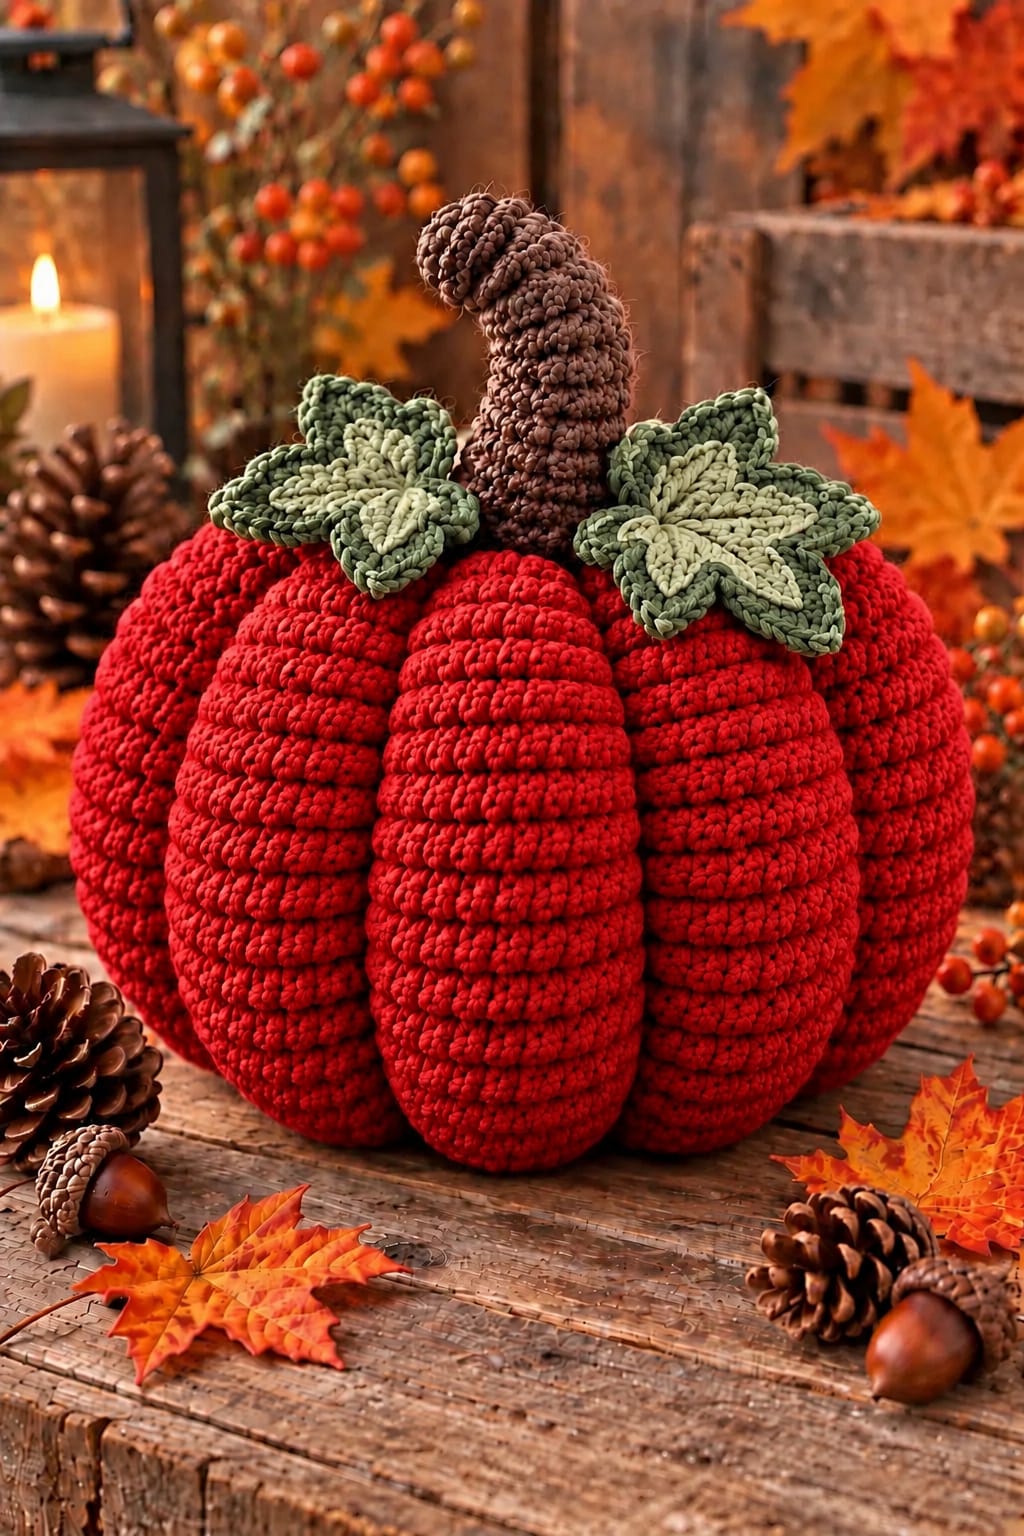
Eight massive red lobes and a bent, bark-textured stem give this pumpkin its unusually sculptural silhouette. This large red crochet pumpkin pattern uses #6 super-bulky yarn, a 7 mm hook, sectional ribbing, fiberfill, and layered green leaves. The intermediate reconstruction targets approximately 32–35 cm wide and 30–33 cm overall, making it substantial enough for a floor, hearth, or table display.
The instructions below are an original photo-inspired reconstruction based on visible structure; published patterns cited later are used only for sizing, gauge, and material benchmarks.
The Design: What Makes This Red Pumpkin Different
The photograph shows unusually deep lobes with horizontal texture running across each section, so a plain spherical amigurumi body would miss its defining structure. This reconstruction uses eight shaped rib panels joined around a stuffed core. Each panel widens through its middle and narrows toward both ends, creating the broad vertical segments before sculpting begins. External shaping strands then deepen the seams without crushing the textured surface. The second distinctive element is the thick curved stem: short textured sections change direction gradually instead of forming a straight cylinder. Finally, two-tone five-point foliage spreads across the crown and hides the panel joins. A common mistake with a giant crochet pumpkin pattern is underestimating circumference. A 30-plus-centimeter pumpkin requires substantially more fabric than a conventional 36- or 42-stitch amigurumi sphere.
Project Info at a Glance
| Skill Level | Time | Finished Size | Hook | Best For |
|---|---|---|---|---|
| Intermediate | Reconstruction estimate: 8–12 hours | 32–35 cm wide × 30–33 cm overall | 7 mm body; 5 mm stem/leaves | Large autumn displays, hearths, entry tables |
Current published patterns confirm the scale range possible with bulky yarn. The Unraveled Mitten lists a #6 super-bulky large pumpkin at approximately 9 inches wide, using 141 yards and a 9 mm hook. Nicole Riley’s bulky-yarn Large Pumpkin measures 9 × 6.5 inches and uses 200–250 yards with a 5 mm hook. A current life-size cable-texture pattern lists approximately 25 cm width and 20 cm height, while giant pumpkin patterns extend beyond 30 inches in circumference. This reconstruction intentionally targets the larger end of decorative tabletop pumpkins.
Materials and Tools
Yarn
- Deep pumpkin red — #6 super bulky — reconstruction estimate: 450–550 g
- Dark forest green — #5 bulky — reconstruction estimate: 70–90 g
- Sage green — #5 bulky — reconstruction estimate: 50–70 g
- Chocolate brown — #5 bulky — reconstruction estimate: 80–100 g
Choose a yarn with visible stitch definition rather than very slippery chenille if you want the pronounced horizontal ridges in the photograph. A dense acrylic, wool blend, or structured polyester works well. The material quantities above are reconstruction estimates, not quantities taken from a published pattern.
Tools
- 7 mm crochet hook for the pumpkin
- 5 mm crochet hook for leaves and stem
- 900–1,200 g polyester fiberfill — reconstruction estimate
- Strong red yarn or cotton cord for sculpting
- Large tapestry needle
- Locking stitch markers
- Scissors
- Measuring tape
Abbreviations
- MR — magic ring
- ch — chain
- sc — single crochet
- hdc — half double crochet
- dc — double crochet
- tr — treble crochet
- sl st — slip stitch
- BLO — back loop only
- inc — two stitches in one stitch
- dec — decrease
- st/sts — stitch/stitches
An invisible decrease is made through the front loops of two adjacent stitches before completing one single crochet; it reduces bulk where shaped pieces narrow.
Construction Overview
The pumpkin body consists of eight identical red panels. Each panel is worked from bottom to top and reaches approximately 38–40 cm long at the reconstruction gauge.
The panels are wider through their middle than at either end. After all eight are sewn together, the lower opening is closed, the pumpkin is stuffed, and the crown is gathered around the stem opening.
This panel method is deliberate. The photograph shows extremely pronounced sections, and eight separately shaped panels create more predictable depth at this scale than attempting to compress a smooth sphere after stuffing.
Gauge
Target approximately 10 sc × 11 rows = 10 cm with the 7 mm hook.
Make a 15 cm swatch before beginning. The fabric should be dense enough that white fiberfill cannot be seen when the swatch is stretched lightly.
If your stitch gauge is substantially tighter, move to an 8 mm hook. If openings expose stuffing, move down to 6.5 mm.
Pattern — Step by Step
Large Red Body Panel — Make 8
Yarn: deep red. Hook: 7 mm.
Ch 13.
Row 1: Sc in second ch from hook and across. (12)
Row 2: Ch 1, turn. Inc, sc in next 10 sts, inc. (14)
Row 3: Ch 1, turn. Sc BLO across. (14)
Row 4: Ch 1, turn. Inc, sc in next 12 sts, inc. (16)
Row 5: Ch 1, turn. Sc BLO across. (16)
Row 6: Ch 1, turn. Inc, sc in next 14 sts, inc. (18)
Row 7: Ch 1, turn. Sc BLO across. (18)
Row 8: Ch 1, turn. Inc, sc in next 16 sts, inc. (20)
Row 9: Ch 1, turn. Sc BLO across. (20)
Row 10: Ch 1, turn. Inc, sc in next 18 sts, inc. (22)
Row 11: Ch 1, turn. Sc BLO across. (22)
Row 12: Ch 1, turn. Inc, sc in next 20 sts, inc. (24)
Rows 13–26: Ch 1, turn. Sc BLO across. (24)
Row 27: Ch 1, turn. Dec, sc in next 20 sts, dec. (22)
Row 28: Ch 1, turn. Sc BLO across. (22)
Row 29: Ch 1, turn. Dec, sc in next 18 sts, dec. (20)
Row 30: Ch 1, turn. Sc BLO across. (20)
Row 31: Ch 1, turn. Dec, sc in next 16 sts, dec. (18)
Row 32: Ch 1, turn. Sc BLO across. (18)
Row 33: Ch 1, turn. Dec, sc in next 14 sts, dec. (16)
Row 34: Ch 1, turn. Sc BLO across. (16)
Row 35: Ch 1, turn. Dec, sc in next 12 sts, dec. (14)
Row 36: Ch 1, turn. Sc BLO across. (14)
Row 37: Ch 1, turn. Dec, sc in next 10 sts, dec. (12)
Row 38: Ch 1, turn. Sc BLO across. (12)
Fasten off with a 60 cm sewing tail.
Make eight identical panels.
Panel Measurement Check
One finished panel should measure approximately 38–40 cm from end to end and about 22–24 cm across its widest section before assembly.
Do not stretch the ribbing while measuring.
Stack all eight panels after completion. Their longest dimensions should agree within approximately 1 cm.
Joining the Eight Pumpkin Panels
Place two panels with their long edges aligned.
Using red yarn and the tapestry needle, mattress stitch from the lower end to the upper end.
Do not pull the seam completely flat. Leave approximately 5–8 mm of natural indentation between panels.
Add the remaining panels one at a time.
Finally join Panel 8 to Panel 1 to create a large hollow segmented shell.
There should be exactly eight vertical seams.
Closing the Pumpkin Base
Thread approximately 150 cm of doubled strong red yarn through a large needle.
Pass through the lower edge of every panel, taking two or three evenly spaced bites through each section.
Pull the eight panel ends toward the center.
Work around a second time before tightening fully.
Close the opening to approximately 2 cm.
Cross the center several times and knot securely inside.
Stuffing the Large Pumpkin
Begin by pushing fiberfill into the outer half of every lobe.
Work around all eight sections rather than filling one completely at a time.
Add stuffing to the lower third next.
Continue through the middle and finish at the crown.
Keep the central vertical core slightly softer than the lobes.
Before closing, target approximately 31–33 cm across. Final sculpting will add definition and can reduce the measured width slightly.
Closing the Crown
Run a doubled red strand around the upper edge using two or three stitches per panel.
Pull gradually.
Stop when the opening measures approximately 3 cm.
Knot securely but leave the center open for the stem.
Deepening the Eight Grooves
The sewn seams already establish eight divisions, but the reference has substantially deeper valleys.
Cut four strong red sculpting strands approximately 180 cm each.
Take the first strand through the bottom center and up one panel seam.
Pass through the crown opening and return down the directly opposite seam.
Pull until both valleys deepen by approximately 2–3 cm.
Knot underneath.
Repeat with the remaining three strands through the other three pairs of opposing seams.
Adjust all eight valleys gradually.
Horizontal Surface Ridges
The BLO rows already create repeated horizontal ridges across each lobe.
For stronger texture, surface slip stitch across every fourth ridge using matching red yarn.
Begin approximately 3 cm from one seam and stop 3 cm before the next seam.
Do not carry the surface line through the valley.
Keep each slip stitch loose enough that the lobe remains rounded.
Large Dark-Green Leaf — Make 6
Yarn: dark forest green. Hook: 5 mm.
The crown foliage in the photograph resembles broad five-point leaves. Each leaf below is made as a single center with five lobes.
R1: 10 sc in MR. Join. (10)
R2: *Sc in next st, 2 sc in next st* ×5. (15)
Do not fasten off.
Leaf Point 1
Ch 11.
Starting in second ch from hook, work:
Sl st, sc, hdc, dc, tr, tr, dc, hdc, sc, sl st. (10)
Sl st into the next three stitches of the center.
Leaf Points 2–5
Repeat the 11-chain point four more times, using the next three center stitches as the anchor interval after each point.
After Point 5, join at the beginning of the round.
Fasten off with a 40 cm tail.
Each leaf has exactly five pointed lobes radiating from its center.
Sage Inner Leaf — Make 4
Yarn: sage green. Hook: 5 mm.
R1: 10 sc in MR. Join. (10)
For each of five points:
Ch 8.
Starting in second chain work:
Sl st, sc, hdc, dc, hdc, sc, sl st. (7)
Sl st into the next two center stitches.
Repeat until five points are complete.
Fasten off with a 30 cm tail.
These smaller sage motifs can be layered over two of the dark-green leaves to reproduce the lighter centers visible in the photograph.
Two-Tone Leaf Assembly
Place one sage five-point motif over one dark-green leaf.
Rotate the sage layer so its points align approximately with the larger dark points.
Sew only around the center circle.
Leave every point free.
Make two prominent two-tone leaves and retain the remaining dark-green leaves as supporting foliage.
Textured Brown Stem
Yarn: chocolate brown #5 bulky. Hook: 5 mm.
The photographed stem is tall, thick, irregular, and visibly curved.
R1: 6 sc in MR. (6)
R2: Inc ×6. (12)
R3: BLO sc around. (12)
R4: Sc around. (12)
R5: *Sc, bobble in next st* ×6. (12 working positions)
R6: Sc around. (12)
R7: *Bobble, sc* ×6. (12)
R8: Sc around. (12)
R9: *Sc, bobble* ×6. (12)
R10: Sc around. (12)
Begin the curve.
R11: Sc in next 4 sts, hdc in next 4 sts, sc in final 4 sts. (12)
R12: Sc around. (12)
R13: Sc in next 4, hdc in next 4, sc in final 4. (12)
R14: *Bobble, sc* ×6. (12)
R15: Sc around. (12)
R16: Sc in next 3, hdc in next 5, sc in final 4. (12)
R17: Sc around. (12)
R18: (Sc, dec) ×4. (8)
R19: Sc around. (8)
Fasten off.
Target visible stem height: approximately 15–17 cm.
Bobble Stitch for the Stem
Yarn over, insert hook into the indicated stitch, yarn over and pull up a loop, yarn over and pull through two loops.
Repeat that partial double crochet four more times into the same stitch.
Yarn over and pull through all remaining loops.
The resulting cluster should project toward the outside of the stem.
Shaping the Curved Stem
Stuff the lower 8–10 cm firmly.
Reduce stuffing through the upper curved section.
Insert a folded pipe cleaner or flexible craft wire only if the pumpkin is intended as adult decorative use and the wire ends can be completely enclosed.
For an all-textile version, bend the stem while lightly damp and tack the upper section to itself with two concealed brown stitches.
The final curve should lean approximately 20–30 degrees from vertical.
Attaching the Stem
Insert approximately 3 cm of the stem into the pumpkin crown.
Sew the 12-stitch stem base to the gathered red opening.
Take one reinforcing stitch through each of the eight body-panel ends.
Pull the red crown inward around the stem.
Check the stem from all sides before knotting permanently.
Arranging the Crown Leaves
Place the two two-tone leaves on opposite sides of the stem.
Position four dark-green leaves between and behind them.
Allow approximately one third of each large leaf to overlap the red pumpkin.
Pin all six before sewing.
Attach each leaf through its center and the inner 2–3 cm of selected points.
Leave the outer tips free so they stand above the pumpkin surface.
Assembly
- Crochet eight identical red panels through Row 38, measuring each against the 38–40 cm length target before fastening off.
- Mattress stitch the eight long panel edges together, leaving a shallow natural valley at every seam and joining the eighth panel back to the first.
- Gather the lower panel ends with doubled red yarn, close the bottom to approximately 2 cm, reinforce the center, and hide the knot inside.
- Stuff all eight lobes progressively from the outer walls inward, keeping the central core softer and bringing the body to approximately 31–33 cm before sculpting.
- Gather the crown to a 3 cm opening and add four long sculpting strands through opposing panel seams to deepen all eight valleys by roughly 2–3 cm.
- Crochet the six large dark-green five-point leaves and four smaller sage motifs, then sew two sage motifs over two dark leaves to create the prominent two-tone foliage.
- Crochet the 19-round textured brown stem, stuff its lower section, form its 20–30-degree bend, and insert approximately 3 cm into the crown.
- Sew the stem base to the eight panel ends, checking that it remains upright at the base even though its upper section curves.
- Arrange six large leaves around the stem, place the two two-tone leaves prominently at the front and sides, and sew only their centers and inner sections.
- Weave all tails into the stuffed interior, set the pumpkin on a flat surface, and adjust the sculpting strands until the final body measures approximately 32–35 cm across with eight balanced lobes.
The finished reconstruction has eight oversized red lobes, repeated horizontal ribbing, a tall textured brown stem, and layered green crown foliage.
7 Technical Tips
- The pumpkin looks octagonal instead of rounded: add stuffing directly behind each panel center rather than packing the seams. Maintain at least 2 cm of visible curvature between the widest point and each sculpted valley.
- The seams disappear after stuffing: run the sculpting strands directly through all eight sewn valleys. Tighten each opposing pair by approximately 1 cm at a time instead of fully tightening one groove first.
- Fiberfill shows through the red fabric: test the 7 mm hook with a stretched swatch before making eight panels. Move down 0.5 mm if white stuffing is visible through ordinary tension.
- The stem falls sideways at its base: insert at least 3 cm into the pumpkin and sew its base to all eight panel ends. Shaping only the upper 7–9 cm keeps the lower stem structurally vertical.
- The BLO ridges flatten during sculpting: keep each shaping strand inside the sewn valley rather than crossing a panel face. A strand displaced by even 1 cm can compress several horizontal ridges.
- The five-point leaves twist: block every large leaf around a 10-stitch center before attaching it. Keep corresponding points within approximately 5 mm of equal radial length.
- The pumpkin rocks on the table: push stuffing away from the lower center and press a shallow 5–6 cm indentation into the gathered base. A hard fiberfill mound beneath the closure prevents a 30 cm pumpkin from standing securely.
Why Eight Separate Panels Fit the Photograph
The visible pumpkin does not read as a smooth sphere with shallow yarn wrapped around it. Its eight sections project individually, and every section carries horizontal bands from top to bottom.
Separate panels reproduce both features. The BLO rows create horizontal texture while the curved panel edges establish vertical segmentation. Sculpting yarn then strengthens geometry that already exists rather than trying to manufacture deep lobes from an otherwise round body.
This approach also scales predictably. A panel can be measured before assembly, which is useful when constructing a pumpkin more than 30 cm across.
Published Large-Pumpkin Benchmarks
The Unraveled Mitten’s Chunky Crochet Pumpkin uses #6 super-bulky Wool-Ease Thick & Quick and a 9 mm hook. Its published large rectangle measures 10 × 22 inches, requires approximately 141 yards, and produces a pumpkin about 5 inches tall × 9 inches wide. The construction uses a rectangle that is sewn, stuffed, cinched, and externally shaped.
Nicole Riley’s Large Pumpkin uses bulky-weight Knit Picks Brava and a 5 mm hook. Ravelry lists approximately 200–250 yards and a finished size of 6.5 × 9 inches. That pattern uses linked treble crochet for dense fabric.
Current Large Decorative Pumpkin Scale
A current cable-textured crochet pumpkin listing specifies a life-size finished measurement of approximately 20 cm high × 25 cm wide with a circumference around 70 cm. Another giant pumpkin listing publishes sizes up to 34 inches around and approximately 225 yards for its largest version.
At the extreme end, a worsted-weight pumpkin listing specifies approximately 45 cm diameter and around 900 m / 990 yards of yarn. These examples show why a large decorative pumpkin cannot be scaled accurately by retaining stitch counts intended for small amigurumi.
Current Blanket-Yarn Benchmark
Repeat Crafter Me’s September 2026 Bernat Blanket Matte & Shiny Crochet Pumpkin uses approximately 223 g / 140 yards of #6 super-bulky yarn with a 6.5 mm hook. The published finished size is approximately 10 inches tall × 12 inches wide, with a circumference around 32 inches.
That scale is especially relevant to this reconstruction. The photographed pumpkin appears close to the 30 cm-wide class but adds a much taller stem and more aggressive segmentation.
Changing the Pumpkin Size
For a smaller version, remove two stitches from the initial chain and four rows from the central 24-stitch plateau of every panel. Apply the same change to all eight pieces.
For a larger version, add two stitches to the maximum panel width and four to six plateau rows. Make one complete paper or crochet test panel before committing to eight enlarged pieces.
Do not simply add stuffing to obtain more diameter. Excess fiberfill reduces groove depth and changes the shape from a pumpkin into a sphere.
Making a Softer Ribbed Version
Work every row in BLO but omit the optional surface slip-stitch accents.
This leaves the natural horizontal ribs visible without producing the stronger bands seen in the reference.
The panel and assembly counts remain unchanged.
Making the Pumpkin with Bernat Blanket
Bernat Blanket can substitute for another #6 yarn, but gauge should control the hook selection. The 2026 Repeat Crafter Me benchmark pairs Blanket Matte & Shiny with a 6.5 mm hook for a 12-inch-wide pumpkin.
Begin with 6.5 or 7 mm and make a swatch. Chenille fabric should remain flexible while preventing stuffing from showing between stitches.
Expect the horizontal ridges to look softer than they do in a plied acrylic or wool blend.
Yarn Planning
Crochet one complete body panel and weigh it before making the remaining seven.
Multiply that weight by eight. Add approximately 12% for seams, sculpting, swatching, and gauge variation.
Calculate leaves and stem separately.
For example, a 55 g test panel predicts approximately 440 g for eight panels before adding the finishing allowance. This component-weight method is more reliable than borrowing yardage from a 9-inch pumpkin when the reconstruction target exceeds 30 cm.
Care and Storage
Follow the care instructions for the selected yarn. Remove any internal craft wire before machine washing if the stem was constructed with removable reinforcement.
Support the pumpkin underneath when wet. A saturated 30-plus-centimeter stuffed form can place substantial stress on the crown and panel seams.
Dry flat and redistribute the stuffing while damp. Re-form all eight valleys before the body is completely dry.
Store without weight on top of the stem or crown leaves. Compression can permanently flatten the textured stem and fold the five-point foliage.
Sources
The Unraveled Mitten — Chunky Crochet Pumpkin Pattern — #6 super-bulky yarn, 9 mm hook, published 5 × 9 inch large pumpkin and 141-yard requirement.
Ravelry — Large Pumpkin by Nicole Riley — bulky yarn, 5 mm hook, 200–250 yards, and published 6.5 × 9 inch dimensions.
AllFreeCrochet — Large Crochet Pumpkin Using Linked Crochet — linked-crochet construction, bulky yarn, 5 mm hook, gauge, and 9-inch-diameter benchmark.
Repeat Crafter Me — Bernat Blanket Matte & Shiny Crochet Pumpkin — September 2026 #6 blanket-yarn pumpkin using approximately 223 g, a 6.5 mm hook, and published 10 × 12 inch dimensions.
Ravelry — Large Pumpkin by Michelle Hall — Aran construction that forms pumpkin sections during crocheting rather than relying exclusively on external shaping.
Etsy — Large Cable-Texture Crochet Pumpkin — current life-size benchmark of approximately 20 × 25 cm with a 70 cm circumference.
Etsy — Giant Crochet Pumpkin Pattern — three large sizes reaching approximately 34 inches in circumference with published 175–225 yard requirements.
Craft Passion — Crochet Pumpkin in Three Sizes — updated 2024 reference for smaller 3, 4, and 5.5 inch amigurumi pumpkin sizing.
Conclusion
The eight shaped panels are the critical measurement, so make and measure one before producing the other seven. Confirm approximately 38–40 cm of panel length, test the fabric against white fiberfill, and keep the widest section flexible enough to curve around stuffing. Assemble the shell before making the foliage so the leaves can be scaled against the finished crown. Your next step is to crochet one complete red test panel and check its gauge. Save this large red crochet pumpkin pattern to Pinterest or share the finished piece on Instagram with #LargeRedCrochetPumpkin. Would you keep both two-tone crown leaves, or make all six leaves dark forest green?









