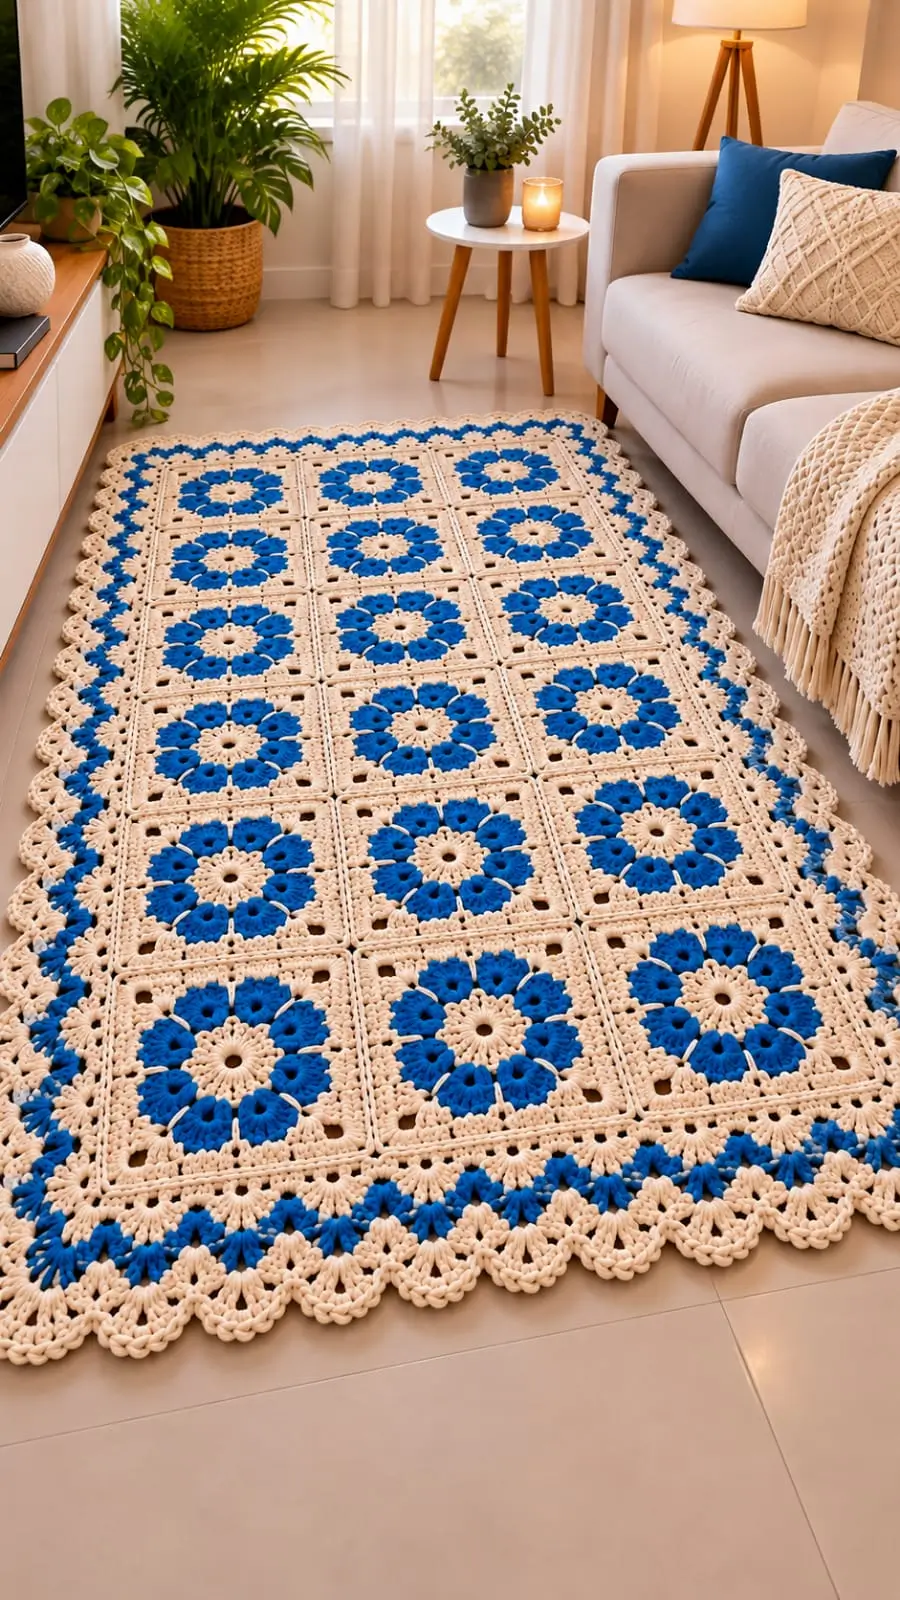
Eight cobalt petals radiating from each cream center give this rug its defining geometry. This blue flower granny square crochet rug uses 15 joined motifs, worsted/Aran yarn and a 5.5 mm hook, with a target size near 90 × 150 cm after gauge adjustment. The intermediate-level construction combines floral rounds, squaring rounds and a scalloped border. Its modular format also makes damaged sections easier to repair individually.
The Design: What Makes This Floral Rug Different
The photographed rug depends on three structural decisions. First, each motif keeps the flower strongly circular before cream stitches convert it into a square; that prevents the blue petals from disappearing into the background. Second, the floral granny square rug uses a narrow neutral frame around every flower, separating adjacent blue motifs after joining. Third, the perimeter repeats blue before returning to cream scallops, which visually connects the border to the flower layer.
The common failure point is adding too many tall stitches while squaring the circular flower. Excess fabric produces bowed motif edges and makes the finished blue granny square rug ripple after assembly. Blocking can correct small tension differences, but it cannot reliably correct a badly overfilled corner.
Published floral-rug references use Aran yarn with a 5.5 mm hook, making that a practical starting combination for this version.
Project Info at a Glance
| Skill Level | Time | Finished Size | Hook | Best For |
|---|---|---|---|---|
| Intermediate | 18–25 hours | Target approx. 90 × 150 cm after gauge adjustment | 5.5 mm | Bedroom, living-room or bedside runner |
The dimensions above are a target for recreating the photographed proportions rather than a measured dimension of the pictured rug. Published granny-square rugs vary considerably because motif gauge, yarn weight, joining method and border depth all affect the finished dimensions.
Materials and Tools
Yarn
- Cream/natural — Aran/worsted — approximately 400–500 g — choose a tightly twisted washable cotton, cotton blend or durable acrylic.
- Royal/cobalt blue — Aran/worsted — approximately 200–300 g — use the same yarn line and weight as the cream.
These quantities are working estimates for the photo-inspired project. Make one complete motif before purchasing the entire yarn quantity because individual tension and yarn construction can substantially change consumption.
Cotton gives a firmer floor textile than a highly elastic wool yarn. Acrylic can work for decorative low-traffic placement, although fiber choice changes the weight, grip and blocking behavior of the finished rug.
Tools
- 5.5 mm crochet hook
- Tapestry needle
- Locking stitch markers
- Scissors
- Tape measure
- Blocking mats and rust-resistant pins
- Non-slip rug underlay for smooth flooring
Abbreviations
- MR — magic ring
- ch — chain
- sc — single crochet
- hdc — half double crochet
- dc — double crochet
- tr — treble crochet
- sl st — slip stitch
- sp — space
- st/sts — stitch/stitches
- rep — repeat
- BLO — back loop only
- dc2tog — double crochet two together
Invisible decrease is an amigurumi technique and is not required in this flat motif construction.
Unlike an amigurumi sphere, this project does not use the six-stitch MR/+6 expansion formula. Flat floral squares depend on corners, chain spaces and stitch height, so applying amigurumi expansion mathematics would distort the motif.
Blue Flower Granny Square Crochet Rug Pattern
Construction: Make 15 individual flower squares, arrange them three across and five down, join the motifs, then work the border around the completed rectangle.
Make one test motif first. The square must lie flat and meet the required measurement before the remaining 14 motifs are produced.
Flower Center — Make 15
Yarn: cream.
R1: MR, ch 3, work 15 dc into ring; join with sl st to top of beginning ch 3. (16 dc)
Pull the magic ring closed firmly.
R2: Ch 1, sc in same st, ch 2, skip next dc, sc in next dc; repeat around. Join with sl st. (8 sc, 8 ch-2 spaces)
Fasten off. Weave the cream tail securely through the backs of several stitches.
Blue Petals — Make 8 Per Motif
Yarn: cobalt blue.
Join blue in any ch-2 space.
R3: Ch 2, 2 dc, 1 tr, 2 dc, ch 2, sl st in the same ch-2 space. Sl st into the next sc and next ch-2 space. Repeat the petal sequence in every ch-2 space. (8 petals)
Check that all eight petals have approximately equal width and height before fastening off.
Fasten off. Leave approximately 10 cm of yarn for weaving.
Cream Squaring Round — Make on All 15 Motifs
Yarn: cream.
The next stage converts the circular eight-petal flower into a square. Keep the four corners evenly spaced around the flower.
R4: Join cream between two petals. Ch 3. Work 2 dc in the same gap, ch 1, 3 dc in next gap, ch 1, then (3 tr, ch 2, 3 tr) in the following gap to form a corner. Continue around, positioning four treble-based corners evenly at the quarter points.
Join with sl st.
Lay the motif on a flat surface. The four corners should sit at approximately 90 degrees without pulling the blue petals sideways.
R5: Sl st to the nearest corner space. Ch 3, 2 dc, ch 2, 3 dc in corner. Work 3 dc into each intervening ch-1 space. In every corner work 3 dc, ch 2, 3 dc.
Join with sl st.
R6: Ch 1. Sc evenly around the complete square, working 3 sc in each corner space. Join with sl st.
Fasten off. Leave approximately 15 cm if the yarn tail will be incorporated into the joining seam.
Joining the 15 Granny Squares
Arrange the completed motifs 3 squares across × 5 squares down.
The flowers should face the same orientation. Pin the entire layout before joining because stretched or rotated motifs become much more noticeable once the straight cream frames are connected.
With cream yarn, place two neighboring squares with their corresponding edges aligned.
Join Row: Ch 1 and work matching sc through the edge loops of both squares from one corner to the next. Fasten off.
Join three squares to form each horizontal row. Repeat until five separate rows have been assembled.
Join those five strips along their long edges to create the rectangular rug body.
A mattress-stitch seam can be substituted when a flatter join is preferred.
Inner Cream Border
Yarn: cream.
Border R1: Join cream at any outer corner. Ch 1 and sc evenly around the entire rectangle. At each of the four corners work 3 sc in one corner stitch.
The exact straight-side stitch count depends on the size of the blocked motifs and the joining method. Count the first long side and duplicate that number on the opposite long side. Do the same for both short sides.
Border R2: Ch 3 and dc in every stitch around. At each corner work 2 dc, ch 2, 2 dc in the center corner stitch or space.
Join with sl st.
Blue Accent Border
Yarn: cobalt blue.
Border R3: Join blue in a corner. Ch 3, 2 dc in the same space, ch 1. Skip 2 sts, work 3 dc in the next stitch; repeat along the side.
At each corner work 3 dc, ch 2, 3 dc.
If the cluster repeat does not divide evenly into a side, distribute the adjustment near both ends of that side instead of placing an obvious partial cluster at one corner.
Border R4: Work one sc in each dc and one sc in each ch-1 space. Work 3 sc in each corner ch-2 space.
Fasten off blue.
Cream Scalloped Edging
Yarn: cream.
The photographed rug has a considerably deeper decorative edge than a standard granny-square border. The final rounds create repeated cream fans around the blue accent section.
Border R5: Join cream. Ch 1, sc in the first stitch. Skip 2 sts, work 5 dc in next stitch, skip 2 sts, sc in next stitch. Repeat around.
At the corners, use a larger 7-dc fan when needed to turn the corner without pulling or cupping the fabric.
Border R6: Sl st to the center dc of the first fan. Ch 1, sc in that stitch, ch 5, sc in the center dc of the next fan. Repeat around.
Border R7: Into every ch-5 space work sc, hdc, 3 dc, hdc, sc.
Join with sl st.
Fasten off. Weave the final tail at least 5 cm through the backs of the stitches, reverse direction, then weave through another section before trimming.
Assembly
- Block all 15 completed motifs to one identical measurement before joining.
- Arrange three motifs across and five motifs down with every flower facing the same orientation.
- Pin neighboring cream edges together at both corners and at the midpoint.
- Join each set of three motifs into a horizontal strip using cream yarn.
- Join the five completed strips along their long edges without stretching the seams.
- Lay the rectangle flat and check both diagonals. Similar diagonal measurements indicate that the assembly is square.
- Work the two cream foundation border rounds around the complete rectangle.
- Add the cobalt-blue accent rounds while maintaining matching stitch counts on opposite sides.
- Work the cream scalloped edging, adjusting the repeat only where necessary at the corners.
- Wet-block to the target dimensions, dry the rug flat and place a non-slip underlay beneath it when used on smooth flooring.
The completed rug consists of 15 independently constructed flower squares joined into a rectangular panel and finished with a multi-round decorative perimeter.
7 Technical Tips for a Flat Crochet Rug
- Mark every corner before starting a border round. Missing one corner increase produces a curved edge within one or two rounds. Place four locking markers before beginning the perimeter.
- Measure every fifth motif against the first. A difference greater than approximately 5 mm per square can accumulate into a visibly uneven 3 × 5 rectangle.
- Control the height of the blue petals. Loose treble stitches can make the flower buckle upward. If a petal projects above the cream frame, correct the stitch tension rather than removing random stitches.
- Check the squaring round before fastening off. Rounded corners can indicate insufficient corner height or chain space, while rippling edges usually indicate excess fabric between corners.
- Pin every seam at three points. Secure both corners and the midpoint. This prevents one motif from feeding excess fabric into its neighbor during joining.
- Keep opposite border counts identical. Both long sides should match and both short sides should match. A difference of two or three stitches can shift the final scallop placement.
- Use a non-slip underlay on smooth flooring. Crochet fabric alone should not be treated as an anti-slip surface because the finished rug can move on tile, laminate or polished wood.
How to Calculate the Finished Rug Size
The most reliable sizing method starts with one finished and blocked flower motif.
For example, if one square measures 24 cm, three motifs across produce approximately 72 cm before the seams and border are considered. Five motifs produce approximately 120 cm in length.
If the decorative perimeter adds approximately 8–10 cm to each side, the resulting rug could measure roughly 88–92 cm wide and 136–140 cm long, depending on the seam construction and final blocking.
A 27 cm motif changes the calculation substantially. Three motifs create approximately 81 cm of width before the border, while five motifs create approximately 135 cm of length.
This is why the finished dimensions should not be determined from the photograph alone.
Make one complete flower square first. Block it using the same method planned for the finished rug, allow it to dry completely, then measure across the center from edge to edge.
Multiply that measurement by three for the basic width and by five for the basic length. Add the expected depth of the border on both sides.
Matching the Blue and Cream Color Placement
The photographed design contains considerably more cream than blue even though the cobalt flowers dominate the pattern visually. Keeping this proportion is important when recreating the same appearance.
Use cream for the circular centers, square backgrounds, joining seams and outer scalloped edging. Reserve cobalt blue primarily for the eight petals and concentrated accent section of the perimeter.
Reversing those quantities produces a substantially darker rug and changes the character of the design.
Negative space between the petals also matters. Adding extra blue stitches to fill those openings reduces the definition between individual petals and makes the flower appear more like a solid circle.
For a close color match, select a saturated royal or cobalt blue rather than navy. Combine it with warm natural, ecru or unbleached cream rather than a stark optical white.
Blocking the Finished Crochet Rug
Blocking should correct small tension differences, not major construction errors. Check the rug before wetting it.
Measure the width at the top, center and bottom. Then measure the length along both outer edges and through the center. Large differences indicate that a joining seam or border section should be corrected before blocking.
For washable yarn, dampen the rug according to the yarn manufacturer’s care instructions. Lay it flat on blocking mats and shape the rectangle to the calculated dimensions.
Pin the four corners first. Add pins along the straight edges without stretching individual scallops beyond their natural shape.
Allow the rug to dry completely before removing the pins.
Conclusion
The defining calculation in this blue flower granny square crochet rug is the relationship between eight blue petals, 15 equal square frames and a border that remains flat around the complete 3 × 5 layout. Make and block one complete motif before purchasing the full yarn quantity; its measured width determines the final dimensions more accurately than a photograph can. Record that measurement, calculate the full layout, then add the planned border allowance. Share the finished version on Pinterest and Instagram with #BlueFlowerGrannySquareRug. For this specific design, would you keep the deep cream scalloped edge shown in the reference or replace it with a narrower straight border?









