Introduction
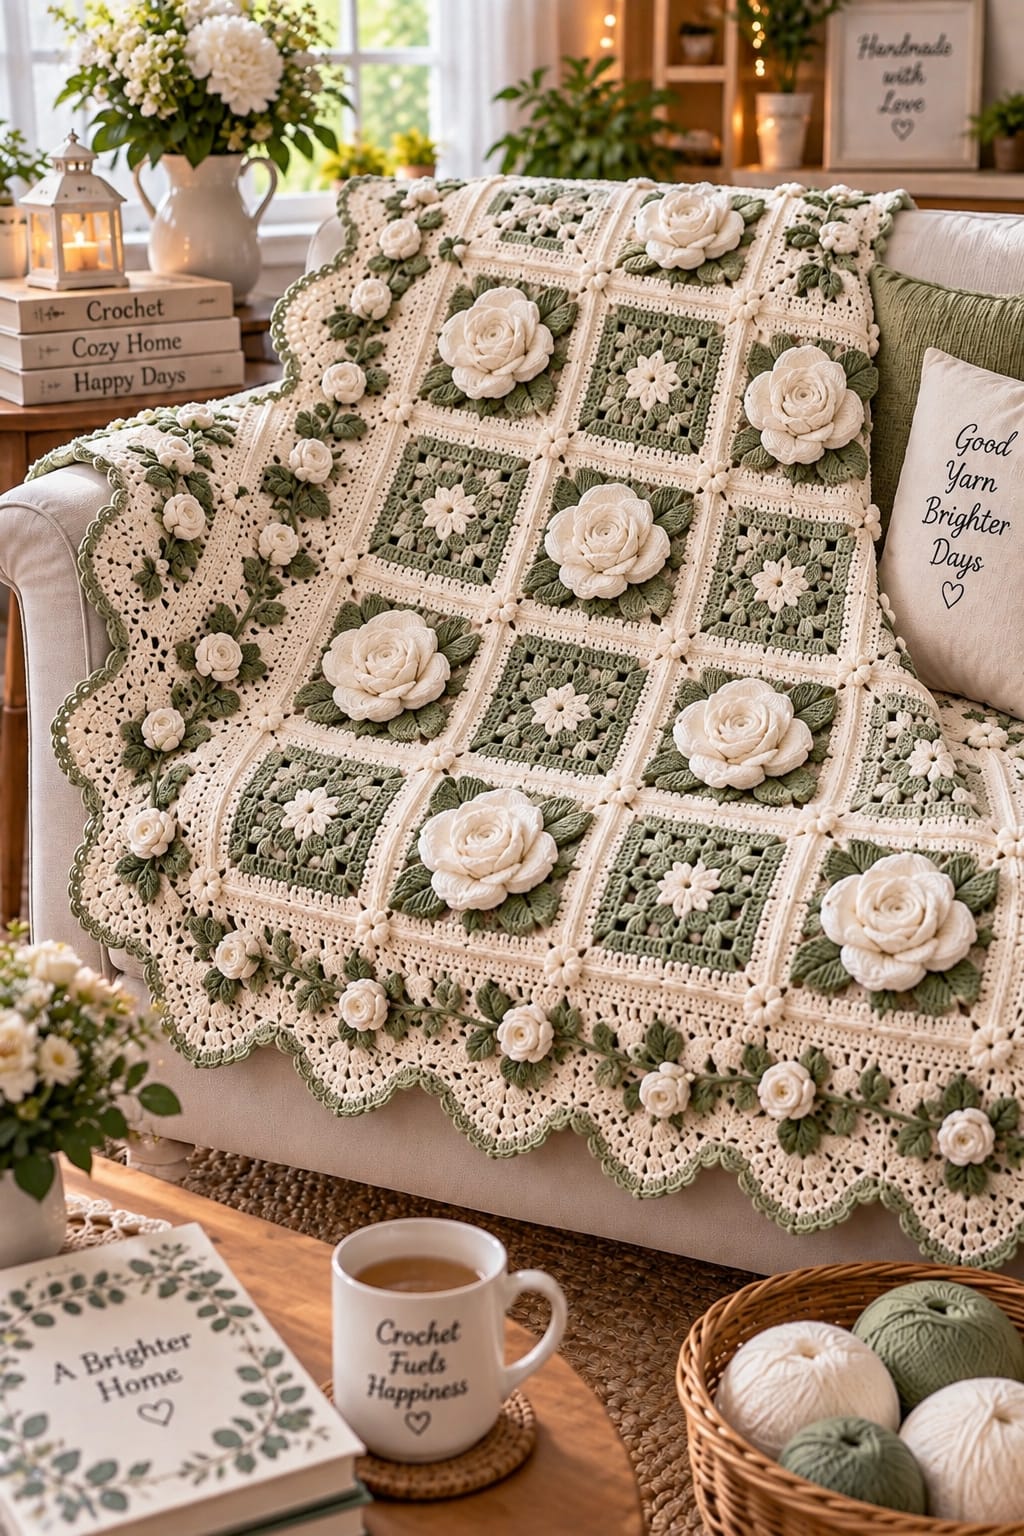
Oversized ivory roses rise above sage squares while smaller daisies occupy the alternating blocks and a vine of miniature roses travels around the lace border. This 3D rose granny square crochet blanket pattern uses worsted cotton-blend yarn, 4.5 and 5 mm hooks, modular squares, separate rose appliqués, leaves, and a scalloped edging. The intermediate reconstruction targets approximately 150 × 190 cm for a decorative sofa or bed throw.
The instructions below are an original photo-inspired reconstruction based on visible structure; published patterns cited later are used only for sizing, gauge, and material benchmarks.
The Design: What Makes This Rose Blanket Different
The photograph alternates two square types instead of repeating one floral block. Large dimensional ivory roses sit over sage centers framed in cream, while neighboring squares carry flatter ivory daisies that keep the surface from becoming uniformly bulky. Raised cream joining strips emphasize the grid and small flowers disguise many four-square intersections. Around that geometric center, a broad ivory lace border changes the construction from modular to continuous; miniature roses, sage leaves, and green-edged scallops complete the perimeter. A 3D rose granny square blanket also needs stronger attachment points than a conventional flat afghan because every large bloom adds localized weight. One common error is sewing only through the rose center. The outer petals then tip forward, so each flower needs a concealed foundation and several distributed attachment points.
Project Info at a Glance
| Skill Level | Time | Finished Size | Hook | Best For |
|---|---|---|---|---|
| Intermediate | Reconstruction estimate: 55–75 hours | Reconstruction target: 150 × 190 cm | 5 mm squares; 4.5 mm flowers | Sofa throws, decorative bedspreads, heirloom-style blankets |
Current published rose-square projects provide useful scale references. Olga Poltava’s rose afghan uses 8 × 8 inch squares, a 4.5 mm hook, and 12 squares for a 37 × 29 inch baby blanket. A current vintage rose blanket pattern lists worsted #4 yarn, a 5 mm hook, and an adjustable 48 × 60 inch throw. Kimberly Arenas’ 2026 3D Rose Granny Square specifies Aran yarn with a 5 mm hook. Simply Made by Erin’s worsted rose appliqué measures about 3.5 inches across, or approximately 4.5 inches including leaves, when worked with the recommended 5 mm hook.
Materials and Tools
Yarn
- Warm ivory — worsted #4 cotton or cotton blend — reconstruction estimate: 1,600–1,850 g
- Muted sage green — worsted #4 — reconstruction estimate: 1,000–1,200 g
- Medium olive green — worsted #4 — reconstruction estimate: 250–325 g
The quantity is intentionally expressed as a reconstruction estimate rather than copied from another blanket. A 12-square published baby afghan uses 440 yards pink, 440 yards white, and 800 yards green, while current commercial rose blankets range from approximately 40-inch squares to 50 × 70 inch throws. A 150 × 190 cm blanket with dimensional flowers and a wide lace border requires substantially more material.
Tools
- 5 mm crochet hook for squares and border
- 4.5 mm crochet hook for roses, daisies, and leaves
- Tapestry needle
- Locking stitch markers
- Scissors
- Blocking mats
- Rust-resistant pins
- Measuring tape
Abbreviations
- MR — magic ring
- ch — chain
- sl st — slip stitch
- sc — single crochet
- hdc — half double crochet
- dc — double crochet
- tr — treble crochet
- inc — two stitches in one stitch
- BLO — back loop only
- sp — space
- st/sts — stitch/stitches
An invisible decrease is made through the front loops of two adjacent stitches before completing one single crochet; this blanket is built from flat motifs, so decreases are not required in the primary squares.
Blanket Layout
Use a 6 × 8 grid containing 48 squares. Block every square to approximately 22 cm before joining.
- Large rose squares ×24
- Daisy squares ×24
- Large ivory roses ×24
- Small ivory daisies ×24
- Intersection flowers ×35
- Border roses ×26
- Border leaves ×52
The 6 × 8 center measures approximately 132 × 176 cm. A border averaging about 8–9 cm brings the reconstruction close to the 150 × 190 cm target, subject to blocking and individual gauge.
Pattern — Step by Step
Base Granny Square — Make 48
Yarn: sage. Hook: 5 mm. Work joined rounds.
R1: Ch 4 and join to form a ring. Ch 3, 2 dc in ring, ch 2; *3 dc in ring, ch 2* ×3. Join. Four 3-dc groups.
R2: Sl st to first corner. Ch 3, 2 dc, ch 2, 3 dc in same corner; *ch 1, (3 dc, ch 2, 3 dc) in next corner* ×3; ch 1, join.
R3: Sl st to corner. Work (3 dc, ch 2, 3 dc) in corner, ch 1, 3 dc in next ch-1 sp, ch 1; repeat around, working the corner group in every ch-2 corner.
R4: Repeat the established granny structure, adding one additional 3-dc group along each side. Each side now contains three 3-dc groups between corner spaces.
R5: Repeat, producing four 3-dc groups per side between corners.
Fasten off sage.
Cream Frame for Every Square
Join ivory in any corner.
R6: Ch 1. Work (2 sc, ch 2, 2 sc) in each corner. Work one sc in every dc and one sc in every ch-1 space along each side.
R7: Ch 3. Dc in every stitch along each side; work (2 dc, ch 2, 2 dc) in each corner.
R8: Ch 1. Sc in every dc; work (sc, ch 2, sc) in each corner.
Fasten off.
Block every completed square to 22 × 22 cm. If a square is smaller, change hook size before producing the complete set rather than stretching individual blocks beyond their natural dimensions.
Large Rose Foundation Disc — Make 24
Yarn: ivory. Hook: 4.5 mm.
R1: 6 sc in MR. (6)
R2: Inc ×6. (12)
R3: (Sc, inc) ×6. (18)
R4: (2 sc, inc) ×6. (24)
R5: (3 sc, inc) ×6. (30)
R6: (4 sc, inc) ×6. (36)
Fasten off with a 50 cm tail.
The disc remains hidden beneath the petals but distributes the flower’s weight over a much larger area than a single center ring.
Large Rose Petal Strip A — Make 24
Ch 31.
Row 1: Starting in second chain, sc across. (30)
Row 2: *Sl st in next st, 4 hdc in next st* ×15.
Fasten off with a 30 cm tail.
This strip produces 15 compact inner petals.
Large Rose Petal Strip B — Make 24
Ch 41.
Row 1: Sc from second chain across. (40)
Row 2: *Sl st in next st, 5 dc in next st* ×20.
Fasten off.
The repeat consumes exactly two stitches and produces 20 middle petals.
Large Rose Petal Strip C — Make 24
Ch 49.
Row 1: Sc from second chain across. (48)
Row 2: *Sl st in next st, (2 dc, 3 tr, 2 dc) in next st* ×24.
Fasten off with a long sewing tail.
This strip forms 24 broad outer petals.
Assembling the Large Rose
Roll Strip A into a compact spiral, keeping the petal edge uppermost. Sew through the lower foundation edge after every half turn.
Wrap Strip B around the finished center. Offset its petals so they do not sit directly behind the first layer.
Add Strip C more loosely. Allow its outer petals to open outward rather than pulling the strip into a tight cylinder.
Center the assembled rose on the 36-stitch foundation disc and sew the complete lower spiral to the disc.
The reconstruction target is approximately 14–16 cm across. Simply Made by Erin’s current worsted rose appliqué measures about 3.5 inches without leaves and 4.5 inches including leaves, providing a useful smaller published benchmark.
Large Sage Leaf — Make 96
Each rose square uses four leaves.
Ch 14.
Starting in second chain, work into the next 12 chains, leaving the final chain for the tip:
Sl st in 1, sc in 2, hdc in 2, dc in 3, tr in 2, dc in 1, hdc in 1. (12)
Work 5 sc in the final chain.
Work the reverse sequence along the opposite side:
Hdc in 1, dc in 1, tr in 2, dc in 3, hdc in 2, sc in 2, sl st in 1. (12)
Fasten off with a 25 cm tail.
Each leaf contains exactly 29 stitches: 12 + 5 + 12.
Leaf Vein
Join sage at the leaf base.
Surface slip stitch along the foundation-chain ridge.
Stop approximately 1 cm before the pointed tip.
Fasten off without pulling the center ridge shorter.
Rose Square Assembly — Make 24
Place four sage leaves diagonally across one completed square with their bases meeting at the center.
Sew each leaf through its base and approximately the lower 3 cm of its center ridge.
Position one large ivory rose over the four leaf bases.
Sew the 36-stitch foundation disc to the square at eight distributed points.
Leave the outer rose petals free.
The flower and leaves should remain inside the cream frame so neighboring roses do not become tangled after the blanket is joined.
Small Ivory Daisy — Make 24
Hook: 4.5 mm.
R1: With sage, 12 sc in MR. Join. (12)
Change to ivory.
R2: *Sl st in next st, (ch 3, 3 dc, ch 3, sl st) in next st* ×6.
Six petals complete.
Fasten off with a 30 cm tail.
The repeat consumes exactly two center stitches per petal and all 12 center stitches are used.
Daisy Square Assembly — Make 24
Center one daisy on a plain sage-and-cream square.
Sew through the 12-stitch center ring at six points.
Leave the petals free.
The flatter motif provides visual spacing between the much larger roses and reduces bulk when the blanket is folded.
Arrange the 48 Squares
Lay the squares in six columns and eight rows.
Alternate rose and daisy squares like a checkerboard.
Row 1 begins:
Rose – Daisy – Rose – Daisy – Rose – Daisy.
Row 2 begins:
Daisy – Rose – Daisy – Rose – Daisy – Rose.
Repeat those two rows four times.
Photograph or number the layout before joining so the checkerboard sequence is not disturbed.
Joining the Squares
Place two neighboring squares wrong sides together.
With ivory and the 5 mm hook, slip stitch through corresponding outer loops along the complete edge.
Keep the slip stitches loose enough to lie flat.
Join the squares into eight horizontal rows first.
Then join the eight rows vertically.
The raised ivory seam should remain visible on the right side, reproducing the pronounced framed grid in the photograph.
Intersection Flower — Make 35
A 6 × 8 grid has exactly 5 × 7 = 35 internal four-square intersections.
With ivory, ch 4 and join to form a ring.
R1: Work 10 sc into ring. (10)
R2: *Sl st in next st, (ch 3, 3 dc, ch 3, sl st) in next st* ×5.
Five petals complete.
Fasten off with a 20 cm tail.
Sew one flower over each internal four-square intersection. Catch all four neighboring cream frames with the sewing stitches so the flower also reinforces the join.
Foundation Border
With ivory and the 5 mm hook, join at any outer corner.
Border R1: Sc evenly around the blanket, placing 35 sc along each 22 cm square edge. At every blanket corner work (sc, ch 2, sc).
Because each long side contains eight squares, each long straight section has 280 sc. Each short side contains six squares for 210 sc.
Mark every square boundary while working the round.
Border Round 2
Ch 3.
Dc in every sc around.
At each corner ch-2 space work (2 dc, ch 2, 2 dc).
Join.
Lace Border Round 3
Ch 1.
*Sc in next dc, ch 3, skip 2 dc* around each straight section.
At each corner work (sc, ch 5, sc) in the corner space.
Where a side count leaves one stitch before a corner, work one sc in that final stitch rather than extending the mesh repeat into the corner.
Lace Border Round 4
Sl st into the first ch-3 space.
Work (sc, ch 4, sc) into every ch-3 space.
In each ch-5 corner space work:
Sc, ch 4, sc, ch 4, sc.
Join.
Scalloped Border Round
In each ch-4 loop work:
Sc, hdc, 3 dc, hdc, sc.
Work two complete shells into each corner arrangement.
Join and fasten off ivory.
The scallops create the broad lace profile visible around the photographed blanket.
Sage Edge Definition
Join sage at the base of any ivory shell.
Work one loose slip stitch into each stitch around the outer scallops.
At the center dc of every shell, work sl st, ch 2, sl st into the same stitch.
Fasten off.
This narrow green line outlines the ivory lace without turning the perimeter into a heavy solid band.
Mini Border Rose — Make 26
Use ivory and the 4.5 mm hook.
Ch 21.
Row 1: Sc from second chain across. (20)
Row 2: *Sl st in next st, 4 hdc in next st* ×10.
Fasten off with a 25 cm tail.
Roll the strip into a compact spiral and sew through its lower edge after each turn.
Target approximately 5–6 cm across.
Small Border Leaf — Make 52
Ch 11.
Starting in second chain, work into the next nine chains, leaving the final chain for the tip:
Sl st in 1, sc in 2, hdc in 2, dc in 2, hdc in 1, sc in 1. (9)
Work 3 sc in the final chain.
Mirror the nine-stitch sequence down the opposite side.
Fasten off.
Make two leaves for every mini rose.
Border Rose Placement
Arrange the 26 miniature roses around the perimeter before sewing.
Use approximately eight roses along each long edge and five along each short edge, adjusting the corner positions so no flower sits directly on a fold point.
Place two sage leaves beneath each rose at approximately 45-degree angles.
Sew the leaves first.
Attach each rose through its rolled foundation only, leaving the outer petals free.
Optional Sage Vine Between Border Roses
For a closer reconstruction of the photographed floral border, embroider a loose chain-stitch vine between neighboring roses using sage yarn.
Keep the vine approximately 1–1.5 cm inside the scalloped edge.
Do not pull the embroidery tightly; the blanket edge must remain elastic enough to lie flat.
Blocking the Squares
Block all 48 squares to exactly 22 × 22 cm before joining.
Measure both diagonals as well as the sides.
A square can have four 22 cm edges and still be distorted into a rhombus if its diagonals differ substantially.
Allow every square to dry completely before adding the dimensional flower appliqués.
Blocking the Finished Blanket
After joining and adding the border, lay the blanket flat.
Pin the cream grid first.
Shape the outer scallops second.
Do not flatten the large roses beneath pins or towels.
The reconstruction target after blocking is approximately 150 × 190 cm, but the final measurement should follow the natural blocked gauge rather than aggressive stretching.
Assembly
- Crochet 48 sage granny-square foundations, add the three-round ivory frame to each, and block every finished square to exactly 22 × 22 cm.
- Make 24 large ivory roses from the three exact petal strips, attach each rose to a 36-stitch foundation disc, and crochet 96 sage leaves.
- Turn 24 squares into rose blocks by sewing four leaves diagonally to each center and attaching one rose foundation at eight distributed points.
- Make 24 six-petal ivory daisies and sew one to the center of each remaining square through its 12-stitch center ring.
- Arrange the 48 blocks in a 6 × 8 checkerboard, alternating rose and daisy squares in every row and reversing the starting motif on each subsequent row.
- Slip-stitch the blocks together with ivory, joining horizontal rows first and then the rows vertically while keeping the raised joining ridge on the right side.
- Make 35 five-petal intersection flowers and attach one at every internal four-square junction, catching all four surrounding cream frames in the sewing stitches.
- Work the ivory foundation, mesh, and scalloped border rounds around the complete blanket, then add the narrow sage slip-stitch definition edge.
- Crochet 26 miniature ivory roses and 52 small sage leaves, pin them around the perimeter, and attach the leaves before sewing down the rolled rose foundations.
- Weave all tails through at least 5 cm of matching fabric, block the completed blanket to its natural dimensions, and reshape every large rose and border flower after drying.
The completed reconstruction contains 48 framed squares, 24 large roses, 24 daisies, 35 intersection flowers, 26 miniature border roses, 148 crocheted leaves, and a wide ivory-and-sage lace perimeter.
7 Technical Tips
- The blanket grid becomes wavy: block every square to exactly 22 × 22 cm before joining. A difference of even 8–10 mm per block can accumulate into several centimeters across a six-square row.
- The large rose leans to one side: attach its 36-stitch foundation disc at eight distributed points instead of sewing only through the rolled center. A 14–16 cm flower needs support beyond its central 3–4 cm.
- The leaf point becomes rounded: leave the final foundation chain unused until the turning group and place all five tip stitches into that chain. Consuming it in the first 12-stitch side removes the central turning anchor.
- The checkerboard sequence breaks during joining: label the 48 squares by row and column before lifting the layout. One misplaced rose block creates two adjacent bulky flowers and changes the alternating pattern across two rows.
- The raised joining ridge puckers: keep every slip stitch approximately the same width as the outer sc stitches on the squares. Pulling the join 5–10% shorter than the square edge causes the cream grid to bow inward.
- The scalloped border ruffles: check the blanket dimensions after the first ivory border round and correct excess stitches before adding mesh. Once several lace rounds are present, a perimeter surplus becomes much harder to redistribute.
- The border roses fold underneath: support each 5–6 cm flower with two small leaves and sew through the rolled foundation at three points. Attaching a dimensional rose by one yarn tail creates a pivot rather than a stable appliqué.
Why Two Square Types Improve the Blanket
Using a large rose on every block would create a highly textured surface with little visual rest. Alternating roses and daisies solves that problem structurally as well as visually.
The flatter daisy squares fold more readily and create spaces between neighboring dimensional blooms. Meanwhile, all 48 blocks share the same sage foundation and ivory frame, so the checkerboard still reads as one coherent blanket.
The photograph strengthens that grid with raised cream seams. Small intersection flowers then soften the geometry without hiding it.
Published Rose Square Benchmarks
Olga Poltava’s published Rose Granny Square Afghan uses a 4.5 mm hook. Each square measures 8 × 8 inches, and 12 squares produce a baby afghan approximately 37 × 29 inches. The listed yarn quantities are 440 yards pink, 440 yards white, and 800 yards green.
Kimberly Arenas’ 2026 3D Rose Granny Square specifies Aran-weight Red Heart Super Saver and a 5 mm hook. Christa Lynn’s published 3D Rose Granny Square likewise specifies Aran yarn and a 5 mm hook. These current examples support medium yarn and roughly 5 mm hooks for dimensional rose blocks.
Published Rose Appliqué Benchmark
Simply Made by Erin’s Crochet Rose Appliqué uses worsted #4 yarn and a 5 mm hook. The published flower measures approximately 3.5 inches across, or around 4.5 inches including the leaves.
The designer also reports approximately 30 yards for the flower and 8 yards for the leaves. That benchmark is useful when estimating dimensional-flower consumption, although the larger multi-strip roses in this reconstruction require more yarn.
Current Blanket Size Benchmarks
A current vintage rose granny-square blanket pattern lists a finished throw around 48 × 60 inches using worsted #4 yarn and a 5 mm hook. Current handmade cotton rose blankets are also offered at approximately 50 × 70 inches, while another handmade 3D rose granny-square blanket measures approximately 52.5 × 56.25 inches.
The 150 × 190 cm reconstruction target is therefore intentionally on the larger end, matching the generous sofa-cover proportions visible in the supplied image.
Changing the Blanket Size
Because the center is modular, size changes are controlled by square count.
For a smaller throw, use 5 × 6 squares. At 22 cm per blocked square, the center measures approximately 110 × 132 cm before the border.
For a larger bedspread, use 7 × 9 squares. The center then measures approximately 154 × 198 cm before edging.
Maintain the alternating checkerboard by reversing the starting motif on every new row.
Making a Flatter Version
Omit Petal Strip C from the large roses.
Use only two sage leaves beneath each bloom and sew the outer half of Strip B lightly to the foundation disc.
This modification reduces the projection of the flowers while retaining the rose identity.
The daisy squares and border can remain unchanged.
Changing the Palette
For a warmer botanical version, replace sage with muted olive and ivory with oatmeal.
A romantic version can use dusty pink roses, cream frames, and gray-green square centers.
Keep sufficient value contrast between the square center and outer frame. If both colors are similarly pale, the raised grid disappears visually and the blanket reads as one continuous field.
Yarn Planning
Complete one framed square, one large rose, four leaves, and one border repeat before buying supplemental yarn.
Weigh each component.
Multiply the square weight by 48, the rose weight by 24, the large-leaf weight by 96, and the border-rose components by their required quantities. Add approximately 15% for joining, tails, swatching, border adjustments, and gauge variation.
This sample-based calculation is more reliable than scaling the yarn requirements of a 12-square baby afghan directly to a large decorative blanket.
Care and Storage
Follow the yarn manufacturer’s washing instructions. A cotton-rich blanket becomes heavy when saturated, particularly where the roses contain several overlapping petal layers.
Support the entire blanket when moving it wet. Dry flat and reshape the large flowers only after the square grid has been aligned.
For storage, fold along the raised cream joining lines rather than directly through the large roses. Place acid-free tissue or a soft cotton cloth between heavily dimensional layers if several flowers would otherwise be compressed against one another.
Sources
Olga Poltava — Crochet Rose Granny Square Afghan — 4.5 mm hook, 8-inch squares, 12-square construction, 37 × 29 inch finished baby-afghan size, and published yarn quantities.
Ravelry — 3D Rose Granny Square by Kimberly Arenas — 2026 floral block using Aran yarn and a 5 mm hook.
Ravelry — 3D Rose Granny Square by Christa Lynn — intermediate dimensional floral square using Aran yarn and a 5 mm hook.
Lion Brand — The Crochet Rose Appliqué — worsted #4 yarn, 5 mm hook, and approximately 3.5-inch flower / 4.5-inch flower-with-leaves benchmark.
Simply Made by Erin — Crochet Rose Appliqué Tutorial — published 30-yard flower and 8-yard leaf requirements plus worsted-yarn sizing information.
GrannySquare.me — Rose Granny Square — layered 3D rose-square construction reference with a published 2.83-inch sample using wool and a 3 mm hook.
Etsy — Vintage Rose Granny Square Blanket Pattern — current intermediate worsted-weight pattern listing a 5 mm hook and approximately 48 × 60 inch adjustable throw.
Etsy — Handmade 3D Rose Bedspread — current cotton rose-blanket size benchmark of approximately 50 × 70 inches.
Conclusion
The 22 cm square is the measurement to establish before producing this blanket in batches. Make one framed sage block, add its four leaves and complete ivory rose, then confirm that the petals remain inside the cream frame before repeating the motif. After all 48 squares are blocked, arrange the checkerboard and join the complete center before calculating any final border adjustments. Your next step is to make one rose square and one daisy square as gauge samples. Save this 3D rose granny square crochet blanket pattern to Pinterest or share the finished blanket on Instagram with #SageRoseGrannyBlanket. Would you keep every large rose ivory, or introduce a few dusty-pink blooms into the checkerboard?









