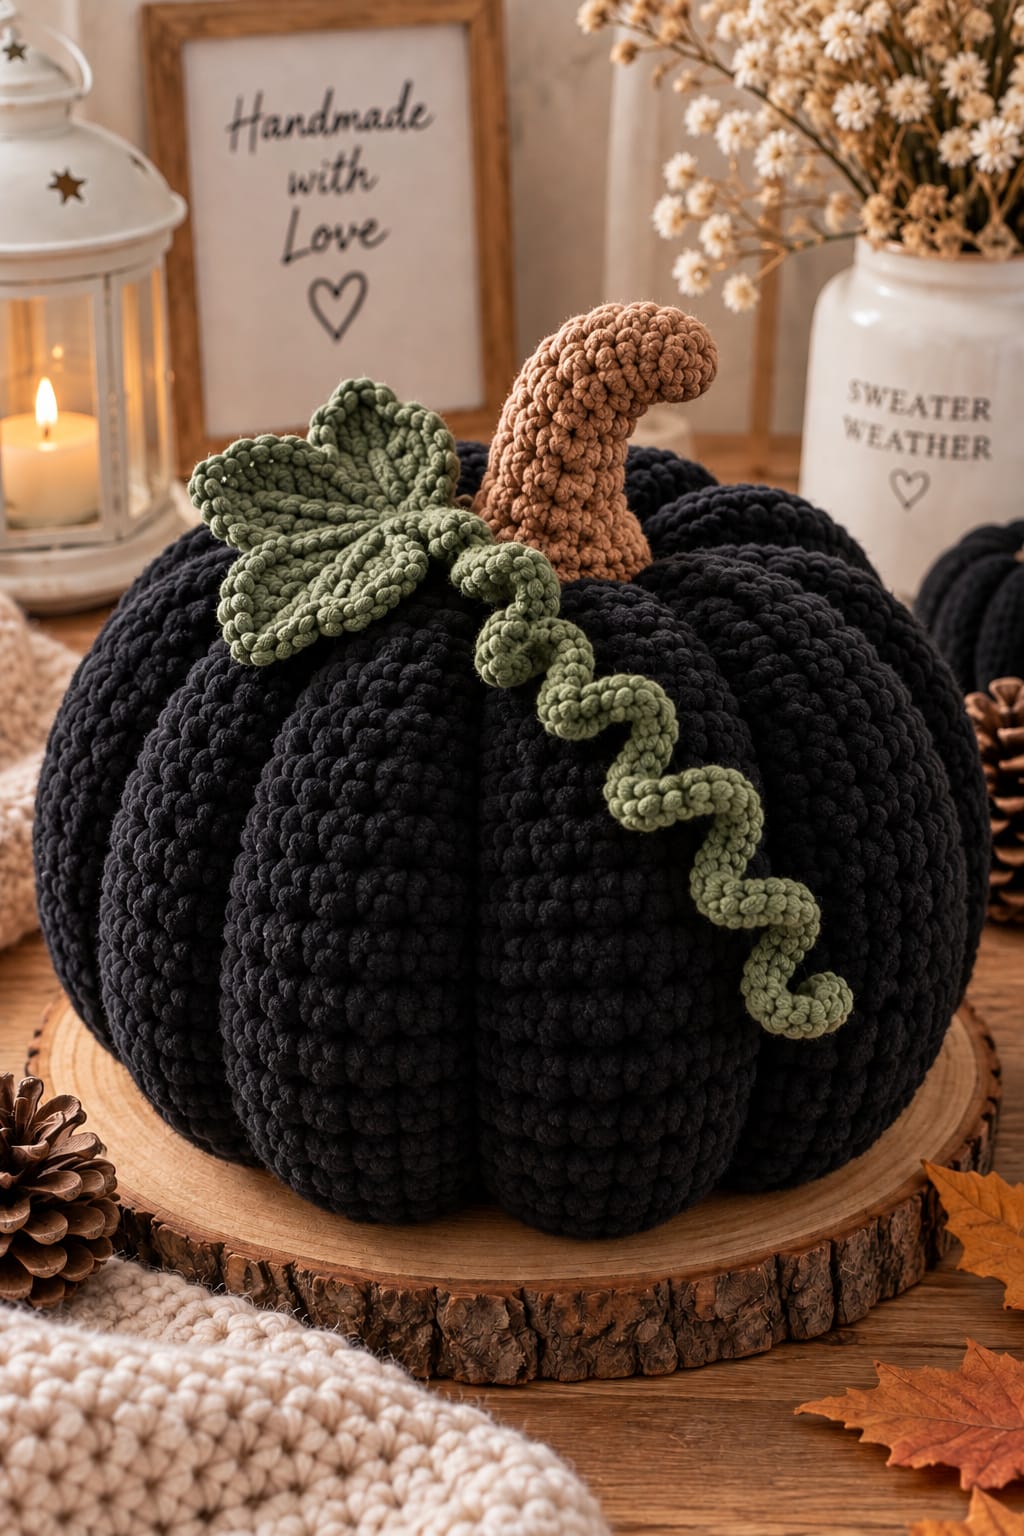
A black pumpkin loses its recognizable lobes faster than an orange one when the ribs are too shallow. This black pumpkin amigurumi crochet pattern solves that problem with external sculpting, a 42-stitch body, curved stem, leaves, and spiral vines. Use worsted yarn and a 3.5 mm hook for an approximately 11–13 cm-wide intermediate project. The compact size works particularly well for grouped Halloween table displays.
The Design: What Makes This Black Pumpkin Different
Three structural decisions define this crochet black pumpkin. First, the body is crocheted as a closed form before separate strands compress it into eight lobes; stuffing alone produces a sphere rather than the photographed pumpkin profile. Second, the stem stays narrow for most of its length and widens only at its base, allowing the upper portion to bend while the bottom remains stable. Third, asymmetrical sage foliage keeps the top from becoming visually circular.
The ribbed crochet pumpkin therefore depends as much on finishing as crochet. A common error is pulling sculpting yarn until it cuts deeply between stitches. That can distort the body and expose pale stuffing. The crochet pumpkin with leaves needs visible indentations, not narrow trenches. A compression depth around 5–8 mm provides a practical reference.
Project Info at a Glance
| Skill Level | Time | Finished Size | Hook | Best For |
|---|---|---|---|---|
| Intermediate | 2–3 hours | Approx. 11–13 cm wide | 3.5 mm | Halloween displays, shelves, pumpkin groups |
Materials and Tools
Yarn
- Black — worsted/weight 4 — approximately 45–55 g — choose a smooth matte cotton, cotton-acrylic, or acrylic yarn.
- Sage/olive green — DK to light worsted — approximately 8–12 g — used for leaves and spiral vines.
- Taupe/light brown — DK to light worsted — approximately 5–8 g — used for the curved stem.
Tools
- 3.5 mm crochet hook
- 20–30 g polyester fiberfill
- Long tapestry or doll needle
- Stitch marker
- Pins
- Yarn needle
- Scissors
- Safety eyes: none
The reference pumpkin contains no face, so safety eyes are not required for this design.
Abbreviations
- MR — magic ring
- sc — single crochet
- inc — 2 sc in one stitch
- dec — decrease
- sl st — slip stitch
- ch — chain
- BLO — back loop only
- st/sts — stitch/stitches
- R — round or row
For an invisible decrease, catch the front loops of the next two stitches, yarn over and pull through them, then complete the single crochet.
Pattern — Step by Step
Work the pumpkin body in a continuous spiral. Place the marker in the first stitch and move it after every completed round.
Pumpkin Body
Yarn: black.
R1: 6 sc in MR (6)
R2: inc ×6 (12)
R3: (1 sc, inc) ×6 (18)
R4: (2 sc, inc) ×6 (24)
R5: (3 sc, inc) ×6 (30)
R6: (4 sc, inc) ×6 (36)
R7: (5 sc, inc) ×6 (42)
R8: 42 sc (42)
R9: 42 sc (42)
R10: 42 sc (42)
R11: 42 sc (42)
R12: 42 sc (42)
R13: 42 sc (42)
R14: 42 sc (42)
R15: 42 sc (42)
R16: (5 sc, dec) ×6 (36)
R17: (4 sc, dec) ×6 (30)
R18: (3 sc, dec) ×6 (24)
Begin stuffing. Keep the filling firm through the center but compressible enough for later sculpting.
R19: (2 sc, dec) ×6 (18)
R20: (1 sc, dec) ×6 (12)
Finish stuffing before the opening becomes too narrow for even distribution.
R21: dec ×6 (6)
Fasten off. Leave approximately 40 cm of yarn and close the final six front loops.
The progression is mathematically balanced: every expansion round adds six stitches and every shaping decrease round removes six.
Sculpted Pumpkin Ribs
Yarn: black.
Cut approximately 180 cm of black yarn. Thread a long needle.
Insert through the bottom center and exit through the top center. Carry the yarn down the outside, reinsert through the bottom center, and return through the top.
Pull until the body develops a visible recess.
Repeat around the pumpkin until there are eight sections.
Each groove should compress the body by roughly 5–8 mm. Check the pumpkin from above before securing the yarn. Eight reasonably equal lobes matter more than making every strand maximally tight.
Fasten securely and bury the tail inside the body.
Curved Stem
Yarn: taupe/light brown.
R1: 6 sc in MR (6)
R2: 6 sc (6)
R3: 6 sc (6)
R4: 6 sc (6)
R5: 6 sc (6)
R6: 6 sc (6)
R7: 6 sc (6)
R8: 6 sc (6)
Add a small amount of stuffing only to the lower section. The upper stem needs enough flexibility to form the pronounced hook visible in the reference.
R9: inc ×6 (12)
R10: (1 sc, inc) ×6 (18)
Fasten off. Leave a 25 cm sewing tail.
Bend the unstuffed upper section rather than forcing the entire stem sideways. The visual target is an organic hook with a broad attachment point.
Large Leaves — Make 2
Yarn: sage green.
R1: ch 10.
Starting in the second chain from the hook, work:
sl st, sc, hdc, dc, dc, hdc, sc, sl st.
Work 3 sc in the final chain.
Continue down the opposite side:
sl st, sc, hdc, dc, dc, hdc, sc, sl st.
Fasten off. Leave a 20 cm sewing tail.
Each finished leaf should measure roughly 5–6 cm with the selected yarn.
Small Leaf — Make 1
Yarn: sage green.
R1: ch 8.
Starting in the second chain:
sl st, sc, hdc, dc, hdc, sc, sl st.
Work 3 sc into the final chain.
Continue along the opposite side:
sl st, sc, hdc, dc, hdc, sc, sl st.
Fasten off. Leave a 20 cm sewing tail.
Do not stuff any of the leaves.
Long Spiral Tendril
Yarn: sage green.
R1: ch 28.
Starting in the second chain from the hook, work 2 sc in every chain.
The increased stitch density makes the strip coil without wire. Stretch it gently once, release it, and allow the curl to reform.
Fasten off. Leave a 15 cm attachment tail.
Short Spiral Tendril
Yarn: sage green.
R1: ch 20.
Starting in the second chain from the hook, work 2 sc in every chain.
Fasten off. Leave a 15 cm sewing tail.
This shorter vine fills the opposite side of the crown without competing with the long corkscrew feature.
Optional Larger Pumpkin
The reference photograph shows a substantially oversized pumpkin. If you want a larger version, extend the six-stitch increase sequence before working the body plateau.
R8: (6 sc, inc) ×6 (48)
R9: (7 sc, inc) ×6 (54)
R10–R19: 54 sc (54)
R20: (7 sc, dec) ×6 (48)
R21: (6 sc, dec) ×6 (42)
R22: (5 sc, dec) ×6 (36)
R23: (4 sc, dec) ×6 (30)
R24: (3 sc, dec) ×6 (24)
R25: (2 sc, dec) ×6 (18)
R26: (1 sc, dec) ×6 (12)
R27: dec ×6 (6)
Fasten off and sculpt into eight ribs. With worsted yarn and comparable tension, this larger variation should measure approximately 15–18 cm across. Exact dimensions depend on yarn, hook, tension, and stuffing density.
Assembly
- Check the closed black body first. Arrange the eight sculpting grooves so their convergence points sit at the centers of the top and bottom.
- Pin the 18-stitch base of the brown stem over the top closure. Hide the joins of the black shaping strands underneath it.
- Sew around the stem base only. Leave its narrow upper portion free so the curved silhouette remains intact.
- Position the first large sage leaf beside the stem. Let the outer half lie across one black lobe rather than centering it beneath the stem.
- Place the second large leaf on another side of the crown. A roughly 140–170-degree separation prevents the two leaves from reading as a symmetrical bow.
- Insert the small leaf into the remaining gap. Keep part of it behind the stem to build a layered top.
- Sew approximately the inner 1–2 cm of each leaf. Leave the outer sections free instead of stitching every edge to the body.
- Attach the long tendril beneath a leaf and direct it over the pumpkin edge. Keep enough of the corkscrew visible to create the long trailing feature.
- Add the shorter tendril on the opposite side. Conceal both attachment tails underneath the foliage.
- Bury all remaining tails through at least 3 cm of the stuffed body, trim them, then check that the pumpkin sits on several lower lobes rather than balancing on its center.
The completed object has one ribbed body, eight sculpted sections, a curved stem, three leaves, and two spiral vines.
7 Technical Tips for a Better Crochet Pumpkin
- Control stitch-marker drift. Losing the true beginning of the round can offset the decrease lines and pull the top closure sideways. Move the marker immediately after completing the first stitch of each new round.
- Test stuffing firmness before sculpting. A rigidly packed sphere will resist the shaping yarn and produce shallow grooves. You should be able to compress the stuffed center by approximately 5–8 mm before adding the external ribs.
- Use invisible decreases from R16 onward. Ordinary decreases can create visible horizontal bars against a dark body. Work through the front loops of the next two stitches to reduce that surface disruption.
- Do not install safety eyes. This pumpkin has no face, and adding eyes changes its botanical construction into a character design. For a separate facial variation, install any hardware before the body opening becomes inaccessible.
- Check black fabric for stuffing gaps. White fiberfill showing through openings larger than roughly 2 mm becomes particularly conspicuous against black yarn. If gaps persist, reduce the hook by about 0.25 mm instead of excessively tightening every stitch.
- Pin all foliage simultaneously. Sewing the first leaf before testing the remaining pieces can crowd every leaf onto one side. Position the two large leaves roughly 140–170 degrees apart from the top view before sewing.
- Bury structural tails deeper than decorative tails. A rib-forming strand ending immediately beneath the surface can migrate during handling and loosen a groove. Run shaping tails through at least 3 cm of dense filling before trimming.
Finishing the Black Pumpkin
The defining measurement in this project is not simply diameter; it is the relationship between the 42-stitch body, eight recessed ribs, and foliage that remains visible against black yarn. Complete the body first, check its stuffing compression, then form every groove before attaching the stem.
After assembly, photograph the pumpkin from directly above to check lobe and leaf spacing. Save this black pumpkin amigurumi crochet pattern to Pinterest for the construction measurements, and share the finished version on Instagram with #BlackPumpkinAmigurumi.
For a second pumpkin, change one feature at a time. Would a longer hooked stem or a second oversized spiral vine reproduce the reference more closely?









