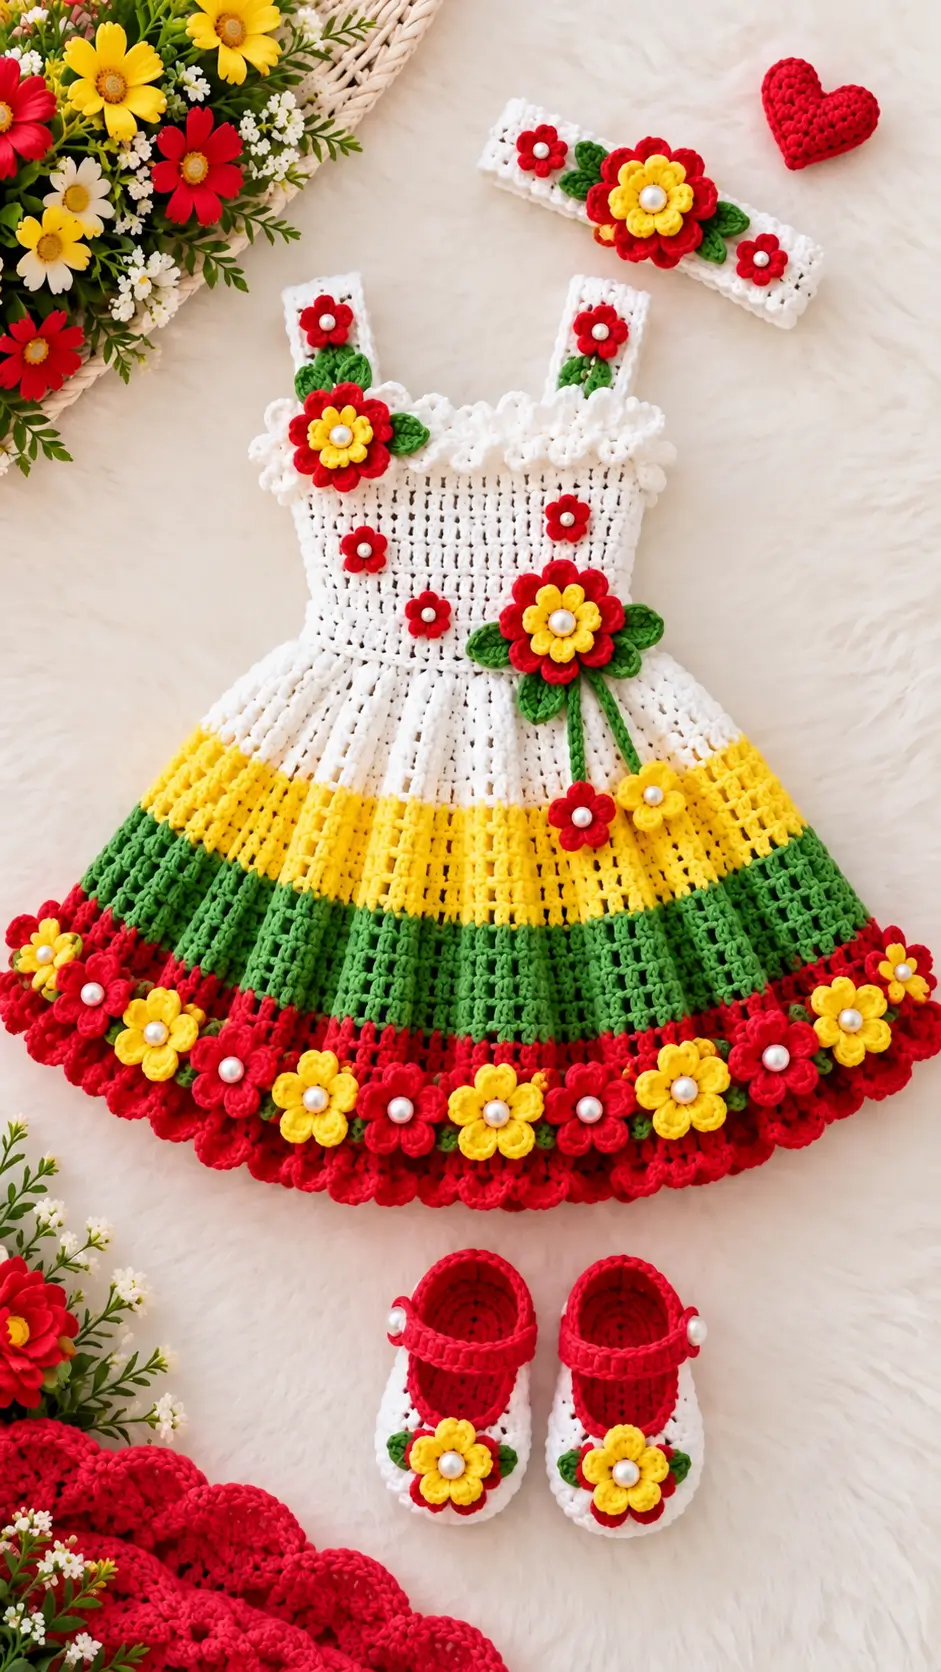
Crochet Flower Dress Pattern with 3D Flowers and Matching Accessories
A red scalloped hem carrying a row of yellow and red flowers is the construction feature that defines this dress. This crochet flower dress pattern uses DK yarn, a fitted white bodice, flared striped skirt, layered floral appliqués, headband, and matching shoes. The photographed proportions suit an intermediate garment project; published children’s patterns support DK yarn and roughly 3.5–4.5 mm hooks. The coordinated pieces also make the design practical for portrait outfits.
The Design: What Makes This Flower Dress Different
Three structural choices separate this crochet floral dress from a basic sleeveless frock. First, the bodice stays comparatively plain so the dimensional flowers remain readable against white crochet. Second, skirt increases are distributed before and through the upper skirt, producing flare without concentrating bulk at the waist. Third, the red scalloped border creates enough visual weight to support a nearly continuous flower garland.
The shoulder straps need particular attention. They must carry the garment without stretching the square neckline out of shape, so dense stitches work better there than open mesh.
A frequent error in a crochet dress for girls is adding heavy flowers before checking the skirt’s finished hang. The photographed arrangement is concentrated at the hem and waist; those embellishments should be attached only after the main garment has been blocked and measured.
Project Info at a Glance
| Skill Level | Time | Finished Size | Hook | Best For |
|---|---|---|---|---|
| Intermediate | Multi-session project | Target 66 cm chest | 3.5–4.5 mm | Child floral dress set |
The 66 cm chest measurement is a practical reference for a child-size version. Always use the intended wearer’s actual measurements rather than relying only on age labels.
Materials and Tools
Yarn
- White: DK/#3, approximately 250–300 g, cotton or cotton/acrylic blend
- Green: DK/#3, approximately 80–100 g, smooth cotton blend
- Yellow: DK/#3, approximately 50–70 g, smooth cotton blend
- Red: DK/#3, approximately 100–130 g, smooth cotton blend
These quantities are working estimates for the photo-inspired construction. Actual yarn use changes with garment size, gauge, skirt length, and the number of flowers added to the finished dress.
Tools
- 4.0 mm crochet hook for the main garment
- 3.5 mm crochet hook for firmer flowers and leaves
- Stitch markers
- Tapestry needle
- Scissors
- Measuring tape
- Sewing needle and matching thread
- Pearl-style beads or crocheted flower centers
- Optional buttons for the shoe straps
For garments intended for very young children, use securely sewn crochet centers instead of detachable beads where small parts could present a choking hazard.
Abbreviations
- MR – magic ring
- ch – chain
- sc – single crochet
- hdc – half double crochet
- dc – double crochet
- inc – two stitches in one stitch
- dec – decrease
- sl st – slip stitch
- BLO – back loop only
- st/sts – stitch/stitches
- sp – space
Invisible decreases are mainly associated with stuffed crochet construction and are not required for the main dress because garment shaping is controlled through measured increases and decreases.
Gauge and Sizing
Work a gauge swatch before starting the bodice. Children’s DK crochet garments can vary considerably according to yarn composition, hook size, and individual tension. A difference that appears minor in a small swatch can become several centimeters across a completed bodice.
For this photo-inspired version, target a finished chest circumference near 66 cm. Adjust the foundation chain until the front panel measures approximately half the required chest circumference.
Do not force a 66 cm garment from a fixed stitch count when your gauge produces a different measurement. Measurements control the garment; stitch counts are the construction framework.
Crochet Flower Dress Pattern – Step by Step
Front Bodice
Yarn: White
Ch 67.
Row 1: Dc in fourth ch from hook and each ch across (64).
Rows 2–18: Ch 3, turn, dc in each st across (64).
Check the panel width against the intended half-chest measurement. Add or remove equal numbers of stitches at both sides when adapting the size.
Row 19: Ch 3, turn, dc2tog, dc across to last 2 sts, dc2tog (62).
Row 20: Repeat decrease shaping (60).
Rows 21–24: Dc across (60).
Fasten off.
Back Bodice
Yarn: White
Work the back panel using the same instructions as the front through Row 24.
The reference dress has a relatively square upper body. Keep the two panels symmetrical and avoid excessive armhole reduction, which would change the proportions of the photographed design.
Shoulder Straps – Make 2
Yarn: White
Ch 11.
Row 1: Sc in second ch from hook and across (10).
Rows 2–24: Ch 1, turn, sc across (10).
Measure each strap directly against the assembled bodice before permanent attachment. Both straps must finish at the same length.
Fasten off, leaving approximately 20 cm of yarn for sewing.
Skirt Foundation
Yarn: White
Join white yarn around the lower edge of the assembled bodice.
Round 1: Work dc evenly around the waist. Space the stitches so the fabric remains flat.
Round 2: Ch 3, *5 dc, 2 dc in next st*; repeat around.
Round 3: Dc in each st around.
Round 4: *6 dc, 2 dc in next st*; repeat around.
Rounds 5–10: Dc in each st around.
The skirt uses distributed garment increases instead of amigurumi-style fixed increases. This produces controlled flare while keeping the waist relatively smooth.
White Skirt Band
Rounds 11–17: Continue with white yarn and work dc in each stitch.
Change to yellow during the final yarn-over of Round 17.
Yellow Skirt Band
Yarn: Yellow
Rounds 18–25: Dc in each stitch around.
Keep the color-change seam positioned toward the center back of the dress.
Green Skirt Band
Yarn: Green
Rounds 26–36: Dc in each stitch around.
The green section should be deeper than the yellow stripe to reproduce the proportions visible in the reference design.
Red Lower Band
Yarn: Red
Rounds 37–40: Dc in each stitch around.
Do not fasten off. Continue directly into the decorative lower edging.
Scalloped Hem
Round 41: Ch 1, sc around.
Round 42: *Skip 1 st, 5 dc in next st, skip 1 st, sl st in next st*; repeat around.
If the repeat does not divide perfectly into the stitch count, distribute the adjustment near the center back rather than changing the visible front scallops.
Fasten off.
Large Layered Flowers – Make 3 or More
Yarn: Yellow and Red
Begin with yellow.
Round 1: 6 sc in MR (6).
Round 2: Inc ×6 (12).
Round 3: Work compact petals using *sl st, ch 2, 3 dc, ch 2, sl st* at six evenly spaced points.
Fasten off yellow.
Join red yarn behind the yellow petals.
Round 4: Work 12 anchoring sc around the rear loops (12).
Round 5: At six evenly spaced anchors work *sl st, ch 3, 4 dc, ch 3, sl st*.
Fasten off, leaving approximately 20 cm for sewing.
Add a securely sewn crocheted center or decorative center.
Small Five-Petal Flowers – Make 12–16
Yarn: Red or Yellow
Round 1: 5 sc in MR (5).
Round 2: In each stitch work *sl st, ch 2, 2 dc, ch 2, sl st*.
This produces five defined petals.
Fasten off and leave approximately 15 cm of yarn for sewing each flower to the garment.
Crochet Leaves – Make 10–14
Yarn: Green
Ch 8.
Row 1: Sl st in second ch from hook, sc, hdc, dc, dc, hdc, 3 sc in final ch. Continue along the opposite side of the foundation chain with hdc, dc, dc, hdc, sc, sl st.
Fasten off with approximately 15 cm of yarn remaining.
For the large waist flower, arrange four to six leaves around the flower before permanently sewing the motif to the dress.
Hanging Flower Stems – Make 2
Yarn: Green
Ch 22–28 according to the required finished length.
Sl st back along the entire chain.
Fasten off. Attach one small red or yellow flower to the lower end of each stem.
Matching Crochet Flower Headband
Headband Base
Yarn: White
Chain to the required head circumference, allowing approximately 2 cm of negative ease where the yarn has suitable stretch. Join carefully without twisting the chain.
Rounds 1–4: Ch 1, sc in each stitch around.
Round 5: Work *sc, ch 2, sc* at regular intervals to form a compact decorative edge.
Fasten off and weave in the ends.
Place one large layered red-and-yellow flower near the center. Add one smaller red flower toward each side and position green leaves behind the main flower.
Matching Crochet Mary Jane Shoes
Shoe Soles – Make 2
Yarn: White
Shoe sizing must be based on actual foot length. The following construction provides a starting framework rather than a universal child size.
Ch 16.
Round 1: 2 sc in second ch from hook, sc across, 5 sc in final ch. Continue along the opposite side of the foundation chain, sc across, then work 3 sc in the final space.
Round 2: Increase around both curved ends while working one sc in each stitch along the straight sides.
Round 3: Repeat evenly spaced increases at the toe and heel.
Measure the sole against the intended foot. Change the foundation-chain length before continuing if the sole is too short or too long.
Shoe Upper – Make 2
Join white yarn around the finished sole.
Rounds 1–2: Sc around without increases.
Round 3: Sc around while decreasing evenly across the toe.
Round 4: Repeat the toe decreases until the opening has the required shape.
Change to red yarn.
Rounds 5–6: Sc around the upper edge.
Fasten off.
Mary Jane Straps – Make 2
Yarn: Red
Ch 14–20 depending on the width of the finished shoe.
Row 1: Sc across.
Row 2: Sc across. If using a button closure, form a ch-2 loop at the appropriate end.
Fasten off and sew the strap firmly to the side of the shoe.
Add one yellow flower and two small green leaves to each toe to match the floral theme of the dress.
Assembly
- Join the bodice side seams while keeping both armholes equal in depth.
- Sew the shoulder straps to the front and back bodice and check the square neckline before tightening the seams.
- Block the unfinished dress to the target chest measurement and check the finished skirt length.
- Position the small red flowers across the white bodice while keeping the motifs clear of the armholes.
- Pin the large red-and-yellow flower near one side of the waist and arrange the green leaves underneath it.
- Attach the two green hanging stems below the waist flower and sew one small flower to each lower end.
- Arrange alternating red and yellow flowers around the lower border. Pin the complete sequence before sewing the flowers permanently.
- Attach the flower and leaf arrangement to the headband while keeping thick seams away from its inner surface.
- Finish both shoes, attach the straps, and sew the matching flower-and-leaf clusters to the toes.
- Weave every yarn tail through several stitch directions, trim excess yarn, and inspect all decorative centers for secure attachment.
The finished project consists of one striped floral crochet dress, one matching flower headband, and a pair of coordinated Mary Jane-style crochet shoes.
7 Technical Tips for Better Results
- Check bodice width early: A 1 cm gauge error in a small swatch can become several centimeters across the completed chest. Measure the bodice again after the first four rows instead of waiting until the upper shaping.
- Control strap stretch: Shoulder straps that lengthen more than about 1 cm under the garment’s weight can lower the neckline. Dense single crochet gives the straps more structural stability than an open stitch pattern.
- Watch skirt increases: Excess increases produce waves immediately below the waist. Lay the skirt flat after each increase round and reduce the increase frequency if persistent rippling develops.
- Secure large flowers: A layered flower sewn only through its center can rotate or droop. Attach the center plus at least three concealed points around the outer flower layer.
- Calculate hem spacing: Sewing flowers individually without first positioning the entire garland can leave one oversized gap. Divide the finished hem circumference by the number of planned motifs before attaching the first flower.
- Match both shoes: A one-stitch difference between the two soles becomes visible around the toe. Count both soles after every round and use a marker at each center heel.
- Secure yarn tails: An embellishment tail woven in only one direction can work loose during laundering. Pass structural tails through at least three directional changes on the wrong side before trimming them.
Why DK Yarn Works for This Crochet Flower Dress
DK yarn provides enough structure for defined flowers while remaining practical for a crocheted garment. The dress requires two different fabric characteristics from the same yarn palette: the bodice and skirt need controlled drape, while flowers and leaves need enough firmness to retain their shapes.
Hook adjustment can help separate those functions. Work the garment with the hook that produces the required gauge, then move down approximately 0.5 mm when making the floral appliqués if the petals appear too loose.
Cotton and cotton-blend DK yarns are particularly practical for stitch definition. Check the care instructions for every color before combining yarns because red and green dyes should be tested for colorfastness before the finished white garment is washed.
Planning the Color Placement
The visual structure depends on color proportion rather than simply using white, yellow, green, and red. White occupies the bodice and upper skirt. Yellow forms a narrower transition band, green creates the deepest colored skirt section, and red anchors the lower edge.
The flowers reverse part of that balance. Red dominates the outer layer of the large statement flowers, while yellow becomes the central floral layer. Green is restricted primarily to leaves and stems.
That distribution keeps the appliqués visible against the striped skirt instead of allowing them to disappear into matching background colors.
Plan the lower garland before sewing. Alternate red and yellow flowers around the hem, then position larger layered flowers where additional visual weight is needed. Leave enough space around every large flower so neighboring petals do not overlap heavily.
Finishing the Dress
Measure the garment after the flowers have been pinned but before they are permanently sewn. Multiple layered crochet motifs add weight, particularly around the waist and hem, and that weight can slightly change the finished hang of the skirt.
Steam or wet block according to the yarn manufacturer’s care instructions. Avoid pressing directly over dimensional petals because flattening them changes the layered appearance of the design.
Inspect every flower center, shoe strap, leaf, and hanging stem after blocking. Garment embellishments need secure attachment at several points rather than relying on a single yarn tail.
Conclusion
Measure the intended wearer before converting the photographed proportions into a finished garment. Chest circumference controls the bodice, foot length controls the shoes, and head circumference controls the band; age labels alone are not accurate enough for all three components. Make the dress first, then reserve the remaining red, yellow, and green yarn for flowers and matching accessories. This sequence allows the number of hem motifs to be adjusted to the actual finished circumference. Save this crochet flower dress pattern to Pinterest or share the finished color arrangement on Instagram with #GardenStripeFlowerDress. Would you keep the red-yellow-green skirt order or change which color forms the deepest band?









