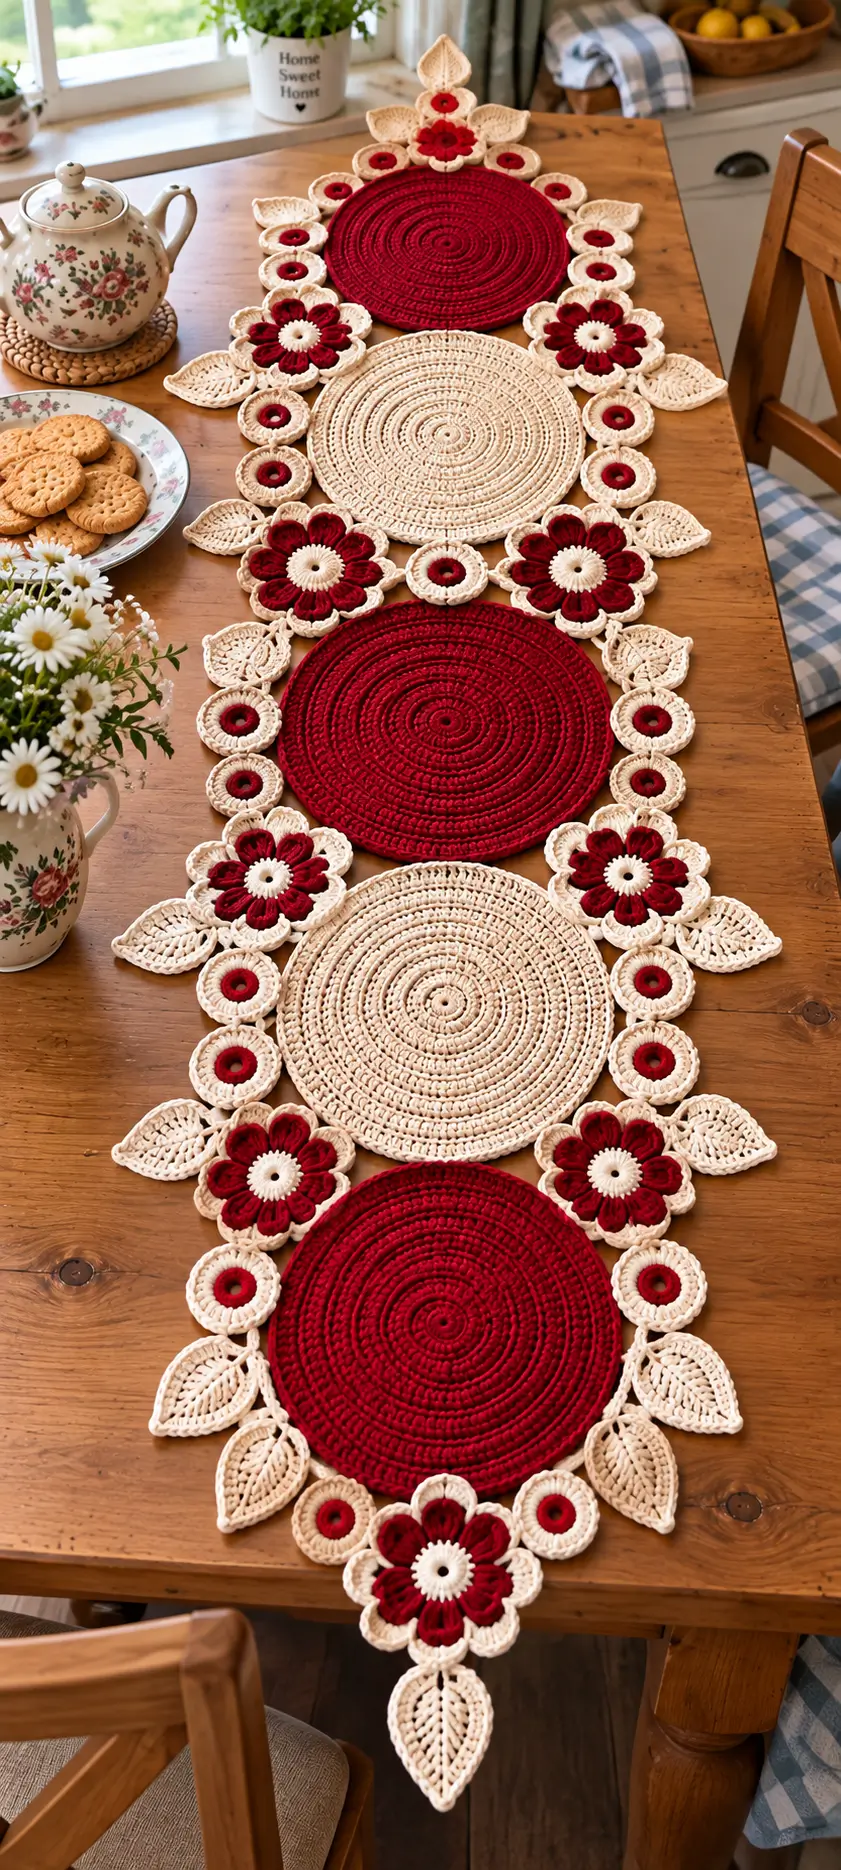
Five oversized circles create the spine of this runner, but the red flowers and pointed cream leaves are what lock its geometry together. This floral crochet table runner pattern reconstructs the photographed arrangement with worsted cotton, a 4 mm hook and modular motifs. Comparable published runners range around 28–38 cm wide. Intermediate crochet skills are appropriate because the project combines circles, layered motifs, joining and blocking.
The Design: What Makes This Floral Runner Different
The runner depends on three structural decisions. First, five large circular medallions replace the rectangular foundation found in many crochet table runner patterns. Alternating deep red and cream prevents the repeated circles from reading as one continuous strip.
Second, smaller ring motifs occupy the spaces beside each medallion. They are functional connectors as well as decoration. The layered flowers then bridge larger transition points, while pointed leaves push the silhouette outward and disguise otherwise abrupt joins.
Third, the entire round motif crochet runner is assembled after the principal components have been blocked. That matters. A common mistake with a crochet flower table runner is sewing every motif together directly from the hook. Small diameter variations then accumulate over the full length and can pull the finished runner into a curve. Blocking the five primary circles to matching diameters gives the assembly a fixed reference.
Project Info at a Glance
| Skill Level | Time | Finished Size | Hook | Best For |
|---|---|---|---|---|
| Intermediate | 15–22 hours estimated | Approx. 37 cm wide × adjustable length | 4.0 mm | Dining table or long console |
The 4 mm hook works well with worsted cotton for this modular construction. Final length is adjustable because the runner is assembled from individual circular and floral motifs.
Materials and Tools
Yarn
A smooth cotton gives the large circles cleaner edges than a heavily textured or fuzzy fiber.
- Deep red — worsted cotton — approximately 250–300 g
- Warm cream/ivory — worsted cotton — approximately 250–300 g
- Optional sewing yarn — matching cream — approximately 10 g
Yarn quantities are working estimates for the five-medallion runner shown here. Actual consumption changes with gauge, yarn construction and finished dimensions.
Tools
- 4.0 mm crochet hook
- Tapestry needle
- Locking stitch markers
- Sharp scissors
- Blocking mats
- Rust-resistant pins
- Measuring tape
Stuffing and safety eyes are not required because every component is worked as a flat crochet motif.
Abbreviations
- MR — magic ring
- ch — chain
- sc — single crochet
- hdc — half double crochet
- dc — double crochet
- tr — treble crochet
- inc — 2 sc in one stitch
- sl st — slip stitch
- st/sts — stitch/stitches
- sp — space
- BLO — back loop only
An invisible decrease is unnecessary for these flat motifs because shaping is produced through increases, chain spaces and changes in stitch height rather than decreases used for stuffed crochet pieces.
Floral Crochet Table Runner Pattern
Work the large circular motifs in a continuous spiral unless otherwise stated. Use a stitch marker to identify the first stitch of each round.
Large Circular Medallion — Make 5
Make 3 in deep red and 2 in cream to reproduce the alternating color sequence.
R1: 6 sc in MR (6)
R2: inc ×6 (12)
R3: (sc, inc) ×6 (18)
R4: (2 sc, inc) ×6 (24)
R5: (3 sc, inc) ×6 (30)
R6: (4 sc, inc) ×6 (36)
R7: (5 sc, inc) ×6 (42)
R8: (6 sc, inc) ×6 (48)
R9: (7 sc, inc) ×6 (54)
R10: (8 sc, inc) ×6 (60)
R11: (9 sc, inc) ×6 (66)
R12: (10 sc, inc) ×6 (72)
R13: (11 sc, inc) ×6 (78)
R14: (12 sc, inc) ×6 (84)
R15: (13 sc, inc) ×6 (90)
R16: (14 sc, inc) ×6 (96)
R17: (15 sc, inc) ×6 (102)
R18: (16 sc, inc) ×6 (108)
R19: (17 sc, inc) ×6 (114)
R20: (18 sc, inc) ×6 (120)
Sl st into the next 2 sts to smooth the transition at the end of the spiral. Fasten off. Leave approximately 25 cm of yarn if the medallion will be sewn directly to adjacent motifs.
Block all five circles to the same diameter before beginning assembly.
Small Ring Connector — Make Approximately 24
Use deep red for the center and cream for the border.
With red:
R1: 6 sc in MR (6)
R2: inc ×6 (12)
R3: (sc, inc) ×6 (18)
Change to cream.
R4: (2 sc, inc) ×6 (24)
R5: (3 sc, inc) ×6 (30)
Fasten off, leaving approximately 20 cm for joining.
For a stronger ring effect, work R3 in BLO before changing to cream. The unused loops create a visible ridge around the red center.
Layered Red Flower — Make 9–10
Use cream for the center, deep red for the main petals and cream for the outer detailing.
With cream:
R1: 6 sc in MR (6)
R2: inc ×6 (12)
Change to red.
R3: (sl st in next st, ch 5) ×12. Join with sl st.
R4: Into each ch-5 sp work (sc, hdc, 3 dc, hdc, sc). Repeat around to produce 12 petals.
Change to cream.
R5: Working around the outside of each red petal, place 1 sc into the first side, 2 hdc across the upper curve and 1 sc into the opposite side. Sl st between petals.
Fasten off and leave approximately 25 cm for sewing.
Allow neighboring petals to overlap slightly during blocking rather than forcing the flower into a completely flat wheel.
Cream Flower Center — Make 1 per Flower
R1: 6 sc in MR (6)
R2: inc ×6 (12)
R3: (sc, inc) ×6 (18)
Fasten off with a 15 cm tail.
Sew the cream circle centrally over the red flower. The circle should cover the inner ends of the petals while leaving the red petal shapes visible.
Pointed Cream Leaf — Make Approximately 18–22
Use cream yarn.
Foundation: Ch 13.
Row 1: Starting in the 2nd ch from hook, work sl st, sc, hdc, dc, dc, tr, tr, dc, dc, hdc, sc, sl st. Ch 2.
Rotate the work. Crochet along the unused loops on the opposite side of the foundation chain.
Work sl st, sc, hdc, dc, dc, tr, tr, dc, dc, hdc, sc, sl st.
Join at the base of the leaf.
For the openwork central vein, ch 10 and sl st down the center line, anchoring the chain at the leaf tip and base.
Fasten off. Leave approximately 20 cm for sewing.
End Flower — Make 2
The terminal flowers use the same basic construction but include a larger cream foundation behind the red petals.
R1: 6 sc in MR (6)
R2: inc ×6 (12)
R3: (sc, inc) ×6 (18)
R4: (sc, ch 5, skip 2 sts) ×6.
Into each ch-5 space work:
(sc, hdc, 4 dc, hdc, sc)
Repeat in every chain space to form six broad cream petals.
Make a smaller red flower and position it centrally over the cream foundation. Sew the layers together through the center.
Attach one pointed cream leaf below each terminal flower. This produces the elongated finishing motif visible at both ends of the runner.
Optional Joining Tabs
Use these small hidden tabs when a gap remains between a flower and a large medallion.
Foundation: Ch 6.
Row 1: Starting in 2nd ch from hook, sc across (5).
Row 2: Ch 1, turn, sc across (5).
Fasten off with long tails.
Position each tab behind the decorative motifs before sewing. The tabs provide additional support without becoming part of the visible design.
Assembly
- Block all five large medallions to an identical diameter before sewing decorative components in place.
- Arrange the circles vertically in the sequence red → cream → red → cream → red.
- Leave a narrow and consistent gap between neighboring circles. Position the major flowers around the transition areas.
- Place the small red-and-cream ring connectors symmetrically along both outside edges. Pin the entire arrangement before sewing.
- Sew each connector to its neighboring motifs through the back loops where possible. Keep the joining stitches on the reverse side.
- Add the large flowers. Anchor each flower at several points around its outer cream edge rather than attaching it only through the center.
- Position the pointed cream leaves beside the flowers and around the outside edges of the medallions. Keep corresponding leaves on the left and right at similar angles.
- Attach the terminal flowers at the top and bottom. Sew one elongated pointed leaf beneath each terminal flower.
- Weave every yarn tail through at least 4–5 cm of matching-color stitches, reverse direction once and trim. Do not carry dark-red yarn underneath open cream motifs.
- Wet-block the complete runner on a flat surface. Pin the centers of all five large circles onto one straight longitudinal line and check that the left and right sides have matching widths.
The completed runner should lie flat with five aligned circular medallions surrounded by balanced flower, ring and leaf motifs.
7 Technical Tips for a Flat, Symmetrical Runner
- Control circle ruffling. If a large medallion begins developing waves, its circumference is expanding too quickly for the current gauge. Check the circle after every fourth round and correct the increase distribution before the waves exceed approximately 1 cm.
- Correct circle cupping early. A medallion that forms a bowl shape has insufficient circumference. Add six evenly distributed increases on the following round instead of depending on blocking to correct severe cupping.
- Mark four alignment points. Place stitch markers at the approximate 12, 3, 6 and 9 o’clock positions of every large circle. Sewing without these reference points can gradually move the side decorations away from the center axis.
- Count every flower petal. Confirm all 12 chain spaces before working the main petal round. A missing chain space creates an obvious asymmetrical gap after the flower is attached.
- Block twisted leaves before sewing. Pin each leaf at its tip, midpoint and base. Attaching a twisted leaf can pull a small connector away from its intended position.
- Keep red yarn tails inside red areas. Weave dark-red ends through at least 4 cm of red stitches before reversing direction. A red tail carried underneath an open cream leaf can remain visible from the front.
- Check the runner width repeatedly. Measure from the center axis to the outermost motif on each side after attaching every major flower cluster. Correct a left-to-right difference greater than approximately 5 mm before attaching the next section.
Finishing and Blocking
Lay the completed runner on blocking mats with the reverse side facing down. Establish a straight center line first. The centers of all five large medallions should sit directly on that line.
Pin the large circles before adjusting any flowers or leaves. Measure the runner at several points instead of checking only its widest section.
Next, shape each flower so its petals remain distinct. Pull the pointed leaves gently toward their tips and pin corresponding leaves on opposite sides to matching dimensions.
Allow the runner to dry completely before removing the pins. Do not fold it immediately after blocking. Keeping the piece flat for several hours after the pins are removed helps identify any section that still pulls against the center line.
Adjusting the Table Runner Length
The modular construction makes the finished length easy to modify without changing the individual motif patterns.
For a shorter table, use three large medallions in a red → cream → red sequence. Retain the terminal flowers and reduce the number of side connectors proportionally.
For a longer dining table, add two medallions rather than one whenever possible. Maintaining an odd total preserves the same red center and matching red end sections shown in this design.
Make all additional circles before calculating the final number of flowers, rings and leaves. Lay the medallions on the intended table, establish the spacing and then fill the border. This prevents unnecessary small motifs from being made.
Keeping the Red and Cream Motifs Balanced
The contrast between the two yarn colors controls much of the visual structure. Red dominates the large medallions and flowers, while cream separates those stronger areas and defines the outer silhouette.
Avoid adding extra red connectors beside a red medallion unless the opposite side receives the same treatment. Repetition is more noticeable in a long runner than in an individual placemat.
Before sewing, photograph the pinned layout from directly overhead. The image makes uneven flower spacing and mismatched leaf angles easier to identify than viewing the runner from the end of the table.
Conclusion
The most reliable construction method for this floral crochet table runner pattern is modular: crochet and block the five large circles first, make the connector rings, then position the flowers and pointed leaves around that fixed framework. Weigh the first completed red and cream medallions before purchasing additional yarn if precise consumption matters. Pin the complete arrangement at full size before sewing the first connector. For Pinterest, use a full-length overhead photograph that clearly shows the alternating five-circle repeat. On Instagram, share the finished runner with #RedCreamFloralRunner. Which element would you change first: the alternating medallion colors, the number of red flowers or the pointed cream leaves?









