Introduction
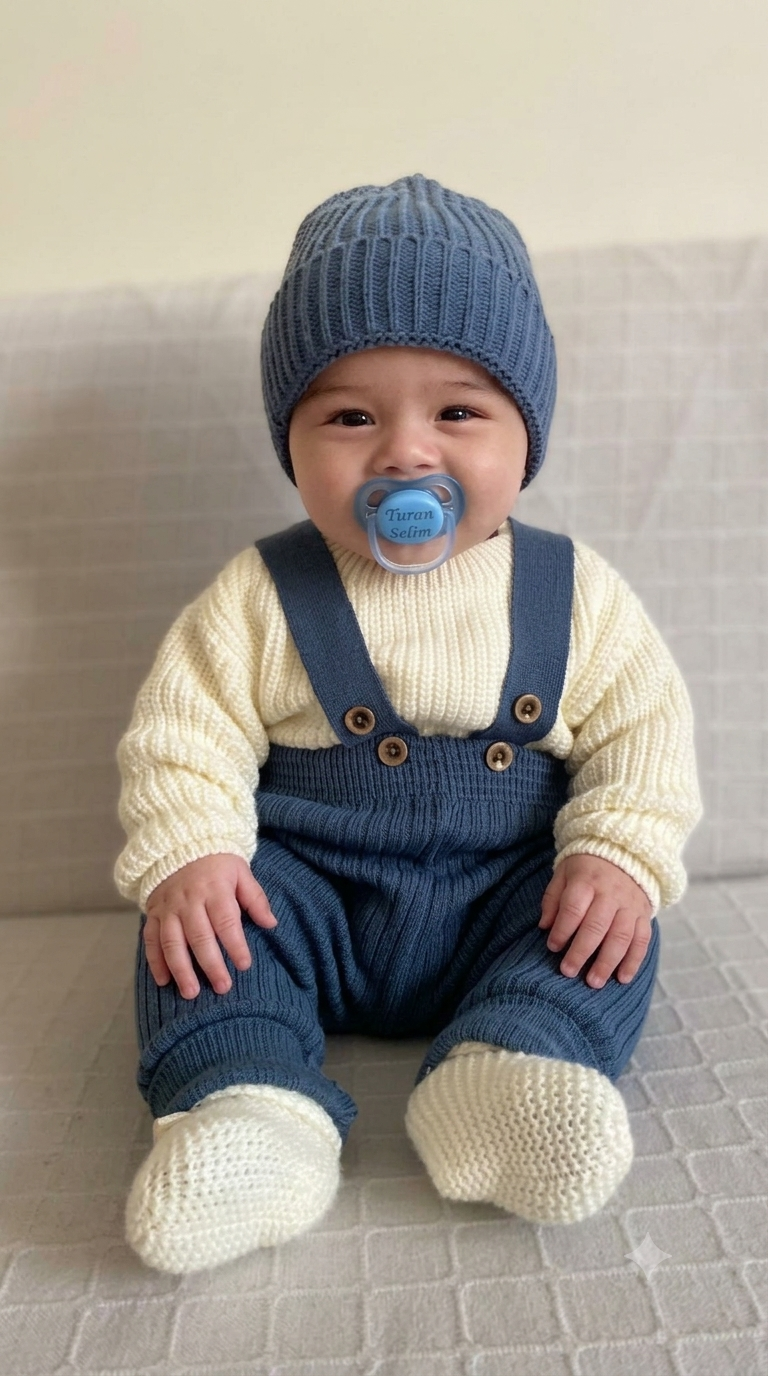
A baby in high-waisted blue suspenders needs a wider seated hip line than a standing crochet doll. This baby doll amigurumi crochet pattern builds that proportion with a 42-stitch body, bent legs, cream sweater, overalls, beanie and pacifier. Using worsted yarn and a 3.5 mm hook, the finished adaptation targets about 26.5 cm sitting height. The intermediate construction works well as a display doll or handmade nursery figure.
The Design: What Makes This Baby Doll Different
Three structural choices define this crochet baby doll pattern. First, the head and torso both reach a 42-stitch primary circumference, creating the broad head-to-body relationship visible in the reference. Second, the back legs are shaped separately and attached in a bent sitting position rather than hanging vertically. That matters because straight legs change both the silhouette and finished sitting height.
The clothing supplies the third distinction. A cream upper section visually separates the torso from the blue high-waisted overalls, while narrow suspenders cross the chest without hiding its shape. The beanie repeats the denim-blue color above the face.
A common error in an amigurumi doll with clothes is adding thick garments to an already oversized torso. That produces a cylindrical figure. Here, the body tapers before the clothing is fitted, preserving the rounded baby proportions.
Project Info at a Glance
| Skill Level | Time | Finished Size | Hook | Best For |
|---|---|---|---|---|
| Intermediate | 8–12 hours | Approx. 26.5 cm sitting | 3.5 mm | Display doll, nursery decoration, photography prop |
The finished measurement is a target rather than an exact gauge requirement. Actual dimensions will vary according to yarn thickness, crochet tension and stuffing density.
Materials and Tools
Yarn
- Skin tone — Worsted/Aran — approximately 50 g — smooth acrylic yarn
- Denim blue — Worsted/Aran — approximately 35 g — for overalls and beanie
- Cream — Worsted/Aran — approximately 30 g — for sweater and booties
- Pale blue — Worsted/Aran — approximately 5 g — for the pacifier
- Brown — scrap quantity — for crocheted button details
- Pink or peach — scrap quantity — optional cheek patches
Tools
- 3.5 mm crochet hook
- 10 mm safety eyes
- Polyester stuffing
- Tapestry needle
- Locking stitch markers
- Scissors
- Pins
- Black embroidery thread
- Four 10–12 mm buttons or crocheted button circles
If the finished doll is intended for a baby or young child, replace safety eyes, conventional buttons and other detachable components with securely embroidered details.
Abbreviations
- MR — magic ring
- sc — single crochet
- inc — 2 sc in one stitch
- dec — decrease
- sl st — slip stitch
- ch — chain
- BLO — back loop only
- FLO — front loop only
An invisible decrease is worked through the front loops of the next two stitches before completing one single crochet, reducing the visible ridge produced by a standard decrease.
Baby Doll Amigurumi Pattern — Step by Step
Work in a continuous spiral unless a section specifically states otherwise. Place a stitch marker in the first stitch of every round and move it upward as the work progresses.
Head
Yarn: skin tone.
R1: 6 sc in MR (6)
R2: inc ×6 (12)
R3: (sc, inc) ×6 (18)
R4: (2 sc, inc) ×6 (24)
R5: (3 sc, inc) ×6 (30)
R6: (4 sc, inc) ×6 (36)
R7: (5 sc, inc) ×6 (42)
R8–R17: sc around (42)
R18: (5 sc, dec) ×6 (36)
R19: (4 sc, dec) ×6 (30)
Install the 10 mm safety eyes between R13 and R14, approximately 7 stitches apart. Begin stuffing the crown firmly before the opening becomes narrow.
R20: (3 sc, dec) ×6 (24)
R21: (2 sc, dec) ×6 (18)
R22: (sc, dec) ×6 (12)
R23: dec ×6 (6)
Finish stuffing. Fasten off and close the opening.
Body
Yarn: cream changing to denim blue.
R1: 6 sc in MR (6)
R2: inc ×6 (12)
R3: (sc, inc) ×6 (18)
R4: (2 sc, inc) ×6 (24)
R5: (3 sc, inc) ×6 (30)
R6: (4 sc, inc) ×6 (36)
R7: (5 sc, inc) ×6 (42)
R8–R13: sc around (42)
Change to denim blue after R13 to establish the high overall waist.
R14–R17: sc around (42)
R18: (5 sc, dec) ×6 (36)
R19: sc around (36)
R20: (4 sc, dec) ×6 (30)
R21: sc around (30)
R22: (3 sc, dec) ×6 (24)
R23: (2 sc, dec) ×6 (18)
R24–R25: sc around (18)
Stuff the lower body firmly. Use slightly less stuffing near the neck so the head can be attached without producing a hard ridge.
Fasten off. Leave approximately 35 cm of yarn for sewing.
Arms — Make 2
Yarn: skin tone and cream.
R1: 6 sc in MR (6)
R2: inc ×6 (12)
R3–R5: sc around (12)
R6: (sc, dec) ×4 (8)
Stuff the hand lightly. Change to cream.
R7–R16: sc around (8)
Add only a narrow strip of stuffing to the forearm. Flatten the final opening.
Fasten off. Leave a 25 cm sewing tail.
Back Legs — Make 2
Begin with cream yarn for the bootie.
R1: 6 sc in MR (6)
R2: inc ×6 (12)
R3: (sc, inc) ×6 (18)
R4–R6: sc around (18)
R7: (sc, dec) ×6 (12)
R8–R9: sc around (12)
Change to denim blue.
R10: BLO sc around (12)
R11: (sc, inc) ×6 (18)
R12–R17: sc around (18)
R18: (sc, dec) ×6 (12)
R19–R21: sc around (12)
Stuff each foot firmly but use less stuffing through the upper leg. Fasten off with a 30 cm sewing tail.
During assembly, bend each leg around R13–R14. This creates the seated, forward-facing foot position.
Ears — Make 2
Yarn: skin tone.
R1: 6 sc in MR (6)
R2: inc ×6 (12)
Do not stuff. Fold each circle slightly into a shallow C shape.
Fasten off. Leave a 15 cm sewing tail.
Cheek Patches — Make 2
Yarn: peach or pink.
R1: 6 sc in MR (6)
R2: inc ×6 (12)
Fasten off and leave a 15 cm tail. For smaller cheeks, omit R2 and use the six-stitch circle alone.
Blue Beanie
Yarn: denim blue.
R1: 6 sc in MR (6)
R2: inc ×6 (12)
R3: (sc, inc) ×6 (18)
R4: (2 sc, inc) ×6 (24)
R5: (3 sc, inc) ×6 (30)
R6: (4 sc, inc) ×6 (36)
R7: (5 sc, inc) ×6 (42)
R8–R13: BLO sc around (42)
R14–R16: sc around (42)
Fasten off. Leave a 25 cm tail if the beanie will be permanently attached.
The BLO section adds linear texture to the hat and distinguishes it from the smooth head underneath.
Overall Suspenders — Make 2
Yarn: denim blue.
Ch 22.
Row 1: sc in second ch from hook and across (21)
Row 2: ch 1, turn, sc across (21)
Fasten off. Leave approximately 20 cm of yarn at each end for attachment.
Each strap should travel from the front bib, across the shoulder and toward the back waist without pulling the torso inward.
Overall Front Bib
Yarn: denim blue.
Ch 15.
Row 1: sc in second ch from hook and across (14)
Rows 2–6: ch 1, turn, sc across (14)
Fasten off. Leave a 25 cm sewing tail.
Position the bib centrally above the blue waistband. Pin it before sewing so both upper corners remain level.
Overall Buttons — Make 4
Yarn: brown.
R1: 6 sc in MR (6)
Sl st into the first stitch and fasten off. Leave a 12 cm sewing tail.
Attach two buttons at the upper bib and two near the waistband. Crocheted or embroidered buttons are preferable when detachable conventional buttons are unsuitable.
Pacifier Shield
Yarn: pale blue.
R1: 6 sc in MR (6)
R2: inc ×6 (12)
R3: (sc, inc) ×6 (18)
R4: sc around (18)
Fasten off and weave in the tail.
Pacifier Center
Yarn: medium blue.
R1: 6 sc in MR (6)
R2: inc ×6 (12)
R3: sc around (12)
R4: dec ×6 (6)
Stuff very lightly. Fasten off and attach the center to the pacifier shield.
Pacifier Handle
Yarn: pale blue.
Ch 18. Sl st into the first chain to form a ring. Sl st into every chain around (18).
Fasten off and sew the ring securely to the front of the pacifier.
For a display doll, the pacifier can remain removable. For a toy intended for a baby or young child, do not add a detachable pacifier or loop; embroider the feature directly onto the face instead.
Cream Sweater Collar
Yarn: cream.
Ch 25.
Row 1: sc in second ch from hook and across (24)
Row 2: ch 1, turn, BLO sc across (24)
Row 3: ch 1, turn, BLO sc across (24)
Fasten off with a 25 cm sewing tail. Wrap the collar around the neck after attaching the head, then seam the short ends at the back.
Bootie Cuffs — Make 2
Yarn: cream.
Ch 19.
Row 1: sc in second ch from hook and across (18)
Row 2: ch 1, turn, BLO sc across (18)
Row 3: ch 1, turn, BLO sc across (18)
Fasten off. Wrap one cuff around each ankle and sew the short edges together.
Assembly
- Pin the head centrally over the 18-stitch neck opening. Sew through both layers twice around the circumference so the weight of the beanie does not cause the head to tilt.
- Check that the blue waistband remains level around the body. Add any final stuffing before completely closing the neck seam.
- Sew the ears to opposite sides of the head between approximately R13 and R17. Position the cheek patches below and slightly outside the eye line.
- Attach both arms at the upper sides of the cream torso. Angle the hands slightly toward the front rather than positioning the arms vertically.
- Pin both legs to the lower body. Bend them at approximately R13–R14 and place the doll on a flat surface before sewing them permanently.
- Attach the blue front bib above the waistband. Align its midpoint with the center of the torso.
- Run each suspender from an upper corner of the bib across the corresponding shoulder and toward the back waist. Sew without stretching the straps.
- Attach two brown crochet buttons near the upper bib and two near the waistband to reproduce the four-button layout.
- Fit the blue beanie over the head and attach the cream bootie cuffs. Sew the sweater collar around the neck with its seam at the back.
- Assemble the pacifier shield, center and handle. Position the completed accessory centrally over the mouth area, then weave all remaining yarn tails through several changes of direction inside the crocheted fabric.
The completed doll should maintain a stable seated position with both cream booties directed toward the front.
7 Technical Tips for Better Shaping
- Control stitch-marker drift. Move the marker immediately after completing the final stitch of every round. A marker displaced by two or three stitches can rotate the facial centerline across a 42-stitch head.
- Adjust stuffing firmness by part. Fill the head more firmly than the arms. Packing an 8-stitch arm tightly produces a rigid tube and interferes with the relaxed forward hand position.
- Use invisible decreases on the face. Work front-loop invisible decreases through the head’s reduction rounds. Conventional decreases can leave six visible ridges around the lower head.
- Install the eyes before the opening becomes narrow. Position the 10 mm eyes before completing the lower head decreases. Fitting the locking washers becomes difficult after the opening contracts below approximately 30 stitches.
- Keep yarn tension consistent. Continue with the 3.5 mm hook through the skin and clothing sections when all yarns have comparable thickness. Loose tension in the denim section can make the 42-stitch waistband wider than the torso.
- Pin the seated pose before sewing. Attach pins through both legs and both suspenders before permanently securing any of them. A leg displaced by approximately 1 cm can cause the doll to lean or rotate while sitting.
- Secure structural yarn tails. Leave 25–35 cm tails on the head, body and legs. After sewing, pass each tail through the stuffed fabric in at least three different directions before trimming the excess.
Finishing the Baby Doll
Check the seated balance before weaving in the leg tails because this determines whether the finished figure maintains the intended bent-knee posture. Place the doll on a flat surface and compare the eye line, suspender spacing, four-button arrangement and bootie angle. Correct any uneven attachment points before securing the final yarn tails.
Next, check the beanie against the head circumference and reposition it if the lower edge covers too much of the forehead. The pacifier should sit centrally between the cheeks without pulling the face inward.
Photograph the completed baby doll amigurumi crochet pattern from the front and side to document the finished proportions. Save the project to Pinterest or share the finished crochet doll on Instagram using #BlueOverallBabyDoll.
For another version, change one construction feature while retaining the 42-stitch body proportions. Which detail would you modify first: the blue beanie, the suspender width, or the pacifier shape?









