Introduction
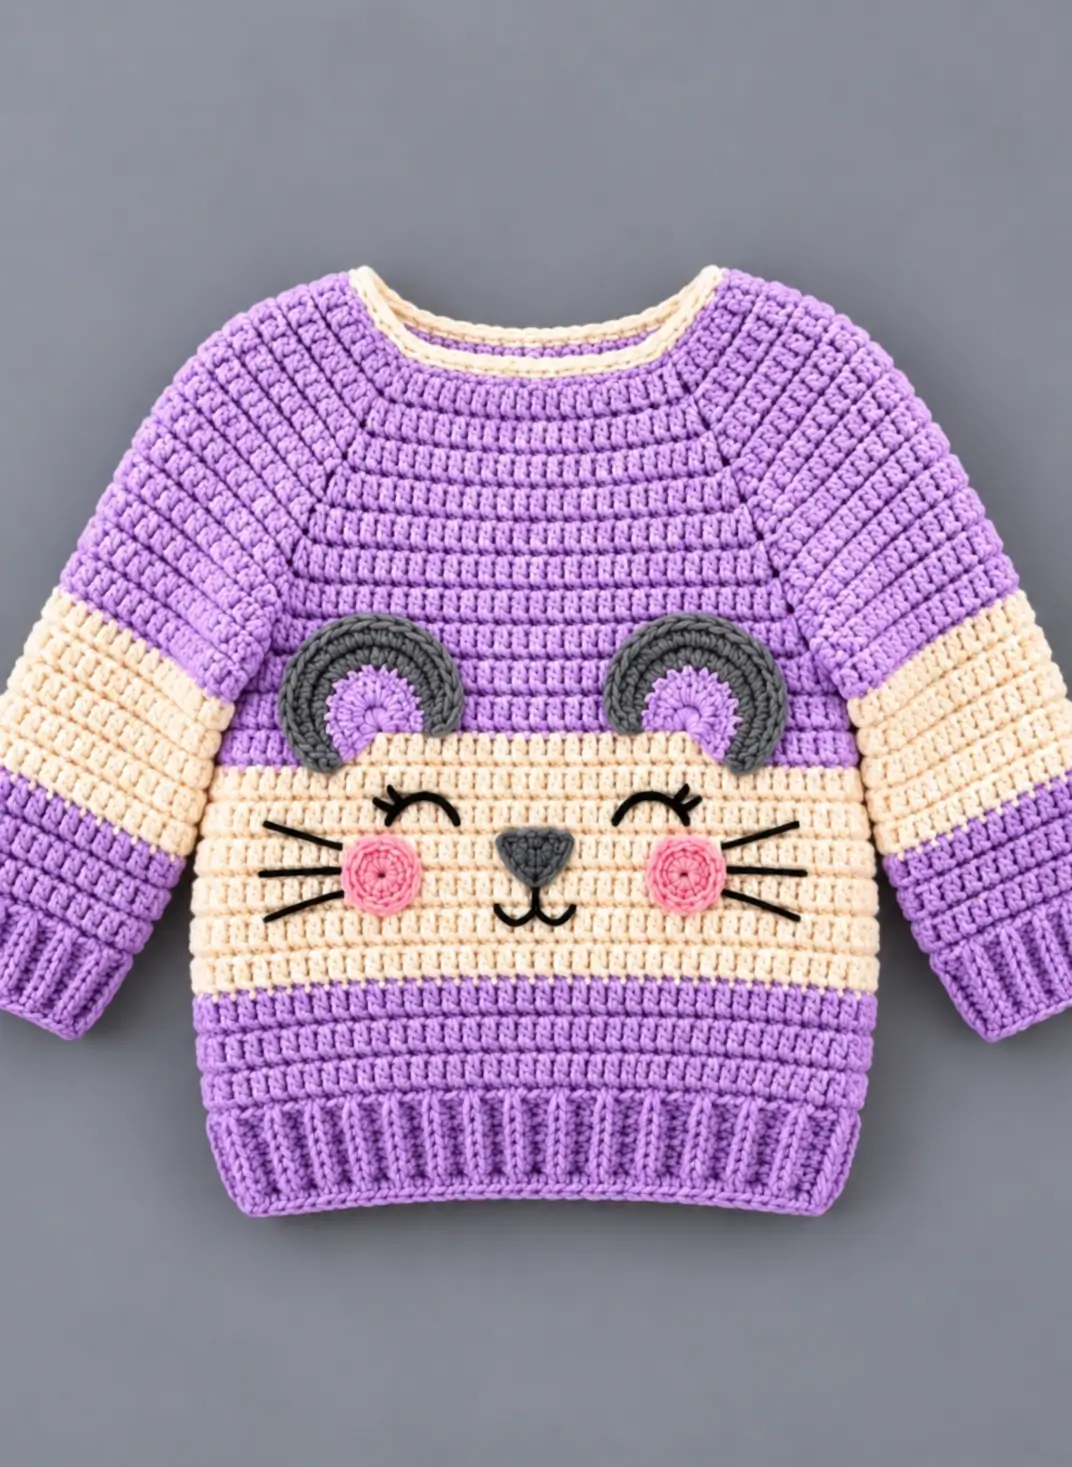
A cat face stops reading correctly when its whiskers drift above the nose or its ears disappear into the sweater yoke. This cat face crochet sweater pattern concept uses DK or light-worsted yarn, a measured child-size pullover base and separate facial appliqués. Treat it as an intermediate garment project. The replaceable appliqué construction is practical because the face can be repositioned without rebuilding the sweater.
The Design: What Makes the Cat Sweater Different
Three structural decisions control this design. First, the cream section is part of the torso rather than a large cream appliqué. That keeps unnecessary layers away from the center front and provides a flat background for embroidery.
Second, two dimensional ears cross the boundary between the purple upper body and cream face. Their placement matters: moving them too far outward makes the motif resemble a bear or mouse rather than a cat.
Third, the pink cheeks are separate flat circles. They give the lower face fixed reference points for whisker placement without affecting garment fit. This construction separates the crochet cat sweater for kids from a conventional color-blocked pullover.
A common error in cat face sweater crochet projects is sewing the facial pieces before the sweater has been blocked. Small changes in width can move an ear or cheek several stitches away from its intended position.
Project Info at a Glance
Because the photograph contains no scale reference, the sweater should be made according to the intended child’s measurements rather than an estimated age.
| Skill Level | Time | Finished Size | Hook | Best For |
|---|---|---|---|---|
| Intermediate | Size dependent | Made to child chest measurement | 4.0 mm starting reference | Child pullover with cat-face motif |
Comparable published DK cat-sweater patterns use approximately 3.5–4 mm hooks, making a 4 mm hook a practical swatching point. The final hook should always be selected according to the blocked gauge.
Materials and Tools
Yarn
Use the same yarn line for all major garment colors. Matching fiber content and yarn thickness helps prevent the color-blocked sections from changing width after washing.
- Purple DK/light-worsted yarn — main body, sleeves, cuffs, neckline and hem.
- Cream DK/light-worsted yarn — face panel, sleeve stripes and neckline accent.
- Charcoal gray yarn — ears and nose.
- Pink yarn — cheek patches.
- Black yarn — closed eyes, eyelashes, mouth and whiskers.
The total yarn quantity depends on the child’s chest measurement, sleeve length, torso length and gauge. Buy enough main-color yarn from the same dye lot to complete the body and both sleeves.
Tools
- 4.0 mm crochet hook as a swatching reference
- Yarn needle
- Locking stitch markers
- Measuring tape
- Scissors
- Blocking pins
- Blocking mat
No safety eyes are required. The cat’s closed eyes are embroidered directly onto the cream section.
Abbreviations
- MR — magic ring
- ch — chain
- sc — single crochet
- hdc — half double crochet
- dc — double crochet
- sl st — slip stitch
- st/sts — stitch/stitches
- inc — two stitches worked into one stitch
- dec — decrease
- BLO — back loop only
- RS — right side
- WS — wrong side
An invisible decrease is primarily associated with stuffed amigurumi. For this sweater, garment decreases should follow the selected stitch pattern and measured shaping.
Gauge and Sizing
Do not determine a child’s sweater size from the photograph. Measure the intended wearer around the chest and decide how much finished ease is required.
Make a swatch larger than 10 × 10 cm using the purple yarn and 4.0 mm hook. Wash and dry the swatch according to the yarn label before counting the stitches.
For example, suppose the blocked fabric measures 16 stitches per 10 cm and the required finished chest circumference is 60 cm.
60 ÷ 10 × 16 = 96 stitches
This gives an approximate torso circumference of 96 stitches before adjustments required by the chosen construction and stitch repeat.
The sweater shown in the reference has diagonal shoulder shaping similar to a raglan construction. Working from the neckline downward makes it possible to check the yoke depth, sleeve opening and body length against actual measurements.
Pattern — Step by Step
Neckband
Yarn: Purple with cream accent.
Work a foundation long enough to pass comfortably over the child’s head while remaining close enough to create a crew neckline.
Join the foundation without twisting.
Work the neckline in ribbing or BLO stitches until the band measures approximately 2–3 cm deep.
The reference design has a narrow cream line around the neckline. Add this accent as the final neckline round or with surface crochet after completing the main band.
Do not use a fixed neckline stitch count from an unrelated sweater. Head circumference, yarn elasticity and blocked gauge determine the correct number.
Yoke
Yarn: Purple.
Divide the neckline into front, back and two sleeve sections. Mark the four raglan positions with locking stitch markers.
Increase at the marked positions at regular intervals. Continue until the yoke reaches the required underarm depth.
The diagonal shoulder lines should remain aligned from the neckline toward the underarms. Avoid moving the markers sideways as additional rounds are completed.
Check the yoke against the intended measurements before separating the sleeves. The arm openings must provide enough room for movement without producing excessive fabric beneath the arms.
Body
Yarn: Purple, cream and purple.
Separate the sleeve stitches and join the front and back sections beneath each arm.
Continue working the torso in the established stitch pattern.
Begin the cream section when the body reaches the intended upper edge of the cat face. The cream area should extend across the front and, when reproducing the photographed color blocking, around the corresponding torso section.
Keep the transition between purple and cream level.
Continue in cream until sufficient height has been created for the eyes, nose, cheeks, mouth and whiskers.
Change back to purple.
Work until the body reaches the required length, leaving enough room for the lower ribbed band.
Ribbed Hem
Yarn: Purple.
The lower edge uses pronounced vertical ribbing. A practical method is BLO single crochet worked perpendicular to the body.
Create a ribbed band approximately 4–6 cm deep, adjusting the depth for the child’s size.
Join each ribbing row to the bottom edge of the sweater as it is worked.
Check the width periodically. Ribbing worked with excessive tension can pull the bottom of the sweater inward.
Join the first and final ribbing rows.
Fasten off and weave the tail through several stitches on the inside.
Sleeves — Make 2
Yarn: Purple, cream and purple.
Rejoin the purple yarn at the underarm.
Work around the sleeve opening while closing any small gap created at the underarm join.
Continue downward, decreasing gradually according to the child’s upper-arm and wrist measurements.
Record every decrease round used on the first sleeve. Repeat exactly the same sequence for the second sleeve.
Change to cream in the lower section to reproduce the broad contrasting sleeve stripe.
After completing the cream section, return to purple.
Continue until the sleeve reaches the beginning of the wrist cuff.
Sleeve Cuffs — Make 2
Yarn: Purple.
Create vertical ribbing using the same method as the lower hem.
Work approximately 4–6 cm of cuff depth, adjusted according to the child’s wrist and arm length.
The cuff should sit flat without restricting the wrist.
Join the first and last ribbing rows.
Fasten off securely.
Cat Ears — Make 2
Yarn: Purple and charcoal gray.
The reference sweater uses unusually rounded ears rather than conventional pointed triangles. Each ear resembles a curved circular appliqué with a purple center and charcoal outer section.
For a compatible flat-circle base, begin with purple:
R1: 6 sc in MR (6)
R2: inc ×6 (12)
R3: (1 sc, inc) ×6 (18)
R4: (2 sc, inc) ×6 (24)
R5: (3 sc, inc) ×6 (30)
For a smaller child’s sweater, stop at an earlier round when the diameter is proportional to the front panel.
Change to charcoal gray and work around the outer portion of the circle. Shape the final section so the lower center remains open, producing the curved ear appearance visible in the reference.
Make the second ear the same size.
Fasten off. Leave approximately 20 cm of yarn for sewing.
Cheek Patches — Make 2
Yarn: Pink.
R1: 6 sc in MR (6)
R2: inc ×6 (12)
R3: (1 sc, inc) ×6 (18)
R4: (2 sc, inc) ×6 (24)
For a smaller garment, stop after R3.
Fasten off and leave approximately 15–20 cm of yarn for sewing.
Block both cheek circles to the same diameter before attaching them to the sweater.
Cat Nose
Yarn: Charcoal gray and black.
The nose is a compact inverted triangle positioned on the vertical center line of the face.
It can be crocheted separately as a small triangular appliqué or embroidered densely with charcoal yarn.
Keep the nose substantially smaller than either cheek.
After attaching the nose, use black yarn to embroider one short vertical line downward from its center.
Eyes and Eyelashes
Yarn: Black.
The reference uses closed embroidered eyes rather than safety eyes.
Mark both eye positions before adding permanent embroidery. Measure outward from the center line so the two curves remain balanced.
Create each eye as a shallow upward arch.
Add short eyelashes near the outer end of each eye.
Avoid carrying one loose strand across a long section of crochet. Several controlled embroidery stitches are less likely to snag during washing and wear.
Mouth
Yarn: Black.
Continue downward from the center of the nose with a short vertical stitch.
Create two shallow curved lines extending from the bottom of this stitch.
Keep the total mouth width narrower than the space between the two pink cheeks.
Secure the yarn on the wrong side and weave the tail into neighboring stitches.
Whiskers
Yarn: Black.
Work three whiskers on each side of the face.
Position the middle whisker close to the level of the lower nose.
Angle the upper whisker slightly upward and the lower whisker slightly downward.
Measure the first set before embroidering the opposite side. The corresponding whiskers should have similar lengths and angles.
The whiskers extend beyond the pink cheeks, making them a major part of the cat-face proportions.
Assembly
- Block the completed sweater to the intended finished measurements before attaching the facial pieces.
- Lay the sweater flat and mark the vertical center of the front with removable stitch markers.
- Position both ears above the cream face section and measure their distance from the center line.
- Sew the ears around their outer edges while preserving their curved shape.
- Place the charcoal nose directly on the center line of the cream panel.
- Position both pink cheeks at equal distances from the nose and sew them flat.
- Mark both closed-eye curves with removable yarn before embroidering them permanently.
- Add the nose line, mouth and three whiskers on each side.
- Inspect the wrong side and weave all embroidery tails through neighboring stitches so no long yarn floats remain.
- Wash or steam according to the yarn manufacturer’s instructions, reshape to the required measurements and dry flat.
The completed sweater should have a centered cream face panel, symmetrical cheeks, paired dimensional ears and balanced embroidered features.
7 Technical Tips
- Prevent marker drift: Put a locking stitch marker at the beginning of every yoke round. Repeatedly shifting the round start by one stitch can distort the raglan line.
- Do not stuff the appliqués: This garment requires zero fiberfill beneath the ears and cheeks. Stuffing creates hard raised sections against the sweater front.
- Control sleeve decreases: Position decreases along the underside of each sleeve. Randomly distributed decreases can produce visible dents across the outer arm.
- Delay eye embroidery: Block the sweater before permanently embroidering the eyes. Changes in torso width can alter the spacing between facial features.
- Match color-section tension: Work the purple and cream torso sections with the same hook and yarn weight. Tighter cream stitches can constrict the sweater across the face panel.
- Measure before sewing: Measure from the center line to each cheek and ear. A difference of approximately 1 cm can be noticeable on a symmetrical cat face.
- Secure embroidery tails: Weave black embroidery tails through approximately 4–5 cm of wrong-side stitches and change direction once. Avoid leaving long unsecured floats behind the eyes and whiskers.
Conclusion
Finish this project by blocking the pullover first, then measuring the center line before attaching a single facial piece. That sequence keeps the ears, cheeks, nose and embroidered eyes aligned after the fabric reaches its final dimensions. Save the cat face crochet sweater pattern to Pinterest with a front-facing finished photograph, and share the completed garment on Instagram with #CatFaceCrochetSweater. Record the wearer’s chest measurement, blocked gauge and final stitch counts before making a second size; those figures are more useful than age labels alone. For your next version, would you keep the rounded charcoal ears shown in the reference or replace them with pointed triangular cat ears?









