Introduction
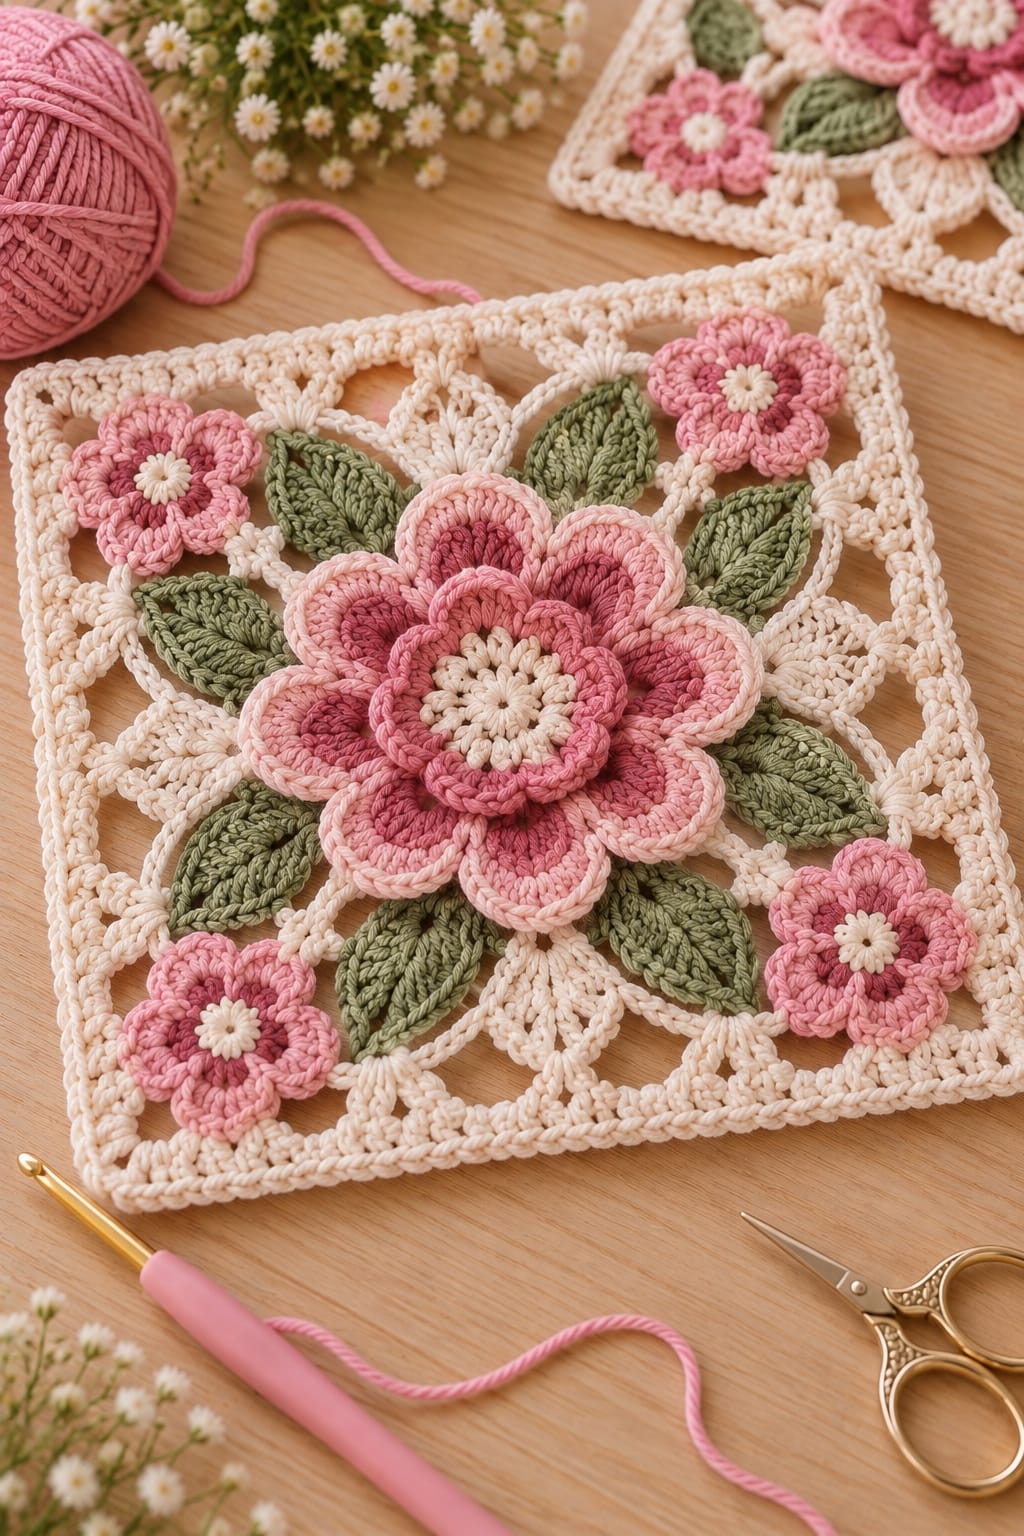
A flower this large cannot simply be dropped into the middle of a granny square; its outer petals need separate anchors or the cream corners will collapse toward the center. This 3D flower granny square crochet pattern uses worsted cotton, a 5 mm hook, layered pink petals, sage leaves, small corner flowers, and an open cream framework. The finished intermediate motif measures approximately 23 cm square.
The Design: What Makes This Flower Granny Square Different
The reference replaces the usual flat granny center with a substantial three-tier flower. Dark dusty-pink inner petals form a raised cup, lighter petals increase the diameter, and pale edging separates overlapping layers. Eight sage leaves radiate behind the blossom, creating a transition between the circular flower and square cream frame. Four smaller pink flowers occupy the corners, while cream chain arches keep the background open rather than turning the motif into a solid block. That combination gives this layered flower granny square considerably more depth than popcorn-flower designs. Published 3D flower squares vary from about 10.5 cm with a 4.5 mm hook to 23 cm with a 5 mm hook. The common failure is attaching every petal edge; the flower then loses its stacked profile and pulls the surrounding framework inward.
Project Info at a Glance
| Skill Level | Time | Finished Size | Hook | Best For |
|---|---|---|---|---|
| Intermediate | Approx. 3–4 hours | Approx. 23 × 23 cm | 5 mm | Blankets, cushions, bags, table runners |
A current 3D granny-square tutorial made with YarnArt Finland and a 5 mm hook finishes at approximately 23 cm. Another published 3D flower motif uses worsted yarn and a 5–5.5 mm hook to produce 14–15 cm squares, while Sarah Zimmerman’s Ravelry 3D Flower Granny Square uses worsted yarn, a 5.5 mm hook, and finishes at 12 inches. The 23 cm target used here is therefore appropriate for the unusually large flower and leaf structure visible in the reference.
Materials and Tools
Yarn
- Warm cream — worsted #4 cotton or cotton blend — approximately 45–55 g
- Dusty rose — worsted #4 — approximately 25–30 g
- Blush pink — worsted #4 — approximately 20–25 g
- Pale pink — worsted #4 — approximately 10–15 g
- Sage green — worsted #4 — approximately 25–30 g
Allow approximately 125–155 g total yarn for one full-size motif. Smaller published 3D flower squares can require very little yarn; one current Ravelry version lists only 23 m for a much smaller sport-weight motif. This design needs more because the central flower, eight dimensional leaves, four secondary flowers, and open square framework are all separate components.
Tools
- 5 mm crochet hook
- 4.5 mm hook — optional for small flowers
- Tapestry needle
- Locking stitch markers
- Scissors
- Blocking pins
- Blocking mat
Abbreviations
- MR — magic ring
- ch — chain
- sc — single crochet
- hdc — half double crochet
- dc — double crochet
- tr — treble crochet
- inc — increase
- sl st — slip stitch
- FLO — front loop only
- BLO — back loop only
- sp — space
- st/sts — stitch/stitches
An invisible decrease is not required because all components are worked flat or as open dimensional layers rather than closed stuffed forms.
Gauge and Finished Measurements
Exact stitch gauge matters less than component dimensions. Make the central flower first and measure it before constructing the cream square.
- Complete square: approximately 23 × 23 cm
- Main flower: approximately 14–15 cm diameter
- Large sage leaf: approximately 6.5–7.5 cm long
- Small corner flower: approximately 4–4.5 cm diameter
- Cream border: approximately 2–2.5 cm deep
A published worsted 3D flower motif measures approximately 14 cm with a 5 mm hook and 15 cm with a 5.5 mm hook, providing a useful benchmark for the central floral diameter used here.
Pattern — Step by Step
Use US crochet terminology. The motif is assembled in layers: central flower, sage leaves, cream framework, small flowers, then the final square border.
Main Flower Center
Yarn: warm cream.
R1: 6 sc in MR. (6)
R2: inc ×6. (12)
R3: (1 sc, inc) ×6. (18)
Join with sl st.
Fasten off.
The 18-stitch center provides six evenly spaced sections for the first petal layer.
Inner Dusty-Rose Petal Layer
Yarn: dusty rose.
Join yarn to any stitch of R3.
*Sl st in next stitch, ch 5, starting in second ch from hook work sc, hdc, 2 dc, sl st into next two center stitches.*
Repeat around to create 6 inner petals.
Join.
Fasten off.
Curve these petals slightly upward toward the cream center.
Middle Petal Foundation
Yarn: blush pink.
Turn the flower to the wrong side.
Join behind the first petal.
*Sc around a stable stitch or post behind the petal, ch 7.*
Repeat six times.
Join to the first sc.
Count: 6 ch-7 petal spaces.
Middle Petals
Into each ch-7 space work:
sc, hdc, 5 dc, hdc, sc.
Repeat in all six spaces.
Join.
Fasten off.
The middle petals should extend beyond the dark inner layer without lying completely flat.
Outer Petal Foundation
Yarn: medium dusty pink.
Join behind the middle petals.
*Sc around the next stable rear anchor, ch 9.*
Repeat until 8 loops have been distributed evenly around the flower.
Join.
Outer Petals
In each ch-9 loop work:
sc, hdc, 2 dc, 4 tr, 2 dc, hdc, sc.
Repeat for all eight petals.
Join.
Fasten off.
Pale Pink Petal Edging
Yarn: pale pink.
Join at the base of one outer petal.
Work one relaxed sc in every stitch around the petal.
At the center of the petal work:
sc, ch 1, sc.
Continue around all eight outer petals.
Join and fasten off.
Repeat a similar relaxed edging around the six middle petals if stronger color separation is wanted.
Raised Cream Flower Center
Join cream yarn to the original central disc.
*Ch 3, 2 dc together in same stitch, ch 1, sl st in next stitch.*
Repeat around to create a compact ring of cream loops or bobble-like stamens.
Fasten off.
Keep the center approximately 3–3.5 cm across.
Sage Leaf — Make 8
Yarn: sage green.
Ch 12.
Starting in second chain from hook work:
sl st, sc, hdc, dc, tr, tr, dc, hdc, sc, sc, sl st.
Work 3 sc in the final chain.
Continue along the opposite side:
sl st, sc, sc, hdc, dc, tr, tr, dc, hdc, sc, sl st.
Join at the base.
Leaf Edging
Ch 1.
Sc around.
At the tip work:
sc, ch 2, sl st in first ch, sc.
Continue around.
Join.
Do not fasten off.
Raised Leaf Vein
Surface sl st along the original foundation chain from the leaf base to the point.
Fasten off, leaving a 25 cm tail.
Block each leaf to approximately 6.5–7.5 cm.
Arrange the Eight Leaves
Place the flower face up.
Position one leaf behind each outer petal valley.
The eight points should radiate evenly.
Attach only the lower 2–2.5 cm of each leaf to the underside of the flower.
Leave the points free.
The flower-and-leaf unit should now measure approximately 18–19 cm across at its widest points.
Cream Structural Ring
Yarn: warm cream.
Turn the flower-and-leaf unit to the wrong side.
Join cream behind any outer petal.
*Ch 6, sc into the attachment area between the next leaf and petal.*
Repeat around.
Join.
Count: 8 ch-6 spaces.
This ring forms the first connection between the dimensional botanical center and the square framework.
Squaring Round
Sl st into the first ch-6 space.
Work:
3 dc, ch 3, 3 dc in the first space.
Ch 4.
Work 3 dc in the next ch-6 space.
Ch 4.
In the next space work:
3 dc, ch 3, 3 dc.
Repeat this sequence around so four ch-3 corner spaces are established.
Join.
Open Lace Square Round
Sl st to the first corner.
In the corner work:
3 dc, ch 3, 3 dc.
Ch 5.
Sc into the next side space.
Ch 5.
Sc into the following side space.
Ch 5.
Work the next corner.
Repeat around.
The open arches should frame the leaves without covering their tips.
Small Corner Flower — Make 4
Yarn: dusty rose and blush pink.
R1: 10 sc in MR. (10)
Join.
Change to blush pink.
*Sl st in next stitch, ch 4, 2 dc in same stitch, ch 4, sl st in next stitch.*
Repeat five times.
Count: 5 petals.
Fasten off with a 25 cm tail.
Small Cream Flower Center
Join cream in the center ring.
*Ch 2, hdc in center, sl st into center.*
Repeat approximately 6 times.
Fasten off.
The completed small flower should measure approximately 4–4.5 cm.
Position the Four Small Flowers
Place one small flower diagonally between the central botanical unit and each square corner.
Do not place it directly inside the outer corner space.
Leave approximately 2 cm between the flower edge and final border.
Secure the small flower through its central ring and one stitch beneath each petal base.
Keep the petal tips free.
Additional Cream Leaf Motifs — Make 4
Yarn: warm cream.
Ch 10.
Starting in second chain work:
sl st, sc, hdc, dc, tr, dc, hdc, sc, sl st.
Work 3 sc in final chain.
Mirror the sequence along the opposite side.
Fasten off with a long tail.
Place one cream leaf between each pair of small flowers if the open square needs additional structure.
Outer Square Border Round 1
Join cream in any corner ch-3 space.
Work:
2 sc, ch 2, 2 sc in the corner.
Sc across the side.
Work 2 sc into each large chain arch.
Where the side crosses behind a small flower, anchor the border to the structural lace rather than the flower petal.
Repeat around.
Join.
Outer Square Border Round 2
Ch 2.
Hdc in every stitch around.
In each corner ch-2 space work:
2 hdc, ch 2, 2 hdc.
Join.
Outer Square Border Round 3
Ch 1.
Sc in every stitch.
In each corner work:
sc, ch 2, sc.
Join and fasten off.
Block the cream border to approximately 23 × 23 cm without flattening the central petals.
Optional Decorative Chain Arches
The reference contains open cream loops between botanical components.
Join cream to the structural ring behind a small flower.
Ch 8–12 according to the distance to the next leaf.
Sl st behind the leaf base.
Continue with another chain arch.
Fasten off after two or three connected loops.
Use these only where additional open structure is needed.
Assembly
- Crochet the three-layer central flower and confirm that its finished diameter is approximately 14–15 cm before making the surrounding components.
- Make eight sage leaves, block them to matching 6.5–7.5 cm lengths, and arrange them evenly behind the outer flower petals.
- Attach only the lower 2–2.5 cm of each leaf so the tips remain raised and visible around the central blossom.
- Work the cream structural ring behind the flower-and-leaf unit and establish four evenly spaced corner positions during the squaring round.
- Add the open cream lace round, checking that the four corner-to-corner measurements remain equal before proceeding.
- Crochet four small five-petal pink flowers and position one diagonally toward each corner without covering the main sage leaves.
- Add the optional cream leaves and chain arches between the small flowers and central botanical unit where the framework needs additional visual balance.
- Work the three cream border rounds around the complete square while anchoring into structural stitches rather than dimensional petals.
- Weave all tails through matching dense stitches and add extra hidden attachment stitches only where a flower or leaf rotates excessively.
- Block the square to approximately 23 × 23 cm, pinning only the cream perimeter and supporting the central flower so its layered petals remain raised.
The finished motif should remain square and flat at its cream perimeter while the central pink flower, sage leaves, and four smaller blossoms project above the open background.
7 Technical Tips
- The square cups around the central flower: increase a tight ch-6 structural arch to ch 7 before working the squaring round. Insufficient circumference behind a 14–15 cm flower pulls all four cream corners toward the center.
- The large petals become flat: attach the flower through its central and lower structures rather than sewing the eight outer petal tips down. Each outer petal needs several millimeters of free movement to retain the layered profile.
- The sage leaves disappear beneath the flower: position their bases behind the valleys between outer petals and expose at least 4–5 cm of each leaf. Placing a leaf directly behind a petal center hides most of its textured surface.
- The square finishes as a diamond: measure both diagonals before adding Border Round 2. A difference greater than approximately 1 cm indicates that one corner arch or side section is tighter than its opposite.
- The small flowers rotate: secure each through its center plus one hidden stitch beneath every second petal. A single center attachment acts as a pivot when the square is handled.
- The final border waves: remove excess stitches from Border Round 1 before continuing. Adding later hdc and sc rounds over an overfilled first border increases the ruffle rather than correcting it.
- The flower collapses during blocking: pin only the 23 cm cream perimeter and place a small rolled cloth beneath the central petals. Direct pressure on the wet flower can permanently reduce the intended three-dimensional separation.
Why This Square Needs a Structural Ring
A conventional granny square expands directly from its center. That method becomes difficult when a 14–15 cm flower already occupies most of the central area.
The cream ch-6 ring solves the problem by creating attachment points behind the petals and leaves.
Those points can then be converted into four corners.
The central flower remains dimensional, while the square framework carries the tension required by the border.
This separation between decoration and structure is particularly important if multiple squares will later be joined into a blanket.
Verified Hook and Size Benchmarks
A current free 3D flower granny-square tutorial specifies worsted #4 yarn, a 5 mm hook, and approximately 14 cm finished size. The same source lists a 5.5 mm version at approximately 15 cm.
Another current pattern using YarnArt Finland with a 5 mm hook produces a substantially larger 23 cm square.
VivCrochets’ smaller flower granny square uses medium-weight yarn with a 4.5 mm hook and measures approximately 10.5 × 10.5 cm.
Sarah Zimmerman’s Ravelry 3D Flower Granny Square uses worsted yarn and a 5.5 mm hook for a 12-inch square.
These published dimensions show why the finished motif measurement should be checked rather than inferred from yarn weight alone.
Choosing the Pink Yarn
The reference uses related pinks rather than one solid shade.
Choose a dark dusty rose for the inner layer, a medium blush for the middle layer, and a lighter shell pink for edging or outer accents.
Keep the saturation similar across all three colors.
A fluorescent pink next to muted sage will dominate the motif and make the green leaves appear gray.
Choosing the Sage Green
A muted medium sage works better than bright leaf green for this palette.
Useful shade descriptions include eucalyptus, sage, soft olive, lichen, and moss.
Use one consistent green for all eight leaves if the square will be repeated in a blanket.
That repeated green creates continuity even when the flower colors change between motifs.
Choosing the Cream
The reference background is warm cream rather than stark white.
Natural cotton, ivory, ecru, and vanilla are suitable options.
A smooth yarn makes the open arches and outer border easier to read.
Keep the same cream for the center stamens, structural framework, optional leaves, and perimeter.
Worsted Cotton Versus Acrylic
Cotton produces crisp leaves and holds the outer square accurately after blocking.
Acrylic is lighter and gives the petals more spring.
A cotton-acrylic blend is a practical middle option when the squares will become a blanket.
Whatever fiber is selected, use the same yarn family across all colors so the components respond similarly during washing.
Making a Smaller Square
Use DK yarn and a 3.5–4 mm hook.
Reduce the outer flower foundation from eight ch-9 loops to six or eight ch-7 loops.
Make the sage leaves with ch 9 instead of ch 12.
Stop after two outer border rounds.
Target approximately 15–17 cm square.
Making a 30 cm Square
Keep the main botanical center unchanged.
Add additional cream framework rather than enlarging every flower component.
After Outer Border Round 2, work a granny-style round with:
3 dc, ch 2, 3 dc in each corner.
Place 3-dc groups at regular intervals along each side.
Add further rounds until the square reaches approximately 30 cm.
Making the Main Flower Larger
Increase the center disc from 18 to 24 stitches:
R4: (2 sc, inc) ×6. (24)
Make eight inner petals instead of six.
Increase the middle layer to eight petals and the outer layer to ten.
Target approximately 17–18 cm flower diameter.
Increase the structural ring chain spaces accordingly so the square remains flat.
Making the Flower Flatter
Omit the middle petal layer.
Keep the six inner petals and eight large outer petals.
Attach one hidden stitch near the base of each outer petal.
The resulting motif is easier to use in blankets intended for frequent washing because there are fewer overlapping layers.
Making a More Raised Flower
Use the 4.5 mm hook for the inner dusty-rose petals and the 5 mm hook for the outer layers.
The tighter inner petals naturally curl upward.
Do not block the central flower flat.
Shape the petals with your fingers after the square perimeter has dried.
Adding Pearl Beads
The cream crochet center can be replaced or supplemented with pearl beads.
Use approximately 5–7 beads measuring 5–6 mm.
Sew each bead through the dense center with strong thread.
Do not attach beads to loose chain loops.
For items intended for young children, omit detachable beads and retain the crocheted center.
Changing the Small Corner Flowers
The four five-petal flowers can use different pink combinations.
Make two dusty rose and two blush.
Arrange matching colors diagonally across the square.
Keep all four cream centers identical.
This creates controlled variation without changing the square’s structural symmetry.
Making Eight Small Flowers
Add one extra small flower near the midpoint of each side.
Reduce their diameter to approximately 3–3.5 cm.
Keep at least 1.5 cm between the small petals and final border.
Too many large secondary flowers can hide the open cream framework that distinguishes the reference design.
Making Longer Leaves
Increase the foundation from ch 12 to ch 15.
Add additional dc and tr stitches around the center of the leaf.
Target approximately 9 cm finished length.
Use longer leaves only on larger squares because their points need to remain inside the final perimeter.
Creating More Leaf Texture
After working the center surface-slip-stitch vein, add two short diagonal veins on either side.
Begin at the center vein.
Work two or three surface slip stitches toward the edge.
Stop before reaching the final sc round.
Excess surface crochet can make the leaf rigid.
Turning the Square into a Cushion
Make four motifs for a highly dimensional front panel or one 30–35 cm enlarged motif for a single-square cushion.
Join squares through the cream border only.
Keep flower petals and leaves clear of the seams.
Use a flatter stitch pattern for the cushion back so the floral front remains the primary textured surface.
Turning the Motifs into a Blanket
Make every square to exactly the same blocked dimension.
Join through the cream perimeter.
Avoid stitching through leaves or small flowers.
For a 3 × 4 arrangement of 23 cm squares, the motif field measures approximately 69 × 92 cm before any outer blanket border.
Add two to four cream rounds around the complete joined panel.
Turning the Motifs into a Table Runner
Make three to five squares.
Join them in one straight row through corresponding cream border stitches.
For five 23 cm squares, the motif length is approximately 115 cm before joining compression and final edging.
Add one continuous cream border around the assembled strip.
Keep the dimensional flowers away from the joining seam.
Joining Squares with Slip Stitch
Place two squares wrong sides together.
Insert the hook through corresponding back loops of both cream borders.
Work relaxed slip stitches across.
Do not tighten the seam.
A tight join shortens the square edge and can make a blanket or runner buckle between motifs.
Joining Squares with Mattress Stitch
Place squares side by side with right sides facing upward.
Thread cream yarn onto a tapestry needle.
Catch corresponding inner loops along both edges.
Pull the seam closed every few centimeters.
This produces a flatter join and keeps the cream border visually continuous.
Checking Square Geometry
Measure all four sides after the final border.
Each should be approximately 23 cm.
Measure both diagonals.
They should match within approximately 5–10 mm.
If one diagonal is shorter, dampen only the cream border and re-pin the affected corners.
Fixing a Tight Structural Ring
If the square cups before the border is added, inspect the ch-6 spaces behind the leaves.
Replace selected ch-6 spaces with ch 7.
Do not stretch the finished square aggressively to compensate.
The structural ring should already lie flat before the first squaring round begins.
Fixing an Overfilled Structural Ring
If the cream framework ruffles around the flower, shorten selected ch-6 spaces to ch 5.
Make changes symmetrically.
Adjust opposite spaces together so the flower remains centered.
Recheck the square before attaching the small flowers.
Fixing Uneven Petals
Count the stitches in every foundation loop before working the petal layer.
All eight outer loops should have the same chain count.
Work the same sequence of sc, hdc, dc, and tr stitches in each.
If one petal remains smaller, remake that petal rather than stretching it during blocking.
Fixing a Leaf That Curls
Check the final sc edging.
A tight perimeter can fold the leaf lengthwise.
Increase to the 5.5 mm hook for the edging or add one extra sc near each widest point.
Block the leaf before attaching it to the flower.
Managing Yarn Tails
Weave center and petal color-change tails before the leaves are attached.
Keep long tails on the leaves and small flowers because they can serve as assembly yarn.
Run each remaining tail through approximately 5 cm of matching dense stitches.
Change direction once.
Do not weave tails through open cream arches where they remain visible.
Blocking the Finished Square
Dampen the cream perimeter according to the yarn label.
Pin four corners first.
Set each side to approximately 23 cm.
Add pins along the straight edges.
Do not pin through the large flower.
Place a small rolled cloth beneath the central blossom while the cream border dries.
Care and Storage
Follow the yarn manufacturer’s washing instructions.
Hand washing is preferable when the motif has heavily layered petals.
Support the square while wet.
Reshape the leaves and petals before drying.
Dry flat.
For storage, avoid stacking heavy objects directly over the central flower because prolonged compression can flatten the petal layers.
Sources
Technical benchmarks were checked against Amigurumi Creations’ 3D Flower Crochet Motif, which lists worsted yarn, 5–5.5 mm hooks, and 14–15 cm sizing; its larger 23 cm flower square tutorial; VivCrochets’ flower granny square, which lists medium yarn, a 4.5 mm hook, and 10.5 cm sizing; and Sarah Zimmerman’s Ravelry 3D Flower Granny Square, which lists worsted yarn, a 5.5 mm hook, and a 12-inch finished square.
Additional construction comparisons were checked against Passionate Crafter’s flower granny square tutorial and the The_sun_of_now 3D Flower Granny Square on Ravelry, which lists sport cotton, a 1.75 mm hook, and 23 m of yarn for its smaller motif.
Conclusion
The critical step in this square is building the cream framework independently from the dimensional flower. Keep the main blossom near 14–15 cm, expose 4–5 cm of each sage leaf, and check that the structural ring lies flat before forming the four corners. Once that geometry is correct, the small flowers and open arches can be added without distorting the perimeter. Make one complete botanical center first, then measure it before committing yarn to additional motifs. Save this 3D flower granny square crochet pattern to Pinterest or share the finished square on Instagram with #PinkGardenGrannySquare. Would you repeat the dusty-pink flower on every square or alternate pink, cream, and sage-centered flowers?









