Introduction
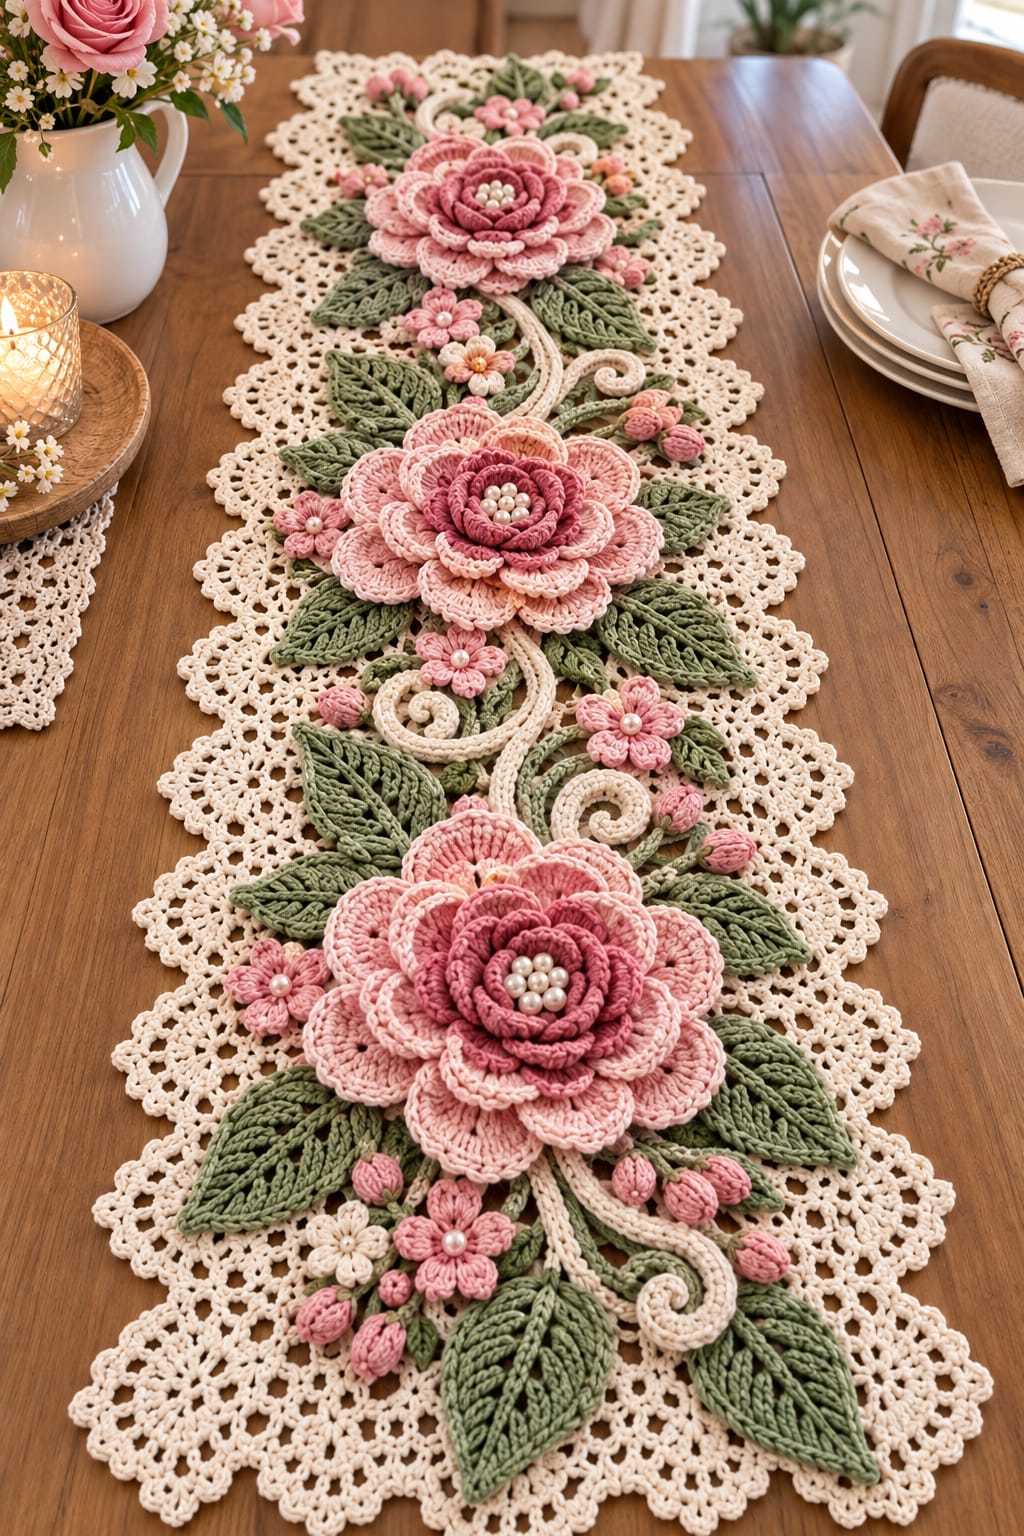
Three oversized layered roses need enough clearance to rise above the lace without forcing the runner underneath them to buckle. This 3D flower crochet table runner pattern uses DK cotton, a 4 mm hook, cream lace, dusty-pink flowers, sage leaves, buds, and scrolling vines. The finished runner measures approximately 140 × 38 cm. Its motif-based construction is suited to intermediate crocheters and can be lengthened without rebuilding the floral components.
The Design: What Makes This Floral Runner Different
The reference combines a flat lace foundation with strongly dimensional botanical appliqués. Three large flowers establish the centerline, but their petals are stacked in separate tiers so the blossoms project above the runner rather than behaving like flat motifs. Sage leaves fill the gaps around each flower and also stabilize the composition by extending diagonally toward the lace edges. Cream scrolling stems connect the floral groups while small pink flowers and closed buds occupy spaces that would otherwise expose large areas of background. Current 3D crochet flower table runner listings use the same general strategy of layered flowers, realistic leaves, motif assembly, and open lace. The main construction error is attaching every appliqué edge. That removes the dimensional effect and can pull the floral crochet table runner inward around its larger flowers.
Project Info at a Glance
| Skill Level | Time | Finished Size | Hook | Best For |
|---|---|---|---|---|
| Intermediate | Approx. 16–22 hours | Approx. 140 × 38 cm | 4 mm | Dining tables, wedding tables, sideboards, spring décor |
Current floral-runner patterns commonly recommend DK or light-worsted cotton with hooks between 3.5 and 4.5 mm. One contemporary floral table-runner listing provides finished sizes from approximately 30 × 91 cm through 36–41 × 183 cm and specifically recommends a 4 mm hook for DK cotton. A Ravelry Flower Table Mat uses fingering yarn held double, a 2.5 mm hook, and approximately 460 g across its three listed colors.
Materials and Tools
Yarn
- Warm cream — DK #3 cotton or cotton blend — approximately 220–260 g
- Dusty rose — DK #3 — approximately 90–110 g
- Blush pink — DK #3 — approximately 80–100 g
- Pale pink — DK #3 — approximately 45–60 g
- Sage green — DK #3 — approximately 130–160 g
- Optional light cream for small flowers — approximately 15–20 g
The quantities above allow for three large layered blossoms, roughly 24–30 leaves, small flowers, buds, stems, and a substantial cream lace base. Keep at least 30 g of cream unused until the final edging is complete.
Tools
- 4 mm crochet hook
- 3.5 mm crochet hook for small flowers and buds
- Tapestry needle
- Stitch markers
- Scissors
- Blocking mats
- Rust-resistant blocking pins
- 18–24 pearl beads approximately 6–8 mm for large flower centers
- Optional 4–6 mm pearl beads for small flower centers
- Strong sewing thread for bead attachment
Abbreviations
- MR — magic ring
- ch — chain
- sc — single crochet
- hdc — half double crochet
- dc — double crochet
- tr — treble crochet
- sl st — slip stitch
- sp — space
- BLO — back loop only
- st/sts — stitch/stitches
An invisible decrease is not required because the runner uses flat lace, appliqués, and dimensional petals rather than closed amigurumi forms.
Gauge and Component Measurements
Exact stitch gauge is secondary to finished motif size. Make one large flower and one leaf before starting the complete runner.
- Large layered flower: approximately 20–22 cm diameter
- Large leaf: approximately 10–12 cm long
- Small leaf: approximately 7–8 cm long
- Small flower: approximately 4–5 cm diameter
- Bud: approximately 2.5–3.5 cm long
- Finished runner: approximately 140 × 38 cm after blocking
Pattern — Step by Step
Make the cream foundation first. Crochet and block the botanical components separately, arrange every motif on the completed lace, then attach them from the largest pieces to the smallest.
Cream Lace Foundation
Yarn: warm cream.
Ch 43.
Foundation Row
Row 1: Dc in fourth ch from hook and in every chain across. (40 dc)
The foundation should measure approximately 27–29 cm before the lace edging is added.
Mesh Row 2
Ch 4, turn.
Skip 1 stitch, dc in next stitch.
*Ch 1, skip 1 stitch, dc in next stitch.*
Repeat across. (20 ch-1 spaces)
Mesh Row 3
Ch 3, turn.
Dc in first ch-1 space.
*Ch 2, dc in next ch-1 space.*
Repeat across.
Mesh Row 4
Ch 3, turn.
Work 2 dc into each ch-2 space across.
Dc in final stitch.
Mesh Row 5
Ch 4, turn.
*Skip 1 stitch, dc in next stitch, ch 1.*
Repeat across.
Continue repeating Rows 3–5 until the center panel measures approximately 128–130 cm.
Finish after a solid Row 4 repeat so both ends have comparable structure.
First Lace Edging Round
Do not fasten off.
Ch 1.
Sc evenly across the short end.
Work 3 sc in the corner.
Along the long edge, work approximately:
sc in next row end, ch 3, skip one row end.
Repeat to the next corner.
Work 3 sc in the corner.
Continue around the opposite short and long edges.
Join.
Second Lace Edging Round
Sl st into the first ch-3 space.
Work:
sc, ch 5, sc into the same space.
Move to the next ch-3 space.
Repeat around.
At each corner, use ch 7 instead of ch 5.
Third Lace Edging Round
Sl st into the first ch-5 arch.
Work:
3 dc, ch 3, 3 dc into the arch.
Sc in the next arch.
Repeat around.
At each corner arch work:
4 dc, ch 3, 4 dc.
Outer Scallop Round
Sl st to the first ch-3 space.
Work:
sc, hdc, 5 dc, hdc, sc into the space.
Sl st into the next available anchoring space.
Repeat around the complete perimeter.
Fasten off.
Block the foundation to approximately 140 × 38 cm.
Large Layered Flower — Make 3
Yarn: dusty rose, blush pink, and pale pink.
The flower is assembled from three petal layers attached to one central disc.
Flower Center
R1: 6 sc in MR. (6)
R2: inc ×6. (12)
R3: (1 sc, inc) ×6. (18)
R4: (2 sc, inc) ×6. (24)
R5: (3 sc, inc) ×6. (30)
Do not fasten off.
Inner Petal Layer
Work in the front loops of R5.
*Sl st in next stitch, ch 5, work 1 sc, 1 hdc, 2 dc, 1 hdc back along the chain, sl st in next stitch.*
Repeat around to create approximately 10 compact inner petals.
Fasten off.
Middle Petal Foundation
Join blush pink to the unused back loops of R5.
*Sc in next 2 back loops, ch 7, skip 1 back loop.*
Repeat around.
Join.
Middle Petals
Into each ch-7 loop work:
sc, hdc, 5 dc, hdc, sc.
Repeat around.
Fasten off.
The petals should overlap slightly but remain individually visible.
Outer Petal Foundation
Turn the flower to the wrong side.
Join pale pink around a post or unused stitch below the middle layer.
*Sc around the next anchor point, ch 9.*
Repeat around to create approximately 10–12 outer loops.
Join.
Outer Petals
In each ch-9 loop work:
sc, hdc, 2 dc, 4 tr, 2 dc, hdc, sc.
Repeat around.
Fasten off, leaving a 50 cm tail for attaching the flower.
Petal Contrast Edge
Join dusty rose or pale pink at the side of an outer petal.
Work relaxed sl sts around each petal edge.
At each petal peak work:
sl st, ch 1, sl st.
Continue around the complete flower.
Fasten off.
Pearl Flower Center
Arrange approximately 6–8 pearl beads inside the central cup.
Sew each bead independently with strong thread.
Pass through the crochet center rather than only through the raised petals.
Knot the thread on the wrong side.
Do not attach all beads with one exposed strand because failure of one section could release the complete group.
Large Sage Leaf — Make 18
Yarn: sage green.
Ch 16.
Starting in second ch from hook work:
sl st, sc, hdc, dc, dc, tr, tr, tr, dc, dc, hdc, hdc, sc, sc, sl st.
Work 3 sc into the final chain.
Continue along the opposite side:
sl st, sc, sc, hdc, hdc, dc, dc, tr, tr, tr, dc, dc, hdc, sc, sl st.
Join at the base.
Leaf Texture Round
Ch 1.
Sc around the leaf.
At the point work:
sc, ch 2, sl st in first ch, sc.
Continue around.
Join.
Do not fasten off.
Raised Leaf Vein
Surface sl st from the base toward the point along the original foundation chain.
Fasten off, leaving a 30 cm attachment tail.
Block the leaf to approximately 10–12 cm long.
Small Sage Leaf — Make 8 to 12
Ch 11.
Starting in second chain work:
sl st, sc, hdc, dc, tr, tr, dc, hdc, sc, sl st.
Work 3 sc in the final chain.
Mirror the stitch sequence along the opposite side.
Sc around once.
Add a surface-slip-stitch vein.
Fasten off with a 25 cm tail.
Small Five-Petal Flower — Make 8 to 10
Yarn: blush pink, dusty rose, or cream.
R1: 10 sc in MR. (10)
Join.
Petal 1: Sl st in next stitch, ch 4, 2 dc in same stitch, ch 4, sl st in next stitch.
Repeat the petal sequence five times around.
Fasten off with a 25 cm tail.
Sew one optional 4–6 mm pearl into the center.
Closed Pink Bud — Make 14 to 18
Yarn: dusty rose or blush pink.
R1: 6 sc in MR. (6)
R2: inc ×6. (12)
R3: sc around. (12)
R4: sc around. (12)
R5: (1 sc, dec) ×4. (8)
Add a very small amount of yarn scrap if a fuller bud is wanted.
R6: dec ×4. (4)
Fasten off, leaving a 25 cm tail.
Green Bud Base — Make 14 to 18
Yarn: sage green.
Join yarn at the lower edge of a pink bud.
*Ch 3, sl st in second ch, sc in next ch, sl st into bud base.*
Repeat four times.
Fasten off.
The small pointed sections create a simple calyx beneath the bud.
Cream Scrolling Vine — Make 4 to 6
Yarn: warm cream.
Ch 65.
Starting in second chain, sl st in each chain for the first 20 stitches.
Sc in each of the next 25 chains.
Hdc in each remaining chain.
Fasten off with long tails at both ends.
The changing stitch heights create a subtle natural curve.
Spiral End for the Vine
For the curled end visible in the reference, make a separate spiral.
Ch 24.
Starting in second chain work 2 sc in each chain.
For the final six chains work 3 sc in each chain.
Fasten off.
Position the spiral at the end of the longer cream stem and stitch the two pieces together.
Green Secondary Stems
Yarn: sage green.
Ch between 25 and 45 according to the required branch length.
Sl st back through every chain.
Fasten off with tails at both ends.
Make approximately 8–10 stems in mixed lengths.
These narrow pieces connect buds and small leaves to the main flower groups.
Planning the Floral Layout
Place the blocked cream runner on a large flat surface.
Position one large flower approximately 20–25 cm from the first end.
Place the second near the exact center.
Position the third approximately the same distance from the opposite end.
The three flower centers should form one straight longitudinal line.
Do not attach them yet.
Positioning the Large Leaves
Arrange approximately six large leaves around each main flower.
Angle the leaves diagonally rather than pointing every leaf directly sideways.
Allow selected leaves to overlap the cream lace slightly.
Keep their tips inside the scalloped perimeter.
Use the remaining large leaves between flower groups to connect the composition.
Positioning the Cream Vines
Place one or two cream scrolling stems between each pair of major flowers.
Curve them into broad S shapes.
Allow one spiral to turn inward toward a flower and another outward toward the lace.
Avoid crossing the center of a large flower.
The stems should appear to travel beneath the flowers and leaves.
Positioning Small Flowers and Buds
Use small flowers to fill spaces approximately 4–7 cm wide.
Group buds in clusters of two or three.
Place some buds beside large leaves and others along green stems.
Do not distribute every small component at identical intervals.
The reference uses controlled asymmetry rather than a rigid repeating grid.
Attaching the Large Flowers
Thread the long flower tail onto a tapestry needle.
Stitch through the central disc and the cream foundation.
Add approximately 6–8 attachment points around the lower flower layer.
Do not stitch the outer half of every petal.
The petals need to remain raised.
Check the lace underneath after every few stitches to confirm that it is not puckering.
Attaching the Leaves
Secure the leaf at its base.
Add two or three small stitches along the center vein.
Stop approximately halfway toward the point.
Leave the outer half free.
This attachment method keeps the leaf dimensional while preventing it from rotating during use.
Attaching the Cream Vines
Pin each curve before sewing.
Add a small stitch approximately every 3–4 cm.
At tight spirals, reduce the spacing to approximately 1.5–2 cm.
Do not stretch the vine while attaching it.
The foundation lace must remain flat beneath the curve.
Assembly
- Crochet and block the cream lace foundation to approximately 140 × 38 cm before placing any floral components.
- Make all three large layered pink flowers and attach the pearl centers securely through the dense central discs.
- Crochet and block the large and small sage leaves, then arrange them around the three main flowers without sewing yet.
- Place the three large blossoms along the runner centerline and verify approximately equal spacing between their centers.
- Arrange the cream scrolling vines and sage secondary stems beneath the planned flower and leaf positions.
- Sew the stems first using small attachment stitches approximately every 3–4 cm so their curves remain smooth.
- Attach each large flower through its central disc and lower petal layer while leaving the outer petal edges free.
- Secure the leaves at their bases and along part of the center veins, keeping their tips raised from the lace.
- Add the small five-petal flowers and groups of pink buds to gaps between the main botanical components.
- Weave every yarn tail into matching dense stitches, inspect the lace for puckering, and lightly re-block only the exposed perimeter if necessary.
The completed runner should remain flat beneath the appliqués while the three major flowers, leaves, buds, and scrolling vines rise visibly above the cream lace.
7 Technical Tips
- The lace puckers under a large flower: limit the main attachment to approximately 6–8 points around the flower base. Sewing every outer petal to the foundation shortens the lace directly beneath a 20–22 cm motif.
- The layered flower becomes flat: attach only the central disc and selected lower petals. The middle and outer petal tips need several millimeters of free movement to maintain the stacked profile.
- A sage leaf rotates after assembly: add two or three hidden stitches along its center vein in addition to the base attachment. Securing only one point creates a pivot whenever the runner is moved.
- The pearl center pulls the crochet inward: attach each 6–8 mm bead through the dense central disc with sewing thread. Running one yarn strand through the entire bead cluster concentrates too much tension at the center.
- A cream vine loses its S curve: pin the complete curve before sewing and attach it every 3–4 cm. Pulling the stem straight while stitching removes the scrolling structure visible between the flowers.
- The border develops waves: correct the first cream chain-arch round before adding the dc fans. Excess arches multiply the additional circumference introduced by every later scallop.
- The finished runner curves lengthwise: align all three large flower centers on one measured centerline before attaching them. Heavy motifs placed even 2–3 cm off-axis can visually pull a narrow runner toward one side.
Why DK Cotton Works for This Design
The runner contains both open lace and substantial three-dimensional appliqués, so the yarn has to perform two different jobs.
DK cotton keeps the cream mesh defined while giving the flower petals enough body to hold their curved edges.
Current floral table-runner patterns frequently recommend DK or light-worsted cotton with hooks around 3.5–4.5 mm. One current floral pattern specifically recommends a 4 mm hook with DK cotton and provides lengths up to approximately 183 cm.
Microfiber can also work. A Ravelry Flower Table Mat uses Alize Diva fingering yarn held together and lists 160 g cream, 140 g wedding pink, and 160 g beige.
Choosing the Pink Palette
Use at least two pink values in each major flower.
A practical sequence is dark dusty rose at the center, medium blush through the middle petals, and pale shell pink on the outer layer.
Useful yarn shade descriptions include antique rose, mauve rose, blush, ballet pink, shell, and dusty carnation.
Avoid using three nearly identical shades. The petal layers need enough value contrast to remain individually visible when viewed from above.
Choosing the Green
The reference uses a muted botanical green rather than bright emerald.
Useful shade names include sage, moss, eucalyptus, lichen, and soft olive.
Use the same green for most leaves and stems.
A second slightly darker green can be introduced for several small leaves, but too many shades compete with the three-tone flowers.
Choosing the Cream Lace
Warm cream gives the runner less contrast against wood than optical white.
Natural, ivory, ecru, and unbleached cotton are suitable alternatives.
Keep the cream vines and foundation from the same yarn family so they share stitch definition and color temperature.
If the vines are substantially thicker than the lace, they can look like cords placed on top rather than part of the same crochet composition.
How the Three-Layer Flower Gets Its Height
The flower does not depend on stuffing.
Its depth comes from placing petal foundations at different levels of the central disc.
The small inner petals turn upward around the pearl center.
Middle petals spread farther outward.
The ch-9 outer foundations support the largest petals and move them behind the previous layer.
Attaching only the lowest portions preserves those different angles.
Making the Flowers More Compact
Use a 3.5 mm hook for the flower while retaining the 4 mm hook for the lace.
Alternatively, reduce the outer petal loops from ch 9 to ch 8.
Replace four treble crochets with two trebles and two double crochets.
Make all three major flowers with the same modification so their proportions remain consistent.
Making Larger Flowers
Increase the center disc to 36 stitches:
R6: (4 sc, inc) ×6. (36)
Add approximately 12 outer petals.
Increase the largest petal foundation loops to ch 10 or ch 11.
Target 23–25 cm diameter.
Check the runner width before making all three because oversized petals can extend beyond the cream scalloped border.
Making a Five-Flower Runner
Extend the cream foundation to approximately 180–190 cm.
Make five large flowers rather than three.
Space them along one centerline before adding leaves.
Increase the large leaf quantity to approximately 28–34.
Add additional small flowers and buds only after the five major groups have been balanced.
Current marketplace patterns for floral runners commonly include adjustable lengths, so motif repetition is a practical way to resize this type of project.
Making a Shorter Runner
Use two large flowers.
Reduce the cream foundation to approximately 85–95 cm.
Place one flower near each third point rather than at the extreme ends.
Connect them with one large cream S-shaped vine.
Use approximately 12–16 large leaves and 6–8 buds.
Making a Narrower Runner
Keep the central foundation around 25–27 cm wide.
Omit the third lace edging round.
Work the outer scallops directly into the second chain-arch round.
Use flowers no larger than approximately 18 cm.
Angle leaves lengthwise rather than horizontally so their points remain within the narrower perimeter.
Making the Lace Wider
Add one extra chain-mesh round before the scallops.
Work:
sc in next arch, ch 5
around the perimeter.
Use ch 7 at corners.
Then work the fan and scallop rounds as written.
Block the lace before attaching flowers because the additional round can increase the width by several centimeters.
Alternative Eight-Petal Small Flower
For a fuller filler blossom:
R1: 8 sc in MR. (8)
For each petal work:
sl st in next stitch, ch 4, 2 dc in same stitch, ch 4, sl st in same stitch.
Repeat eight times.
Add one pearl to the center.
Use these flowers sparingly because their larger diameter can compete with the buds.
Making Open Buds
Work the bud through R4.
Instead of decreasing immediately, work:
R5: BLO sc around. (12)
R6: (1 sc, dec) ×4. (8)
The unused front loops create a small ridge near the top.
Add the green calyx around the lower edge.
Adding More Leaf Texture
Surface slip stitch the central vein first.
Then add two shorter diagonal veins on each side.
Begin at the center and work toward the outer edge.
Stop approximately 5 mm before the leaf perimeter.
Too many surface stitches make the leaf rigid and can cause its edges to curl upward.
Making the Cream Vines Thicker
Work back along the foundation chain with sc as written.
Turn.
Add a second row of slip stitches along one edge.
This creates a cord-like stem closer to the thick scrolling vines visible in the photograph.
Keep the spiral tip thinner so it can curl without excessive bulk.
Making a Green Vine Instead
Replace selected cream scrolls with sage yarn.
Use green near clusters of buds and small leaves.
Retain at least two cream vines so the scrolling structure visually connects with the lace foundation.
If every vine is green, the composition becomes more foliage-heavy and the cream background appears less integrated with the appliqués.
Spacing the Three Main Flowers
Measure the blocked runner from end to end.
Mark its exact midpoint.
Place the center flower there.
Position the other two flower centers approximately 42–48 cm away on either side, adjusting for actual flower diameter.
The remaining space near the ends is filled with leaves, buds, vines, and lace rather than another large blossom.
Preventing a Heavy Center
The central flower already carries substantial visual and physical weight.
Do not place all the largest leaves immediately around it.
Distribute several long leaves toward the two outer flower groups.
Use small flowers and buds around the center instead.
This keeps the runner from appearing dense in the middle and empty toward the ends.
Attaching Pearl Beads Safely
Use strong sewing thread rather than split DK yarn when the bead holes are small.
Pass through each bead at least twice.
Anchor the thread through multiple crochet stitches beneath the flower center.
If the runner will be used around small children, omit detachable beads and replace them with cream French knots or small crocheted bobbles.
Crocheted Center Alternative
For a completely yarn-based center, join cream yarn to the flower disc.
Work one bobble in each of six evenly spaced stitches.
A simple bobble can be made by partially completing five dc in one stitch and closing all remaining loops together.
Fasten off on the wrong side.
This reproduces the clustered light center without beads.
Blocking the Foundation Before Assembly
Do not attach flowers to an unblocked lace panel.
Wet or damp block the cream foundation first.
Pin the centerline straight.
Set the finished width at approximately 38 cm.
Shape every scallop individually.
Allow the runner to dry completely before adding the dimensional motifs.
Re-Blocking After Assembly
A heavily appliquéd runner should not be stretched aggressively after assembly.
If the perimeter needs correction, dampen only the exposed cream lace.
Pin the scallops into position.
Support the flowers with rolled towels so their petals are not crushed against the blocking surface.
Allow everything to dry before removing the supports.
Fixing a Flower That Tilts
Inspect the flower’s central attachment points.
Add one hidden stitch on the side that lifts too high.
Do not sew down the raised outer petals.
If the tilt comes from a leaf trapped beneath the flower, reposition the leaf instead of flattening the blossom.
Fixing a Curling Leaf
Check the final sc edging first.
If the edging is tight, remake it with the 4 mm hook.
Add one extra sc near the widest point on each side if necessary.
Block the leaf separately.
A slight upward curve is useful; a leaf that folds lengthwise will hide its surface-vein detail.
Fixing an Uneven Lace Border
Count chain arches along corresponding long sides.
Both sides should contain matching totals.
If one side has an extra arch, correct it before adding the fan round.
Trying to compensate with a larger scallop produces a visible asymmetry near the edge.
Yarn Tail Management
Weave lace tails before appliqué assembly.
Leave long tails on flowers, leaves, and buds because those tails can serve as attachment yarn.
After sewing, weave each tail through approximately 5–7 cm of matching dense crochet.
Change direction once.
Avoid running tails through open cream mesh where they remain visible from the front.
Care and Storage
Follow the care instructions for the selected cotton yarn.
Hand washing is preferable when pearl beads and heavily layered flowers are attached.
Support the runner fully when wet.
Reshape petals, leaves, vines, and scallops while damp.
Dry flat.
For storage, roll the runner around a wide tube rather than pressing the three flowers into hard folds.
Conclusion
The success of this runner depends on separating flat construction from dimensional construction. Finish and block the cream lace first, then build three 20–22 cm flowers, sage leaves, small blossoms, buds, and scrolling stems as independent components. Arrange the complete botanical composition before making permanent attachments, and sew only the structural portions of petals and leaves so their outer edges remain raised. Start by making one large flower and confirm its diameter against the planned 38 cm runner width. Save this 3D flower crochet table runner pattern to Pinterest or share the finished piece on Instagram with #PinkFloralCrochetRunner. Would you keep the pearl flower centers shown here or replace them with crocheted cream bobbles?









