Introduction
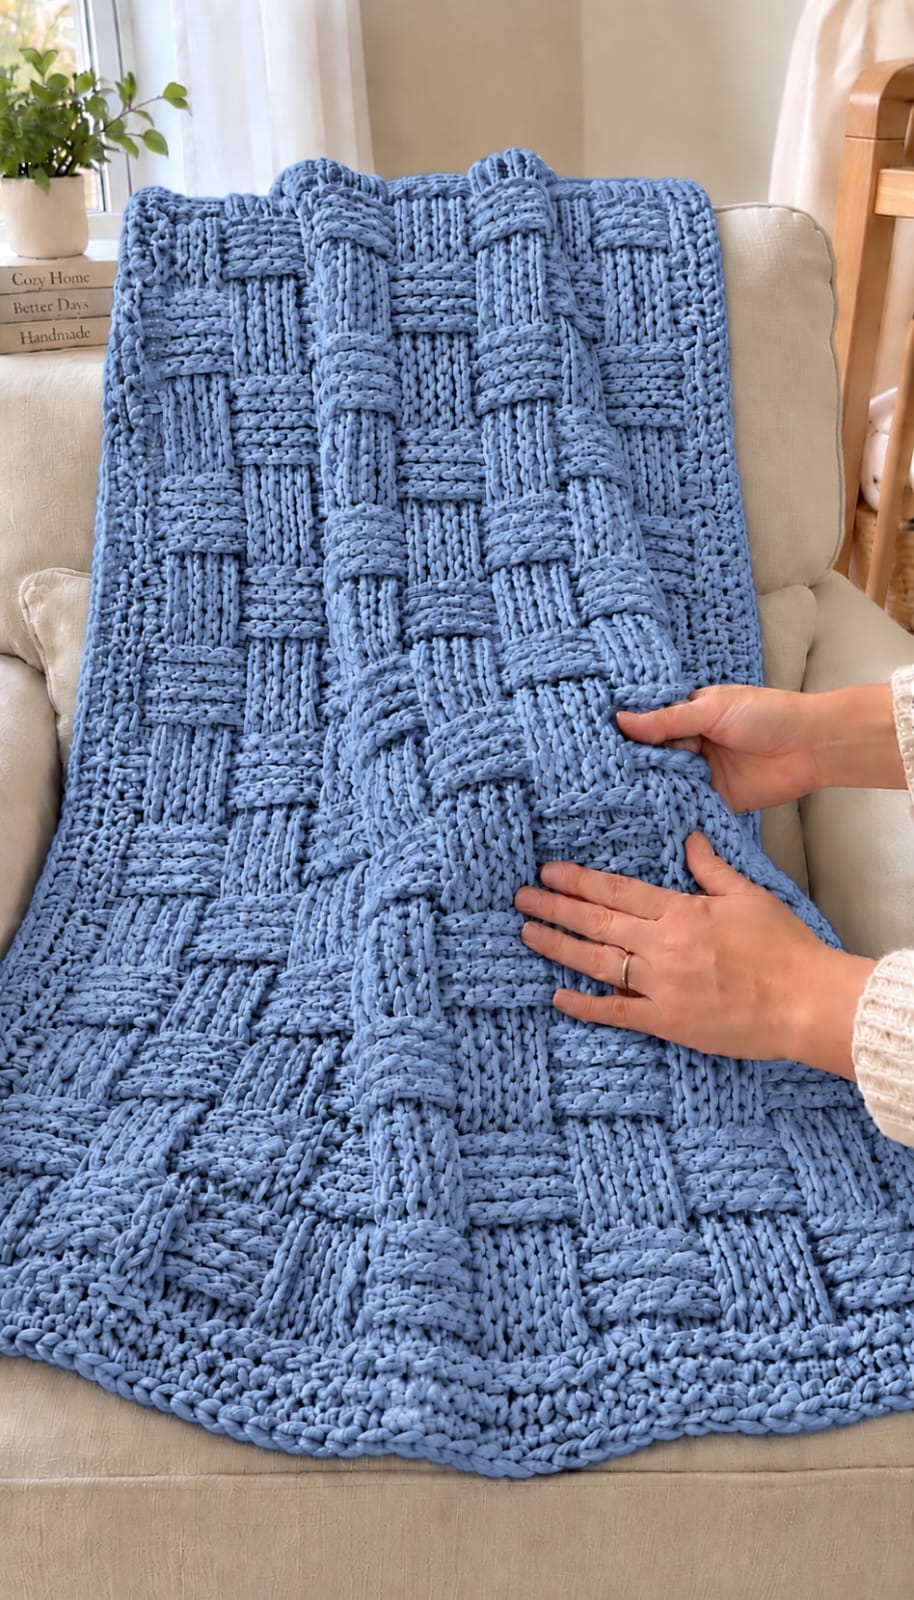
Powder blue makes every raised basket block visible, including the exact point where a six-post section changes direction. This blue chunky basket weave crochet blanket pattern uses super-bulky chenille yarn, a 9 mm hook, and alternating front- and back-post double crochet. The intermediate throw finishes at approximately 127 × 145 cm. Its dense one-piece construction works particularly well as a sofa, armchair, or lap blanket.
The Design: What Makes This Blue Basketweave Blanket Different
The photographed blanket uses unusually broad woven blocks rather than the smaller four-stitch units found in many basketweave patterns. Six post stitches form each block, producing large raised rectangles that remain readable in thick chenille yarn. Each section reverses after four rows, changing a raised FPdc block into a recessed BPdc block and creating the over-under illusion. A narrow same-color border controls the perimeter without competing with the field texture. This structure gives the chunky basket weave crochet blanket a pronounced three-dimensional surface while retaining a single-color palette. Published super-bulky basketweave throws use hooks from 8 to 11.5 mm, with 9 mm providing a useful midpoint for plush #6 yarn. The most common failure is losing one post at a block boundary, which shifts every subsequent rectangle sideways.
Project Info at a Glance
| Skill Level | Time | Finished Size | Hook | Best For |
|---|---|---|---|---|
| Intermediate | Approx. 14–20 hours | Approx. 127 × 145 cm | 9 mm | Sofa throws, armchairs, lap blankets |
Yarnspirations’ Basket Weave Crochet Blanket provides the closest verified specification: super-bulky Bernat Blanket Tweeds, a 9 mm hook, gauge of 8 stitches × 5 rows per 10 cm, and approximately 1,573–1,609 m of yarn. Another super-bulky pattern by Michele Webb finishes at approximately 140 × 114 cm with an 8 mm hook and about 2.13 kg of yarn.
Materials and Tools
Yarn
- Powder blue / dusty blue — super bulky #6 chenille or blanket yarn — approximately 1,570–1,610 m (1,720–1,760 yd)
- Estimated yarn weight — approximately 2,400 g when using 300 g / 201 m blanket-yarn skeins
- Border reserve — keep approximately 150–200 m of the total yarn unused until the main field is complete
Bernat Blanket-style polyester yarn is a practical match for the thick rounded stitches in the image. Yarnspirations specifies eight 300 g balls of Bernat Blanket Tweeds for its comparable basketweave blanket, while Michele Webb’s 55 × 45 inch version lists approximately 75 oz of Bernat Blanket.
Tools
- 9 mm crochet hook
- 10 mm crochet hook — optional for a tight foundation chain
- Large tapestry needle
- Locking stitch markers
- Scissors
- Tape measure
Abbreviations
- ch — chain
- sc — single crochet
- hdc — half double crochet
- dc — double crochet
- FPdc — front post double crochet
- BPdc — back post double crochet
- sl st — slip stitch
- st/sts — stitch/stitches
An invisible decrease is not required because the blanket is a flat rectangle with a constant stitch count from the first field row to the final stabilizing row.
Gauge
Target approximately 8 stitches × 5 rows = 10 × 10 cm in established basketweave pattern with the 9 mm hook.
This matches the published gauge for Yarnspirations’ super-bulky Basket Weave Crochet Blanket.
Make a basketweave swatch rather than measuring ordinary double crochet. Post stitches pull yarn around the vertical posts and produce a different width from stitches worked conventionally into the top loops.
Basket Block Measurements
At eight stitches per 10 cm, a six-stitch block measures approximately 7.5 cm wide.
At five rows per 10 cm, four rows measure approximately 8 cm high.
That produces nearly square woven units after the post stitches compress and settle. The broad six-stitch blocks closely match the oversized woven texture visible in the reference.
Pattern — Step by Step
Use US crochet terminology. The blanket is worked flat in rows. Turning chains do not count as stitches unless specifically stated.
Foundation Chain
Yarn: powder blue.
Ch 101.
Use the optional 10 mm hook for this chain if your normal foundation tends to contract.
Foundation Row
Row 1: Dc in fourth ch from hook and in every chain across. (98)
Ch 2 and turn.
The 98-stitch field contains two edge stitches and 96 basketweave stitches.
Since 96 divides evenly into eight 12-stitch pattern units, every row contains eight complete pairs of six-stitch blocks.
Marker Setup
Place a marker after the first edge stitch.
Then place markers after every 12 field stitches.
Place the final marker before the last edge stitch.
These markers identify the boundaries between complete FPdc/BPdc pairs and make a shifted block easier to detect.
Basketweave Section A
Row 2
Ch 2, turn.
Dc in first stitch.
*FPdc around next 6 posts, BPdc around next 6 posts.*
Repeat from * to * 8 times.
Dc in final stitch. (98)
Row 3
Ch 2, turn.
Dc in first stitch.
*FPdc around next 6 posts, BPdc around next 6 posts.*
Repeat across eight complete units.
Dc in final stitch. (98)
Row 4
Repeat Row 3. (98)
Row 5
Repeat Row 3. (98)
You now have one four-row basketweave section.
Basketweave Section B
Row 6
Ch 2, turn.
Dc in first stitch.
*BPdc around next 6 posts, FPdc around next 6 posts.*
Repeat from * to * 8 times.
Dc in final stitch. (98)
Row 7
Repeat Row 6. (98)
Row 8
Repeat Row 6. (98)
Row 9
Repeat Row 6. (98)
The raised and recessed blocks have now reversed, producing the first complete woven checker sequence.
Continue the Basketweave Field
Repeat Rows 2–9.
Each eight-row repeat contains one Section A and one Section B.
Continue until the basketweave field measures approximately 137–140 cm from the foundation edge.
Finish after a complete four-row block section rather than stopping midway through a raised rectangle.
Final Stabilizing Row
Ch 1, turn.
Hdc in each stitch across. (98)
Do not fasten off.
This row gives the upper edge a simpler structure before the perimeter border begins.
Why the Block Direction Changes
FPdc stitches sit toward the front of the fabric while BPdc stitches recede.
Working six FPdc followed by six BPdc creates one raised and one recessed rectangle.
After four rows, the stitch order reverses.
The previously raised block becomes recessed and the neighboring block projects forward.
This alternating relief is what produces the woven-basket illusion without actually interlacing separate strips of crochet.
Border Round 1
Ch 1.
Sc evenly around the complete blanket.
Across the top and bottom, work one sc into each stitch.
Along each long side, distribute the stitches evenly through the row ends.
Work 3 sc in every corner.
Join with sl st.
Border Round 2
Ch 1.
Hdc in each stitch around.
Work 3 hdc into the center stitch of every corner.
Join.
Border Round 3
Ch 1.
Sc in each stitch around.
Work 3 sc into each corner center.
Join.
Border Round 4
Ch 1.
Hdc in every stitch.
At each corner work:
hdc, ch 1, hdc in the center corner stitch.
Join.
Fasten off, leaving approximately 25 cm for weaving.
Optional Reverse Single Crochet Finish
Join yarn in any non-corner border stitch.
Work reverse single crochet around the perimeter.
Keep the stitches loose.
At corners, work two reverse single crochets rather than forcing one tight stitch around the turn.
Join and fasten off.
Assembly
- Make a basketweave gauge swatch with the 9 mm hook and confirm approximately 8 stitches × 5 rows per 10 cm before establishing the full width.
- Chain 101 loosely and work the 98-stitch foundation row, checking that the lower edge remains flat rather than curving inward.
- Place markers around the eight 12-stitch pattern units so every six-post transition can be checked while the blanket grows.
- Work four rows of 6 FPdc and 6 BPdc blocks to establish the first large raised-and-recessed section.
- Reverse the post sequence for the following four rows, maintaining exactly 98 stitches from edge to edge.
- Repeat the eight-row basketweave sequence until the main field measures approximately 137–140 cm.
- Add one half-double-crochet stabilizing row across the final field edge before beginning the perimeter.
- Work four same-color border rounds, placing the specified increases at every corner and adjusting side-edge spacing if rippling appears.
- Add the optional reverse-single-crochet finish only after confirming that the completed border lies flat on all four sides.
- Weave yarn tails through matching dense stitches, lay the blanket flat, and shape it to approximately 127 × 145 cm without aggressively stretching the post texture.
The completed blanket should form a rectangular field of large alternating woven blocks framed by a narrow powder-blue border.
7 Technical Tips
- A basket block shifts sideways: stop at every marker and confirm that each unit contains exactly 6 FPdc plus 6 BPdc. One missed post moves every later transition by one stitch and breaks the checker alignment.
- The foundation edge curves upward: make the starting chain with a hook approximately 1 mm larger than the working hook. Post-stitch fabric is thick enough that a tight 101-chain foundation cannot expand to the field width.
- The blocks look tall and narrow: compare four completed rows with the target height of approximately 8 cm. If the section is much taller, shorten the block to three rows or adjust hook tension before continuing the full blanket.
- The blanket loses stitches along a side: place a marker in both edge stitches before working the post groups. The first and last conventional dc are easy to overlook beside thick raised FPdc sections.
- The woven texture looks flat: insert the hook fully around the vertical post rather than through the stitch top. Catching only top loops removes the forward-and-back relief that creates the basketweave surface.
- The border develops waves: reduce the number of sc placed into long-side row ends before beginning Border Round 2. Excess side stitches become more visible with every additional perimeter round.
- A yarn join forms a hard lump: change skeins at an edge whenever possible and leave tails at least 15 cm long. Joining in the middle of a six-post block can create a visible knot on the raised face.
Why Super-Bulky Yarn Changes the Basketweave
Basketweave crochet already produces a thick fabric because post stitches travel around existing double-crochet posts rather than taking the shortest route through the stitch tops.
Super-bulky yarn magnifies that structure.
The resulting blanket has lower drape than a standard double-crochet throw, but the blocks stand much farther from the background.
Stitch Authority describes basketweave as a fabric formed by alternating groups of front- and back-post double crochet and notes that the structure is thick, warm, and relatively low in drape.
That characteristic is visible in the reference: the blanket folds into substantial rounded ridges rather than collapsing into thin pleats.
Verified Super-Bulky Basketweave Benchmarks
Yarnspirations’ Basket Weave Crochet Blanket uses super-bulky Bernat Blanket Tweeds, a 9 mm hook, gauge of 8 stitches × 5 rows per 10 cm, and approximately 1,573–1,609 m of yarn.
Sirdar’s Basketweave Blanket 10230 uses super-bulky Hayfield Bonus Super Chunky, an 11.5 mm hook, gauge of 8 stitches × 6 rows per 10 cm, and approximately 1,125 m. Its finished size is approximately 107 × 150 cm.
Michele Webb’s Chunky Basketweave Blanket uses Bernat Blanket with an 8 mm hook, approximately 1,335–1,408 m, and finishes around 140 × 114 cm.
Tiffany Brown’s Giant Basketweave Throw uses super-bulky Bernat Velvet Plus, a 10 mm hook, gauge of 6 stitches × 5 rows per 10 cm, and finishes at approximately 103 × 132 cm.
How Much Yarn to Buy
For the 127 × 145 cm version, plan around the Yarnspirations benchmark of eight 300 g skeins when using yarn with approximately 201 m per 300 g.
That equals approximately 2.4 kg of blanket yarn.
Do not calculate quantity from weight alone when substituting yarn. Bernat Velvet Plus, for example, is also sold in 300 g balls but provides only about 71 m per ball, while Bernat Blanket provides roughly 201 m at the same nominal weight.
Compare meterage first.
Choosing the Blue Yarn
The photographed color sits between powder blue and muted cornflower blue.
Useful shade descriptions include dusty blue, denim blue, powder blue, cornflower, steel blue, and blue fog.
Choose a solid shade rather than a heavily variegated yarn if the goal is to emphasize the basket geometry.
Color changes running through individual blocks compete with the alternating post direction.
Chenille Versus Plied Super-Bulky Yarn
Chenille blanket yarn produces the rounded, cushioned texture closest to the image.
A conventional plied super-bulky acrylic gives sharper stitch definition and makes it easier to identify individual posts.
Chenille requires more attention because the stitches can visually merge.
Markers at every 12-stitch repeat are particularly useful when the yarn surface hides the top loops.
Why This Pattern Uses Six-Stitch Blocks
Many basketweave tutorials use groups of four post stitches. Jo to the World, for example, uses a stitch multiple based on eight because its basket sections contain four front-post and four back-post stitches.
The reference shows broader blocks.
Six raised posts beside six recessed posts create a 12-stitch repeat and produce rectangles roughly 7.5 cm wide at the verified Yarnspirations gauge.
The larger scale works particularly well with thick blanket yarn because each woven unit remains visible from across a room.
Why Four Rows Per Section
A six-stitch block at the target gauge measures about 7.5 cm across.
Four rows measure about 8 cm high.
Those dimensions create nearly square basket units.
Using only two rows would create narrow horizontal bands. Six or more rows would create tall rectangles and change the balanced over-under appearance visible in the reference.
Making a Smaller Lap Blanket
Use 74 field stitches instead of 98.
This provides two edge stitches plus 72 basketweave stitches.
Since 72 divides into six complete 12-stitch units, the block sequence remains intact.
Work until the blanket reaches approximately 100–110 cm long.
Add the same border.
Making a Narrow Throw
Use 86 stitches across.
That gives two edge stitches plus 84 field stitches.
Because 84 divides evenly into seven 12-stitch units, the blanket contains seven complete block pairs.
At the target gauge, the unbordered width is approximately 107 cm.
Making a Large Throw
Increase the field to 110 stitches.
Two stitches serve as edges and 108 form nine complete 12-stitch units.
At eight stitches per 10 cm, the main field measures approximately 137.5 cm before the border.
Expect yarn consumption to rise substantially because basketweave post stitches use more yarn than a flat stitch pattern.
Making an Extra-Wide Blanket
Use 122 stitches.
That leaves 120 basketweave stitches after the two edges, or ten complete 12-stitch units.
At the target gauge, the field is approximately 152.5 cm wide.
Swatch and calculate yarn before beginning because a width increase of this size adds thousands of post stitches to a full-length blanket.
Resizing Formula
For this six-post design, calculate:
12 × desired number of block pairs + 2 edge stitches.
Examples:
- 6 units: 74 stitches
- 7 units: 86 stitches
- 8 units: 98 stitches
- 9 units: 110 stitches
- 10 units: 122 stitches
Adjust the foundation chain according to the starting method used.
Changing to Four-Stitch Blocks
For smaller woven squares, work four FPdc followed by four BPdc.
Reverse the sequence after approximately three rows.
The repeat then becomes eight stitches rather than 12.
This version produces more blocks across the same width and resembles many traditional basketweave patterns.
Keep the two edge stitches outside the repeating field.
Changing to Eight-Stitch Blocks
For oversized blocks, use eight FPdc followed by eight BPdc.
Work enough rows to make the block height close to its width.
At the target gauge, eight stitches measure approximately 10 cm.
Five rows also measure approximately 10 cm, making an eight-stitch by five-row block a useful starting proportion.
Maintaining Straight Side Edges
Basketweave texture can distract from the actual row ends.
Mark the first and final conventional dc of every row.
Count 98 stitches periodically.
If the blanket gradually narrows, check whether a post stitch immediately beside an edge has been skipped.
Do not compensate by adding random stitches several rows later because the block alignment will remain incorrect.
Managing the Weight While Crocheting
A 2.4 kg blanket becomes difficult to rotate repeatedly.
Work at a table or with the completed fabric supported on your lap.
Turn the work by moving the active upper edge rather than lifting the entire blanket.
Keep the yarn ball beside the working hand so the weight of the project does not pull additional yarn from the skein and alter tension.
Joining New Skeins
Change yarn near the first or final edge stitch whenever possible.
Complete the final yarn-over of the old stitch with the new strand.
Leave both tails at least 15 cm long.
Continue the pattern without knotting the strands together on the visible face.
Weave the tails through dense border or post-stitch sections after the blanket is complete.
Fixing a Reversed Block
A single FPdc/BPdc error changes the apparent depth of the block.
If the error is discovered in the current row, remove stitches back to that post and correct it.
If several rows have already been completed, repairing only the surface does not restore the underlying post direction.
For a highly visible monochrome blanket, undoing the affected rows gives the cleanest result.
Fixing a Tight Foundation
If the bottom edge curves upward after three or four rows, the foundation is too short for the basketweave field.
Restart with the 10 mm hook for the chain.
Another option is foundation double crochet, provided its finished tension matches the 98-stitch field width.
Do not expect the border to correct a strongly contracted foundation edge.
Fixing a Wavy Border
Lay the blanket flat after Border Round 1.
If the sides ripple, remove some stitches from the row-end edges.
If they pull inward, add a few evenly distributed stitches.
Correct the first border round before continuing because every later round repeats its circumference.
Care and Storage
Follow the washing instructions for the selected blanket yarn.
Large wet blankets are heavy, so support the fabric when transferring it from washer to drying area.
Reshape the corners and border while damp.
Avoid hanging a saturated blanket from one edge because the weight can lengthen the post-stitch field.
For storage, fold loosely along block boundaries rather than compressing the same raised sections under heavy objects.
Sources
Primary size, gauge, hook, and yardage benchmarks were checked against Yarnspirations’ Basket Weave Crochet Blanket on Ravelry, which specifies super-bulky yarn, a 9 mm hook, 8 stitches × 5 rows per 10 cm, and 1,720–1,760 yd.
Additional comparisons were checked against Michele Webb’s Chunky Basketweave Blanket, which uses Bernat Blanket, an 8 mm hook, 1,460–1,540 yd, and finishes at 55 × 45 inches; HCK Crafts’ published pattern specifications; and Sirdar’s Basketweave Blanket 10230, which uses super-bulky yarn and finishes at approximately 107 × 150 cm.
Post-stitch construction was cross-checked with Jo to the World’s Basketweave Stitch Blanket and Stitch Authority’s basketweave stitch reference. A larger-scale comparison came from Tiffany Brown’s Giant Basketweave Throw, which uses super-bulky yarn, a 10 mm hook, and a 6-stitch × 5-row gauge.
Conclusion
The six-post blocks are the defining measurement in this blanket, so establish their width and four-row height before committing to the full 98-stitch field. Keep markers between the 12-stitch units, reverse the post sequence only after complete four-row sections, and correct any shifted block immediately. A 9 mm hook with super-bulky chenille produces the substantial woven texture shown in the reference while a narrow same-color border controls the heavy fabric. Start with one complete basketweave swatch and verify the 8-stitch × 5-row gauge. Save this blue chunky basket weave crochet blanket pattern to Pinterest or share the finished throw on Instagram with #BlueBasketWeaveBlanket. Would you use this powder blue or a deeper denim shade?









